Delegated administration
Overview
With delegated administration in Citrix Cloud™, you can configure the access permissions that all of your administrators need, in accordance with their role in your organization.
By default, administrators have full access. This setting enables access to all available customer administration and management functions in Citrix Cloud, plus all subscribed services. To tailor an administrator’s access:
- Configure custom access for an administrator’s general management permissions in Citrix Cloud.
- Configure custom access for subscribed services. In Citrix DaaS (formerly Citrix Virtual Apps and Desktops™ service), you can configure custom access when you invite a new administrator. You can change an administrator’s access later.
For information about displaying the list of administrators and defining access permissions, see Manage administrator access to Citrix Cloud.
This article describes how to configure custom access in Citrix DaaS.
Administrators, roles, and scopes
Delegated administration uses three concepts for custom access: administrators, roles, and scopes.
- Administrators: An administrator represents a person identified by their Citrix Cloud sign-in, which is typically an email address. Each administrator is associated with one or more role and scope pairs.
-
Roles: A role represents a job function, and has permissions associated with it. These permissions allow certain tasks that are unique to Citrix DaaS. For example, the Delivery Group Administrator role has permission to create a delivery group and remove a desktop from a delivery group, plus other associated permissions. An administrator can have multiple roles. An administrator might be a Delivery Group Administrator and a Machine Catalog Administrator.
Citrix DaaS offers several built-in custom access roles. You cannot change the permissions within these built-in roles, or delete those roles.
You can create your own custom access roles to meet your organization’s requirements, and delegate permissions with more detail. Use custom roles to allocate permissions at the granularity of an action or task. You can delete a customized role only if it is not assigned to an administrator.
You can change which roles an administrator has.
A role is always paired with a scope.
-
Scopes: A scope represents a collection of objects. Scopes are used to group objects in a way that is relevant to your organization. Objects can be in more than one scope.
There is one built-in scope: All, which contains all objects. Citrix Cloud and Help Desk administrators are always paired with the All scope. That scope cannot be changed for those administrators.
When you invite (add) an administrator for this service, a role is always paired with a scope (by default, the All scope).
You create and delete scopes using Studio. You assign role/scope pairs in the Citrix Cloud console.
A scope is not shown for Full access administrators. By definition, those administrators can access all customer-managed Citrix Cloud and subscribed services objects.
Built-in roles and scopes
Citrix DaaS has the following built-in roles.
-
Cloud Administrator: Can perform all tasks and operations for managing DaaS.
Can see the Manage and the Monitor consoles in Studio. This role is always combined with the All scope. You cannot change the scope.
Do not be confused by this role’s name. A custom access Cloud Administrator cannot perform Citrix Cloud-level tasks (Citrix Cloud tasks require Full access).
-
Read Only Administrator: Can see all objects in the specified scopes (in addition to global information), but cannot change anything. For example, a Read Only Administrator with a scope of London can see all global objects and any objects in the London scope (for example, London Delivery Groups). However, that administrator cannot see objects in the New York scope (assuming that the London and New York scopes do not overlap).
Can see the Manage and the Monitor consoles in Studio.
-
Help Desk Administrator: Can view delivery groups, and manage the sessions and machines associated with those groups. Can see the machine catalog and host information for the delivery groups being monitored. Can also perform session management and machine power management operations for the machines in those delivery groups.
Can see the Monitor console in Studio. Cannot see the Manage console. This role is always combined with the All scope. You cannot change the scope.
-
Machine Catalog Administrator: Can create and manage machine catalogs and provision the machines into them. Can manage base images and install software, but cannot assign applications or desktops to users.
Can see the Manage and the Monitor consoles in Studio. You can change the scope.
-
Delivery Group Administrator: Can deliver applications, desktops, and machines. Can also manage the associated sessions. Can manage application and desktop configurations such as policies and power management settings.
Can see the Manage and the Monitor consoles in Studio. You can change the scope.
Note:
To change a desktop’s display name as a Delivery Group Administrator, you need the Perform Machine Update permission. This permission is necessary because changing the display name involves updating the machine property.
-
Host Administrator: Can manage host connections and their associated resource settings. Cannot deliver machines, applications, or desktops to users.
Can see the Manage console in Studio. Cannot see the Monitor console. You can change the scope.
-
Session Administrator: Can view delivery groups being monitored and manage their associated sessions and machines.
Can see the Monitor console in Studio. Cannot see the Manage console. You cannot change the scope.
-
Full Monitor Administrator: Can perform all tasks and operations for monitoring DaaS.
Can see the Monitor console in Studio. Cannot see the Manage console. You cannot change the scope.
-
Probe Agent Administrator: Has access to Probe Agent APIs.
Can see the Manage and the Monitor consoles in Studio. Has read-only access to the Applications page but cannot access any other views.
The following table summarizes which console tabs are visible for each custom access role in Citrix DaaS, and whether the role can be used with custom scopes.
| Custom access administrator role | Can see Manage console in Studio? | Can see Monitor console in Studio? | Can role be used with custom scopes? |
|---|---|---|---|
| Cloud Administrator | Yes | Yes | No |
| Read Only Administrator | Yes | Yes | Yes |
| Help Desk Administrator | No | Yes | No |
| Machine Catalog Administrator | Yes | Yes | Yes |
| Delivery Group Administrator | Yes | Yes | Yes |
| Host Administrator | Yes | No | Yes |
| Session Administrator | No | Yes | No |
| Full Monitor Administrator | No | Yes | No |
| Probe Agent Administrator | Yes | Yes | No |
Note:
- Custom access administrator roles (except Cloud Administrator and Help Desk Administrator) are unavailable for Virtual Apps Essentials and Virtual Desktops Essentials.
- Custom access administrator roles (except Cloud Administrator and Full Monitor Administrator) are unavailable for Citrix DaaS Standard for Azure.
To view the permissions associated with a role:
- Sign in to Citrix Cloud.
- In the DaaS tile, click Manage to open Studio.
- In the left pane, select Manage > Administrators.
- Select the Roles tab.
- Select a role in the upper middle pane. The Role definition tab in the lower pane lists the categories and permissions. Select a category to see the specific permissions. The Administrators tab lists the administrators who have been assigned the selected role.
How many administrators you need
The number of administrators and the granularity of their permissions generally depend on the size and complexity of the deployment.
- In small or proof of concept deployments, one or a few administrators do everything. There is no custom access delegation. In this case, each administrator has Full access, which always has the All scope.
- In larger deployments with more machines, applications, and desktops, more delegation is needed. Several administrators might have more specific functional responsibilities (roles). For example, two have Full access, and others are Help Desk Administrators. Also, an administrator might manage only certain groups of objects (scopes), such as machine catalogs in a particular department. In this case, create new scopes, plus administrators with the appropriate custom access role and scopes.
Administrator management summary
Setting up administrators for Citrix DaaS follows this sequence:
-
If you want the administrator to have a role other than a built-in role, create a custom role.
-
If you want the administrator to have a scope other than All (and a different scope is allowed for the intended role, and has not already been created), create scopes.
-
From Citrix Cloud, invite an administrator. If you want the new administrator to have anything other than the default Full access, specify a custom access role and scope pair.
Later, if you want to change an administrator’s access (roles and scope), see Configure custom access.
Add an administrator
To add (invite) administrators, follow the guidance in Add administrators to a Citrix Cloud account. A subset of that information is repeated here.
Important:
Do not confuse how “custom” and “custom access” are used.
- When creating administrators and assigning roles for Citrix DaaS in the Citrix Cloud console, the term “custom access” includes both the built-in roles and any additional custom roles that were created in the service’s Studio interface.
- In the service’s Studio interface, “custom” simply differentiates that role from a built-in role.
The general workflow for adding administrators is as follows:
-
Sign in to Citrix Cloud and then select Identity and Access Management in the upper left menu.
-
On the Identity and Access Management page, select Administrators. The Administrators tab lists all current administrators for the account.
-
On the Administrators tab, select your identity type, enter the administrator’s email address, and then click Invite.
- Select Full access if you want the administrator to have full access. In that way, the administrator can access all customer administrator functions in Citrix Cloud and in all subscribed services.
- Select Custom access if you want the administrator to have limited access. You can then select a custom access role and scope pair. In that way, the administrator has the intended permissions when signing in to Citrix Cloud.
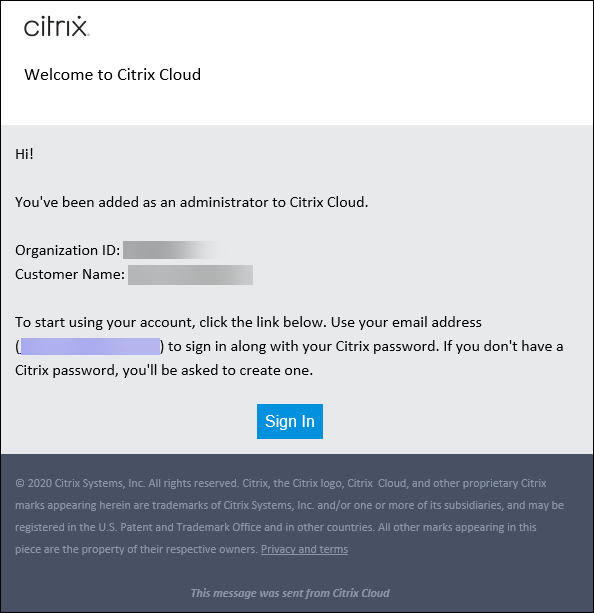
- Click Send Invite. Citrix Cloud sends an invitation to the email address and adds the administrator to the list after the administrator completes onboarding.
When receiving the email, the administrator clicks the Sign In link to accept the invitation.
For more information about adding administrators, see Manage Citrix Cloud administrators.
Alternatively, go to Administrators > Administrators in Studio and click Add Administrator. You are directly taken to Identity and Access Management > Administrators, which opens in a new browser tab. After you are finished adding administrators there, close the tab and return to the console to continue with your other configuration tasks.
Create and manage roles
When administrators create or edit a role, they can enable only the permissions that they themselves have. This control prevents administrators from creating a role with more permissions than they currently have and then assigning it to themselves (or editing a role that they are already assigned).
Custom role names can contain up to 64 Unicode characters. Names cannot contain: backslash, forward slash, semicolon, colon, pound sign, comma, asterisk, question mark, equal sign, left arrow, right arrow, pipe, left or right bracket, left or right parenthesis, quotation marks, and apostrophe.
Role descriptions can contain up to 256 Unicode characters.
- Sign in to Citrix Cloud if you haven’t already.
- In the DaaS tile, click Manage to open Studio.
- In the left pane, select Manage > Administrators.
- Select the Roles tab.
-
Follow the instructions for the task you want to complete:
- View role details: Select the role in the middle pane. The lower portion of the middle pane lists the object types and associated permissions for the role. Select the Administrators tab in the lower pane to display a list of administrators who currently have this role.
-
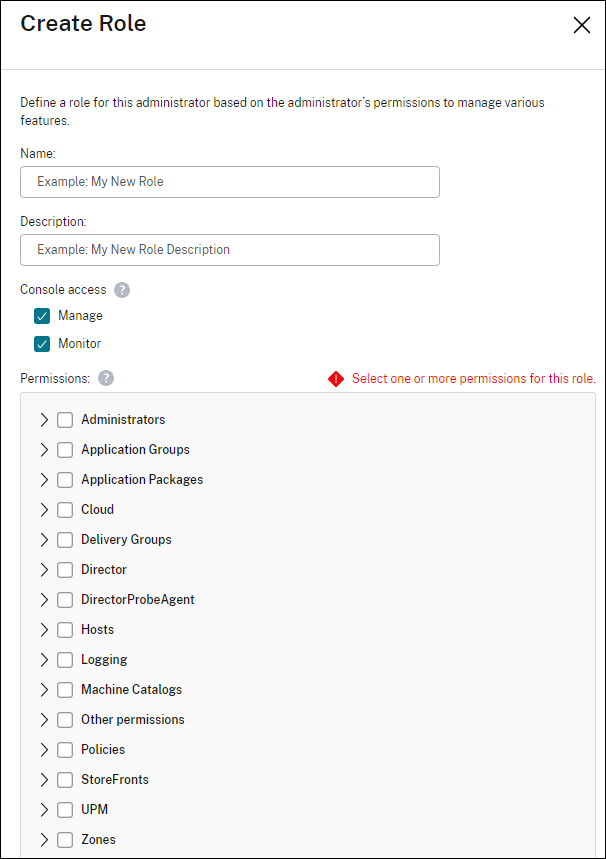
Create a custom role: Select Create Role in the action bar. Configure settings as follows:
- Enter a name and description.
- Configure console access. Determine which consoles are visible to the administrators. You can proceed without selecting any console. In that case, administrators with the role cannot access Manage and Monitor but can access, view, or manage objects through SDKs and APIs.
- Select the object types and permissions. To grant full access permission to an object type, select its check box. To grant permission at a granular level, expand the object type and then select Read Only or individual objects under Manage within the type.
- Copy a role: Select the role in the middle pane and then select Copy Role in the action bar. Change the name, description, object types, and permissions, as needed. When you’re done, select Save.
- Edit a custom role: Select the role in the middle pane and then select Edit Role in the action bar. Change the name, description, object types, and permissions, as needed. You cannot edit a built-in role. When you’re done, select Save.
- Delete a custom role: Select the role in the middle pane and then select Delete Role in the action bar. When prompted, confirm the deletion. You cannot delete a built-in role. You cannot delete a custom role if it is assigned to an administrator.
Create and manage scopes
By default, all roles have the All scope for their relevant objects. For example, a Delivery Group Administrator can manage all Delivery Groups. For some administrator roles, you can create a scope that allows that administrator role to access a subset of the relevant objects. For example, you might want a give a Machine Catalog Administrator access to only catalogs that contain a certain type of machines, rather than all catalogs.
- Full access administrators or custom access Cloud Administrators can create scopes for the Read Only Administrator, Machine Catalog Administrator, Delivery Group Administrator, and Host Administrator roles.
- Scopes cannot be created for Full access administrators, nor can they be created for Cloud Administrators or Help Desk Administrators. Those administrators always have the All scope.
Create scopes
- In Studio, select Manage > Administrators in the left pane.
- Select the Scopes tab.
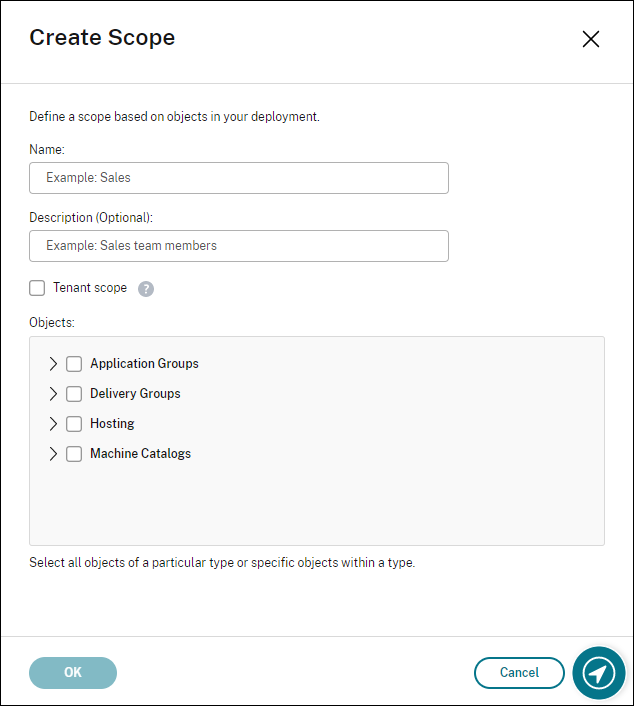
- In the action bar, select Create Scope.
-
Enter a name and description:
- Scope names can contain up to 64 Unicode characters. Names cannot include: backslash, forward slash, semicolon, colon, pound sign, comma, asterisk, question mark, equal sign, left or right arrow, pipe, left or right bracket, left or right parenthesis, quotation marks, and apostrophe.
- Scope descriptions can contain up to 256 Unicode characters.
-
Select the objects that you want to include in this scope. Objects are listed by type, such as delivery groups and machine catalogs.
- To include all objects of a particular type (for example, all delivery groups), select the check box for the object type.
-
To include individual objects within a type, expand the type and then select the check boxes for the objects (for example, specific delivery groups).
Note:
Application groups, delivery groups, or machine catalogs are displayed in folder structures that align with their management in DaaS. You can select a folder to select all its objects or expand a folder to select specific objects.
-
To include an object that previously didn’t support scope control (an unscoped object) and now supports it (a scoped object), disable Bypass scope control next to the object, and then select it.
Note:
Unscoped objects are visible to all administrators with the required permissions. When such an object becomes scoped, Bypass scope control appears and is enabled by default to preserve visibility to all administrators.
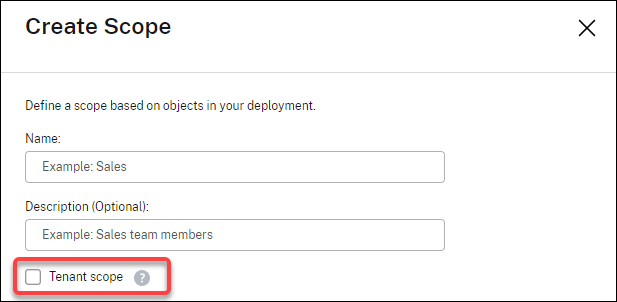
- To create a tenant customer, select the Tenant scope check box. If selected, the name you entered for the scope is the tenant name. For more information about the tenant scope, see Manage tenants.
-
When you’re done, select OK.
After you create a scope, it appears in the Custom access list in the Citrix Cloud console. You can then select it when you assign a role to an administrator.
For example, if you create a scope named CAD and include catalogs with machines suitable for CAD applications, the CAD scope appears in the Edit scopes list when you assign roles in the Citrix Cloud console.
Note:
The Cloud Administrator and Help Desk Administrator roles always have the All scope. The CAD scope doesn’t apply to them.
Manage scopes
You can perform the following tasks to manage scopes:
- View scope details: Select the scope. The lower portion of the pane lists the objects and administrators that have that scope.
- Copy a scope: Select the scope in the middle pane and then select Copy Scope in the action bar. Change the name, description. Change the object types and objects, as needed. When you’re done, select Save.
-
Edit a scope: Select the scope in the middle pane and then select Edit Scope in the action bar. Change the name, description, object types, and objects, as needed. When you’re done, select Save.
Note:
When you copy or edit a scope, keep in mind that removing objects from the scope can make those objects inaccessible to an administrator. If the edited scope is paired with one or more roles, ensure that your scope updates do not make any role/scope pair unusable.
-
Delete a scope: Select the scope in the middle pane and then select Delete Scope in the action bar. When prompted, confirm the deletion.
You cannot delete a scope if it is assigned to a role. If you attempt to do this, an error message indicates that you do not have permission. In fact, the error occurs because the role/scope pair that uses this scope is assigned to an administrator. First, remove the role/scope pair assignment for all administrators who use it. Then delete the scope in Studio.
Manage tenants
Using Studio, you can create mutually exclusive tenants under a single Citrix DaaS. You achieve that by creating tenant scopes in Administrators > Scopes and associating related configuration objects, such as machine catalogs and delivery groups, with those tenants. As a result, administrators with access to a tenant can manage only objects that are associated with the tenant.
This feature is useful, for example, if your organization:
- Has different business silos (independent divisions or separate IT management teams) or
- Has multiple on-premises sites and wants to maintain the same setup in a single Citrix DaaS instance.
The interface lets you filter tenant customers by name. By default, the interface displays information about all tenant customers. To display information about a specific tenant, select that tenant from the list in the upper-right corner.
Create a tenant customer
To create a tenant customer, select Tenant scope when creating a scope. By selecting the option, you create a unique scope type that applies to objects in scenarios where you share a Citrix DaaS instance between different business units— each of those business units are independent of the others. After you create a tenant scope, you cannot change the scope type.
The Scopes tab displays all scope items. The only difference between regular scopes and tenant scopes is in the Type column. A blank column field indicates a regular scope. You can click the Type column to sort scope items if needed.
To see the resources (objects) attached to a scope, select Administrators in the left pane. On the Scopes tab, select the scope and then select Edit Scope in the action bar.
Tip:
The tenant property is assigned at a scope level. Machine catalogs, delivery groups, applications, and connections inherit the tenant property from the applicable scope.
When using a tenant scope, be aware of the following considerations:
- The tenant property is assigned in the following order: Hosting > Machine Catalogs > Delivery Groups > Applications. Lower-level objects rely on higher-level objects to inherit the tenant property from. For example, when selecting a delivery group, you must select the associated hosting and machine catalog. Otherwise, the delivery group cannot inherit the tenant property.
- After creating a tenant scope, you can edit tenant assignments by modifying objects. When a tenant assignment is changed, it is still subject to the constraint that it must be assigned to the same tenants or to a subset of those tenants. However, lower-level objects are not reevaluated when tenant assignments change. Make sure that objects are properly restricted when you change tenant assignments. For example, if a machine catalog is available for
TenantAandTenantB, you can create a delivery group forTenantAand one forTenantB. (TenantAandTenantBare both associated with that machine catalog.) You can then change the machine catalog to be associated only withTenantA. As a result, the delivery group associated withTenantBbecomes invalid.
Configure custom access for administrators
After creating tenant scopes, configure custom access for respective administrators. For more information, see Configure custom access for an administrator. Citrix Cloud sends an invitation to those customer administrators you specified and adds them to the list. When they receive the email, they click Sign In to accept the invitation. When they sign in to Studio, they see resources that the assigned role and scope pairs contain.
Administrators with access to a tenant can manage only objects (for example, machine catalog, delivery group) that are associated with the tenant.
Configure custom access for an administrator
This feature lets you define access permissions of existing administrators or administrators you invite in a way that aligns with their role in your organization.
Changes you made to access permissions take 5 minutes to take effect. Signing out of Studio and logging back on makes the changes take effect immediately. In scenarios where administrators still use the management interface after the changes take effect without reconnecting to it, a warning appears when they attempt to access items to which they no longer have permissions.
By default, when you invite administrators, they have Full access. Full access allows the administrator to manage all subscribed services and all Citrix Cloud operations (such as inviting more administrators). A Citrix Cloud deployment needs at least one administrator with Full access.
You can also grant custom access when you invite an administrator. Custom access allows the administrator to manage only the services and operations that you specify.
When you create a role or scope in Citrix DaaS, it appears in the custom access list and can be selected. When you select a role for an administrator, you can modify the scopes as needed to reflect the administrator’s role in your organization.
To configure custom access for an administrator:
- Sign in to Citrix Cloud. Select Identity and Access Management > Administrators in the upper left menu.
-
Locate the administrator you want to manage, select the ellipsis menu, and select Edit access.

-
Select Custom access.
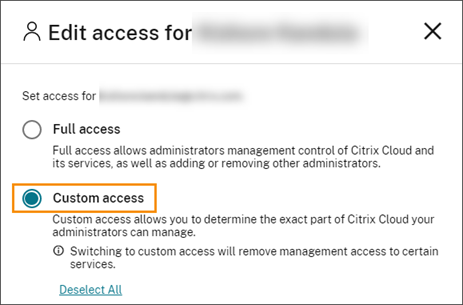
-
Under DaaS, select or clear the check marks next to one or more roles. To modify the scopes associated with an assigned role, select Edit scopes.
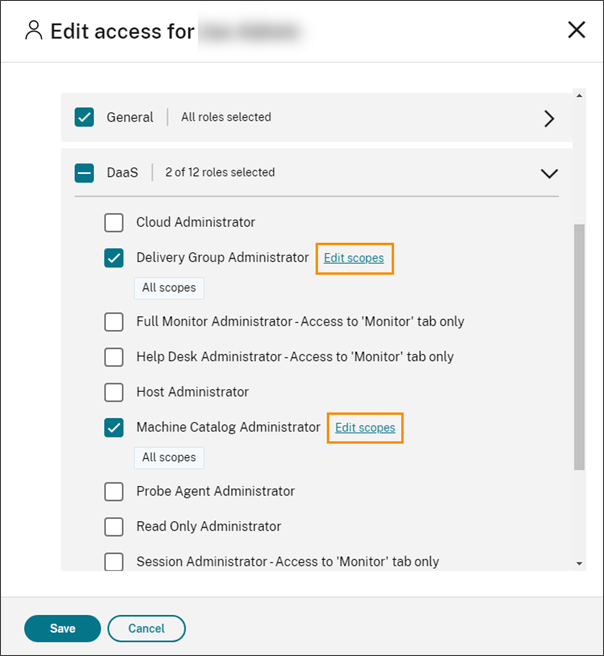
By default, each selected role has all scopes selected, as noted by the All scopes label.
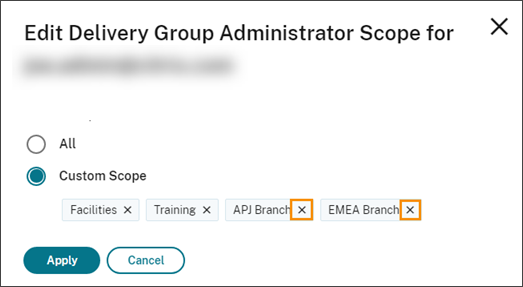
-
To specify the scopes for a selected role, select Custom Scope and then add or remove the appropriate scopes. By default, all custom scopes are added to a role. To remove a scope, click the X icon on the scope.
Scopes that have been removed and are available to add to the role appear in a list below the scopes that are already added. To add a scope to the role, select the plus icon for the scope.
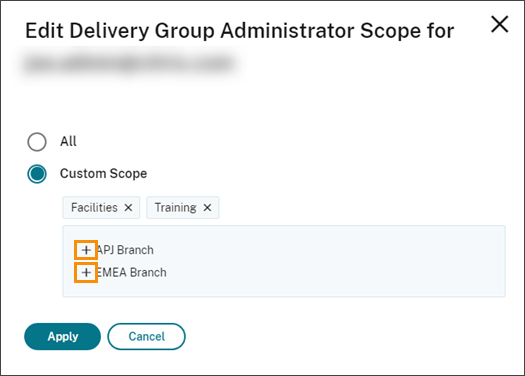
-
When you’re finished selecting scopes, select Apply.
- Select Save to save the selected roles for the administrator.
Differences from on-premises Citrix Virtual Apps and Desktops
If you’re familiar with delegated administration in the on-premises Citrix Virtual Apps and Desktops product, Citrix DaaS version has several differences.
In Citrix Cloud:
- Administrators are identified by their Citrix Cloud login, rather than their Active Directory account. You can create role/scope pairs for Active Directory individuals, but not groups.
- Administrators are created, configured, and deleted in the Citrix Cloud console, rather than Citrix DaaS.
- Role/scope pairs are assigned to administrators in the Citrix Cloud console, rather than Citrix DaaS.
- Reports are not available. You can view administrator, role, and scope information in the service’s Studio interface.
-
The custom access Cloud Administrator is similar to a Full Administrator in the on-premises version. Both have full management and monitoring permissions for the Citrix Virtual Apps and Desktops version being used.
However, in Citrix DaaS, there is no named Full Administrator role. Do not equate “Full access” in Citrix Cloud with the “Full administrator” in on-premises Citrix Virtual Apps and Desktops. Full access in Citrix Cloud spans the platform-level domains, library, notifications, and resource locations, plus all subscribed services.
More information
See Delegated administration and monitoring for information about administrators, roles, and scopes used in the service’s Monitor node.
In this article
- Overview
- Administrators, roles, and scopes
- Built-in roles and scopes
- How many administrators you need
- Administrator management summary
- Add an administrator
- Create and manage roles
- Create and manage scopes
- Configure custom access for an administrator
- Differences from on-premises Citrix Virtual Apps and Desktops
- More information