Audio
Client audio mapping enables applications that run on the Citrix Virtual Apps and Desktops or Citrix DaaS server to play sounds and record audio through a sound device that’s installed on the user device. You can configure client audio mapping using policies. For more information, see the Citrix Virtual Apps and Desktops documentation.
Support for audio recording
Starting with version 2212, the audio recording feature is enabled by default. The devices to record audio appear when a session starts.
To disable this feature, set the value for AllowAudioInput to False in the wfclient.ini file.
Note:
- The Mic and Webcam option in the Preferences dialog is disabled by default. For information on how to enable the mic and webcam, see Preferences.
Support for multiple audio devices
Citrix Workspace app for Linux supports multiple audio devices and redirects them to a session. Starting with version 2212, this feature is enabled by default.
With this feature:
- The PulseAudio library is used to access the audio devices, and multiple devices are supported.
- Multiple applications can use the audio devices at the same time.
- All local audio devices are displayed by name in the session and are available for selection. You can select a specific device or use the client’s default device, which updates dynamically.
- Sessions update automatically when you plug in or unplug audio devices.
Known limitations:
- When you launch a session as the root user, PulseAudio might refuse the connection, and the session falls back to a single audio device. In this case, only one speaker and one microphone appear, named Citrix HDX™ Audio, which corresponds to the default device on the client side. Bluetooth and HDMI audio devices are not supported in this case.
- On Ubuntu 24.04 and later, HDMI audio devices might not be correctly detected or removed in the VDA when you plug in or unplug the HDMI device while the session is active. This issue occurs because of differences in PipeWire, the default audio engine in Ubuntu 24.04 and later, compared to its predecessor, PulseAudio. This issue affects machines that support both HDMI audio output and built-in speakers at the same time. The behavior is as follows:
- When an HDMI device is plugged in before session launch, the device is redirected to the VDA as expected.
- When an HDMI device is plugged in after session launch, the device is not redirected to the VDA correctly.
- When an HDMI device is unplugged after session launch, the device remains in the VDA and cannot be used.
- When an HDMI device is unplugged and then reconnected after session launch, the device works as expected in the VDA.
Echo cancellation
Citrix Workspace™ app now supports echo cancellation feature designed to enhance real-time user experiences. The echo cancellation feature supports low quality, medium quality, and adaptive audio. Citrix recommends using adaptive audio for better performance.
Note:
Starting with the 2411 version, the echo cancellation feature is enabled by default.
During real-time user cases, it is recommended to turn on the echo cancellation if the speaker is used instead of the headset.
To disable this feature, do the following:
- Navigate to the
<ICAROOT>/configfolder and open themodule.inifile. -
Go to the [ClientAudio] section and update the value of the
EnableEchoCancellationparameter as follows:EnableEchoCancellation=False
Limitation:
By design, the echo cancellation feature is disabled for high quality audio. For more information on high quality audio, see the Citrix Virtual Apps and Desktops documentation.
Addition of client-side jitter buffer mechanism
Starting with version 2305, Citrix Workspace app ensures clear audio even when the network latency fluctuates. By default, this feature is enabled.
To disable this feature, navigate to the /opt/Citrix/ICAClient/config/module.ini configuration file and edit JitterBufferEnabled=FALSE.
Adaptive audio
Starting with version 2109, Citrix Workspace app supports adaptive audio. With adaptive audio, you don’t need to manually configure the audio quality policies on the VDA. Adaptive audio optimizes settings for your environment and replaces obsolete audio compression formats to provide an excellent user experience. Adaptive audio is enabled by default. For more information, see Adaptive audio.
Starting with version 2112, adaptive audio works when using User Datagram Protocol (UDP) audio delivery.
Known limitation:
- Adaptive audio requires CPU processors that support Streaming SIMD Extensions (SSE) 4.x. Citrix Workspace app might be closed when adaptive audio is used with the CPU processor that doesn’t support SSE 4.x.
Enabling UDP audio
UDP audio can improve the quality of phone calls made over the Internet. It uses UDP instead of TCP.
Starting with Version 2112, adaptive audio works when using UDP audio delivery. Also, from this version, Citrix Workspace app supports the Datagram Transport Layer Security (DTLS) protocol for UDP audio. As a result, you can access the UDP audio through Citrix Gateway. By default, this feature is disabled.
Starting with version 2202, Citrix Workspace app supports UDP audio through Citrix Gateway.
To enable UDP audio:
- Navigate to the
<ICAROOT>/configfolder and open the module.ini file. - Set the following options in the [ClientAudio] section of module.ini:
- Set
EnableUDPAudioto True. By default, this value is set to False, which disables UDP audio. - Specify the minimum and maximum port numbers for UDP audio traffic using
UDPAudioPortLowandUDPAudioPortHighrespectively. By default, ports 16500–16509 are used.
- Set
- Set the following policies on the Domain Delivery Controller™ (DDC):
- Set Audio over UDP to Allowed.
- Set Audio over UDP real-time transport to Enabled.
-
By default, adaptive audio is enabled on the VDA and supports UDP audio. If you have disabled adaptive audio, set the following policy on the Domain Delivery Controller (DDC):
- Set Audio quality to Medium.
As a result, the resultant audio is of a medium quality, and it can support UDP audio.
To enable UDP audio through Citrix Gateway:
- Navigate to the
<ICAROOT>/configfolder and open themodule.inifile. -
Go to the [WFClient] section and set the following entry:
EnableUDPThroughGateway=True
-
Go to the [ClientAudio] section and set the following entry:
EnableUDPAudio=True
- Set the following policies on the Domain Delivery Controller (DDC):
- Set Audio over UDP to Allowed.
- Set Audio over UDP real-time transport to Enabled.
-
By default, adaptive audio is enabled on the VDA and supports UDP audio. If you have disabled adaptive audio, set the following policy on the Domain Delivery Controller (DDC):
- Set Audio quality to Medium.
Loss tolerant mode for audio
Starting with the 2402 version, Citrix Workspace app supports loss tolerant mode (EDT lossy) for audio redirection. This feature improves the user experience for real-time streaming when users are connecting through networks with high latency and packet loss. By default, this feature is enabled.
You need to use VDA version 2311 or later. For more information, see Support for audio over loss-tolerant mode in the Citrix Virtual Apps and Desktops documentation.
To disable this feature on Citrix Workspace app for Linux, set the value for EdtUnreliableAllowed to FALSE in the $ICAROOT/config/module.ini configuration file, and restart the session for the changes to take effect.
Support for Audio volume synchronization
Starting with the 2402 version, Citrix Workspace app for Linux supports synchronization of audio volume between the VDA and your audio devices. You can now tune the volume using the VDA audio volume slider and have the same volume on your device and the other way around. This feature is enabled by default.
You need to use VDA version 2308 or later. For more information, see Audio volume synchronization in the Citrix Virtual Apps and Desktops documentation.
To disable this feature on Citrix Workspace app for Linux, set the value for EnableVolumeSync to FALSE in the $ICAROOT/config/module.ini configuration file, and restart the session for the changes to take effect.
Enable noise suppression
Starting with the 2411 version, Citrix Workspace app now offers improved audio redirection with enhanced noise suppression. This feature reduces background noise, ensuring clearer and more accurate speech, improving the overall communication experience.
Note:
This feature is disabled by default.
To enable this feature, do the following:
-
Navigate to Preferences > Audio > Noise Suppression.
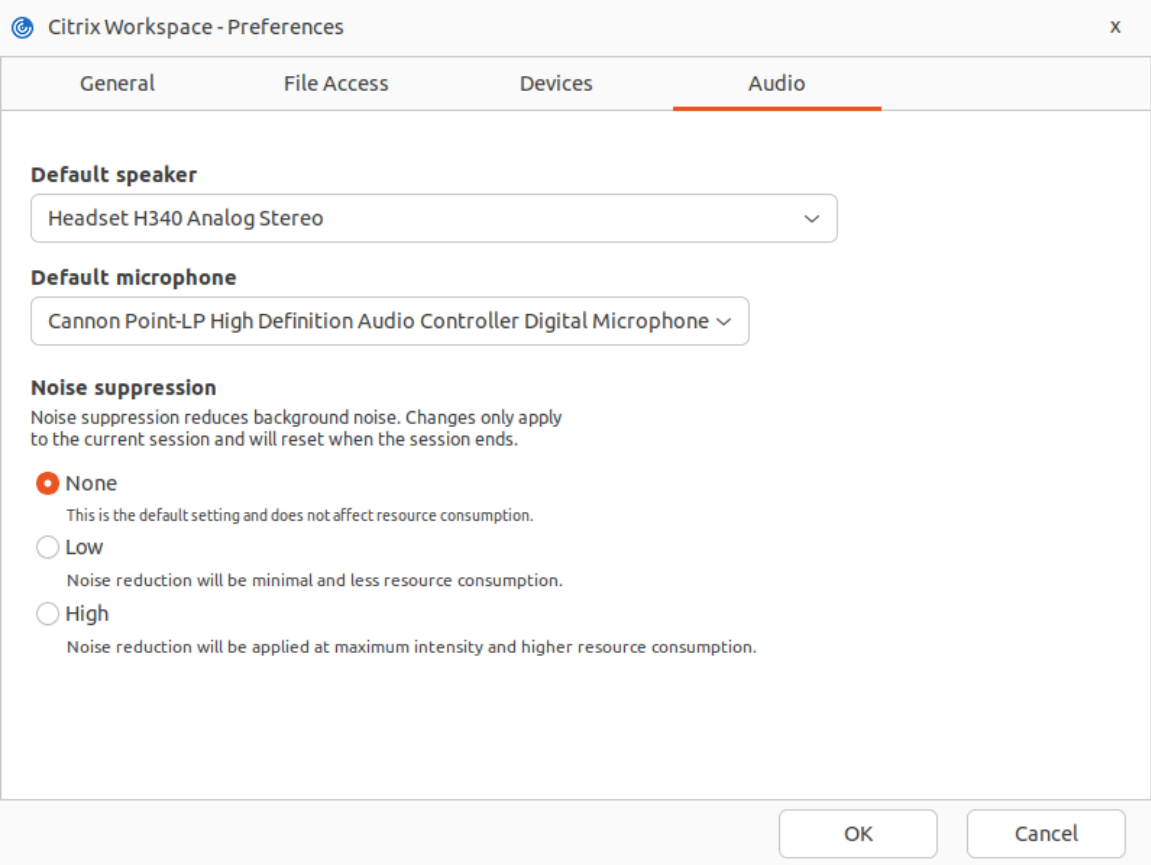
- Select one of the options:
- None: This is the default setting and doesn’t use or affect resource consumption.
- Low: Noise reduction is minimal and uses the least resource consumption.
- High: Noise reduction is applied at maximum intensity with the best performance and uses higher resource consumption than the Low setting.
- Click OK. The selected configuration is applied.
Note:
- Changes apply only to the current session and reset once the session ends.
- This feature is supported only on x64 and ARM64 Linux distributions. On x64 Linux, both Low and High options are available, while on ARM64 Linux, only the Low option is available due to CPU limitations on ARM devices.
Audio Quality Enhancer for EDT loss tolerant mode
Starting with the 2508 version, audio quality enhancer is enabled by default for adaptive audio over EDT loss tolerant mode for audio.
Audio quality enhancer maintains clear audio during brief network disruptions. This feature adapts to the network conditions to ensure consistent audio performance during playback and recording.
Note:
Adaptive audio must be enabled for this feature to work.
Default audio device selection
Starting with 2503 version, you can now select your preferred audio devices directly in the Desktop Viewer toolbar. This feature offers a more customized audio experience with the following key features when connected to a virtual desktop.
- Device splitting: You can assign different audio devices to different VDAs. For example, you can have two monitors with two different VDAs, each using a separate audio device (one loudspeaker and one headset).
- Specific device selection: The exact audio device can be selected for each active VDA from the Preferences section.
- Configuration persistence: The selected configuration is preserved for the next session, ensuring a seamless experience.
Note:
If you don’t want the selected configuration to be preserved for the next session, you can adjust the settings accordingly in the Preferences section.
This feature isn’t applicable to a pooled desktop environment because each time a user signs in, they might be connected to a different VDA.
To select the specific audio device, do the following:
-
Navigate to the Preferences section on the Desktop Viewer toolbar.
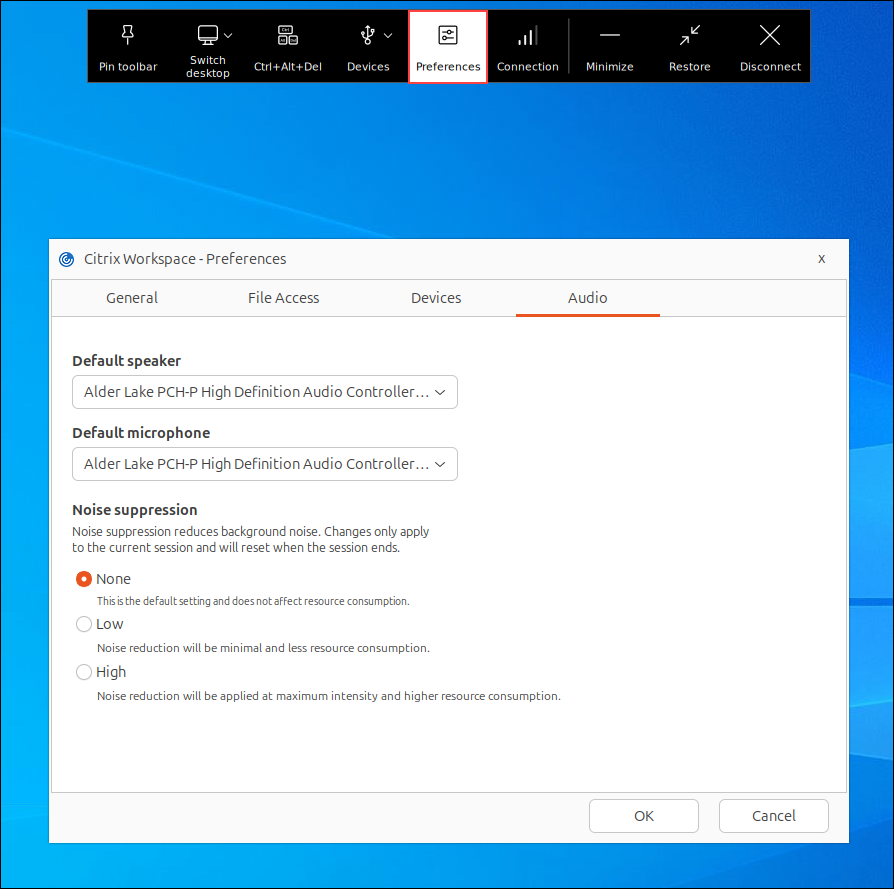
- Select the device that you want from the Default speaker drop-down list.
- Select the device that you want from the Default microphone drop-down list.
- Click OK to save the changes.
In this article
- Support for audio recording
- Support for multiple audio devices
- Echo cancellation
- Addition of client-side jitter buffer mechanism
- Adaptive audio
- Enabling UDP audio
- Loss tolerant mode for audio
- Support for Audio volume synchronization
- Enable noise suppression
- Audio Quality Enhancer for EDT loss tolerant mode
- Default audio device selection