-
-
WebSocket communication between VDA and Delivery Controller™
-
-
-
Backup or Migrate your configuration
-
Backup and Restore configuration
-
Backup and Restore using Studio
-
-
Troubleshoot Automated Configuration and additional information
-
-
-
-
-
This content has been machine translated dynamically.
Dieser Inhalt ist eine maschinelle Übersetzung, die dynamisch erstellt wurde. (Haftungsausschluss)
Cet article a été traduit automatiquement de manière dynamique. (Clause de non responsabilité)
Este artículo lo ha traducido una máquina de forma dinámica. (Aviso legal)
此内容已经过机器动态翻译。 放弃
このコンテンツは動的に機械翻訳されています。免責事項
이 콘텐츠는 동적으로 기계 번역되었습니다. 책임 부인
Este texto foi traduzido automaticamente. (Aviso legal)
Questo contenuto è stato tradotto dinamicamente con traduzione automatica.(Esclusione di responsabilità))
This article has been machine translated.
Dieser Artikel wurde maschinell übersetzt. (Haftungsausschluss)
Ce article a été traduit automatiquement. (Clause de non responsabilité)
Este artículo ha sido traducido automáticamente. (Aviso legal)
この記事は機械翻訳されています.免責事項
이 기사는 기계 번역되었습니다.책임 부인
Este artigo foi traduzido automaticamente.(Aviso legal)
这篇文章已经过机器翻译.放弃
Questo articolo è stato tradotto automaticamente.(Esclusione di responsabilità))
Translation failed!
Backup and Restore using Studio
This article describes the actions that you can perform on the Backup and Restore node available in the left pane of your Manage DaaS console.
Backup and Restore allows the administrator to take backups from the Studio.
Create on-demand backups
- Sign in to Citrix Cloud.
- Click the DaaS tile.
- From the left-menu, select Backup and Restore.
- Within the Backup and Restore tab, click Create backup.
-
On the Create backup page, enter the notes, and click Create backup.
A summary activity is displayed showing the backup components being backed up in the admin’s name who triggers the back up.
- After the backup completes successfully, it is listed as a line item under the Backup and Restore tab.
- Select a particular backup to see more information on the backup in the Details tab.
To delete a backup, right-click a backup and click Delete backup.
Pin a backup
Citrix® stores the last 30 backups. When you create more than 30 backups, the system deletes old backups in the order they were created. For every new backup that is created in addition to the 30 backup limit, the system deletes the backup that was created first. Pin backup is used to prevent automatic deletion of a particular backup. You can pin up to 5 backups. In case there are pinned backups, we retain all pinned backups in addition to 30 backups that is at most, you can retain 35 backups – 30 non-pinned, and 5 pinned backups.
- Right-click a backup to pin.
Create scheduled backups
Create a backup schedule that aligns with your organization’s requirements to automate your backup and restore processes. Backups operate in the background at a frequency that you select (daily, weekly, monthly, or other suitable frequency).
- Go to the schedule tab and select Create Schedule.
-
On the Create schedule page, enter the following:
- Enable this schedule. Choose yes to enable this backup schedule.
- Name. Enter a name for the backup schedule.
- Description. Enter a description.
- Time zone. Select the time zone of your choice.
- Frequency. Select the frequency to run the backup.
- Repeats every. Enter the number of days after which the schedule must be repeated.
- Start date. Enter the start date.
- Begin backup at. Enter the time when you want the backup to begin in a 24-hour format.
- Select Done.
Limit scheduled backups
You can limit scheduled backups to one per day to avoid identical backups.
- Go to the Settings tab of the Backup and Restore node.
- Click Change in Scheduled backups box.
- Switch the toggle to enable limit scheduled backups to one per day.
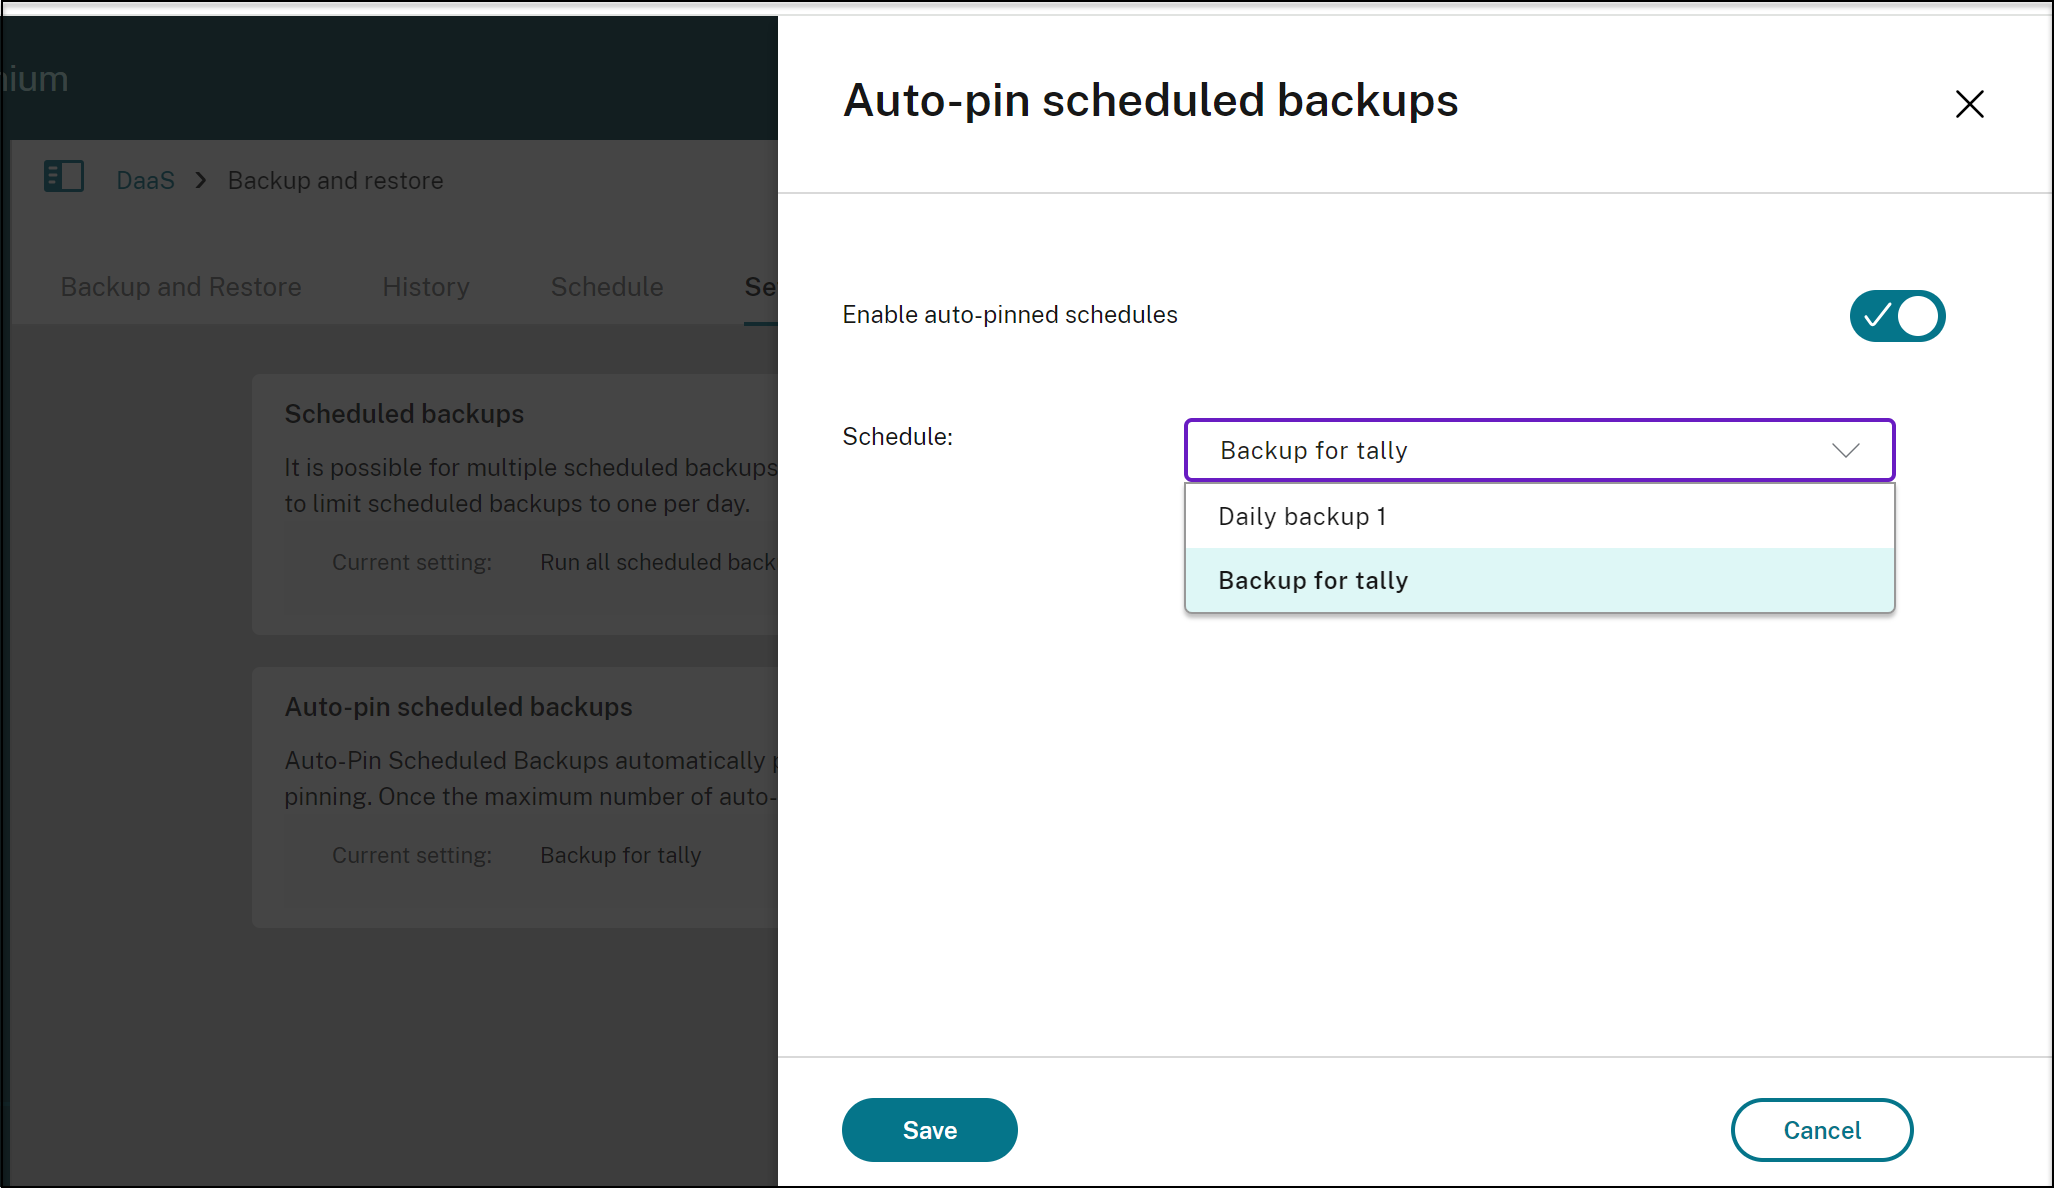
Auto-pin scheduled backups
Auto-Pin scheduled backups automatically pins backups created by the selected schedule. Only one schedule can be selected for auto-pinning.
Using auto-pin scheduled backups you can retain a maximum of six scheduled backups. When the maximum limit is reached, the oldest auto-pinned backup is deleted.
Note:
Citrix stores up to six auto-pinned backups. The system deletes old backups in the order they were created after the sixth backup. For every new backup that is created in addition to the six backup limit, the system deletes the backup that was created first.
- Go to the Settings tab of the Backup and Restore node.
- Select a scheduled backup for auto-pinning.
- Switch the toggle to enable auto-pinned schedules.
- Select a schedule and click Save.
Restore
This feature allows the administrators to restore the site configurations from the backups. We allow you to restore one component at a time.
Note:
- Restoring only one component at a time ensures that there are no conflicts during restoration due to the dependencies between the components.
- The workflow for restoring host connections is different from other components as you would need to enter the secret every time you try to restore the host connection. After you click Restore Backup, you must see a dialog to enter the secret. For example, for Azure, enter the alphanumeric application secret used to create the connection.
- Right-click a specific backup from the list and click Restore Backup.
-
On the Restore Backup window, enter the following:
- Components: Select the components that you want to restore.
-
Filters: Specify the member names that you want to restore in a comma-separated list. For example, filtering for the word chrome restores only objects with the name chrome. Similarly, the phrase
chrrestores objects beginning withchr.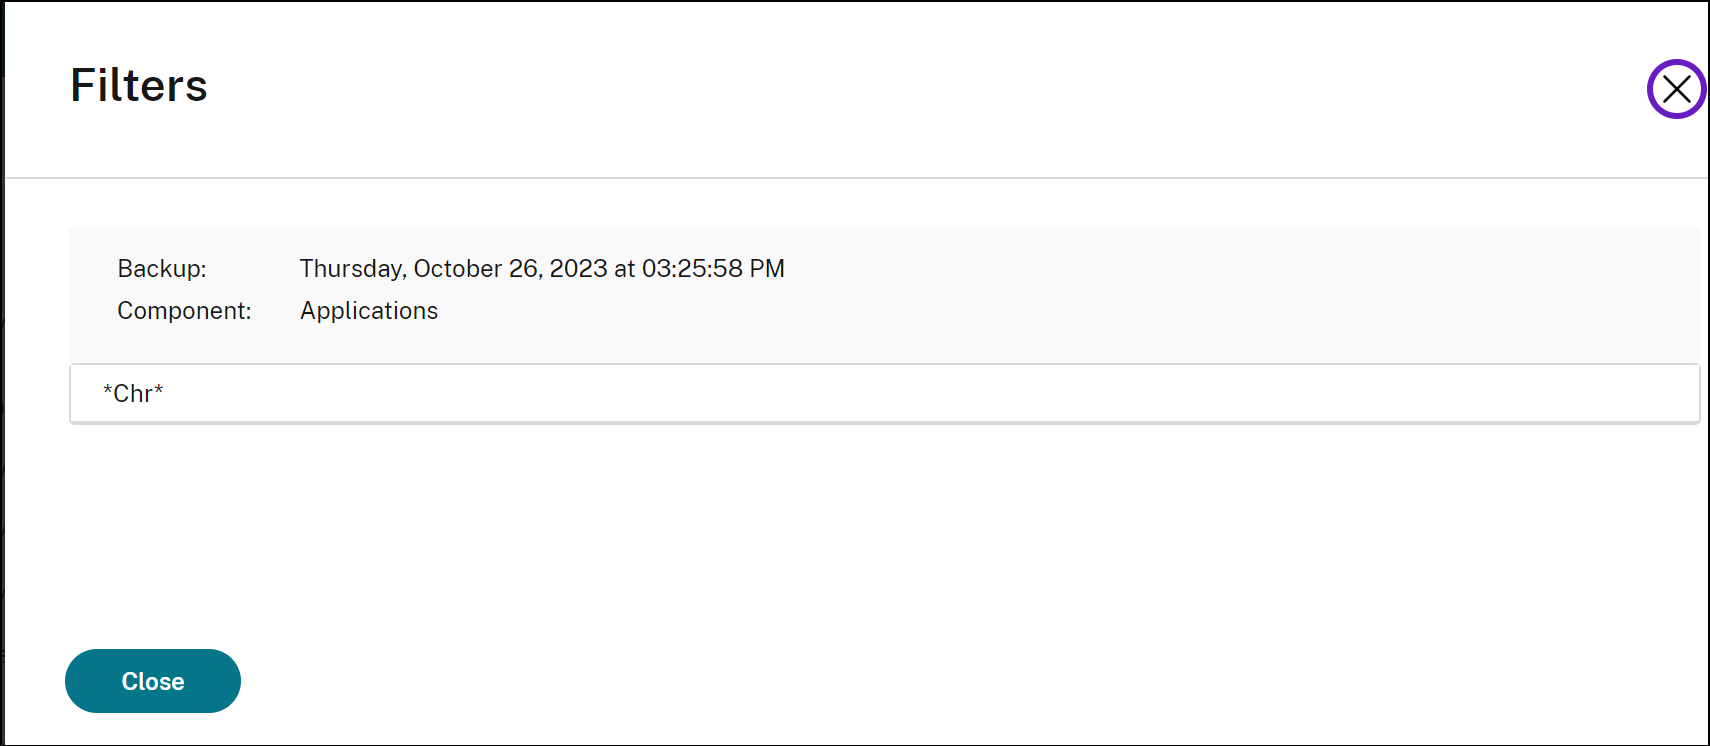
To view the component members, select a backup and navigate to Details > Components. Select a component and click View component members.
-
Check mode: Choose yes to confirm what must be restored when an actual restore operation is done. This option pre-evaluates everything needed for a restore without actually triggering one. For example, it displays the list of applications that will be restored when the restore process is run for the applications component.
Note:
Check mode does not run the actual restore. This option also does not check for any dependencies between the components. For optimal results, we recommend using the check mode on one component at a time.
-
Restore type: Choose either one:
- Missing only: Use this restore type to add components and members to a site. This option does not change the existing components and members even if the backup being restored has different configurations.
- Missing and updating existing: Use this restore type to add and update components to a site. This option updates the existing components and members with the configurations of the backup if both have different configurations.
- Notes: Enter any notes.
-
Select Restore.
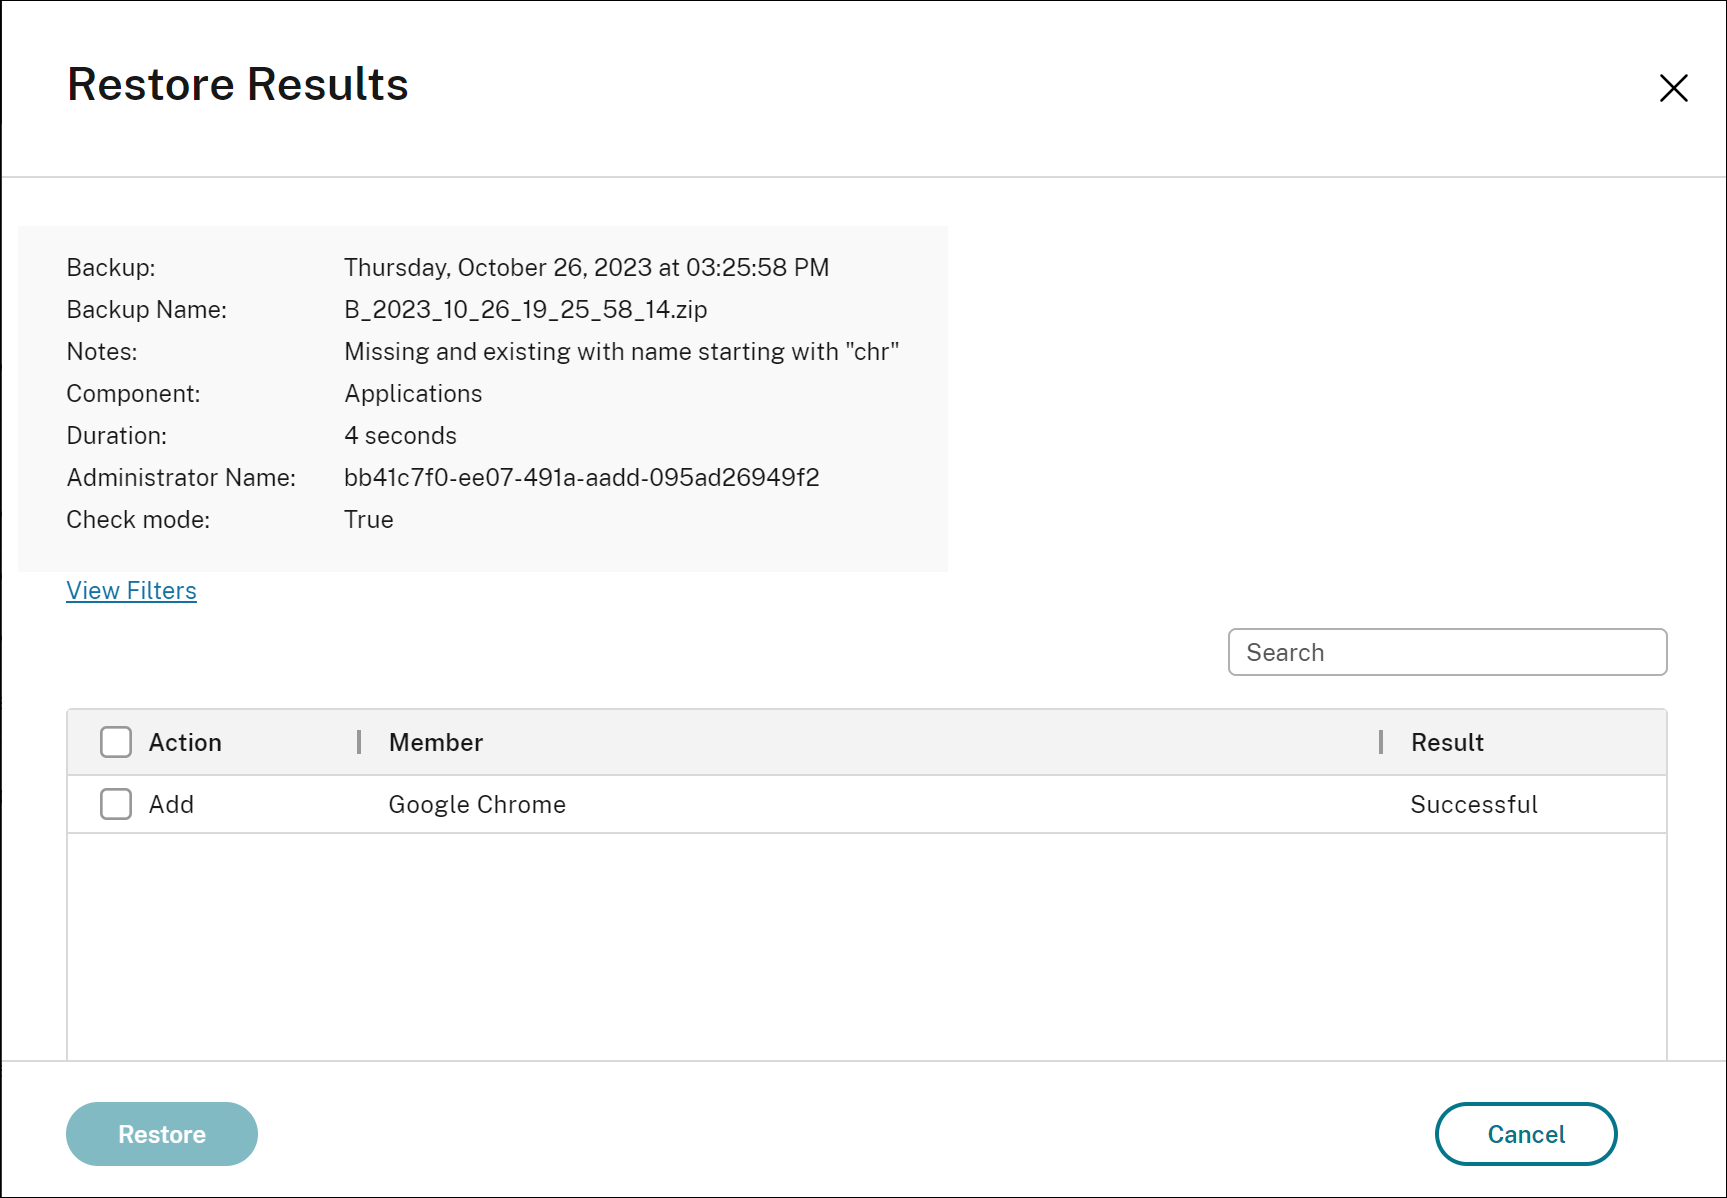
The restore results are listed in the Restore window after the restore action is completed. All restore actions are listed under the History tab.
History
You can track all the backup and restore actions in the History tab.
Under Actions, you can see all deleted backup and backup history.
To view details about a backup:
- Go to the History tab.
- Select a backup action and click View details.
The backup results give you the following details:
- Duration
- Notes
- Administrator name
- Components backed up
Use the search bar on the top right corner of the History page to search for a specific backup. For example: you can search for backups taken by a particular admin or taken on a particular day.
Share
Share
This Preview product documentation is Citrix Confidential.
You agree to hold this documentation confidential pursuant to the terms of your Citrix Beta/Tech Preview Agreement.
The development, release and timing of any features or functionality described in the Preview documentation remains at our sole discretion and are subject to change without notice or consultation.
The documentation is for informational purposes only and is not a commitment, promise or legal obligation to deliver any material, code or functionality and should not be relied upon in making Citrix product purchase decisions.
If you do not agree, select I DO NOT AGREE to exit.