Preparing a master target device for imaging
A master target device refers to a target device from which a hard disk image is built and stored on a vDisk. Provisioning Services then streams the contents of the vDisk created from the master target device to other target devices.
Important
Citrix® recommends that you install Windows updates before installing a PVS target device.
Preparing the master target device’s hard disk
The master target device is typically different from subsequent target devices because it initially contains a hard disk. This is the hard disk that is imaged to the vDisk. If necessary, after imaging, the hard disk can be removed from the master target device.
To support a single vDisk that is shared by multiple target devices, those devices must have certain similarities to ensure that the operating system has all required drivers. The three key components that must be consistent are the:
- Motherboard
- Network card, which must support PXE
- Video card
Tip
Some platforms (physical or virtual) require a consistent hardware configuration for boot media. For example, if target devices use BDM, the master target (prior to vDisk creation) should match the BDM configuration because end target devices use that configuration when booting.
However, the Provisioning Services Common Image Utility allows a single vDisk to simultaneously support different motherboards, network cards, video cards, and other hardware devices.
If target devices are sharing a vDisk, the master target device serves as a template for all subsequent diskless target devices as they are added to the network. It is crucial to prepare the hard disk of the master target device be prepared correctly and to install all software on it in the correct order.
Follow the instructions below after installing and configuring the Provisioning Server and creating target devices.
Software must be installed on the Master Target Device in the following order:
- Windows operating system
- Device drivers
- Service packs updates
- Target device software
Applications can be installed before or after the target device software is installed. If target devices are members of a domain, and will share a vDisk, more configuration steps must be completed (refer to Managing Domain Computer Accounts, before proceeding with the installation).
Important
Dual boot vDisk images are not supported.
Configuring a master target device’s BIOS
The following steps describe how to configure the target devices system’s BIOS and the BIOS extension provided by the network adapter, to boot from the network. Different systems have different BIOS setup interfaces – if necessary, consult the documentation that came with your system for further information on configuring these options.
- If the target device BIOS has not yet been configured, reboot the target device and enter the system’s BIOS setup. (To get to BIOS setup, press the F1, F2, F10, or Delete key during the boot process. The key varies by manufacturer).
- Set the network adapter to On with PXE. Note: Depending on the system vendor, this setting may appear differently.
- Configure the target device to boot from LAN or Network first. Optionally, select the Universal Network Driver Interface; UNDI first, if using a NIC with Managed Boot Agent (MBA) support. Note: On some older systems, if the BIOS setup program included an option that permitted you to enable or disable disk-boot sector write protection, ensure that the option is disabled before continuing.
- Save changes, then exit the BIOS setup program.
- Boot the target device from its hard drive over the network to attach the vDisk to the target device.
Configuring Network Adapter BIOS
This procedure is only necessary for older systems.
-
Reboot the Master Target Device.
-
Configure the network adapter’s BIOS extension through setup.
During the system boot, the network adapter’s BIOS extension presents an initialization message similar to the following: Initializing Intel ® Boot Agent Version 3.0.03 PXE 2.0 Build 078 (WfM 2.0) RPL v2.43
Enter the network adapter’s BIOS extension. (Consult the network adapter’s documentation.) The key combination for entering the network adapter’s BIOS extension varies by manufacturer. For example, to enter the Intel Boot Agent setup screen, type Ctrl+S.
A screen similar to the following appears:
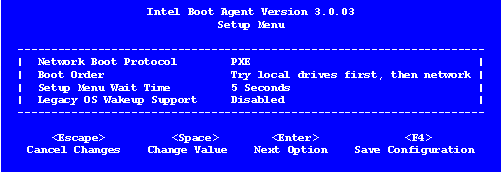
-
Change the boot order to Network first, then local drives.
-
Save any changes, and exit the setup program. In the Intel Boot Agent, typing F4 saves the changes.
Alternatively, a device can be configured to provide IP and boot information (boot file) to target devices using the Manage Boot Devices utility.
Installing the master target device software
Note: Before installing the software on a master target device, turn off any BIOS-based-virus protection features. To include anti-virus software on the vDisk image, be sure to turn the anti-virus software back on before running the Imaging Wizard.
Install and configure the OEM NIC teaming software before installing target device software.
Provisioning Services target device software components comprise:
- Provisioning Services Virtual Disk: the virtual media used to store the disk components of the operating system and applications.
- Provisioning Services Network Stack: a proprietary filter driver that is loaded over the NIC driver, allowing communications between the target devices and the Provisioning Server.
- Provisioning Services SCSI Miniport Virtual Adapter: the driver that allows the vDisk to be mounted to the operating system on the target device.
- Provisioning Services Imaging Wizard: used to create the vDisk file and image the Master Target Device.
- Virtual Disk Status Tray Utility: used to provide general vDisk status and statistical information. This utility includes a help system.
- Target Device Optimizer Utility: used to change target device setting to improve performance.
Provisioning Services target device software is available for 32-bit and 64-bit Windows operating systems.
Note: When installing Provisioning Services target device software on NT6.x systems within a multi-NIC environment, all available NICs can be used. Therefore bindcfg.exe is no longer required and no longer installed with target device software.
Installing Provisioning Services target device software on a Windows device
- Boot the master target device from the local hard disk.
- Verify that all applications on the device are closed.
- Double-click on the appropriate installer. The product installation window appears.
- On the Welcome dialog that displays, click Next, scroll down to the end, then accept the terms of the license agreement.
- Click Next to continue. The Customer Information dialog appears.
- Type your user name and organization name in the appropriate text boxes.
- Select the appropriate install user option. The option you select depends on whether this application will be shared by users on this computer, or whether only the user associated with this computer should have access to it.
- Click Next. The Destination Folder dialog appears.
- Click Next to install the target device to the default folder (C:\Program Files\Citrix\Provisioning Services). Optionally, click Change, then either enter the folder name or navigate to the appropriate folder, and then click Next, then click Install. The installation status information displays in the dialog. Note: The installation process may take several minutes. While the installation process is running, you can click Cancel to cancel the installation and roll-back any system modifications. Close any Windows Logo messages that appear.
- The ‘Installation Wizard Completed’ message displays in the dialog when the components and options have successfully been installed. Close the wizard window. If both .NET 4.5 or newer is installed and Windows Automount is enabled, the Imaging Wizard starts automatically by default (for details, refer to Using the Image Wizard to Create a New Disk. Note: If a Windows reboot request message displays before the imaging process completes, ignore the request until imaging completes successfully.
- Reboot the device after successfully installing product software and building the vDisk image.