Deployment Guide: Deploying Citrix Secure Developer Spaces™ on Red Hat OpenShift
The Citrix Secure Developer Spaces™ platform provides a secure and productive cloud development environment that can be deployed on public, private clouds, and self-hosted servers. It also works in full air-gapped modes, such as high-security settings. The primary purpose of Citrix Secure Developer Spaces platform is to provide secure, cloud development environments (CDEs) that boost developer productivity while ensuring enterprise-level security. It allows organizations to streamline the provisioning and management of coding environments, improving efficiency and collaboration among internal and external teams. By centralizing development resources and integrating automated security features, the platform reduces the risk of data leaks and intellectual property theft, enabling safe remote work and supporting DevSecOps practices. Specifically, typical usage scenarios encompass IT efficiency, developer productivity, and governance of the development process. This deployment guide provides the steps to deploy the Secure Developer Spaces to an existing Red Hat OpenShift cluster. The CDEs can be accessed through cloud or local integrated development environments (IDEs), offering a secure and isolated environment for developers.
This guide helps the user perform the following tasks:
- Preparing for the installation
- Installing and configuring the Secure Developer Spaces platform
- Accessing and upgrading the Secure Developer Spaces workspace
- Onboarding end users
For more information, see the Secure Developer Spaces website.
Prerequisites
The Secure Developer Spaces CDE platform deployment has the following prerequisites:
- Container registry to which you have push permissions
- An up-and-running OpenShift cluster
- Basic tools for working with that OpenShift cluster: oc and kubectl You should already be authenticated in both oc and kubectl with your OpenShift cluster.
Deployment Steps
Obtain a Citrix Secure Developer Spaces platform license
You need a valid license to use the Citrix Secure Developer Spaces platform. Please contact your ATS or Solution Architect to request that one be issued to you. To issue a license, we only need to know which URL will be used to access the Citrix Secure Developer Spaces platform. In case of OpenShift, we need to find out the cluster domain first, which we can easily do in two ways:
- From the web console URL: The cluster domain is part of the OpenShift web console address. If you access the console at
https://console-OpenShift-console.apps.cluster.example.com, then your cluster domain isapps.cluster.example.com -
Using the OpenShift CLI (oc):
oc get ingresses.config/cluster -o jsonpath='{.spec.domain}' <!--NeedCopy-->- You will get an output like:
apps.sm9kda46je6e9a9c7b.swedencentral.aroapp.io - Once you have the cluster domain, the final Citrix Secure Developer Spaces platform domain will be in the form of:
sn.<cluster-domain> - In our case, it will look like the following:
sn.apps.<CLUSTER_ID>.<REGION>.aroapp.io
- You will get an output like:
Now that we have the domain, we will register it with the Citrix Secure Developer Spaces License server.
Check the Wildcard policy of your OpenShift cluster
To be able to create and use workspaces on the Citrix Secure Developer Spaces platform, which have dynamic routes, you need to make sure that the wildcard policy of your OpenShift cluster routing is set to WildcardsAllowed.
To do that, you can follow these steps:
- Find out the name of your ingress controller by running:
   oc get ingresscontroller -n openshift-ingress-operator -o jsonpath='{.items[*].metadata.name}'
<!--NeedCopy-->
- If you made a default installation of an OpenShift cluster and haven’t changed any of the settings, the name will most likely be default.
- Check if your ingress controller has a WildcardsAllowed policy already set, using the name of the controller obtained from the previous step. In our case, it is default, so the command looks like:
   oc get ingresscontroller default -n openshift-ingress-operator -o jsonpath='{.spec.routeAdmission.wildcardPolicy}'
<!--NeedCopy-->
- If the output is WildcardsAllowed, then everything is set, and you can go to the next step of the guide.
- If the output is empty, it means we need to set the policy manually. This can be done by editing the configuration of that particular ingress controller (named default) by executing:
   oc patch ingresscontroller default -n openshift-ingress-operator --type=merge -p '{"spec":{"routeAdmission":{"wildcardPolicy":"WildcardsAllowed"}}}'
<!--NeedCopy-->
- You can now check that the previous command was successful by executing and getting WildcardsAllowed as a response:
   oc get ingresscontroller default -n openshift-ingress-operator -o jsonpath='{.spec.routeAdmission.wildcardPolicy}'
 <!--NeedCopy-->
- If you want to see the complete ingress controller configuration, you can execute:
   oc get ingresscontroller default -n openshift-ingress-operator -o yaml
<!--NeedCopy-->
More info on the subject of Ingress controllers and wildcard policies in particular can be found at: https://docs.redhat.com/en/documentation/OpenShift_container_platform/4.18/html/operator_apis/ingresscontroller-operator-OpenShift-io-v1#spec-routeadmission
Create a Kubernetes namespace for your deployment
Select the name of the namespace that you want to use for Citrix Secure Developer Spaces deployment. It is advised not to reuse existing namespaces for deploying our platform. For this guide, we will use the name Citrix Secure Developer Spaces.
- First, you need to check if that namespace already exists by running:
    kubectl get namespaces | grep strong-network
<!--NeedCopy-->
- If it does not exist, you can create it by running:
    kubectl create namespace strong-network
<!--NeedCopy-->
Run the Citrix Secure Developer Spaces installer
You can start the installation process by running the following command from the console of your device:
docker run -it --rm -v ${PWD}:/strong-network/shared strongnetwork/strong_installer:2026.4.5
<!--NeedCopy-->
After this is executed and the installer image is pulled and run, you can run the installer. The installer will create a configuration file that should be used to upgrade the product in the future. It will also download the Helm chart to the shared host directory and push Citrix Secure Developer Spaces images to your container registry.
Since we provide a large number of pre-built workspace images by default, which occupy a significant amount of space, you can reduce the number of images that we pull or push by editing the list of workspace images that we will pull or push, or by not downloading them at all. This could also be useful if you (the client) plan to use your workspace images, so you do not need Citrix Secure Developer Spaces’ prebuilt ones.
In case you need only specific workspace images but do not want to download the rest, you can edit the workspace_images.txt file and remove the ones that you do not need.
Then you can run:
./strong-cli install
<!--NeedCopy-->
You will have to go through a wizard that helps you create the YAML configuration file.
Enter the main domain of the platform (e.g, strong-network.example.com): `sn.apps.<CLUSTER_ID>.<REGION>.aroapp.io`
The default domain used to access workspaces is: proxy.sn.apps.<CLUSTER_ID>.<REGION>.aroapp.io`
Do you want to change it? (y/n): n
Set the email of the platform admin: admin:admin@example.com
Set password for admin (leave empty to autogenerate):
Define the base64 database encryption key (leave empty to autogenerate):
Define the JWT secret (leave empty to autogenerate):
Do you want to enable node affinities for workspaces and strong network services? (y/n): n
Use two-factor authentication for users? (y/n): n
Installing version 2025.5.0...
<!--NeedCopy-->
In case you get an error in the terminal like the following:
Failed to fetch access token with error: permission denied, try using a service account...
This means that your domain is not registered correctly on the Citrix Secure Developer Spaces License server, and therefore, we cannot automatically generate the access token for our container registry.
If you did not encounter any problems during the wizard, your whole wizard will look something like the output below.
root@0f7ca7f89e78:/strong-network# ./strong-cli install
Enter the main domain of the platform (e.g, strong-network.example.com): sn.apps.<CLUSTER_ID>.<REGION>.aroapp.io
The default domain used to access workspaces is: proxy.sn.apps.<CLUSTER_ID>.<REGION>.aroapp.io
Do you want to change it? (y/n): n
Set the email of the platform admin: admin:admin@example.com
Set password for admin (leave empty to autogenerate):
Define the base64 database encryption key (leave empty to autogenerate):
Define the JWT secret (leave empty to autogenerate):
Do you want to enable node affinities for workspaces and Citrix Secure Developer Spaces services? (y/n): n
Use two-factor authentication for users? (y/n): n
Installing version 2026.4.5...
⢿ Authenticating... Done.
⣟ Finding best source registry... Selected EU region.
Pulling helm chart version 2026.4.5..
File ninjahchart-2026.4.5.tgz downloaded to /strong-network/shared/ninjahchart-2026.4.5.tgz
Destination Registry URL:<YOUR_REGISTRY>.azurecr.io
Detected Azure Registry Type..
Select Type For Authentication:
        [1] User Account
        [2] Service Principal
Please Enter Your Numeric Choice: 2
Enter service principal ID: <YOUR_SERVICE_PRINCIPAL_ID>
Enter service principal password: Authentication successful.
src: europe-docker.pkg.dev/strong-network-release/images/frontend:2026.4.5
dst: http://<YOUR_REGISTRY>.azurecr.io/frontend:2026.4.5
Getting image source signatures
Copying blob fb6ab0edbcbd done   |
Copying blob ab9385d5595c done   |
Copying blob 0c1c1add5fb1 done   |
Copying blob 4f4fb700ef54 skipped: already exists
Copying config 3564c26c52 done   |
Writing manifest to image destination
⢿ Finishing up... Done.
Run your deployment like this:
    helm upgrade --install \\
            --namespace default \\
            --create-namespace \\
            -f "./config_2026.4.4.yaml" \\
            release ./ninjahchart-2026.4.5.tgz
root@0f7ca7f89e78:/strong-network#`
<!--NeedCopy-->
Add Docker registry secrets to Kubernetes
Docker images for the Citrix Secure Developer Spaces platform itself and later for workspace images need to be hosted in a suitable location. This is why you need to provide your Container registry (or Artifactory), because the Citrix Secure Developer Spaces installer is going to pull the images from Citrix Secure Developer Spaces private GCP Artifactory and push them to your registry. Citrix Secure Developer Spaces container registry is likely not going to be public, and this is why you need to authenticate with it. The credentials for this authentication must be present during the Citrix Secure Developer Spaces platform installation so that images can be pulled for each of the Citrix Secure Developer Spaces service pods. Once you have the credentials ready, you can add them by running:
kubectl create secret docker-registry acr-secret   --namespace=strong-network   --docker-server=<YOUR_REGISTRY>.azurecr.io    --docker-username=<YOUR_SERVICE_PRINCIPAL_ID>-token   --docker-password=<YOUR_REGISTRY_PASSWORD>
<!--NeedCopy-->
This creates a new Docker registry secret named ‘acr-secret’ in the ‘strong-network’ namespace.
You can verify that the secret is successfully added by executing:
`kubectl get secrets | grep acr-secret`
<!--NeedCopy-->
Now you need to manually edit the YAML configuration that you got as a result of running the Strong installer and add the following line in the platform section: imagePullSecrets: acr-secret
Set proper Security Context Constraints
Since the OpenShift security model differs from the standard Kubernetes security model, you must apply additional policies; otherwise, Citrix Secure Developer Spaces services or workspaces will not start properly. You need to set policies for both service deployments and workspaces that will be made on the platform.
Set policies for the service accounts of platform services
Execute the instructions below:
oc adm policy -n strong-network add-scc-to-user privileged -z release-central-service
oc adm policy -n strong-network add-scc-to-user privileged -z release-coordinator
oc adm policy -n strong-network add-scc-to-user privileged -z release-proxy
oc adm policy -n strong-network add-scc-to-user privileged -z release-workspace-api
oc adm policy -n strong-network add-scc-to-user privileged -z release-mongodb
oc adm policy -n strong-network add-scc-to-user privileged -z release-frontend
oc adm policy -n strong-network add-scc-to-user privileged -z release-cron-service-account
<!--NeedCopy-->
This will add the elevated permissions to all platform services’ service accounts that Citrix Secure Developer Spaces uses.
The -z flag indicates that what follows is a service account name, for example, release-proxy.
Create a new service account, its policy, and assign it
Create a file named workspaces-policy.yaml:
apiVersion: security.openshift.io/v1
kind: SecurityContextConstraints
metadata:
  annotations:
    kubernetes.io/description: anyuid provides all features of the restricted SCC
      but allows users to run with any UID and any GID.
  creationTimestamp: "2024-08-07T12:25:28Z"
  generation: 1
  name: strongnetwork-scc
  resourceVersion: "998061"
  uid:
allowHostDirVolumePlugin: false
allowHostIPC: false
allowHostNetwork: false
allowHostPID: false
allowHostPorts: false
allowPrivilegeEscalation: true
allowPrivilegedContainer: true
allowedCapabilities:
- NET_ADMIN
- NET_RAW
defaultAddCapabilities: null
fsGroup:
  type: RunAsAny
groups:
- system:cluster-admins
priority: 10
readOnlyRootFilesystem: false
requiredDropCapabilities:
- MKNOD
runAsUser:
  type: RunAsAny
seLinuxContext:
  type: MustRunAs
supplementalGroups:
  type: RunAsAny
users: []
volumes:
- configMap
- downwardAPI
- emptyDir
- persistentVolumeClaim
- projected
- secret
<!--NeedCopy-->
Apply it by running:
kubectl apply -f workspaces-policy.yaml
<!--NeedCopy-->
Now you need to check if a service account named statefulset-sa already exists:
oc get serviceaccounts | grep statefulset-sa
<!--NeedCopy-->
Service account already exists
If the service account already exists, you can check if it is already assigned the strongnetwork-scc SecurityContextConstraints. You can do so by running:
`oc get rolebindings,clusterrolebindings --all-namespaces -o wide | grep statefulset-sa`
<!--NeedCopy-->
You can expect to get an output like the one below, which would mean that it is using a strongnetwork-scc: If this is the case, you do not need to do any extra steps regarding the service account and its policies.
Service account does not exist
If the service account does not exist, you need to create one and assign the strongnetwork-scc policy to it:
oc create serviceaccount statefulset-sa -n strong-network
oc adm policy add-scc-to-user strongnetwork-scc -z statefulset-sa
<!--NeedCopy-->
Editing the YAML configuration
Finally, you need to manually edit the YAML configuration that you got as a result of running the Strong installer. You need to add the following lines in the platform section:
useOpenShift: true
<!--NeedCopy-->
You need to add the following lines in the region section:
clusterConfig:
        privilegedWorkspaces: true
        customServiceAccount: statefulset-sa
<!--NeedCopy-->
Final YAML
After all the edits made in previous steps, the YAML configuration should look like this:
mongodb:
    auth:
        replicaSetKey: <MONGODB_REPLICA_SET_KEY>
        password: <MONGODB_PASSWORD>
        rootPassword: <MONGODB_ROOT_PASSWORD>
platform:
    imageTag: 2025.1.13
    dockerRegistry: <YOUR_REGISTRY>.azurecr.io/
    workspaceRegistry: <YOUR_REGISTRY>.azurecr.io/ws-images/
    publicRegistryLatestTag: 2.2.5
    secureBrowserTag: 2025.1.13
    sidecarTag: 2025.1.13
    hostName: sn.apps.<CLUSTER_ID>.<REGION>.aroapp.io
    centralProxyHostname: proxy.sn.apps.<CLUSTER_ID>.<REGION>.aroapp.io
    userAdminEmail: admin@example.com
    userAdminPassword: <ADMIN_PASSWORD>
    secretKeyReposB64: <BASE64_ENCRYPTION_KEY>
    jwtSecret: <JWT_SECRET>
    sslCertificateSecret: ""
    sslCertificateSecretProxy: ""
    twoFaDisabled: true
    useOpenShift: true
    imagePullSecrets: acr-secret
region:
    clusterConfig:
        privilegedWorkspaces: true
        customServiceAccount: statefulset-sa
<!--NeedCopy-->
Deployment
Now what’s left is to run the helm upgrade and deploy the application:
helm upgrade --install \\
            --namespace strong-network \\
            -f "./config_2026.4.4.yaml" \\
            release ./ninjahchart-2026.4.5.tgz
<!--NeedCopy-->
The terminal will freeze for a few seconds while deployment is in progress. Now you can go to the OpenShift console and Workloads -> Pods and verify that all pods are running correctly:
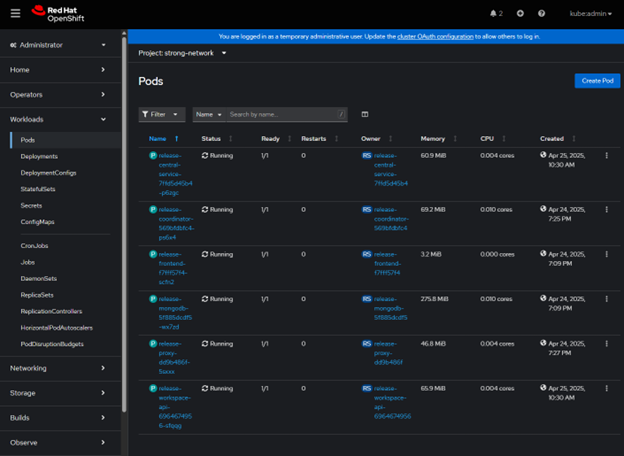
If there is a problem with a particular pod, click on that pod and have a look at its Logs/Events. When everything is ok with all the pods, you can proceed to log in to the platform on the URL that is defined by the hostName value in the YAML, using the userAdminEmail and userAdminPassword from the YAML.
After creating the initial organization and project, you can try creating a workspace and see if it deploys correctly. If the workspace does not deploy correctly, examine the logs of the relevant Pod/StatefulSet, as explained above.
In this article
- Prerequisites
-
Deployment Steps
- Obtain a Citrix Secure Developer Spaces platform license
- Check the Wildcard policy of your OpenShift cluster
- Create a Kubernetes namespace for your deployment
- Run the Citrix Secure Developer Spaces installer
- Add Docker registry secrets to Kubernetes
- Set proper Security Context Constraints
- Create a new service account, its policy, and assign it
- Service account already exists
- Service account does not exist
- Editing the YAML configuration