Connect to external servers and services via SSH
Developers often need to reach systems outside of their workspace over SSH — for example, to push code to a Git repository hosted on Azure DevOps, deploy to a staging server, or access a remote database. By default, the SDS Proxy blocks outbound SSH connections from workspaces for security reasons. To allow developers to reach these external servers and services, an administrator must enable one of the two options described below.
Choosing the right option
| Consideration | Personal SSH Identity | Connected SSH Services |
|---|---|---|
| Best for | Individual developers who each need their own SSH key (for example, to authenticate with Azure DevOps or GitHub) | Teams or organizations where multiple users connect to the same SSH-based service |
| Who sets it up | Project Owner or Security Officer enables the toggle; each developer generates and registers their own key | Project Owner or Security Officer creates the service resource and injects it into workspaces; developers connect without additional setup |
| Key ownership | Each user owns their key | The platform or admin manages the key |
| Registration effort | Each user registers their public key on every target service | Admin registers the key once; all workspace users connect automatically |
| Scope | User-level — works across all workspaces where the toggle is enabled | Resource-level — attached per workspace or template |
| Best fit | Individual access to personal accounts or services | Shared infrastructure (build servers, staging VMs, cloud instances) |
Option 1: Personal SSH Identity
With Personal SSH Identity, the platform generates and manages an SSH key pair for each user. The private key is applied automatically when you connect from a workspace — it is never exposed inside the workspace itself.
Prerequisites
- A Project Owner or Security Officer must enable Enable Personal SSH Identity on the workspace or workspace template (see Admin setup below).
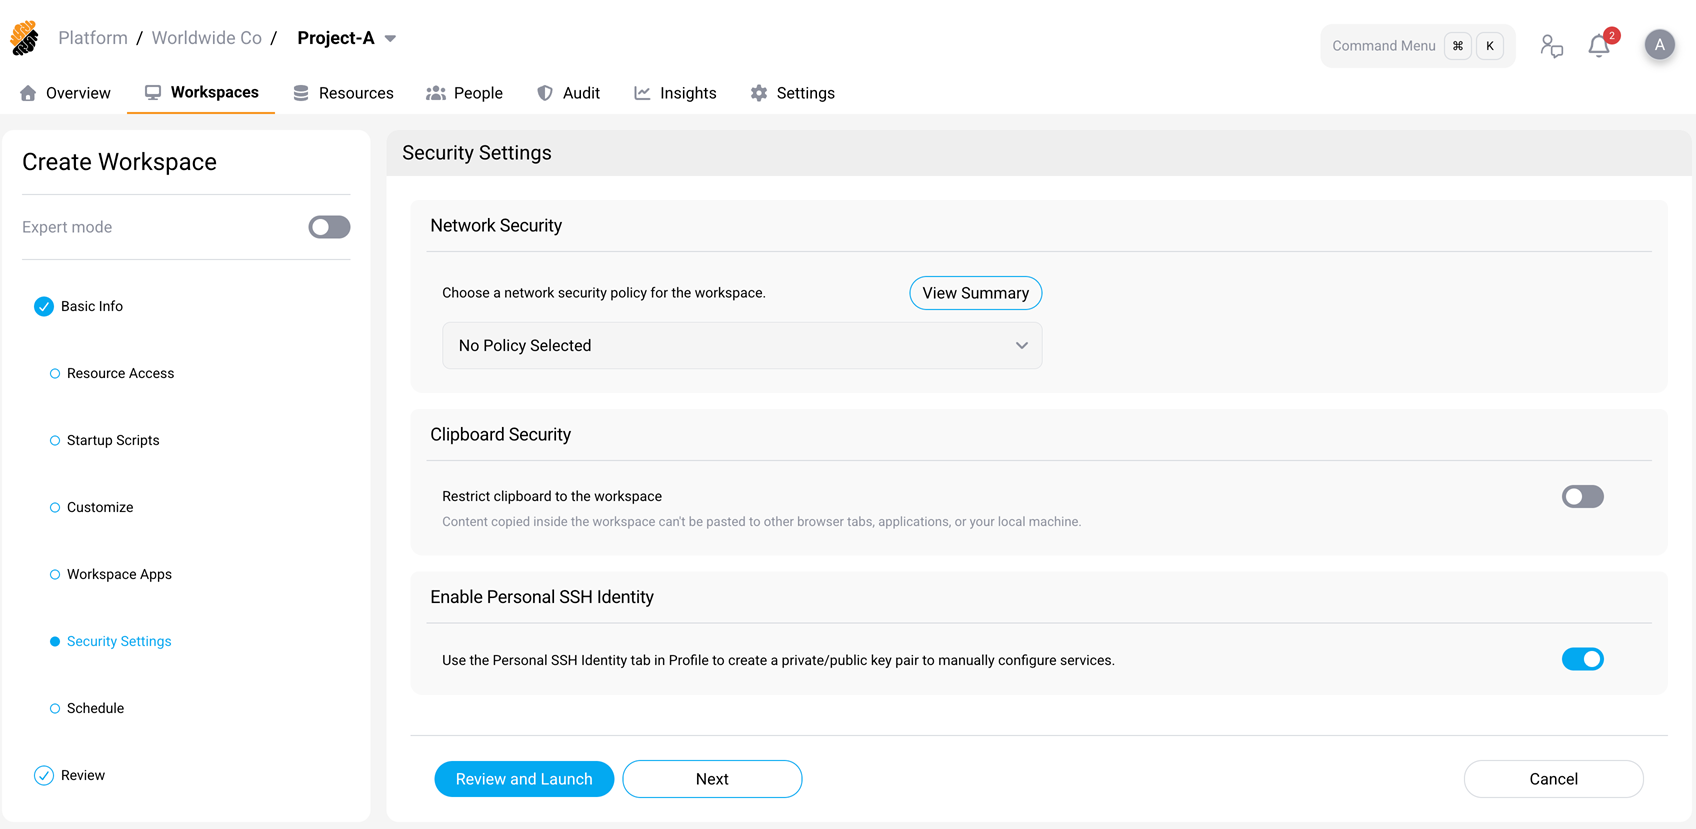
Enable Personal SSH Identity on a workspace or template
Permission: Security::Manage
You can enable this setting on an individual workspace or on a workspace template. When enabled on a template, every workspace created from that template inherits the setting.
On a workspace:
- Navigate to the project’s Workspaces tab.
- Create or edit a workspace.
- In the left panel, select Security Settings.
- Under Enable Personal SSH Identity, switch the toggle to on.
- Select Review and Launch or Next to save the workspace.
On a workspace template:
- Navigate to the project’s Workspaces tab and select the Templates view.
- Create or edit a template.
- In Security Settings, switch Enable Personal SSH Identity to on.
- Save the template.
After this setting is enabled, SSH connections are allowed from the workspace, and users can generate a Personal SSH Identity key in their profile.
Generate your SSH key
- Select your profile picture (top-right corner) to open your profile.
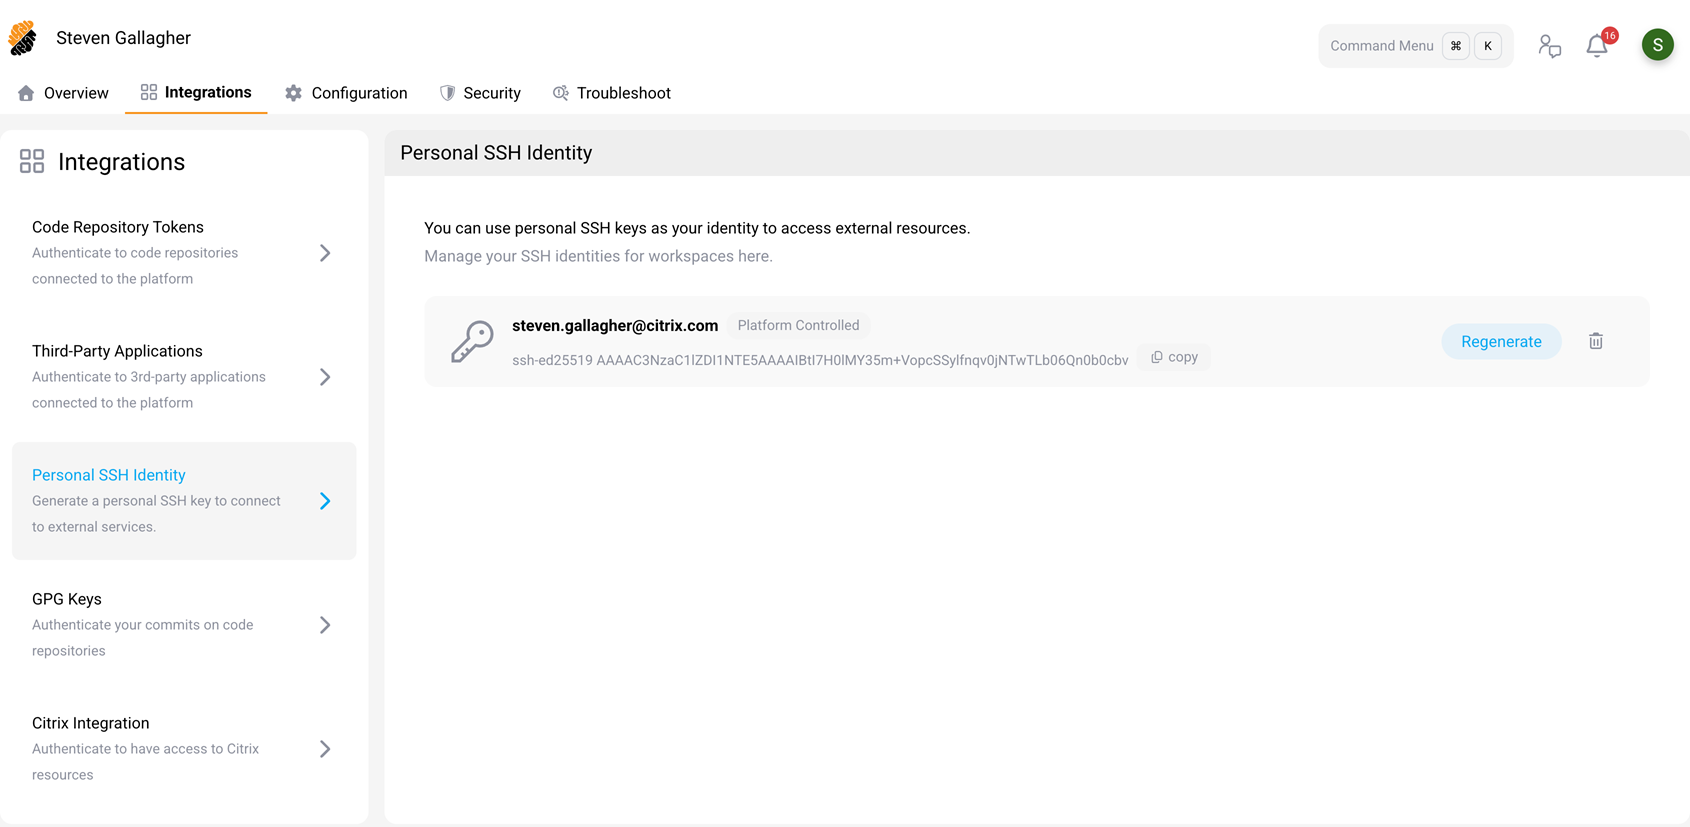
- Go to Integrations > Personal SSH Identity.
- Select Generate Key.
- Enter a default username (for example,
git). You can override this username when connecting to individual services. - Select Create.
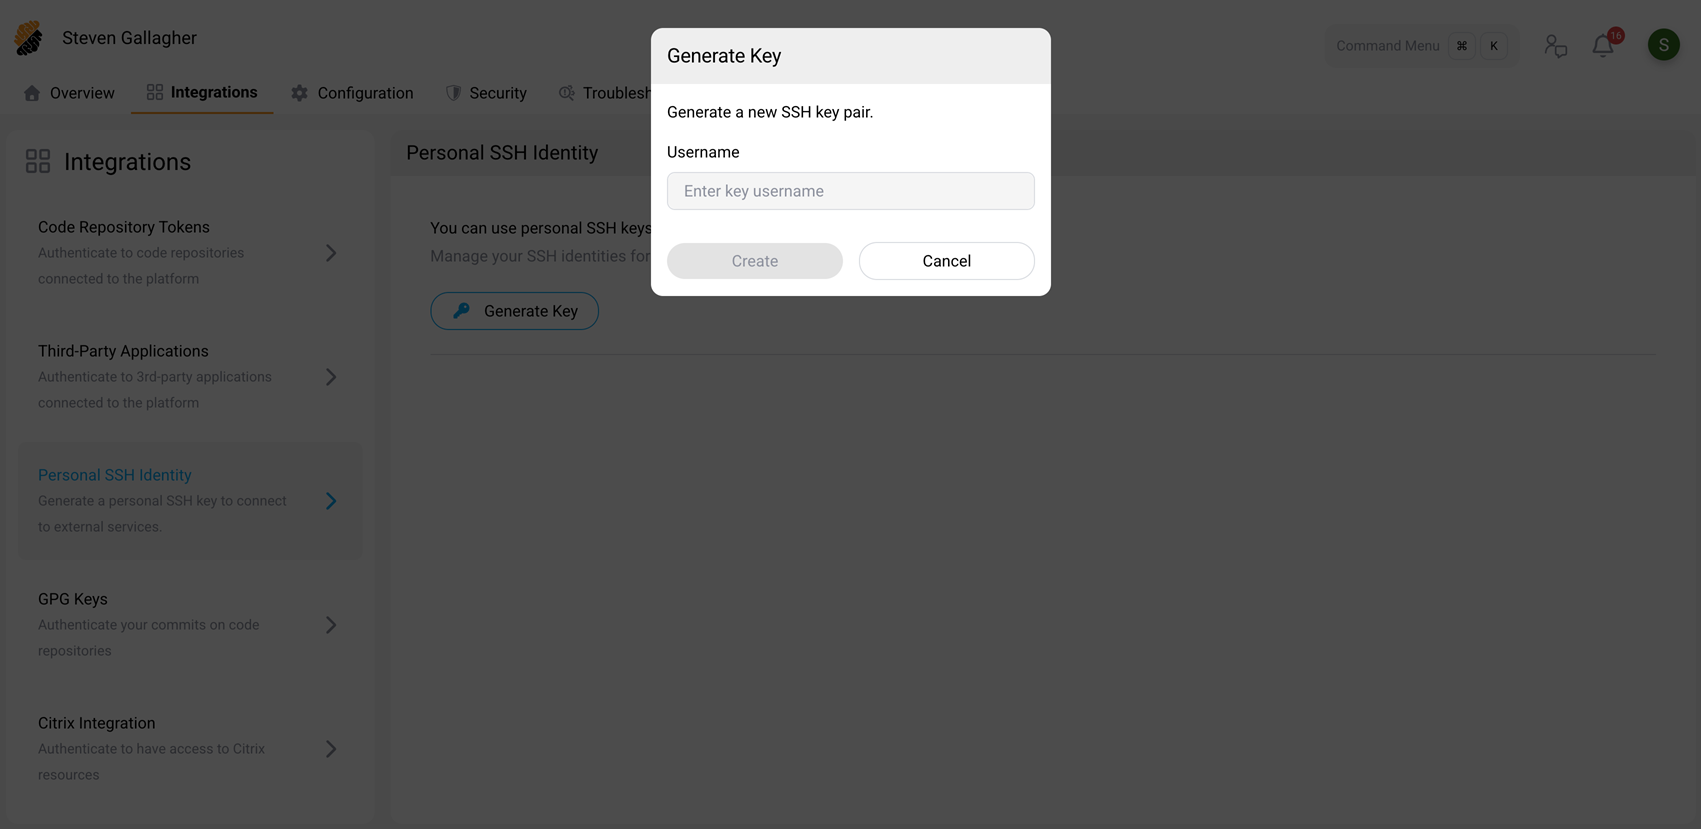
The platform generates a key pair and displays the public key. The SSH key applies to both new and existing workspaces.
Register the public key on the target service
- On the Personal SSH Identity page, select Copy to copy the public key.
- Add the public key to the target service, such as adding the public key inside your
~/.ssh/authorized_keysfile. The exact steps depend on the service.
Connect from a workspace
Once the public key is registered on the target service, open a terminal inside any workspace where Personal SSH Identity is enabled and connect normally:
ssh <username>@<hostname>
<!--NeedCopy-->
SDS automatically applies your private key. No manual key management is required.
Option 2: Connected SSH Services
Connected SSH Services let administrators define an SSH target once and share it across workspaces. When the service is injected into a workspace, developers can connect without any additional authentication setup.
Prerequisites
- The user creating the service must have the Resources::Manage permission (typically a Project Owner or Security Officer).
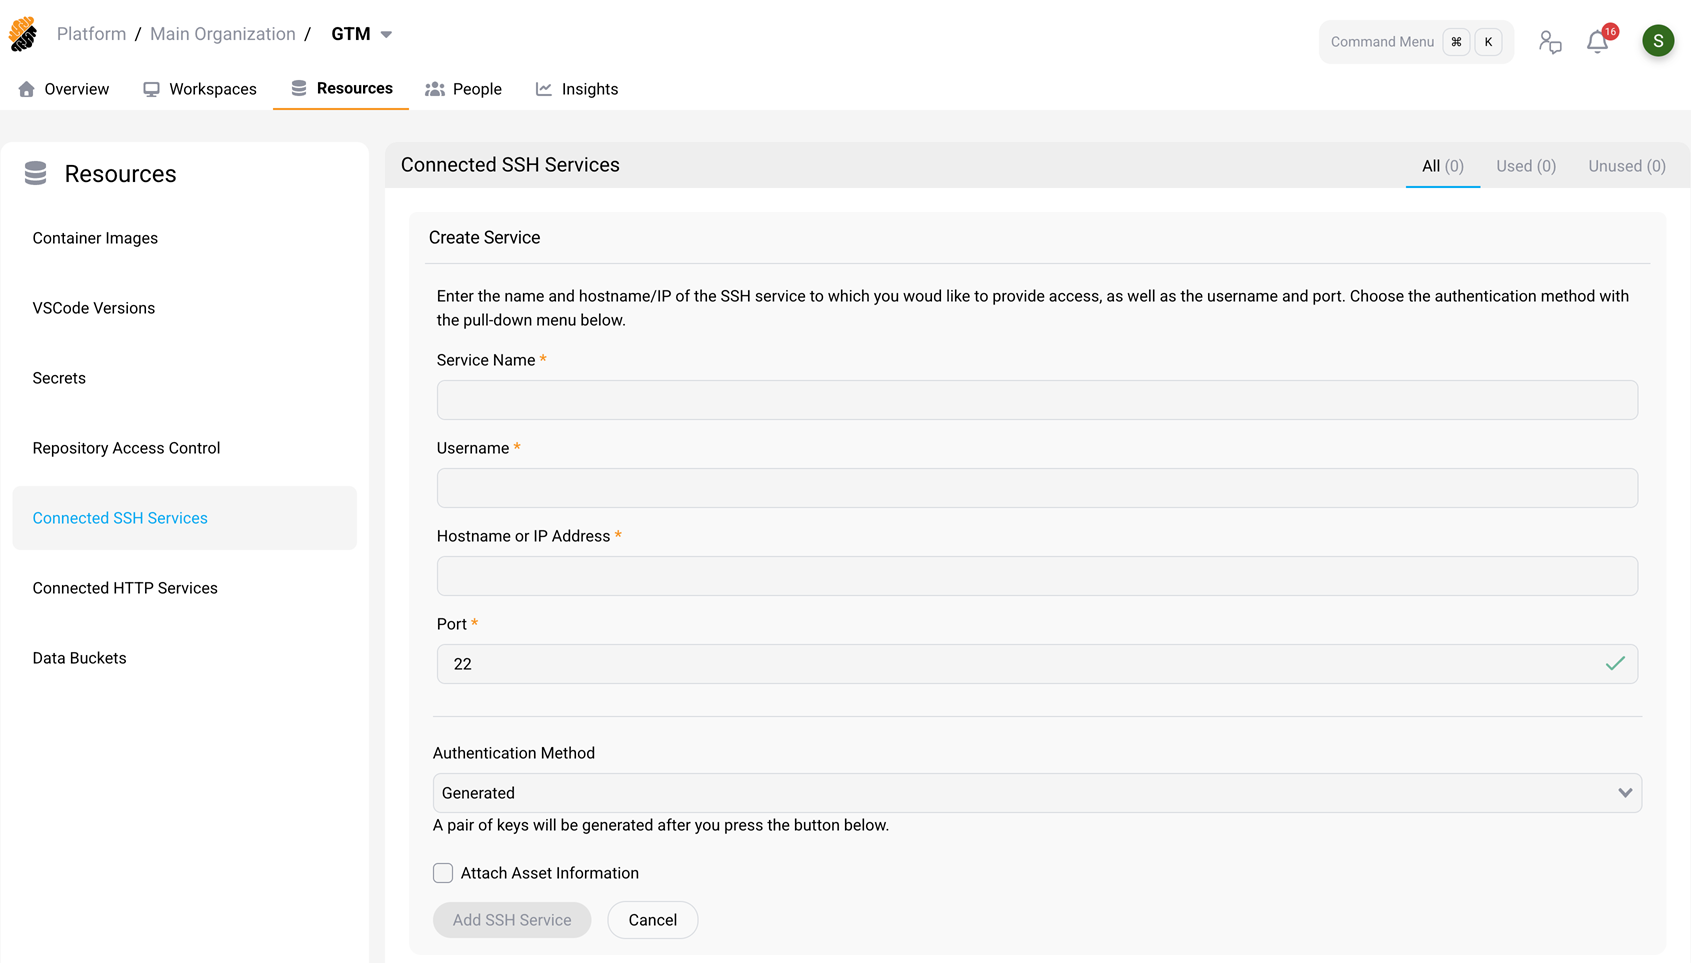
Create the SSH service resource
- Navigate to the project’s Resources tab.
- In the left panel, select Connected SSH Services.
- Select New SSH Service (or Add Service).
-
Fill in the service details:
-
Service Name — a name to identify the service (for example,
gcp-vm). -
Username — the SSH username for the target host (for example,
ubuntu). - Hostname or IP Address — the address of the target host.
-
Port — the SSH port (default
22). -
Authentication Method — choose one of:
- Generated — the platform generates a key pair. Copy the public key and register it on the target host.
- Upload Private Key — upload an existing private key.
- Password — enter the password for the SSH username.
- Asset Information (optional) — a description of the service.
-
Service Name — a name to identify the service (for example,
- Select Add SSH Service.
If you choose Generated authentication, the platform displays the public key after it is created. Copy it and register it on the target SSH service.
Inject the service into a workspace
- Create or edit a workspace.
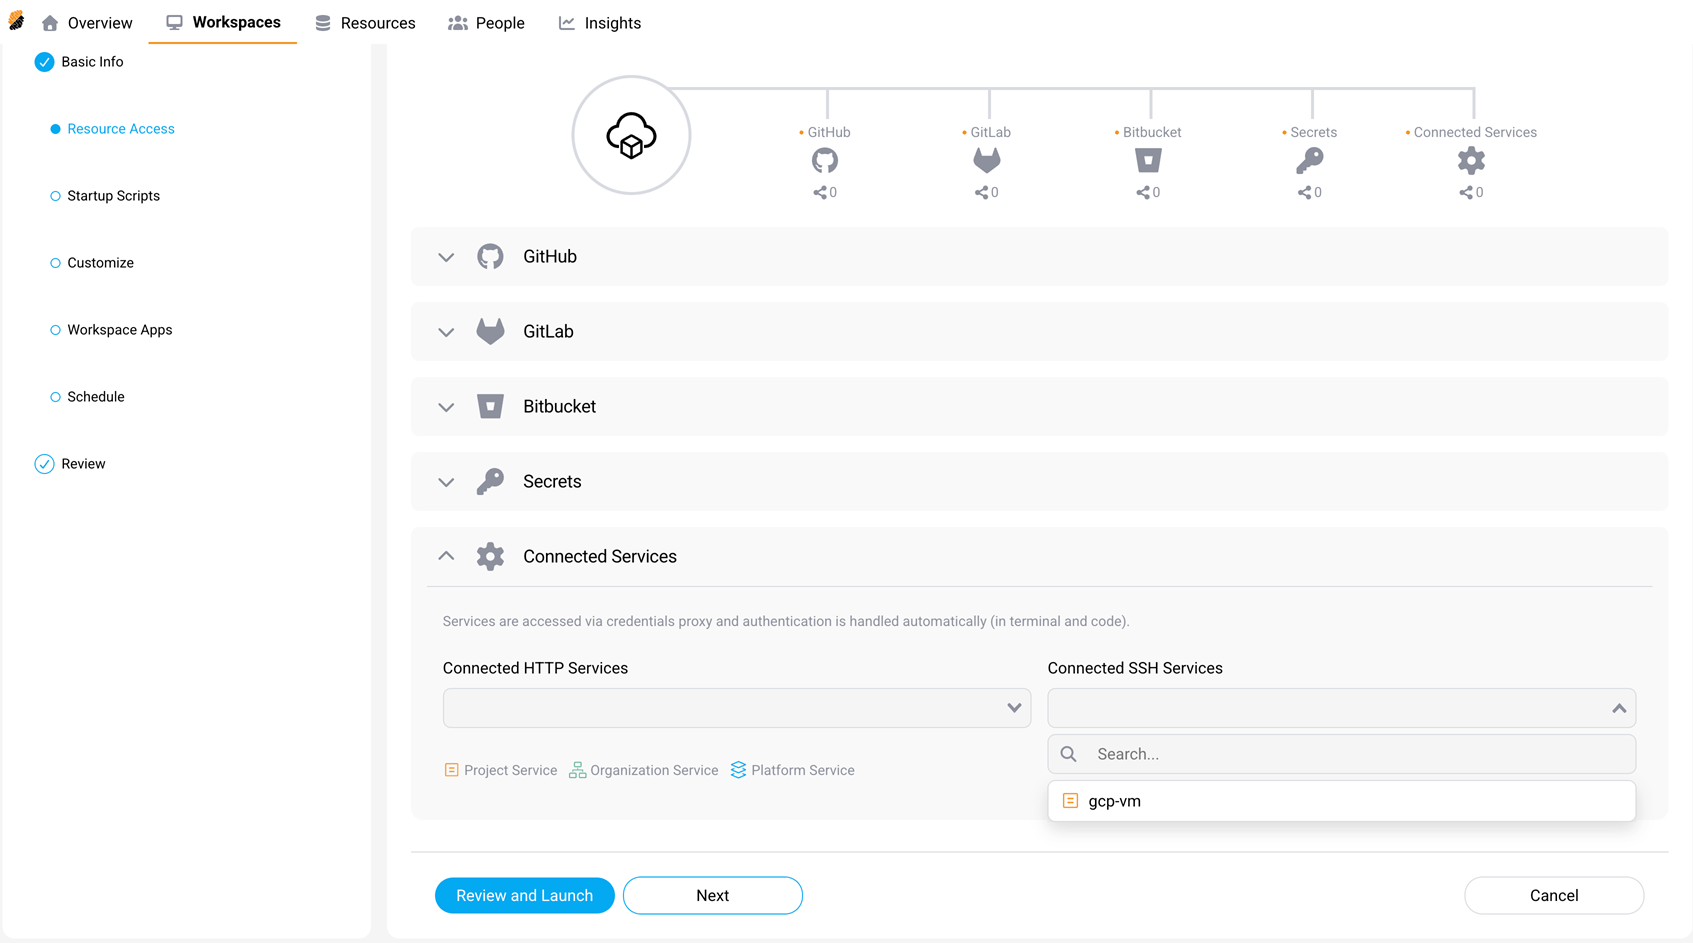
- In the left panel, select Resource Access.
- Under Connected Services, locate the Connected SSH Services dropdown.
- Select the service you created (for example,
gcp-vm). - Select Review and Launch or Next to save.
Connect from a workspace
Open a terminal inside the workspace and type:
ssh <service-name>
<!--NeedCopy-->
For example:
ssh gcp-vm
<!--NeedCopy-->
SDS authenticates you automatically. No further key or password entry is needed.
Troubleshoot blocked outbound SSH connections
If no SSH method is configured for the target host, the workspace terminal shows the following guidance before the SSH client closes the connection:
SSH access to external hosts is disabled by default in this workspace.
To connect, an administrator must enable one of:
  - Personal SSH Identity (per-user key) - in the workspace/template Security Settings
  - a Connected SSH Service - then run: ssh <service-name>
See: https://docs.citrix.com/en-us/secure-developer-spaces/workspace/ssh-connectivity
<!--NeedCopy-->
To resolve the issue, enable Personal SSH Identity for individual developer access or inject a Connected SSH Service for shared service access.