Configure Simplified SAML for use with Native and Guest SAML Users
It is essential you understand whether “Simplified SAML” is appropriate for your authentication use case before following this article. Read the use case descriptions and FAQ thoroughly before deciding to implement this particular special case SAML solution. Before proceeding, make sure you fully understand the scenarios where Simplified SAML is appropriate and which types of identities you need to use. Most SAML use cases can be achieved by following other SAML articles and by sending all four cip_* attributes for authentication.
Note:
Using “Simplified SAML” increases the load placed on the Citrix Cloud connectors as they have to lookup the user email, SID and OID for each Workspace end user logon instead of these values being provided by the SAML assertion. Sending all four cip_* attributes in the SAML assertion is preferable from a Citrix Cloud connector performance perspective if Simplified SAML is not actually required.
Prerequisites
- A SAML application specifically configured for use with Simplified SAML that only sends cip_upn for authentication within the SAML assertion.
- FrontEnd users within your SAML provider.
- A resource location containing a pair of Citrix Cloud connectors joined to the AD forest and domain where the AD shadow accounts are created.
- Alternative UPN suffixes added to the backend AD forest where the AD shadow accounts are created.
- Backend AD shadow accounts with matching UPNs.
- DaaS or CVAD resources mapped to the AD shadow account users.
- One or more FAS servers linked to the same resource location.
FAQ
Why should I use Simplified SAML?
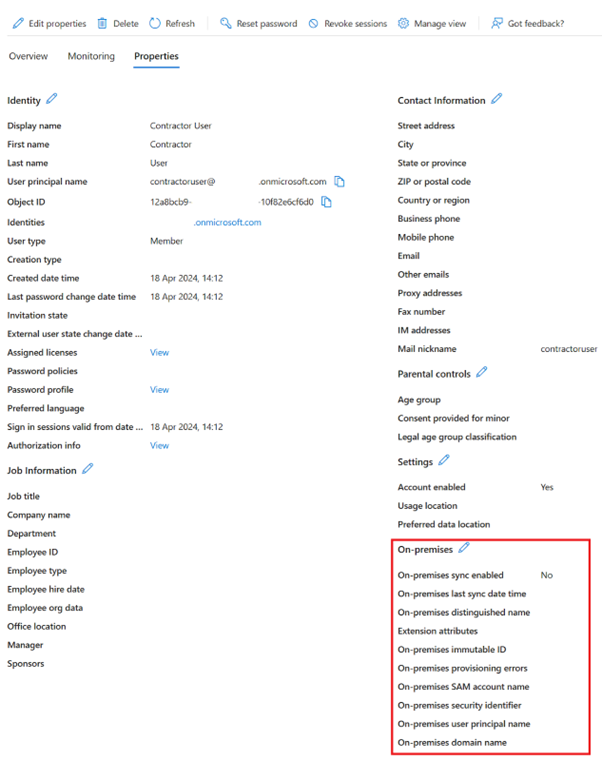
It is very common for large organisations to invite contractors and temporary employees into their identity platform. The goal is to grant the contractor temporary access to Citrix Workspace using the user’s existing identity such as a contractor email address, or an email address outside of your organisation. Simplified SAML allows the use of native or guest frontend identities that do not exist inside the AD domain where DaaS resources are published.
What is Simplified SAML?
Typically, when signining into Citrix Workspace, four SAML attributes cip_* and their corresponding AD user attributes are used to authenticate the end user. These four SAML attributes are expected to be present in the SAML assertion and populated using AD user attributes. Simplified SAML refers to the fact that only the cip_upn SAML attribute is required for authentication to succeed.
| AD Attribute | Default Attribute Name in the SAML Assertion |
|---|---|
| userPrincipalName | cip_upn |
| cip_email | |
| objectSID | cip_sid |
| objectGUID | cip_oid |
The other three AD user attributes objectSID, objectGUID, and mail required for authentication are obtained using the Citrix Cloud connectors joined to the AD domain where the AD shadow account exists. They no longer need to be included in the SAML assertion during a SAML sign-in flow for Workspace or Citrix Cloud.
| AD Attribute | Default Attribute Name in the SAML Assertion |
|---|---|
| userPrincipalName | cip_upn |
Important:
It is still necessary to send the displayName for all SAML flows including Simplified SAML. The displayName is required by the Workspace UI to correctly show the Workspace user’s full name.
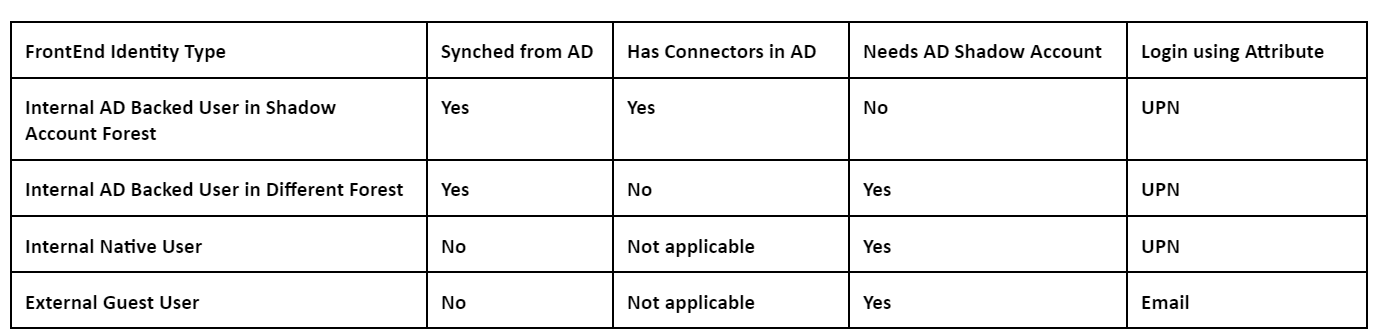
What is a native SAML user identity?
A native SAML user is a user identity that only exists within your SAML provider directory, e.g. Entra ID or Okta. These identities do not contain on-prem user attributes as they are not created via AD synching tools like Entra ID Connect. They require matching AD backend shadow accounts to be able to enumerate and launch DaaS resources, the native SAML user must be mapped to a corresponding account within Active Directory.

What is an AD backed SAML user identity?
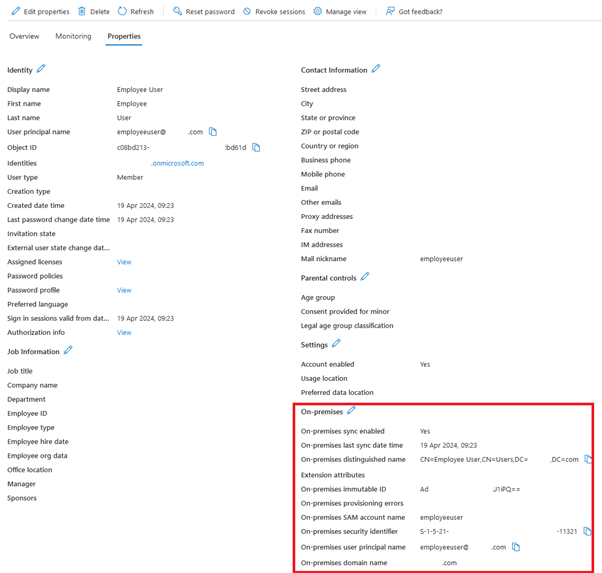
An AD backed SAML user is a user identity that exists within your SAML provider directory like Entra ID or Okta and also within your on premise AD forest. These identities contain on-prem user attributes as they are created via AD synching tools like Entra ID Connect. AD backend shadow accounts are not required for these users as they contain on premise SIDs and OIDs and so can enumerate and launch DaaS resources.

What is a FrontEnd Identity?
A frontend identity is the identity used to sign-in to both the SAML provider and Workspace. Frontend identities have different user attributes depending on how they were created within the SAML provider.
- Native SAML user identity
- AD backed SAML user identity
Your SAML provider may have a mixture of these two types of identities. For example, if you have both contractors and permanent employees within your identity platform, the Simplified SAML will work for both types of Frontend identities but is only mandatory if you have some accounts that are of type native SAML user identity.
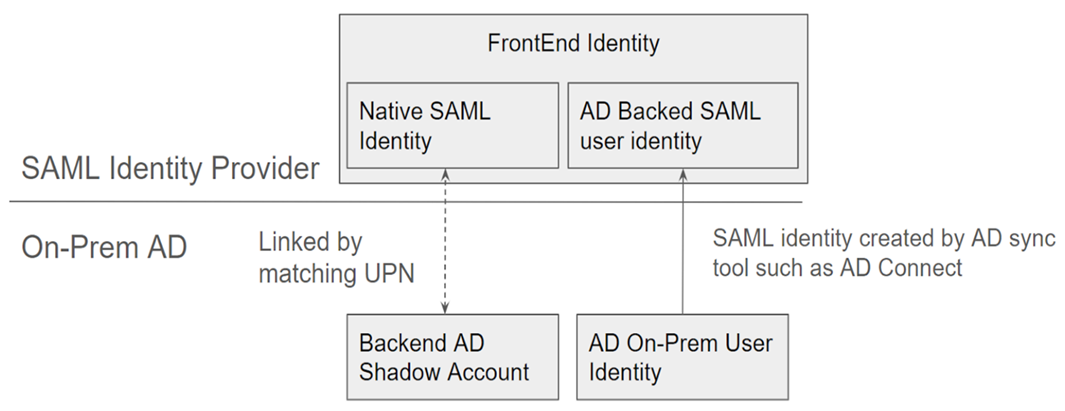
What is a Backend AD shadow account?
A backend AD shadow account is an AD account used by DaaS, which is mapped to a corresponding frontend identity within your SAML provider.
Why are Backend AD shadow accounts needed?
In order to enumerate DaaS or CVAD resources published using AD domain joined VDAs, AD accounts within the Active Directory forest that the VDAs are joined to are required. Map resources within your DaaS delivery group to shadow account users, and to AD groups containing shadow accounts within the AD domain which you joined your VDAs to.
Important:
Only native SAML users with no AD Domain attributes require matching AD shadow accounts. If your FrontEnd Identities are imported from Active Directory then you do not need to use Simplified SAML, and do not need to create Backend AD shadow accounts.
How do we link the FrontEnd Identity to the corresponding Backend AD shadow account?
The method used to link the FrontEnd identity and the Backend identity is by using matching UPNs. The two linked identities should have identical UPNs so that Workspace can tell that they represent the same end user that needs to sign in to Workspace, and to enumerate and launch DaaS resources.
Is Citrix FAS needed for Simplified SAML?
Yes. FAS is required for SSON to the VDA during launch when using any federated authentication method to sign in to Workspace.
What is the “SID mismatch problem” and when can it occur?
The “SID mismatch problem” is caused when the SAML assertion contains a SID for a FrontEnd user, which does not match the SID of the AD Shadow Account user. This can happen when the account signing into your SAML provider has an on premise SID, which is not the same as the shadow account user’s SID. This can only occur when the Frontend identity is provisioned by AD synchronisation tools like Entra ID Connect and from a different AD Forest than where the shadow account was created.
Simplified SAML prevents the “SID mismatch problem” from occurring. The correct SID is always fetched for the shadow account user via the Citrix Cloud connectors joined to the backend AD domain. The shadow account user lookup is performed using the UPN of the FrontEnd user, which is then matched to its corresponding backend shadow account user.
Example of the SID Mismatch Problem:
FrontEnd user was created by Entra ID Connect and is synced from AD forest 1.
S-1-5-21-000000000-0000000000-0000000001-0001
Backend shadow account user was created within AD forest 2 and mapped to DaaS resources
S-1-5-21-000000000-0000000000-0000000002-0002
The SAML assertion contains all four cip_* attributes and cip_sid contains the value S-1-5-21-000000000-0000000000-0000000001-0001, which does not match the shadow account’s SID and triggers an error.
Configure Simplified SAML using Entra ID for external guest accounts
- Sign-in to the Azure portal.
- From the portal menu, select Entra ID.
- From the left pane, under Manage, select Enterprise Applications.
- Select Create your own application.
-
Enter a suitable name for the SAML application such as
Citrix Cloud SAML SSO Production Simplified SAML.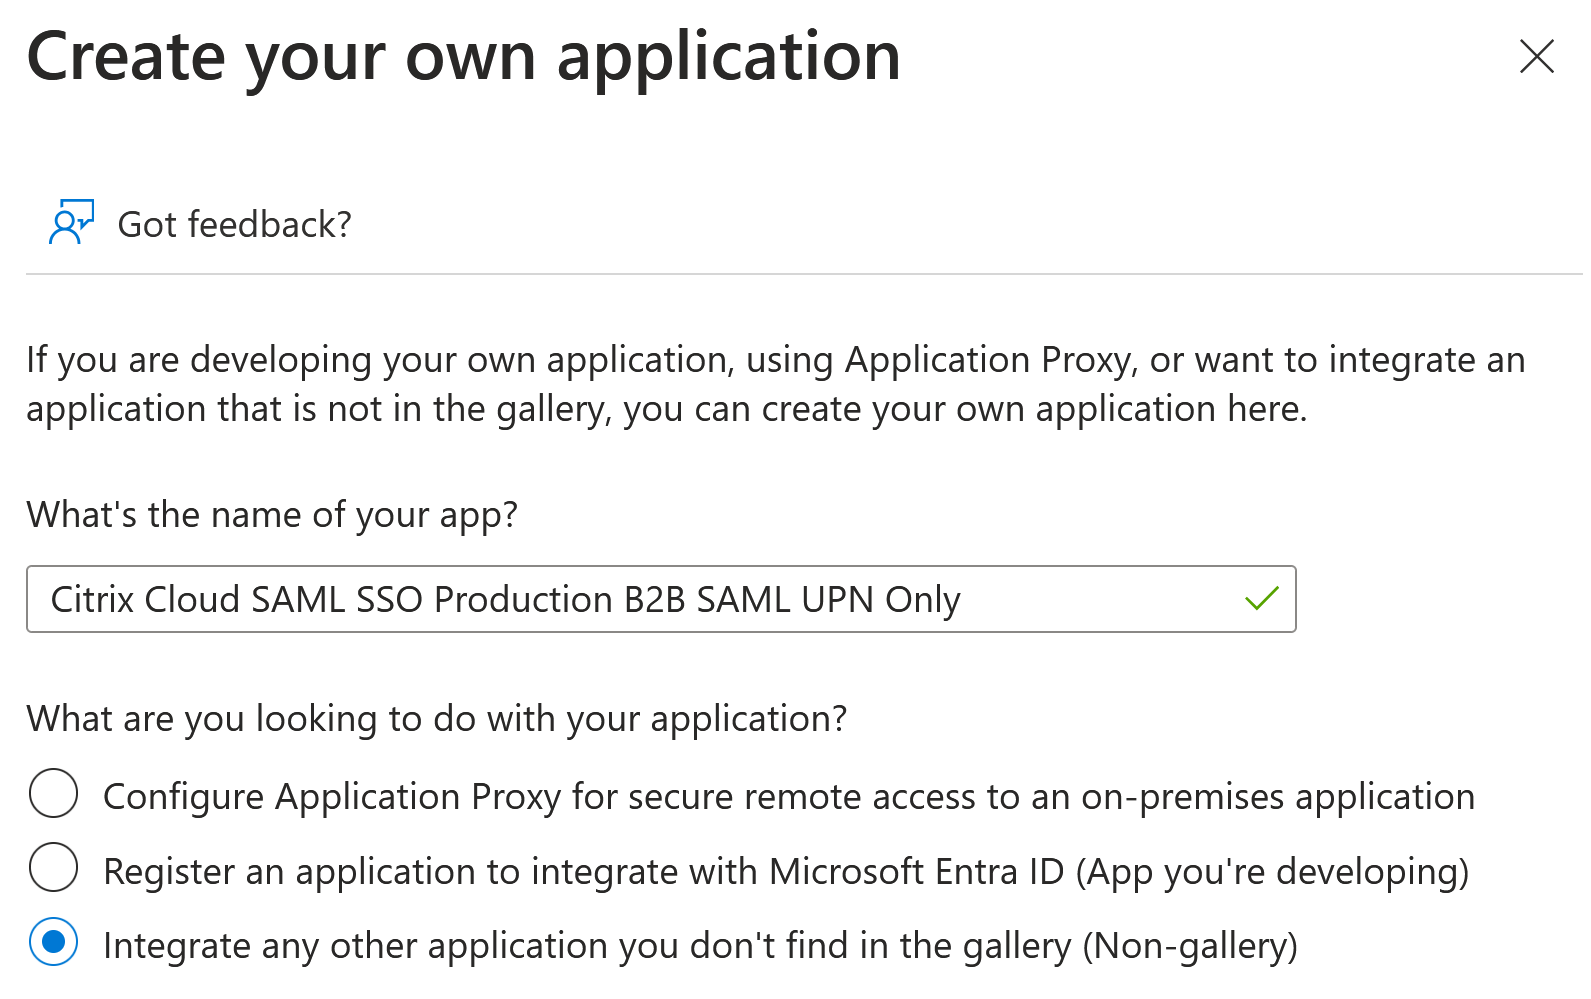
- From the left navigation pane, select Single sign-on and from the working pane, click SAML.
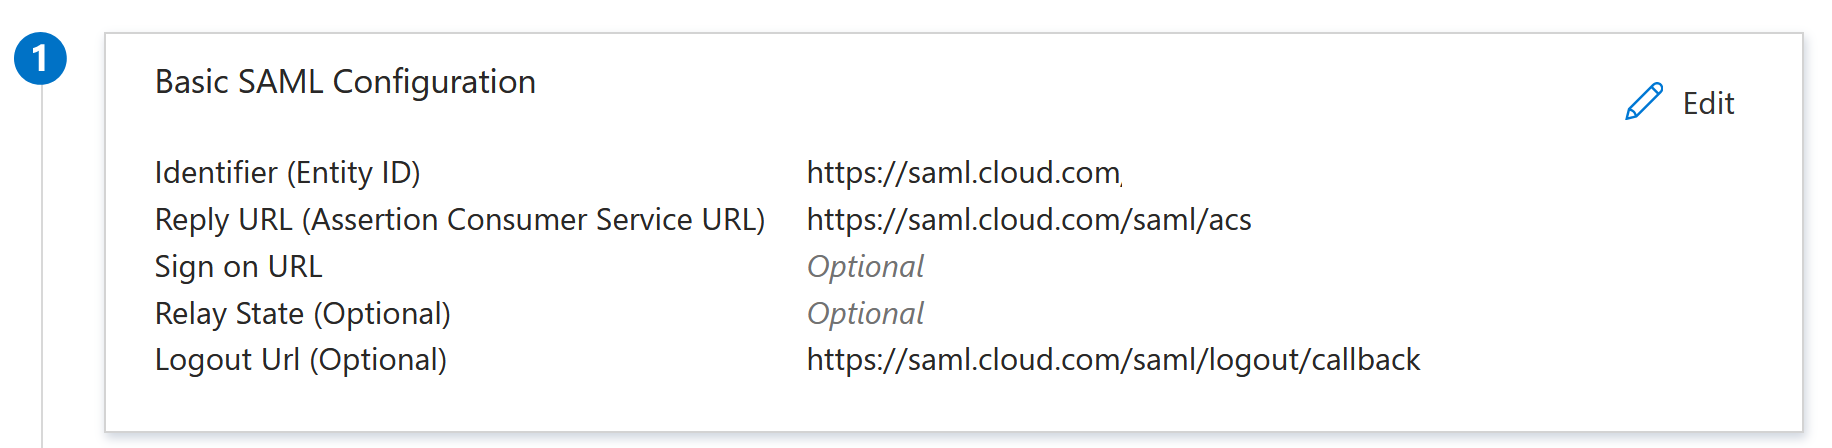
- In the Basic SAML Configuration section, click Edit and configure the following settings:
- In the Identifier (Entity ID) section, select Add identifier and then enter the value associated with the region in which your Citrix Cloud tenant is located:
- For Europe, United States, and Asia-Pacific South regions, enter
https://saml.cloud.com. - For the Japan region, enter
https://saml.citrixcloud.jp. - For the Citrix Cloud Government region, enter
https://saml.cloud.us.
- For Europe, United States, and Asia-Pacific South regions, enter
- In the Reply URL (Assertion Consumer Service URL) section, select Add reply URL and then enter the value associated with the region in which your Citrix Cloud tenant is located:
- For Europe, United States, and Asia-Pacific South regions, enter
https://saml.cloud.com/saml/acs. - For the Japan region, enter
https://saml.citrixcloud.jp/saml/acs. - For the Citrix Cloud Government region, enter
https://saml.cloud.us/saml/acs.
- For Europe, United States, and Asia-Pacific South regions, enter
- In the Sign on URL section, enter your Workspace URL.
- In the Logout URL (Optional) section, enter the value associated with the region in which your Citrix Cloud tenant is located:
- For Europe, United States, and Asia-Pacific South regions, enter
https://saml.cloud.com/saml/logout/callback. - For the Japan region, enter
https://saml.citrixcloud.jp/saml/logout/callback. - For the Citrix Cloud Government region, enter
https://saml.cloud.us/saml/logout/callback.
- For Europe, United States, and Asia-Pacific South regions, enter
-
From the command bar, click Save. The Basic SAML Configuration section appears as follows:
- In the Identifier (Entity ID) section, select Add identifier and then enter the value associated with the region in which your Citrix Cloud tenant is located:
-
In the Attributes & Claims section, click Edit to configure the following claims. These claims appear in the SAML assertion within the SAML response. After SAML app creation, configure the following attributes.
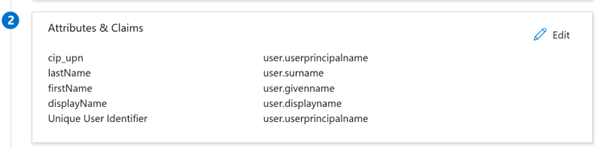
- For the Unique User Identifier (Name ID) claim, leave the default value of
user.userprincipalname. - For cip_upn claim, leave the default value of
user.userprincipalname. - For displayName, leave the default value of
user.displayname. -
In the Additional claims section, for any remaining claims with the
http://schemas.xmlsoap.org/ws/2005/05/identity/claimsnamespace, click the ellipsis (…) button and click Delete. No need to include these claims as they are duplicates of the above user attributes.When finished, the Attributes & Claims section appears as illustrated below:
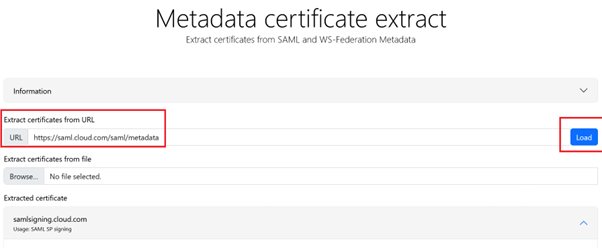
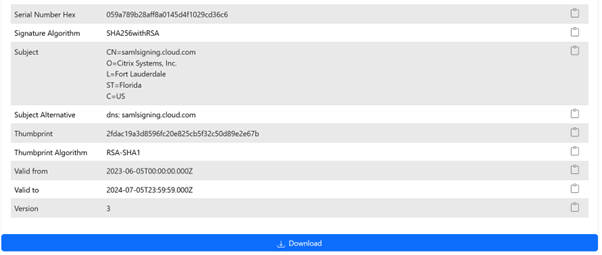
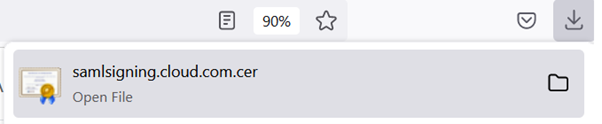
- Obtain a copy of the Citrix Cloud SAML signing certificate using this third party online tool.
- Enter
https://saml.cloud.com/saml/metadatain the URL field and click Load.
- For the Unique User Identifier (Name ID) claim, leave the default value of
-
Scroll to the bottom of the page and click Download.
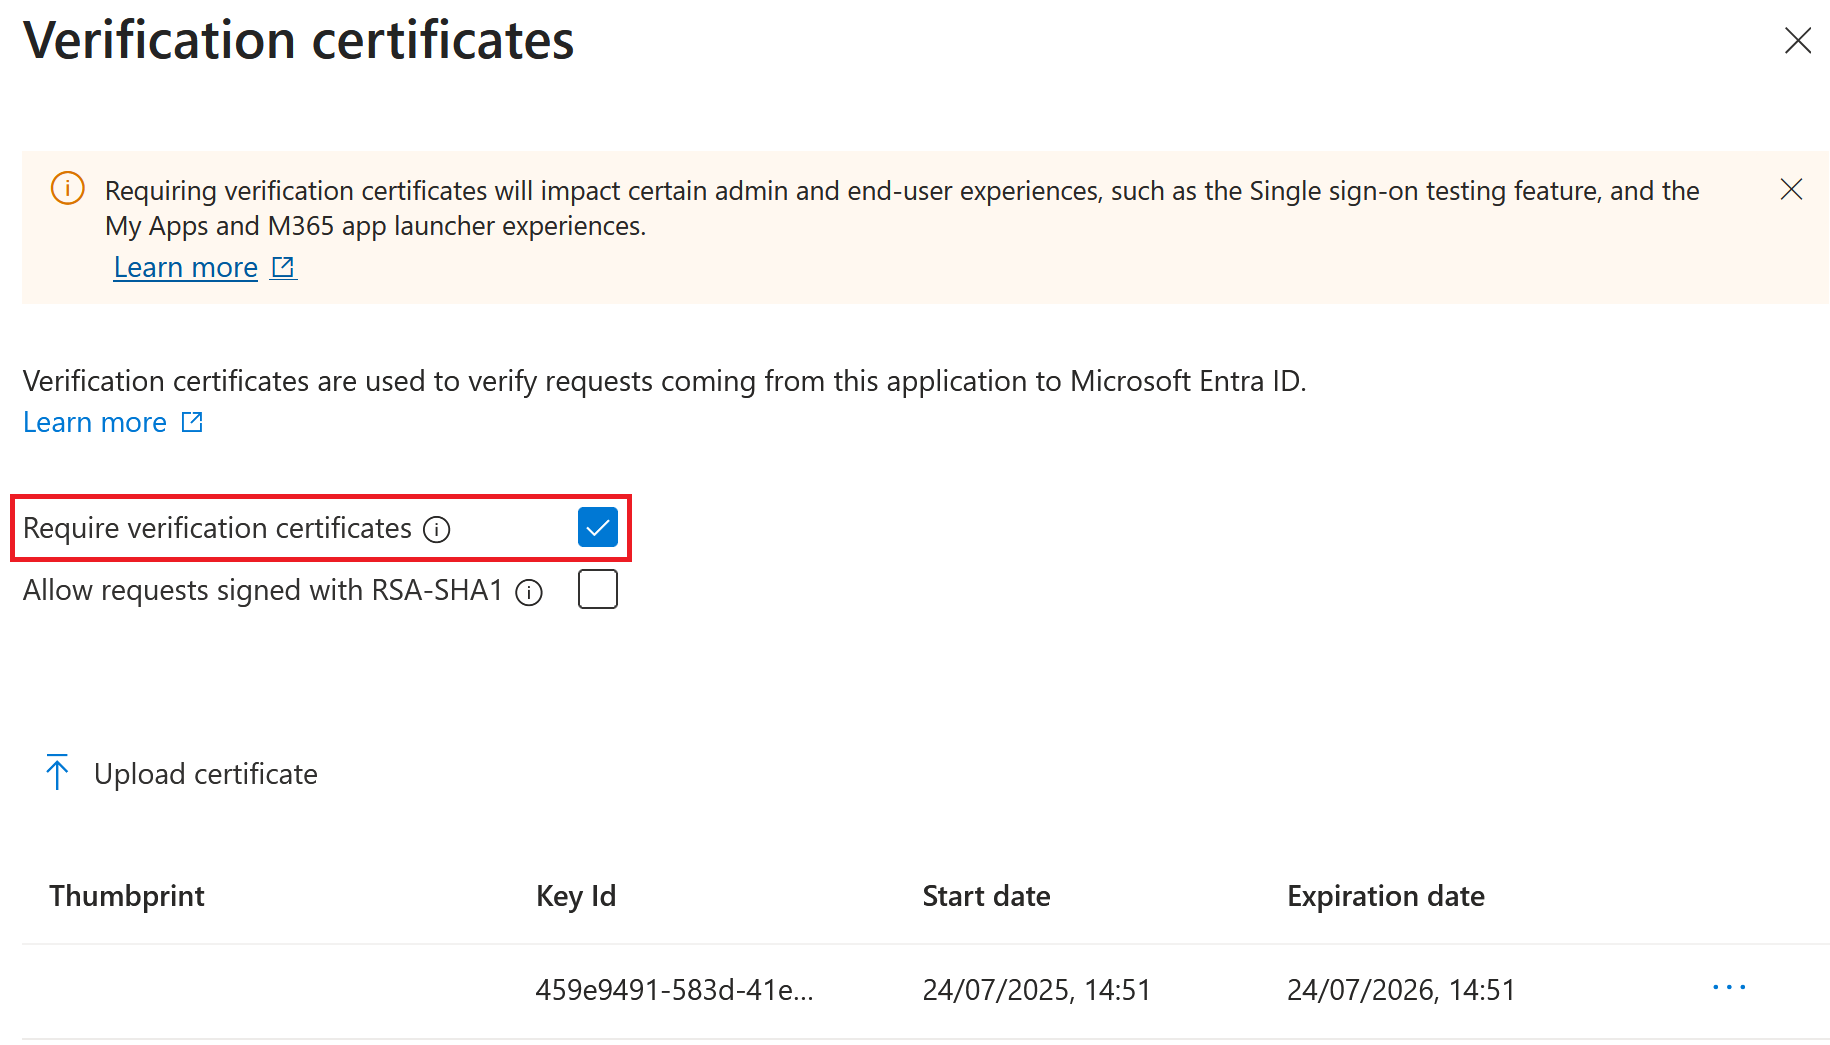
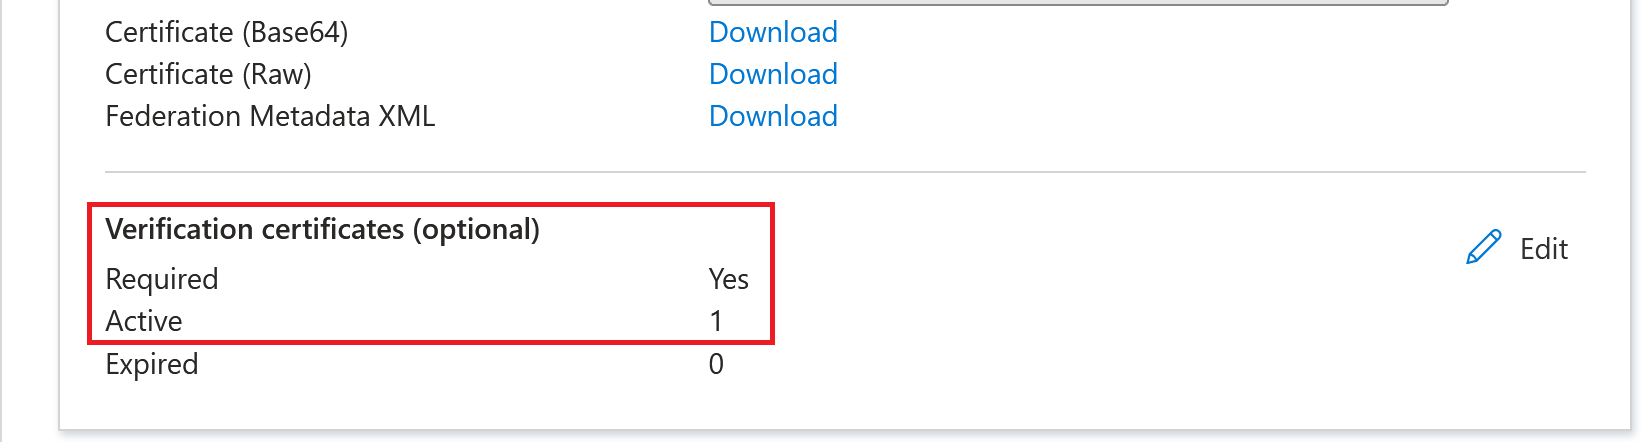
- Configure the Azure Active Directory SAML application Signing Settings.
- Upload the production SAML signing certificate obtained in step 10 within the Azure Active Directory SAML application
- Enable Require verification certificates.
Configure the Citrix Cloud Simplified SAML Connection
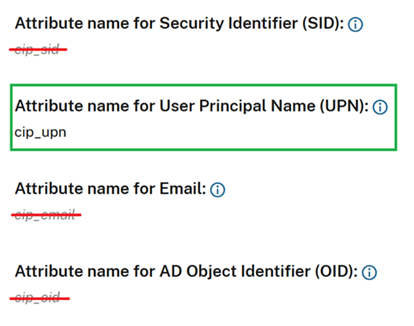
By default, Citrix Cloud will expect cip_upn, cip_email, cip_sid and cip_oid to be present in the SAML assertion and will fail the SAML sign-in if these attributes are not sent. To prevent this, remove the checks for these attributes when you create your new SAML connection.
- Create a new SAML connection using the default settings.
- Navigate to the SAML Attribute Mappings Configuration section at the bottom and make changes before saving the new SAML configuration.
- Remove the SAML attribute name from each of the cip_email, cip_sid, and cip_oid fields.
- Do not remove cip_upn from its field.
- Do not remove any other attributes from their respective fields. The displayName is still needed by the Workspace UI and should not be changed.
Configure your AD Shadow Account Resource Location and Connectors
A resource location and connector pair within the backend shadow account AD forest are required. Citrix Cloud requires connectors within this AD forest to look up shadow account user identities and attributes such as cip_email, cip_sid, and cip_oid when only cip_upn is provided directly within the SAML assertion.
-
Create a new Resource Location which will contain Citrix Cloud connectors joined to the backend shadow account AD forest.

- Name the Resource Location to match the AD forest, which contains the backend AD shadow accounts you wish to use.
- Configure a pair of Citrix Cloud connectors within the newly created resource location.
For example
ccconnector1.shadowaccountforest.com
ccconnector2.shadowaccountforest.com
Configure FAS within the Backend AD Forest
Contractor Frontend users will definitely require FAS. During DaaS launches contractor users will not be able to manually enter windows credentials to complete the launch as they will likely not know the AD shadow account password.
- Configure one or more FAS servers within the backend AD forest where your shadow accounts were created.
- Link the FAS servers to the same Resource Location that contains a pair of Citrix Cloud connectors joined to the backend AD forest where your shadow accounts were created.

Configure alternative UPN Suffixes within your AD Domain
Important:
A UPN is not the same as the user’s email address. In many cases they are the same value for ease of use, but UPN and email have different internal uses and are defined in different active directory attributes.
The User Principal Name (UPN) suffix is part of the sign-on name in AD. When you create a new account, it will use the implicit UPN suffix of your AD forest by default such as yourforest.com. You will need to add a matching alternative UPN suffix for every external FrontEnd user you wish to invite into your Okta or Azure AD tenants.
For example, if you invite an external user “contractoruser@hotmail.co.uk” and you wish to associate this with a backend AD shadow account “contractoruser@yourforest.com” then add “yourforest.com” as an ALT UPN Suffix within your AD forest.
Add Alternative UPN Suffixes in Active Directory using Active Directory Domains and Trusts UI
- Sign in to a domain controller within your backend AD forest.
- Open the Run dialog, and then type in
domain.msc, and then click OK. - On the Active Directory Domains and Trusts window, right-click Active Directory Domains and Trusts, and then select Properties.
-
On the UPN Suffixes tab, in the Alternative UPN Suffixes box, add an alternative UPN suffix, and then select Add.
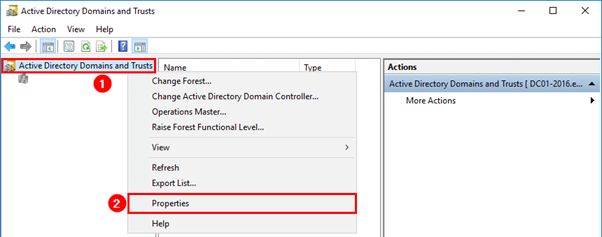
- Click OK.
Manage your Backend AD Forest’s UPN Suffixes using PowerShell
You may need to add a large number of new UPN suffixes to your backend AD forest in order to create the necessary shadow account UPNs. The number of alternative UPN suffixes you will be required to add to your backend AD forest will depend on how many different external users you choose to invite into your SAML Provider tenant.
Here is some PowerShell to achieve this if a large number of new alternative UPN suffixes need to be created.
# Get the list of existing ALT UPN suffixes within your AD Forest
(Get-ADForest).UPNSuffixes
# Add or remove ALT UPN Suffixes
$NewUPNSuffixes = @("yourforest.com","externalusers.com")
# Set action to "add" or "remove" depending on the operation you wish to perform.
$Action = "add"
foreach($NewUPNSuffix in $NewUPNSuffixes)
{
Get-ADForest | Set-ADForest -UPNSuffixes @{ $Action=$NewUPNSuffix }
}
## Configure an AD Shadow Account within your Backend AD Forest
1. Create a new AD shadow account user.
1. The AD forest implicit UPN such as `yourforest.local` is selected by default for new AD users. Select the appropriate alternative UPN suffix you created earlier. For example, select `yourforest.com` as the shadow account user’s UPN Suffix.
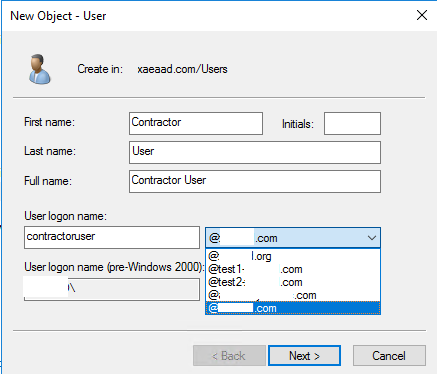
The shadow account user’s UPN can also be updated through PowerShell.
<!--NeedCopy-->
Set-ADUser "contractoruser" -UserPrincipalName "contractoruser@yourforest.com"
```
- The shadow account user’s UPN should exactly match the external FrontEnd identity user’s UPN.
- Test the FrontEnd user’s sign in to Workspace.
- Verify all expected resources are enumerated in Workspace after the sign-in has succeeded. Resources mapped to the AD shadow account should appear.
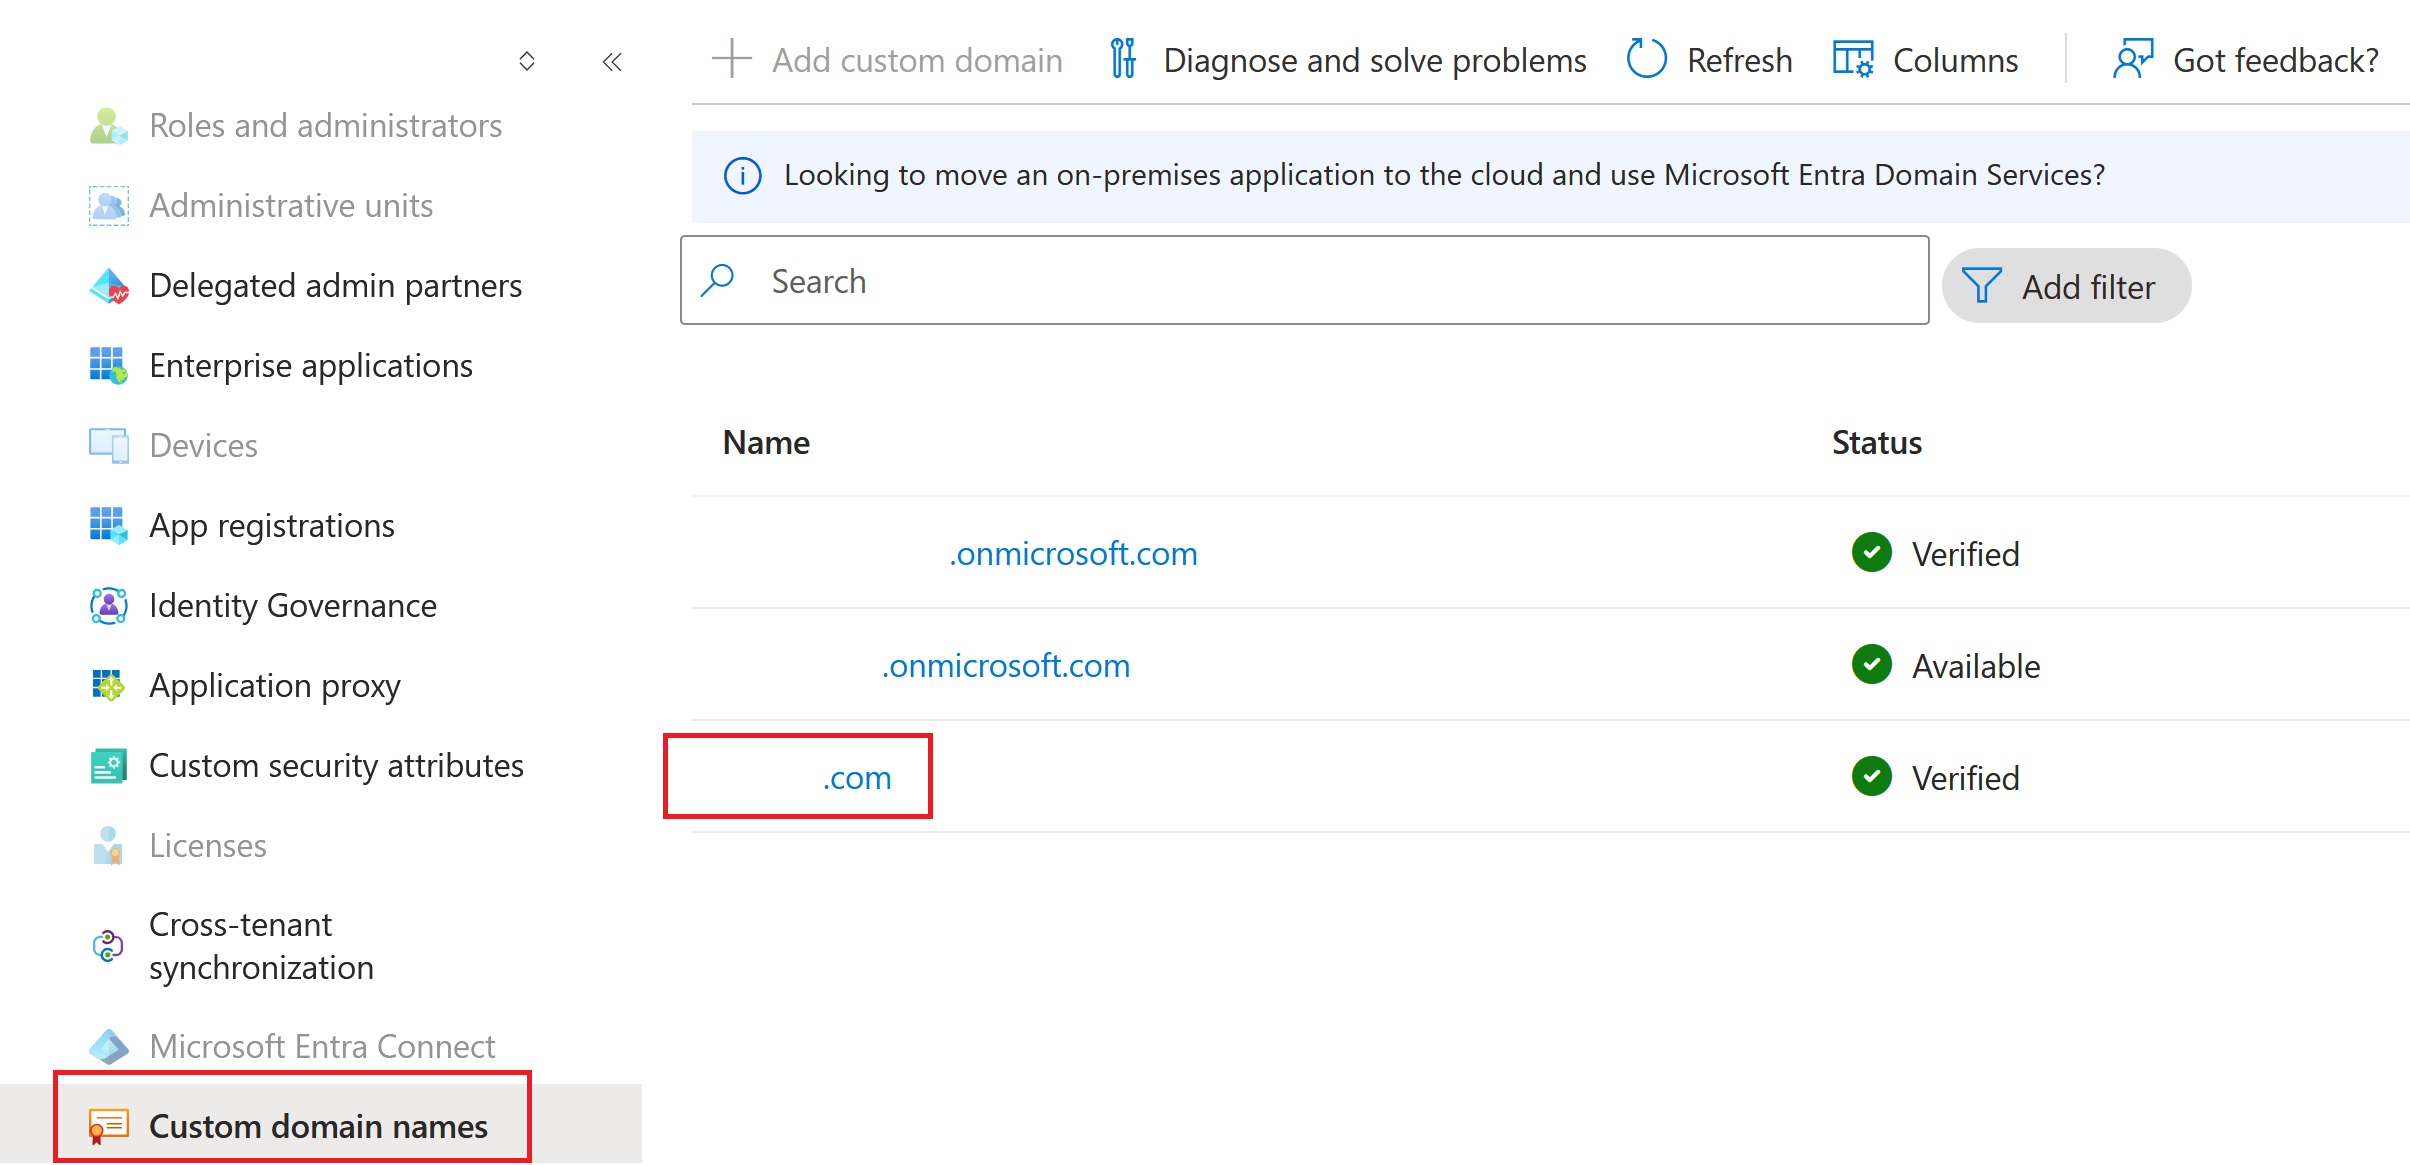
Configure the Guest Entra ID User UPN to match the AD Shadow Account UPN
When external guest users are invited to an Entra ID tenant, an auto generated UPN is created indicating that the user is external. The external Entra ID user will be automatically assigned the @Entra IDtenant.onmicrosoft.com UPN suffix, which is unsuitable for use with simplified SAML and will not match your AD shadow account. This will need to be updated to match an imported DNS domain within Entra ID and the alternative UPN suffix you created within your AD forest.
-
Import a Custom Domain into Entra ID that matches the alternative UPN suffix you added to your AD forest.
-
Invite a guest user such as
contractoruser@hotmail.co.ukand ensure the invited gues user accepts the Microsoft invitation to the Entra ID tenant.Example external guest user UPN format generated by Microsoft.
contractoruser_hotmail.co.uk#EXT#@yourEntra IDtenant.onmicrosoft.com
Important:
Citrix Cloud and Workspace cannot use UPNs containing the # character for SAML authentication.
-
Install the necessary Azure PowerShell Graph modules to allow you to manage Entra ID users.
Install-Module -Name "Microsoft.Graph" -Force Get-InstalledModule -Name "Microsoft.Graph" -
Sign in to your Entra ID tenant using a global admin account and with the
Directory.AccessAsUser.Allscope.Important:
If you use a less privileged account or do not specify the
Directory.AccessAsUser.Allscope you will not be able to complete Step 4 and update the Guest user’s UPN.$GuestUserId = (Get-MgUser -UserId "contractoruser_hotmail.co.uk#EXT#@yourentraidtenant.onmicrosoft.com").Id Update-MgUser -UserId $GuestUserId -UserPrincipalName "contractoruser@your.com" -
Get the entire list of external guest users within your Entra ID tenant (optional).

Get-MgUser -filter \"userType eq 'Guest'\" | Select Id,DisplayName,UserPrincipalName,Mail -
Get the Guest user identity that needs its UPN updated and then update its UPN suffix.
$GuestUserId = (Get-MgUser -UserId "contractoruser_hotmail.co.uk#EXT#@yourEntra IDtenant.onmicrosoft.com").Id Update-MgUser -UserId $GuestUserId -UserPrincipalName "contractoruser@yourforest.com" -
Check the Guest user identity can be found using its newly updated UPN.
Get-MgUser -UserId "contractoruser@yourforest.com"
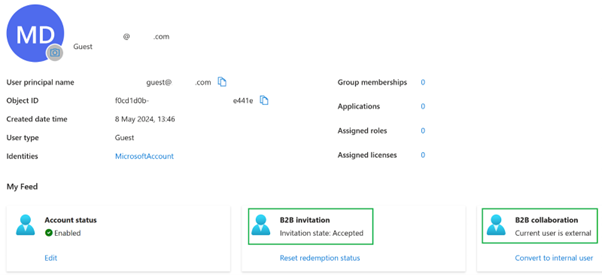
Testing the Simplified SAML Solution
Once all documented steps have been completed in AD, Citrix Cloud and your SAML provider then you need to test the sign-in and verify that the correct list of resources are shown for the guest user within Workspace.
Citrix recommends the use of the SAML-tracer browser extension for all SAML debugging. This extension is available for most common web browsers. The extension decodes Base64-encoded requests and responses into SAML XML, which renders them human-readable.

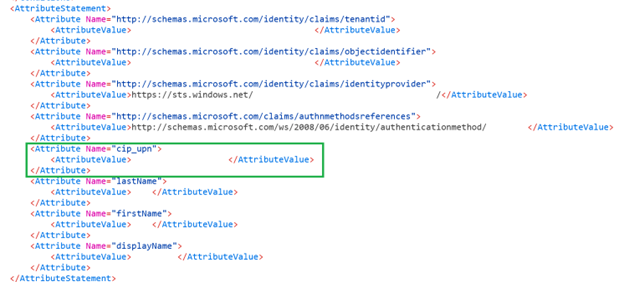
Example of a Simplified SAML assertion using just cip_upn for authentication captured using SAML tracer.
-
Map the correct DaaS resources to AD backed and shadow account users or groups that contain them.
-
Start the SAML tracer browser extension and capture the entire logon and logoff flow.
-
Log into Workspace using the attribute specified in the table for the frontend user type you wish to test.
Guest Entra ID user logon: The contractor user you invited to your Entra ID tenant as a guest user has the email address
contractoruser@hotmail.co.uk.Enter the guest user’s email address when prompted by Entra ID.
OR
AD backed Entra ID user/Native Entra ID user logon: These Entra ID users will have UPNs in the format of
adbackeduser@yourforest.comornativeuser@yourforest.com.Enter the user’s UPN when prompted by Entra ID.
-
Check the assertion only contains the cip_upn attribute for authentication and that it also contains the displayName attribute required by the Workspace UI.
-
Check the user can see the required DaaS resources in the UI.
Troubleshooting the Simplified SAML Solution
Missing cip_* Attribute Errors
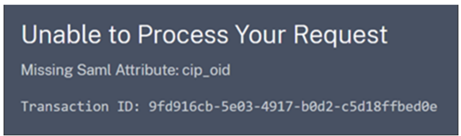
Cause 1: The SAML attribute is not present in the SAML assertion but Citrix Cloud is configured to expect to receive it. You have failed to remove the unnecessary cip_* attributes from the Citrix Cloud SAML connection within the SAML Attributes section. Disconnect and reconnect SAML to remove references to the unnecessary cip_* attributes.
Cause 2: This error can also occur if there is no corresponding AD shadow account for the Citrix Cloud connectors to look up in your backend AD forest. You may have correctly configured the frontend identity but the backend AD shadow account identity with a matching UPN does not exist or cannot be found.
Logon succeeds but no DaaS resources are shown after the user has logged into Workspace
Cause: This is most likely caused by incorrect frontend to backend identity UPN mappings.
Ensure the 2 UPNs for the frontend and backend identities exactly match and represent the same end user that is logging into Workspace. Check that the DaaS delivery group contains mappings to the correct AD shadow account users or AD groups that contain them.
During Launch of DaaS Resources FAS SSON to the AD domain joined VDAs is failing
When attempting to launch DaaS resources the Workspace end user is prompted to enter their windows credentials within the GINA. Also Event ID 103 is appearing within the windows event logs on your FAS servers.
[S103] Server [CC:FASServer] requested UPN [frontenduser@yourforest.com] SID S-1-5-21-000000000-0000000000-0000000001-0001, but lookup returned SID S-1-5-21-000000000-0000000000-0000000001-0002. [correlation: cc#967472c8-4342-489b-9589-044a24ca57d1]
Cause: Your simplified SAML deployment is suffering from the “SID mismatch problem”. You have frontend identities which contain SIDs from an AD forest which is different from the backend shadow account AD forest.
Do not send cip_sid in the SAML assertion.
Logon fails for AD Backed Users when the same UPN suffix exists in multiple connected AD forests
Citrix Cloud has multiple resource locations and connectors joined to different AD forests. Logon fails when AD backed users imported into Entra ID from a different AD forest than the shadow accountAD forest are used.
AD Forest 1 is synched to Entra ID to create frontend users with UPNs such as frontenduser@yourforest.com.
AD Forest 2 contains the backend shadow accounts with UPNs such as frontenduser@yourforest.com.
Cause: Your simplified SAML deployment is suffering from the “UPN ambiguity problem”. Citrix Cloud cannot determine which connectors to use to look up the user’s backend identity.
Do not send cip_sid in the SAML assertion.
Your user’s UPN exists in more than one AD forest connected to Citrix Cloud.
```
In this article
- Prerequisites
- FAQ
- Configure Simplified SAML using Entra ID for external guest accounts
- Configure the Citrix Cloud Simplified SAML Connection
- Configure your AD Shadow Account Resource Location and Connectors
- Configure FAS within the Backend AD Forest
- Configure alternative UPN Suffixes within your AD Domain
- Configure the Guest Entra ID User UPN to match the AD Shadow Account UPN
- Testing the Simplified SAML Solution
- Troubleshooting the Simplified SAML Solution