Configure a SAML application with a scoped Entity ID in Citrix Cloud™
This article describes how to provision multiple SAML applications within the same SAML provider.
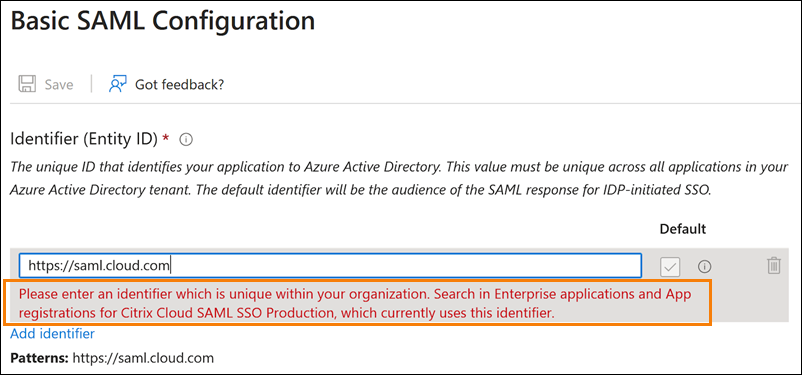
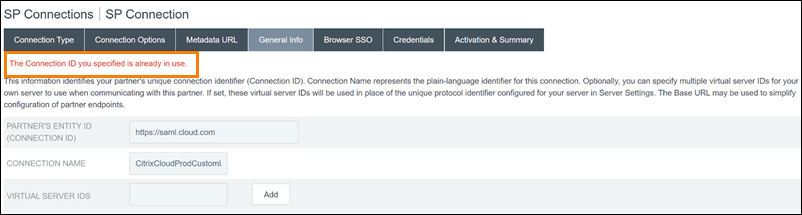
Some SAML providers, such as Microsoft Entra ID (ME-ID), Active Directory Federation Services (ADFS), PingFederate, and PingSSO, prohibit reusing the same Service Provider (SP) Entity ID within multiple SAML applications. As a result, administrators who create two or more different SAML applications within the same SAML provider can’t link them to the same, or differing, Citrix Cloud tenants. Attempting to create a second SAML application using the same SP Entity ID, such as https:\\saml.cloud.com, when an existing SAML application is already using it triggers an error at the SAML provider, indicating the Entity ID is already in use.
The following images illustrate this error:
-
In Microsoft Entra ID:
-
In PingFederate:
The scoped Entity ID feature in Citrix Cloud addresses this limitation so you can create more than one SAML application within the SAML provider (such as an Microsoft Entra ID tenant) and link it to a single Citrix Cloud tenant.
What is an Entity ID?
A SAML Entity ID is a unique identifier that is used to identify a specific entity in the SAML authentication and authorization protocol. Typically, the Entity ID is a URL or URI that’s assigned to the entity and used in SAML messages and metadata. Each SAML application that you create within your SAML provider is considered a unique entity.
Within a SAML connection between Citrix Cloud and Microsoft Entra ID, for example, Citrix Cloud is the Service Provider (SP) and Microsoft Entra ID is the SAML provider. Both have an Entity ID that must be configured on the opposite side of the SAML connection. This means Citrix Cloud’s Entity ID must be configured within Microsoft Entra ID, and Microsoft Entra ID’s Entity ID must be configured within Citrix Cloud.
The following Entity IDs are examples of a generic Entity ID and a scoped Entity ID in Citrix Cloud:
- Generic:
https://saml.cloud.com - Scoped:
https://saml.cloud.com/67338f11-4996-4980-8339-535f76d0c8fb
Generic and scoped SP Entity IDs by region
Existing SAML connections in Citrix Cloud (created before November 2023) use the same generic Entity ID for each SAML connection and Citrix Cloud tenant. Only new Citrix Cloud SAML connections provide the option of using a scoped Entity ID.
If you elect to use scoped Entity IDs for new connections, any existing SAML connections continue to function using their original generic Entity IDs.
The following table lists the generic and scoped SP Entity IDs for each Citrix Cloud region:
| Citrix Cloud region | Generic SP Entity ID | Scoped Entity ID |
|---|---|---|
| United States, European Union, Asia Pacific-South | https://saml.cloud.com |
https://saml.cloud.com/67338f11-4996-4980-8339-535f76d0c8fb |
| Japan | https://saml.citrixcloud.jp |
https://saml.citrixcloud.jp/db642d4c-ad2c-4304-adcf-f96b6aa16c29 |
| Government | https://saml.cloud.us |
https://saml.cloud.us/20f1cf66-cfe9-4dd3-865c-9c59a6710820 |
Generating unique SP Entity IDs for new and existing SAML connections
When you create a new SAML connection, Citrix Cloud generates a unique ID (GUID). To generate a scoped Entity ID, you enable the Configure scoped SAML Entity ID setting when you create the new connection.
If you want to update an existing SAML connection to use scoped Entity IDs, you must disconnect and then reconnect your SAML provider from the Identity and Access Management > Authentication page in Citrix Cloud. Citrix Cloud doesn’t allow you to edit existing SAML connections directly. However, you can clone the configuration and modify the clone.
Important:
Closing the SAML connection process before completing it discards the Entity ID that Citrix Cloud automatically generates. When you restart the SAML connection process, Citrix Cloud generates a new scoped Entity ID GUID. Use this new scoped Entity ID when you configure the SAML provider. If you’re updating an existing SAML connection to use scoped Entity IDs, you must update the SAML application for that connection with the scoped Entity ID that Citrix Cloud generates.
Frequently asked questions about scoped Entity IDs
Can I create more than one Microsoft Entra ID SAML application within the same Microsoft Entra ID tenant and link it to one or more Citrix Cloud tenants?
Citrix Cloud’s scoped Entity ID feature addresses the limitation of preventing duplicate Entity IDs that some SAML providers impose. With this feature, you can provision more than one SAML application within your Microsoft Entra ID tenant and configure each one with a scoped Entity ID from a single Citrix Cloud tenant.
Can I still link the same Microsoft Entra ID SAML application to multiple Citrix Cloud tenants?
This scenario is a common one among Citrix Cloud customers and Citrix continues to support it. To implement this scenario, you must meet the following requirements:
- Use a generic Entity ID, such as
https://saml.cloud.com. - Don’t enable scoped Entity IDs for your SAML connection.
How do I decide whether or not to use a scoped Entity ID within my SAML provider?
Scoped Entity IDs in Citrix Cloud offer the flexibility to use a generic or a scoped Entity ID, depending on your requirements. Consider the number of SAML applications you need and the number of Citrix Cloud tenants you have. Also, consider whether or not each tenant might share an existing SAML application or require its own scoped SAML application.
Important:
If your SAML provider already allows you to create multiple SAML applications with the same Entity ID (such as
https://saml.cloud.com), you don’t need to enable scoped Entity IDs or make any changes to your existing SAML configuration. You don’t need to update any settings either in Citrix Cloud or in your SAML application.
Affected SAML providers
The following table lists the SAML providers that allow or limit the use of duplicate Entity IDs.
| SAML Provider | Supports duplicate Entity IDs |
|---|---|
| Microsoft Entra ID (cloud) | No |
| ADFS (on-premises) | No |
| PingFederate (on-premises) | No |
| PingOneSSO (cloud) | No |
| Okta (cloud) | Yes |
| Duo (cloud) | Yes |
| OneLogin (cloud) | Yes |
Affected use cases
The following table indicates whether a generic or scoped Entity ID is supported based on the SAML applications that your use case requires and whether your SAML provider supports duplicate Entity IDs.
| Use case requirement | SAML provider supports duplicate Entity IDs? | Supported configuration |
|---|---|---|
| Only one SAML application | Yes | Generic or scoped Entity ID |
| Only one SAML application | No | Generic or scoped Entity ID |
| Two or more SAML applications | Yes | Generic or scoped Entity ID |
| Two or more SAML applications | No | Scoped Entity ID |
| store custom URL and SAML application pairs | Yes | Generic or scoped Entity ID |
| store custom URL and SAML application pairs | No | Scoped Entity ID |
| Link the same SAML application to multiple Citrix Cloud tenants | Yes | Generic Entity ID |
| Link the same SAML application to multiple Citrix Cloud tenants | No | Generic Entity ID |
Configure the primary SAML connection with a scoped Entity ID
In this task, you create a SAML connection in Citrix Cloud using a scoped Entity ID for the primary SAML application (SAML App 1).
- From the Citrix Cloud menu, select Identity and Access Management.
- On the Authentication tab, locate SAML 2.0 and select Connect from the ellipsis menu.
- When prompted to create your unique sign-in URL, enter a short URL-friendly identifier for your company (for example,
https://citrix.cloud.com/go/mycompany) and select Save and continue. This identifier must be unique across Citrix Cloud. - Under Configure SAML Identity Provider, select Configure scoped SAML Entity ID. Citrix Cloud automtically generates scoped Entity IDs and populates the fields for Entity ID, Assertion Consumer Service, and Logout URL.
- Under Configure a SAML Connection to Citrix Cloud, enter the connection details from your SAML provider.
- Accept the default SAML attribute mappings.
- Select Test and Finish.
Configure the primary SAML connection with a generic Entity ID
In this task, you create a SAML connection in Citrix Cloud using the default, generic Entity ID for the primary SAML application (SAML App 1).
- From the Citrix Cloud menu, select Identity and Access Management.
- On the Authentication tab, locate SAML 2.0 and select Connect from the ellipsis menu.
- When prompted to create your unique sign-in URL, enter a short URL-friendly identifier for your company (for example,
https://citrix.cloud.com/go/mycompany) and select Save and continue. This identifier must be unique across Citrix Cloud. - Under Configure SAML Identity Provider, verify that Configure scoped SAML Entity ID is disabled.
- Under Configure a SAML Connection to Citrix Cloud, enter the connection details from your SAML provider.
- In Service Provider SAML Metadata, click Download to acquire a copy of the generic SAML metadata, if needed.
- Accept the default SAML attribute mappings.
- Select Test and Finish.
Configure a SAML connection using Citrix® StoreFront Cloud custom domains
This section includes for configuring a SAML connection using a custom store URL with either a scoped or generic Entity ID.
The tasks in this section are applicable only if you have an existing custom store URL that you’re using with SAML. If you’re not using a custom store URL with SAML authentication, you can skip the tasks in this section.
For more information, refer to the following articles:
Configure a SAML connection with a store custom URL and a generic Entity ID
In this task, the Configure scoped Entity ID setting is disabled.
- From the Citrix Cloud menu, select Store Authentication.
- In Custom store URL, select Edit from the ellipsis menu.
- Select Use both [customerName].cloud.com URL and custom domain URL.
- Enter the generic Entity ID, SSO URL and optional SLO URL for SAML App 2 and upload the signing certificate that you downloaded earlier from your SAML provider.
- If needed, in Service Provider SAML Metadata for custom domain, click Download to acquire a copy of the generic SAML metadata for the store custom URL SAML application.
- Click Save.
Configure a SAML connection with a store custom URL and a scoped Entity ID
In this task, the Configure scoped Entity ID setting is enabled.
- From the Citrix Cloud menu, select Store Authentication.
- In Custom store URL, select Edit from the ellipsis menu.
- Select Use both [customerName].cloud.com URL and custom domain URL.
- Enter the scoped Entity ID, SSO URL, and optional SLO URL for SAML App 2 and upload the SAML signing certificate that you downloaded earlier from your SAML provider.
- Click Save.
After you save the configuration, Citrix Cloud generates the scoped SAML metadata containing the correct GUID. If needed, you can obtain a copy of the scoped metadata for the store custom URL SAML application.
- On the Identity and Access Management page, locate the SAML connection and select View from the ellipsis menu.
- In Service Provider SAML Metadata for custom domain, click Download.
View the SAML configuration of both the primary and custom store URL SAML applications
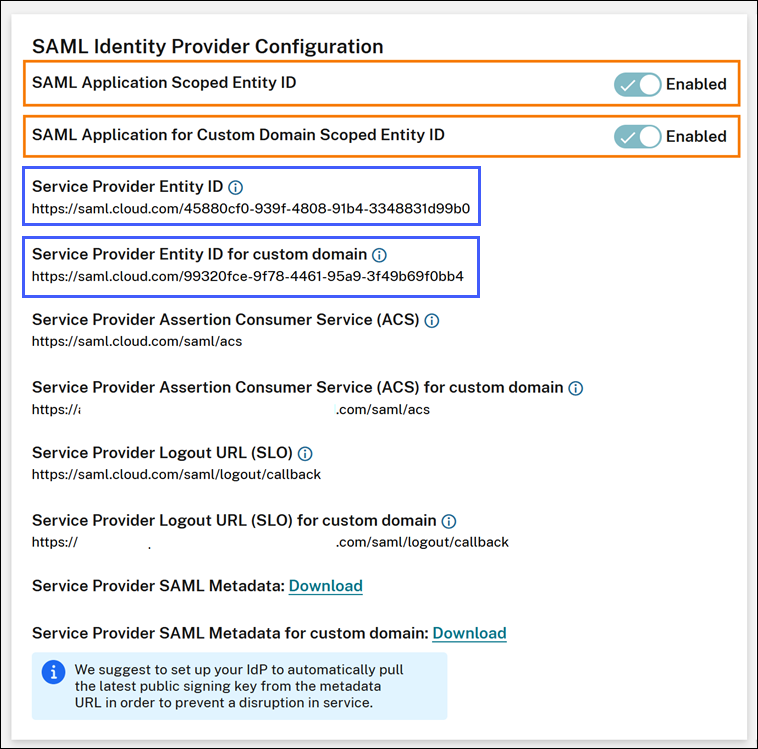
When viewing the configuration details for your scoped SAML connection, Citrix Cloud displays the scoped Entity ID settings for both the primary SAML application and the store custom domain SAML application.
For example, when scoped Entity IDs are enabled, the Service Provider Entity ID and Service Provider Entity ID for custom domain fields contain the scoped Entity IDs that Citrix Cloud generates.
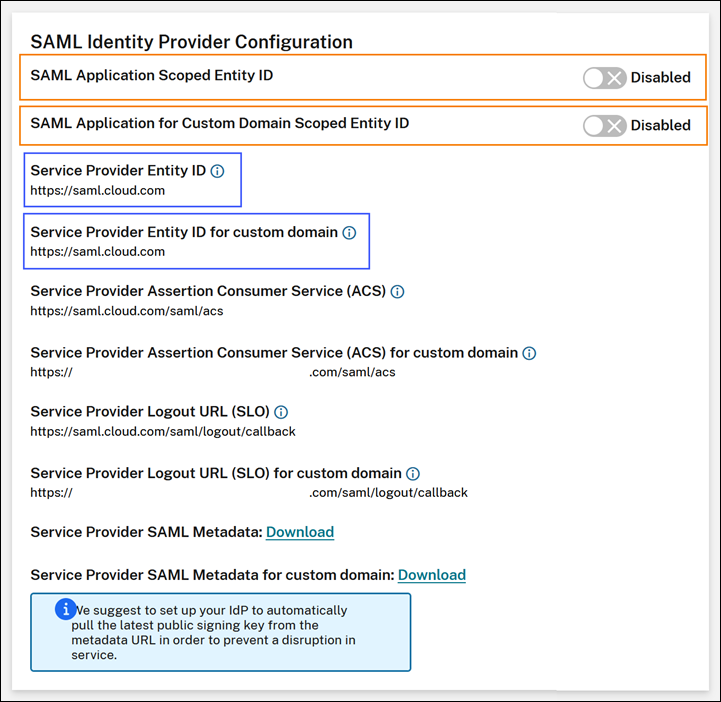
When scoped Entity IDs are disabled, the Service Provider Entity ID and Service Provider Entity ID for custom domain fields contain the generic Entity IDs.
You can update existing SAML applications within your SAML provider by appending the scoped Entity ID to the existing Entity ID value.
SAML provider configuration with scoped Entity IDs
After configuring the SAML connection in Citrix Cloud with scoped Entity IDs, you can add the scoped Entity ID to your SAML provider.
This section includes configuration examples from Microsoft Entra ID and PingFederate.
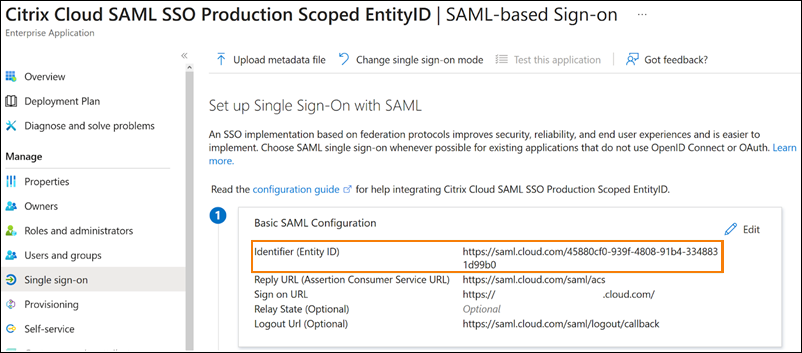
Microsoft Entra ID SAML configuration with scoped Entity ID
In this example, the scoped Entity ID from Citrix Cloud is entered in the Identifier field in Microsoft Entra ID.
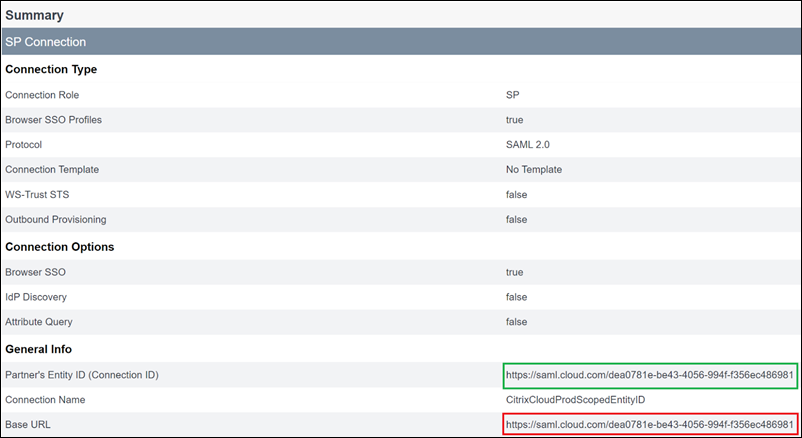
PingFederate SAML configuration with scoped Entity ID
In this example, the scoped Entity ID and the generic Entity ID from Citrix Cloud are populated in the Partner’s Entity ID field and the Base URL field, respectively.

Troubleshooting
Citrix recommends using the SAML-tracer browser extension to troubleshoot any issues with your SAML configuration. This extension decodes Base64-encoded requests and responses into SAML XML, rendering the information human-readable. You can use the SAML-tracer extension to examine both the SSO and SLO SAML requests that Citrix Cloud (the Service Provider) generates and sends to your SAML provider (the identity provider). The extension can show whether the Entity ID scope (GUID) is included in both requests.
- From the Extensions panel in your web browser, install and enable the SAML-tracer extension.
- Perform a SAML sign-in and sign-out operation and capture the entire flow with the SAML-tracer extension.
-
Locate the following line within either the SAML SSO request or SLO request.
<saml:Issuer xmlns:saml="urn:oasis:names:tc:SAML:2.0:assertion">https://saml.cloud.com/cfee4a86-97a8-49cf-9bb6-fd15ab075b92</saml:Issuer> <!--NeedCopy--> - Verify that the Entity ID matches the configured Entity ID in your SAML provider application.
- Verify that the scoped Entity ID is present in the Issuer field and verify that it’s configured correctly in your SAML provider.
- Export and save the SAML-tracer JSON output. If you’re working with Citrix Support to resolve an issue, upload the output to your Citrix support case.
Microsoft Entra ID troubleshooting
Issue: Signing out of Microsoft Entra ID fails when SLO is configured. Microsoft Entra ID displays the following error to the user:
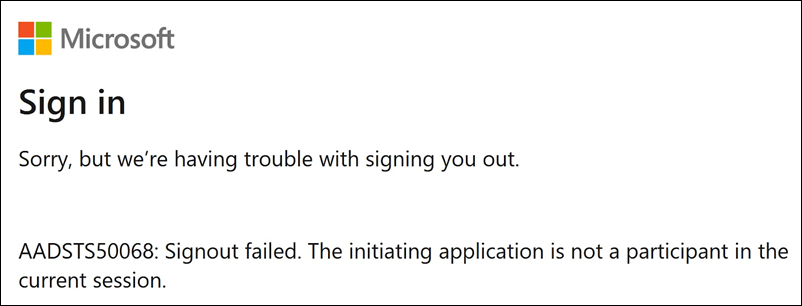
If scoped Entity IDs are enabled for the SAML connection in Citrix Cloud, the scoped Entity ID must be sent in both the SSO and SLO requests.
Cause: The scoped entity is configured but the Entity ID is missing from the SLO request. Verify the scoped Entity ID is present in the SLO request in the SAML-tracer output.
On-premises PingFederate troubleshooting
Issue: Signing in or signing out of PingFederate fails after enabling the scoped Entity ID setting.
Cause: The PingFederate administrator added the scoped Entity ID to the SP connection base URL.
To correct this issue, add the scoped Entity ID to the Partner’s EntityID field only. Adding the scoped Entity ID to the base URL results in a malformed SAML endpoint. If the Citrix Cloud base URL is incorrectly updated, all other SAML endpoint relative URLs that are derived from the base URL produce sign-in failures.
The following endpoints are examples of malformed Citrix Cloud SAML endpoints that might appear in the SAML-tracer output:
https://saml.cloud.com/<GUID>/saml/acshttps://saml.cloud.com/<GUID>/saml/logout/callback
The following image shows a misconfigured PingFederate SAML application. The correctly configured field is shown in green. The incorrectly configured field is shown in red.
In this article
- What is an Entity ID?
- Generic and scoped SP Entity IDs by region
- Generating unique SP Entity IDs for new and existing SAML connections
- Frequently asked questions about scoped Entity IDs
- Affected SAML providers
- Affected use cases
- Configure the primary SAML connection with a scoped Entity ID
- Configure the primary SAML connection with a generic Entity ID
- Configure a SAML connection using Citrix® StoreFront Cloud custom domains
- SAML provider configuration with scoped Entity IDs
- Troubleshooting