SAML using Azure AD and AAD identities for workspace authentication
This article describes how you can configure SAML for workspace authentication using Azure Active Directory (AD) identities instead of AD identities. Use this configuration if your Azure AD users can’t enumerate Windows 365 Cloud PCs or Azure AD domain-joined VDAs after signing in to Citrix Workspace™ with the default SAML behavior. After completing the configuration, your users can sign in to Citrix Workspace using SAML authentication to access both HDX apps and desktops through Citrix DaaS™ and Windows 365 Cloud PCs through Azure.
The default behavior for Citrix Cloud™ and SAML authentication to Citrix Workspace is to assert against an AD user identity. For the configuration described in this article, using Azure AD Connect to import your AD identities to your Azure AD is required. The AD identities contain the user’s SID, which Citrix Workspace can send to Citrix DaaS and allows the HDX resources to be enumerated and launched. Because the Azure AD version of users’ identities is used, users can also enumerate and launch Azure resources like Windows 365 Cloud PCs from within Citrix Workspace.
Important:
Enumeration refers to the list of resources that users see after they sign in to Citrix Workspace. The resources that a given user is allowed to access depends on their user identity and which resources are associated with that identity in Citrix DaaS. There is an associated article that provides instructions on utilizing Azure AD and AD identities as the SAML provider for authenticating into Workspace. You can find detailed instructions in SAML using Azure AD and AD identities for Workspace authentication
Feature scope
This article applies to users who use the following combination of Citrix Cloud and Azure features:
- SAML for workspace authentication
- Citrix DaaS and HDX™ resource enumeration of resources published using AD domain-joined VDAs
- Azure AD domain-joined VDA resource enumeration
- Azure hybrid domain-joined VDA resource enumeration
- W365 Cloud PC enumeration and launch
Important:
Do not use this AAD SAML flow for SAML login to Citrix Cloud as this requires the Citrix Cloud admin user to be a member of an AD group and therefore an AD user identity should be used. You can find detailed instructions in SAML using Azure AD and AD identities for Workspace authentication
What’s best: AD identities or Azure AD identities?
To determine whether your workspace users should authenticate using either SAML AD or SAML Azure AD identities:
- Decide which combination of resources you intend to make available to your users in Citrix Workspace.
-
Use the following table to determine which type of user identity is appropriate for each resource type.
Resource type (VDA) User identity when signing in to Citrix Workspace Needs SAML identity using Azure AD? FAS provides single sign-on (SSO) to VDA? AD joined AD, Azure AD imported from AD (contains SID) No. Use default SAML. Yes Hybrid joined AD, Azure AD imported from AD (contains SID) No. Use default SAML. Yes, for AD as an identity provider. FAS isn’t required if Azure AD is selected for VDA. Azure AD joined Azure AD native user, Azure AD imported from AD (contains SID) Yes, use SAML through Azure AD. No Windows 365 Cloud PCs Azure AD native user, Azure AD imported from AD (contains SID) Yes, use SAML through Azure AD. No AD joined, Azure AD joined, Windows 365 Cloud PCs Azure AD imported from AD (contains SID) Yes, use SAML through Azure AD. Yes, for AD joined. No, for Azure AD joined and Windows 365 Cloud PCs.
More information
- Citrix DaaS documentation:
- Citrix FAS documentation: Install and configure
- Microsoft Azure documentation: What is Azure AD Connect?
Requirements
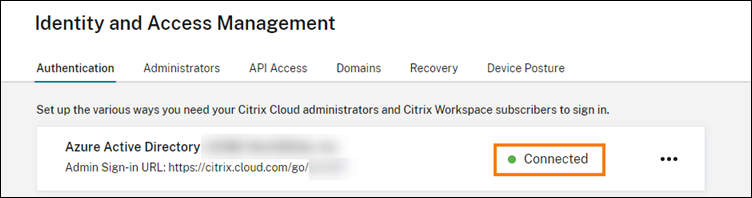
- Your Azure Active Directory tenant must be connected to your Citrix Cloud tenant. In the Citrix Cloud console, you can find your existing Azure AD connection by selecting Identity and Access Management > Authentication.
Or,
You can create a new Azure AD directory connection by selecting Identity and Access Management > Authentication –> Add an identity provider –> Select Azure Active Directory.
Important:
You must connect the same Azure Active Directory tenant where you intend to create the new SAML application which will use AAD identities.
- The workspace authentication method must be set to SAML 2.0. Don’t use Azure AD as the authentication method. To change the workspace authentication method, go to Workspace Configuration > Authentication in the Citrix Cloud console.
- The UPN suffix
@yourdomain.commust be imported and verified within Azure AD as a custom domain name. In the Azure portal, this is located under Azure Active Directory > Custom Domain Names. - Azure AD user identities must be imported from AD using Microsoft Azure AD Connect. This ensures user identities are correctly imported and have the correct UPN suffix. Azure AD users with
@yourtenant.onmicrosoft.comUPN suffixes aren’t supported. - Citrix FAS must be deployed and connected to the Citrix Cloud tenant and resource location. FAS provides single sign-on to HDX desktops and applications that are launched from Citrix Workspace. You don’t have to configure AD shadow accounts because the UPN
user@customerdomainfor both the AD and Azure AD user identities must match. FAS generates the necessary user certificates with the correct UPN and performs a smart card sign-in when HDX resources are launched.
Configure the custom Azure AD Enterprise SAML application
By default, the behavior for SAML sign-in to workspaces is to assert against an AD user identity. The cip_directory SAML attribute is a hardcoded string value that’s the same for all subscribers and acts as a switch. Citrix Cloud and Citrix Workspace detect this attribute during sign-in and trigger SAML to assert against the Azure AD version of the user identity. Using the azuread parameter with this attribute overrides the default SAML behavior, triggering the use of SAML in Azure AD instead.
Although the steps in this section are for Azure AD, you can create a similar SAML application using a different SAML 2.0 provider (for example, ADFS, Duo, Okta, OneLogin, PingOneSSO, and so on), provided you perform the same tasks. Your SAML provider must allow you to configure a hardcoded SAML attribute (cip_directory = azuread) within the SAML application. Simply create the same SAML attribute mappings as described in this section.
- Sign in to the Azure portal.
- From the portal menu, select Azure Active Directory.
- From the left pane, under Manage, select Enterprise Applications.
- From the command bar in the working pane, select New Application.
- From the command bar, select Create your own application. Don’t use the Citrix Cloud SAML SSO enterprise application template. The template doesn’t allow you to modify the list of claims and SAML attributes.
- Enter a name for the application and then select Integrate any other application you don’t find in the gallery (Non-gallery). Click Create. The application overview page appears.
- From the left pane, select Single sign-on. From the working pane, select SAML.
- In the Basic SAML Configuration section, select Edit and configure the following settings:
- In the Identifier (Entity ID) section, select Add identifier and then enter the value associated with the region in which your Citrix Cloud tenant is located:
- For European Union, United States, and Asia-Pacific South regions, enter
https://saml.cloud.com. - For the Japan region, enter
https://saml.citrixcloud.jp. - For the Citrix Cloud Government region, enter
https://saml.cloud.us.
- For European Union, United States, and Asia-Pacific South regions, enter
- In the Reply URL (Assertion Consumer Service URL) section, select Add reply URL and then enter the value associated with the region in which your Citrix Cloud tenant is located:
- For European Union, United States, and Asia-Pacific South regions, enter
https://saml.cloud.com/saml/acs. - For the Japan region, enter
https://saml.citrixcloud.jp/saml/acs. - For the Citrix Cloud Government region, enter
https://saml.cloud.us/saml/acs.
- For European Union, United States, and Asia-Pacific South regions, enter
- In the Logout URL (Optional) section, enter the value associated with the region in which your Citrix Cloud tenant is located:
- For European Union, United States, and Asia-Pacific South regions, enter
https://saml.cloud.com/saml/logout/callback. - For the Japan region, enter
https://saml.citrixcloud.jp/saml/logout/callback. - For the Citrix Cloud Government region, enter
https://saml.cloud.us/saml/logout/callback.
- For European Union, United States, and Asia-Pacific South regions, enter
- From the command bar, select Save.
- In the Identifier (Entity ID) section, select Add identifier and then enter the value associated with the region in which your Citrix Cloud tenant is located:
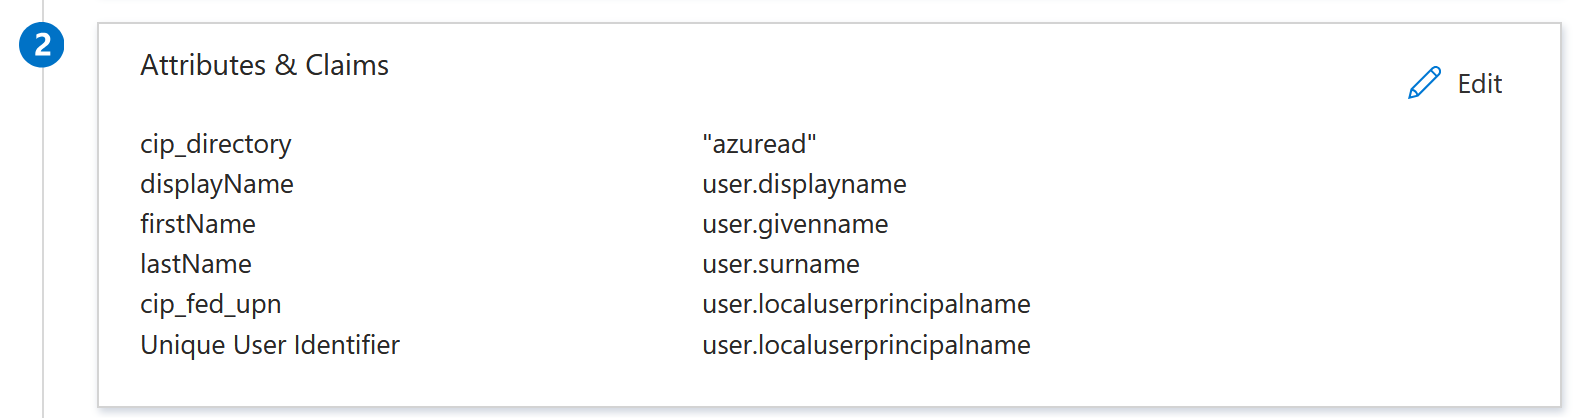
- In the Attributes & Claims section, select Edit to configure the following claims. These claims appear in the SAML assertion within the SAML response.
- For the Unique User Identifier (Name ID) claim, update the default value to be
user.localuserprincipalname. - From the command bar, select Add new claim.
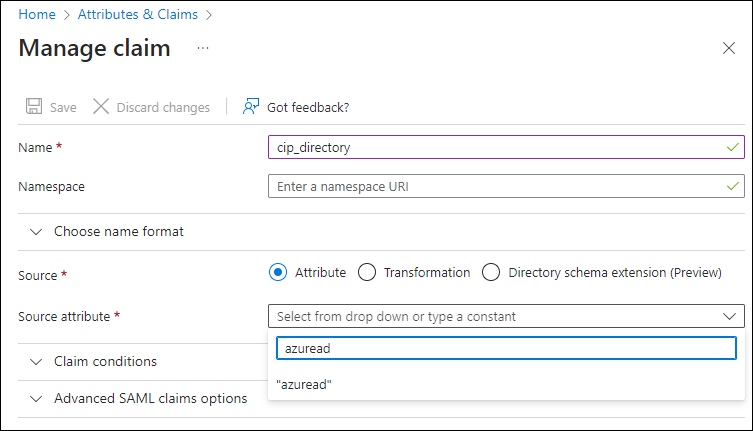
- In Name, enter cip_directory.
- In Source, leave Attribute selected.
-
In Source attribute, enter azuread. This value appears in quotation marks after you enter it.
- From the command bar, select Save.
-
Create additional claims with the following values in the Name and Source attribute fields:
Name Source attribute cip_fed_upn user.localuserprincipalname displayName user.displayname firstName user.givenname lastName user.surname 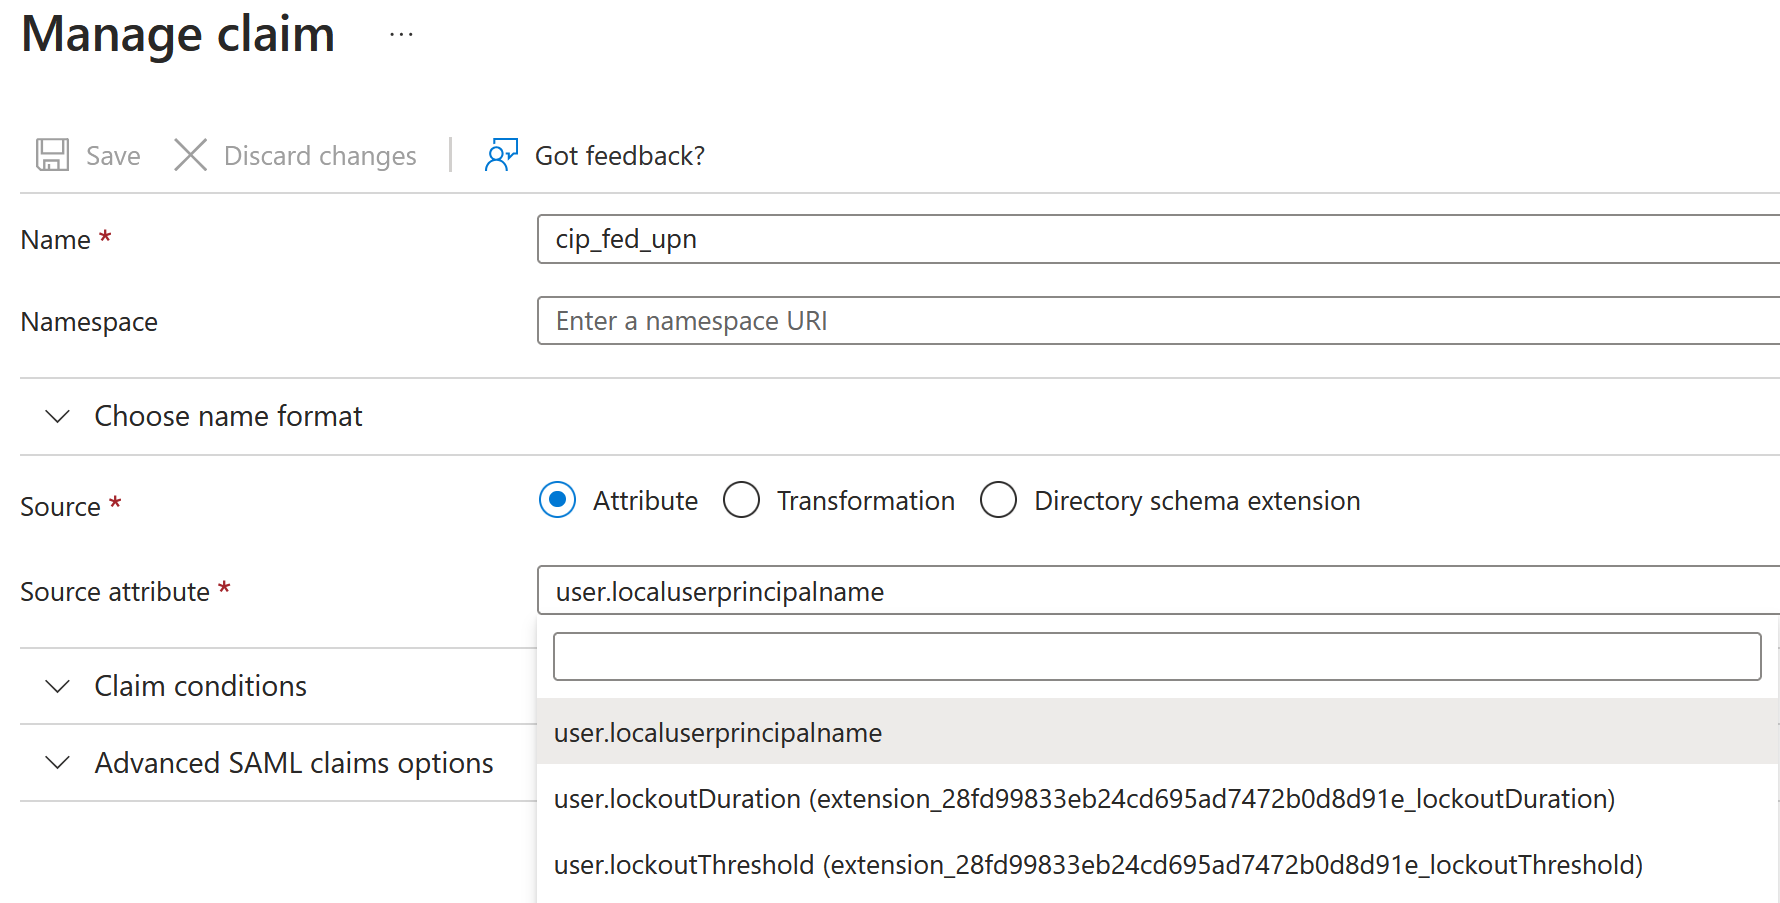
Important:
You can create these additional claims by either repeating Steps b-f for each claim or by modifying the default claims in the Additional claims section that already have the source attributes listed in the table above. The default claims include the namespace
http://schemas.xmlsoap.org/ws/2005/05/identity/claims.If you modify the default claims, you must remove the namespace from each claim. If you create new claims, you must delete the claims that include the namespace. If claims with this namespace are included in the resulting SAML assertion, the assertion will be invalid and will include incorrect SAML attribute names.
-
In the Additional claims section, for any remaining claims with the
http://schemas.xmlsoap.org/ws/2005/05/identity/claimsnamespace, click the ellipsis (…) button and click Delete.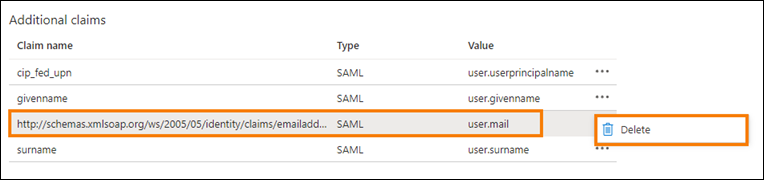
When finished, the Attributes & Claims section appears as illustrated below:
- For the Unique User Identifier (Name ID) claim, update the default value to be
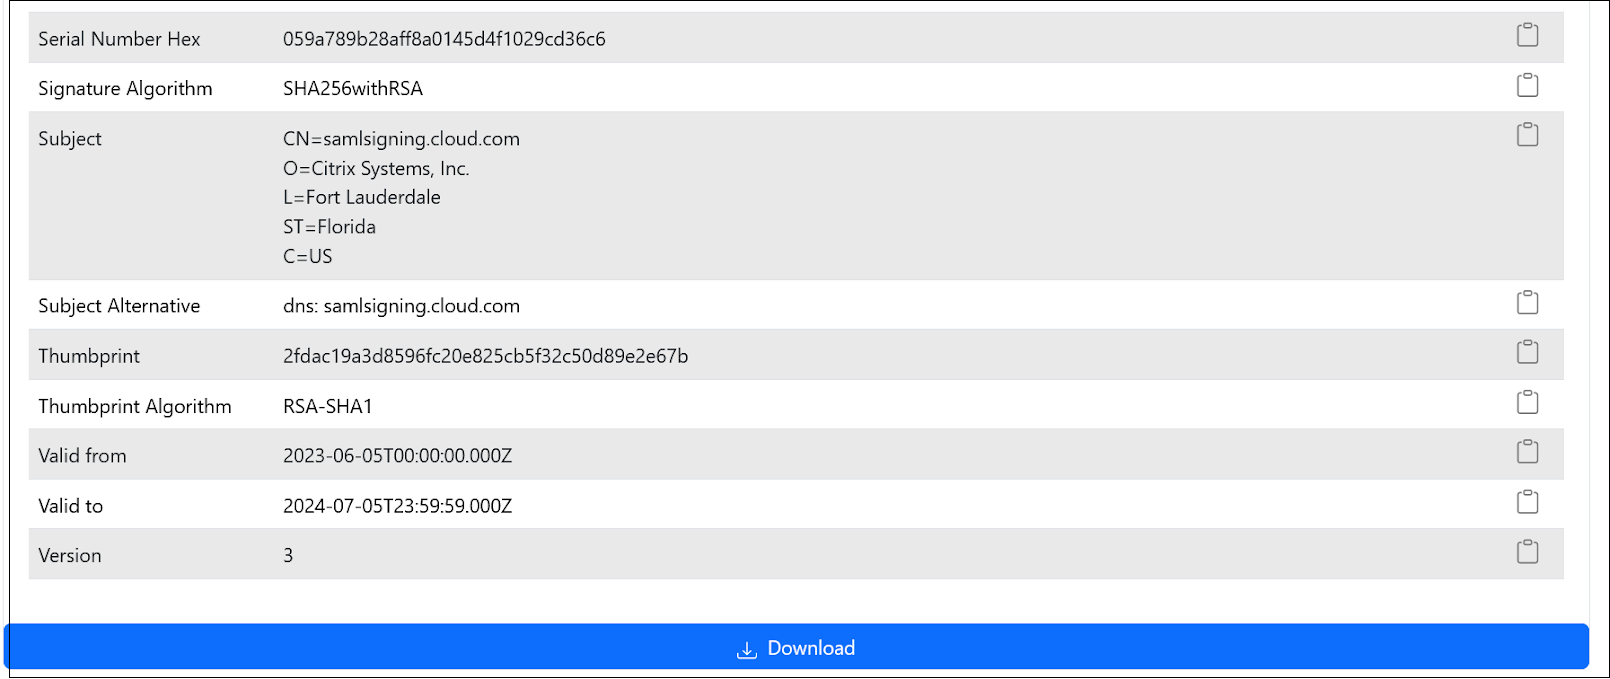
- Obtain a copy of the Citrix Cloud SAML signing certificate using this third party online tool.
-
Enter https://saml.cloud.com/saml/metadata into the URL field and click Load.

-
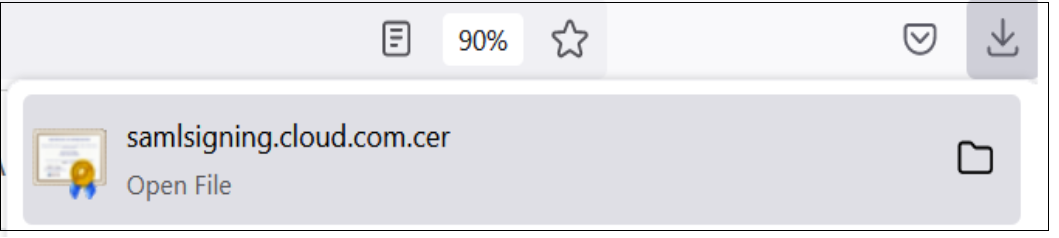
Scroll to the bottom of the page and click Download.
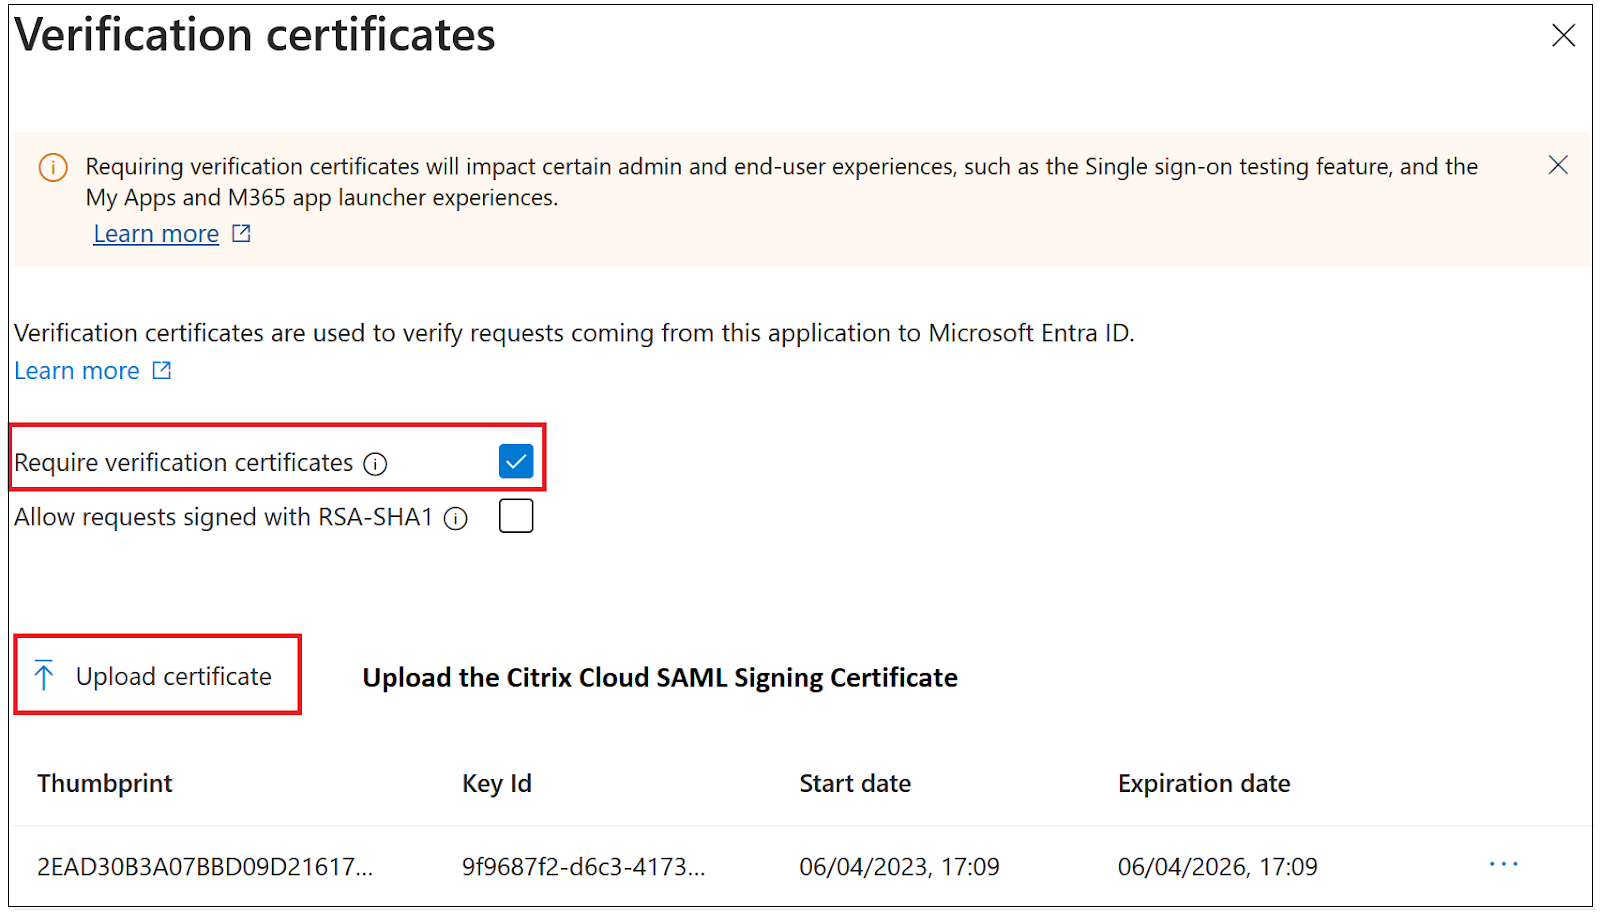
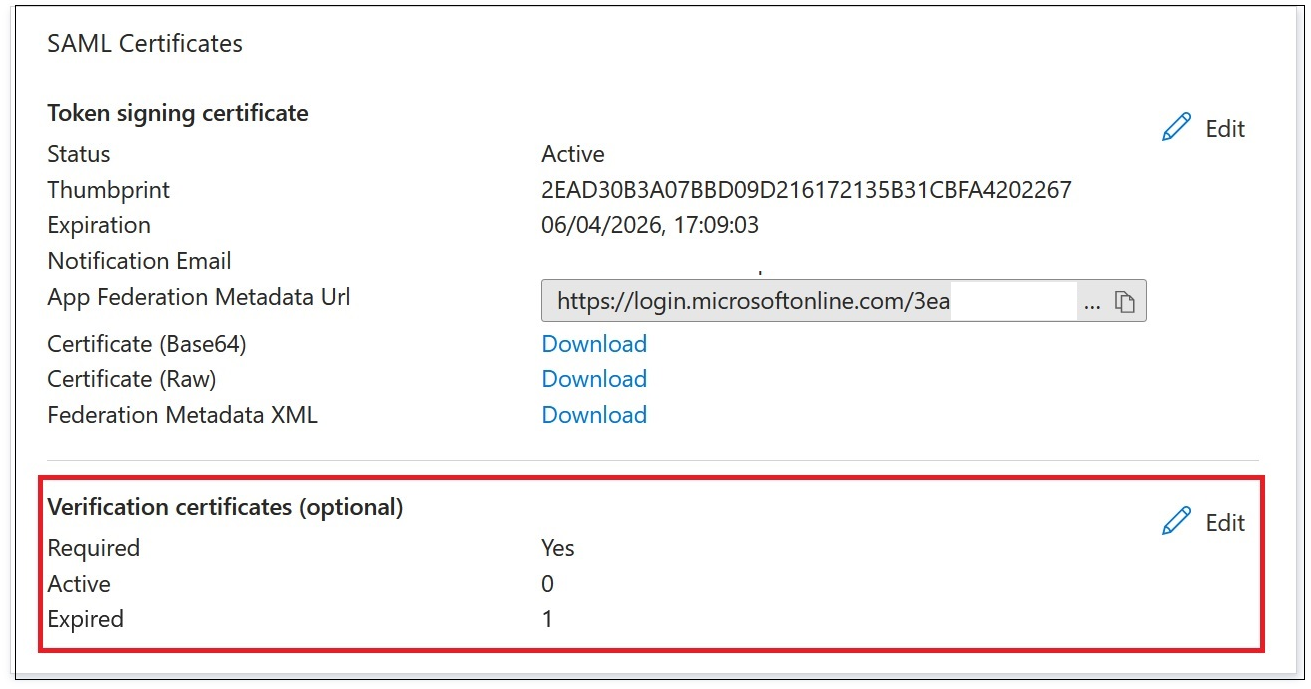
- Configure the Azure Active Directory SAML application Signing Settings.
- Upload the production SAML signing certificate obtained in step 10 within the Azure Active Directory SAML application.
- Enable Require verification certificates.
Troubleshooting
- Verify your SAML assertions contain the correct user attributes using a SAML networking tool, such as the SAML-tracer browser extension.
-
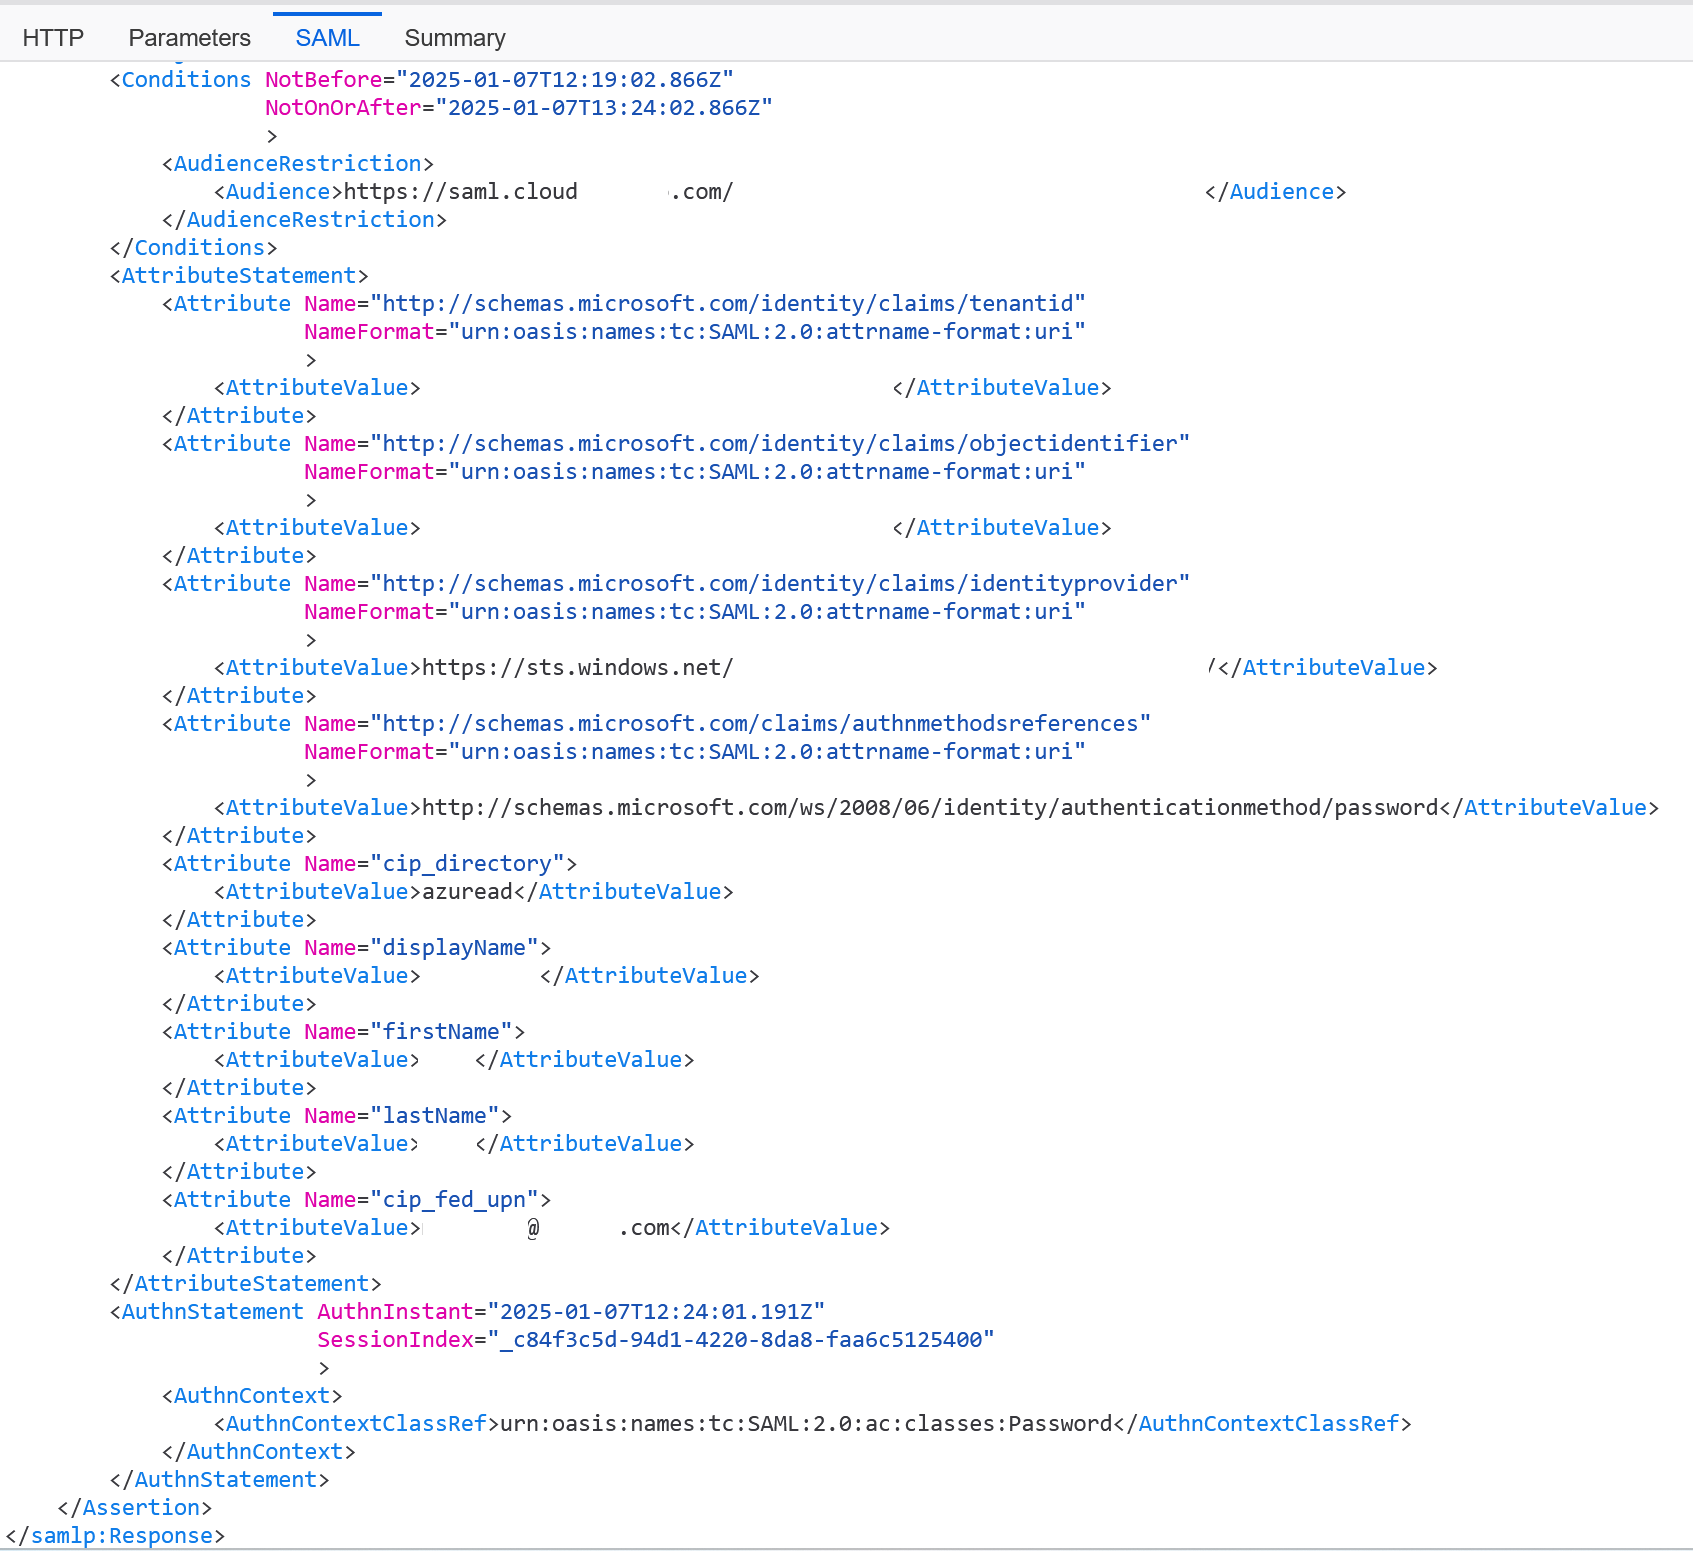
Locate the SAML response shown in yellow and compare to this example:

- Click on the SAML tab in the bottom pane to decode the SAML response and view as XML.
-
Scroll to the bottom of the response and verify that the SAML assertion contains the correct SAML attributes and user values.
If your subscribers still can’t sign in to their workspace, contact Citrix Support and provide the following information:
- SAML-tracer capture
- Date and time the sign-in to Citrix Workspace failed
- The affected user name
- The caller IP address of the client computer that you used to sign in to Citrix Workspace. You can use a tool like https://whatismyip.com to get this IP address.
Configure the Citrix Cloud SAML connection
All Citrix logon flows need to be Service Provider initiated using either a Workspace URL or a Citrix Cloud GO URL.
Use the default recommended values for the SAML connection within Identity and Access Management > Authentication > Add an identity provider > SAML.
Obtain the Entra ID SAML application SAML endpoints from your Entra ID portal to enter into Citrix Cloud.
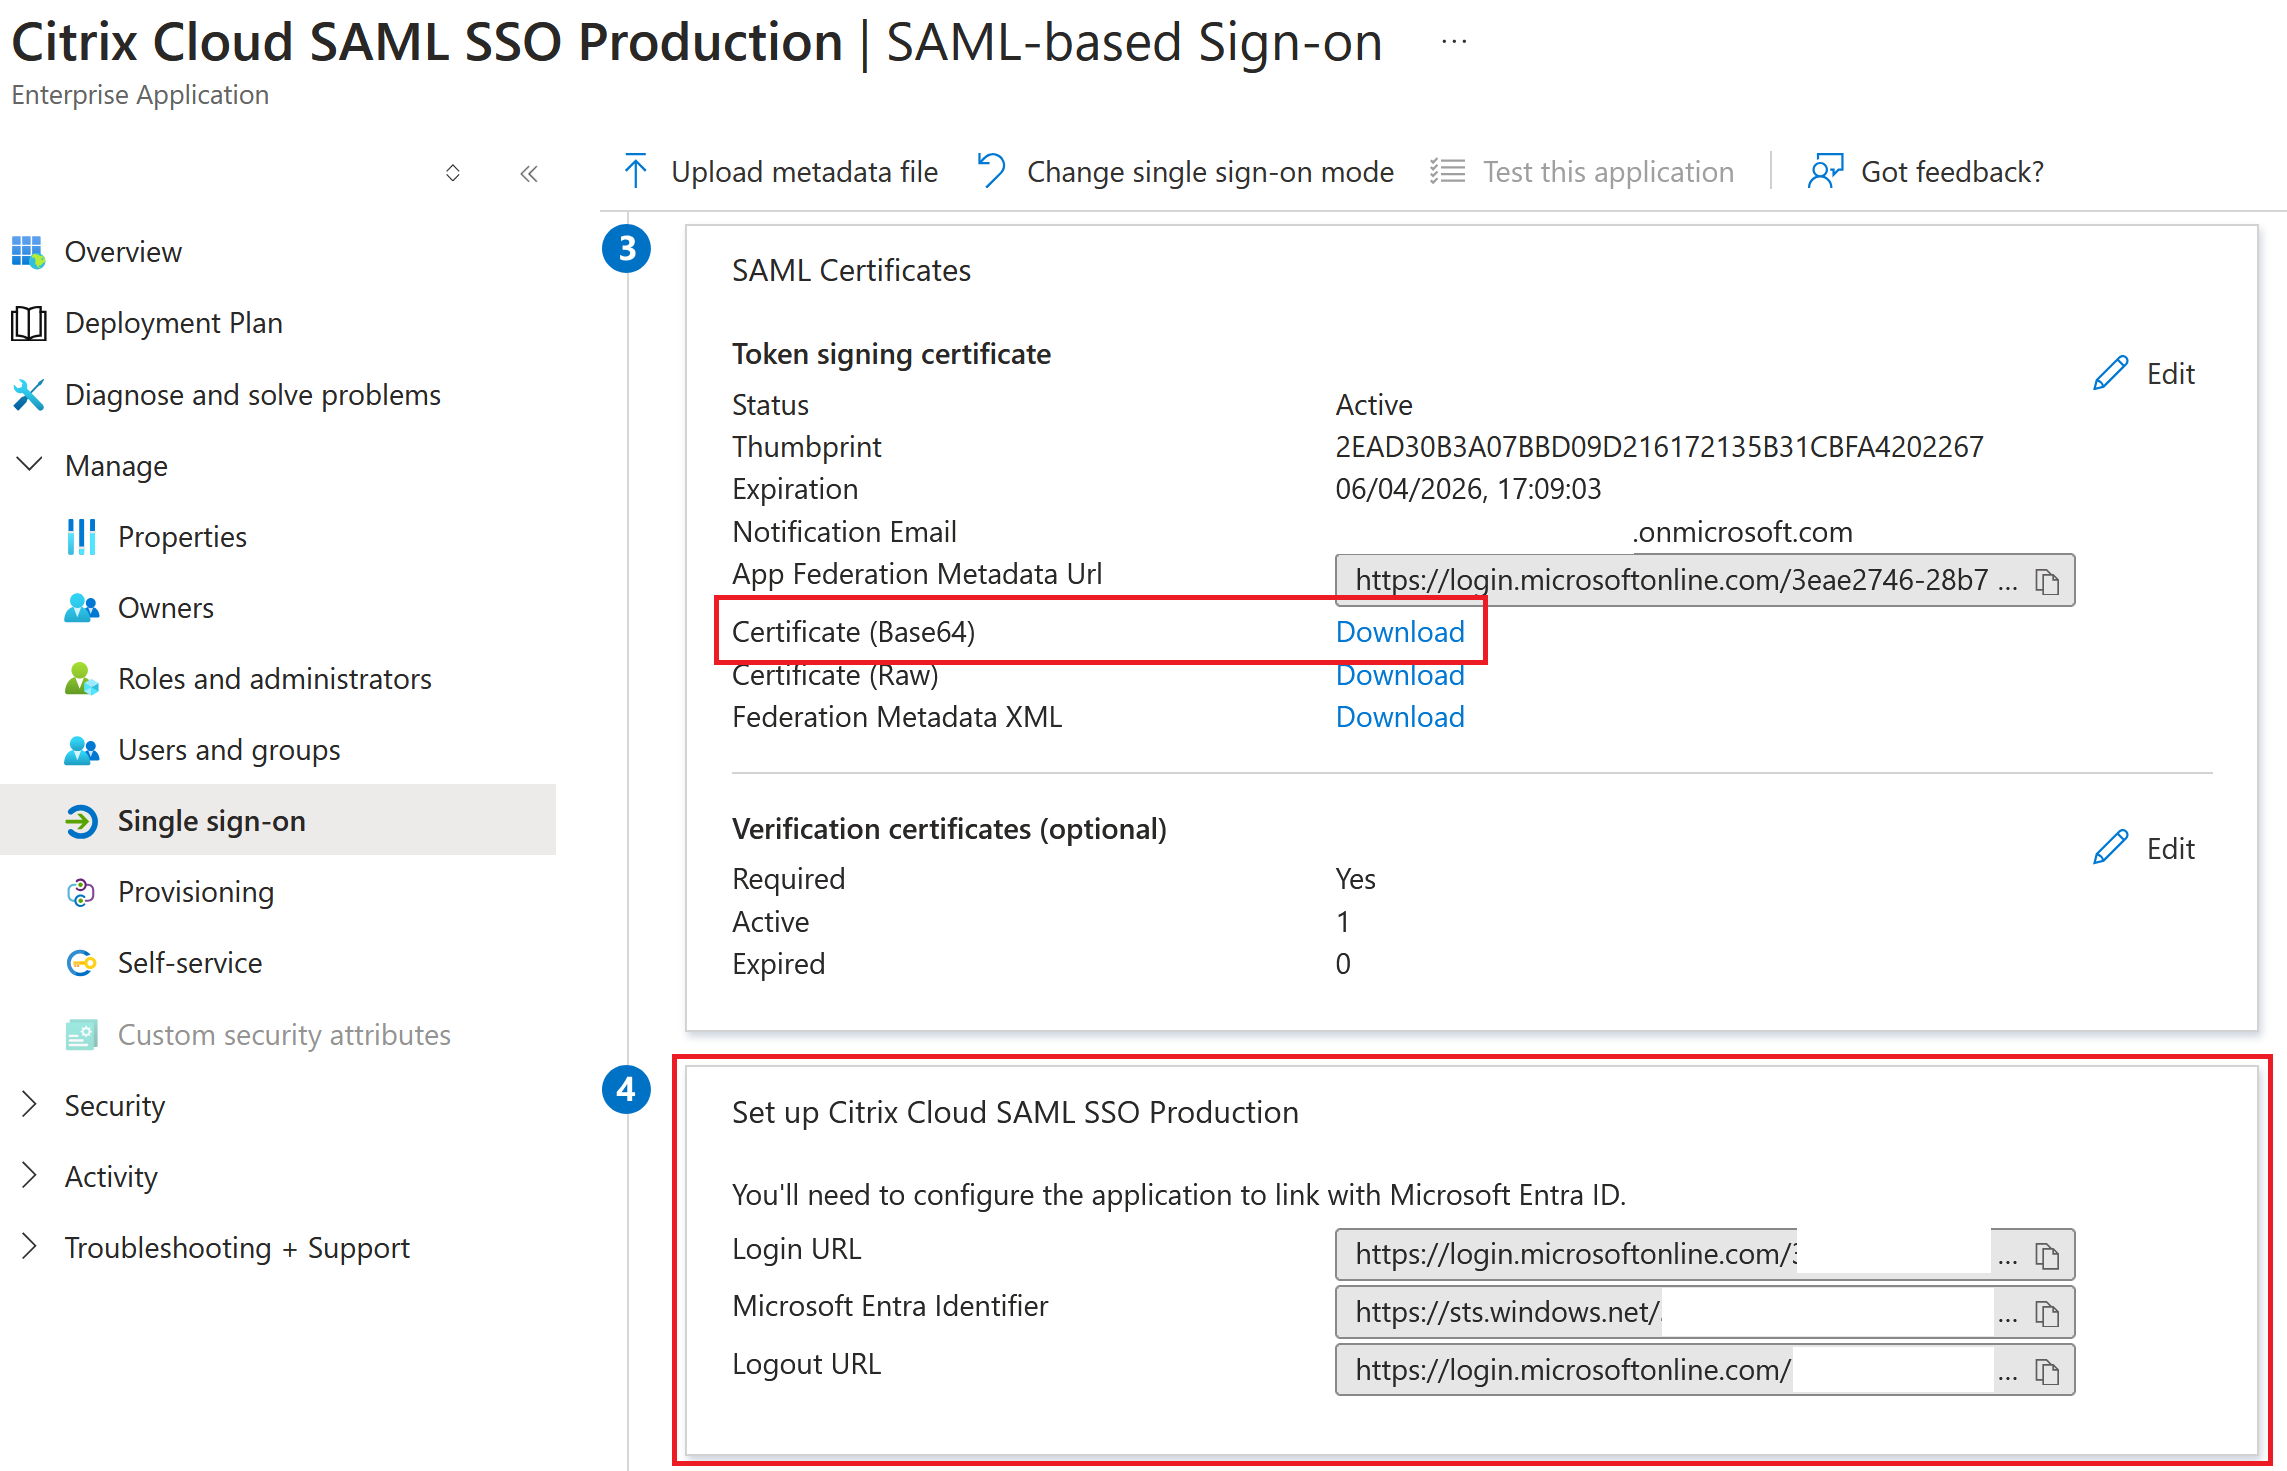
Entra ID SAML endpoint examples to be used within the Citrix Cloud SAML connection
Important:
EntraID SSO and Logout SAML endpoints are the same URL.
| In this field in Citrix Cloud | Enter this value |
|---|---|
| Entity ID | https://sts.windows.net/<yourEntraIDTenantID> |
| Sign Authentication Request | Yes |
| SSO Service URL | https://login.microsoftonline.com/<yourEntraIDTenantID>/saml2 |
| SSO Binding Mechanism | HTTP Post |
| SAML Response | Sign Either Response Or Assertion |
| Authentication Context | Unspecified, Exact |
| Logout URL | https://login.microsoftonline.com/<yourEntraIDTenantID>/saml2 |
| Sign Logout Request | Yes |
| SLO Binding Mechanism | HTTP Post |