Connection to AWS EC2
Create and manage connections and resources describes the wizards that create a connection. The following information covers details specific to AWS cloud environments.
Prerequisites
Do the following before creating a connection to AWS EC2:
- Complete setting up your AWS as a resource location. See AWS virtualization environments.
- Define IAM permissions policy of IAM user or role for Citrix to manage AWS resources on your behalf.
Define IAM permissions
Before creating a host connection, an IAM permissions policy needs to be properly defined for an IAM user or role that gives Citrix proper permissions to provision and manage resources in your AWS account on your behalf. Use the information in this section to define IAM permissions for Citrix DaaS on AWS. Amazon’s IAM service permits accounts having multiple users, which can be further organized into groups. These users can possess different permissions to control their ability to perform operations associated with the account. For more information about IAM permissions, see the IAM JSON policy reference.
To apply IAM permissions policy to a new group of users:
- Log in to the AWS management console and select the IAM service from the drop-down list.
- Select Create a New Group of Users.
- Type a name for the new user group and select Continue.
- On the Permissions page, choose Custom Policy then Select.
- Type a name for the Permissions policy.
- In the Policy Document section, enter the relevant permissions.
After entering the policy information, select Continue to complete the application of the IAM permissions policy to the group of users. Users in the group are granted permissions to do only those actions that are required for Citrix DaaS.
Important:
Use the policy text provided in the example provided in this article to list the actions that a Citrix DaaS uses to perform actions within an AWS account without restricting those actions to specific resources. Citrix recommends that you use the example for testing purposes. For production environments, you might choose to add further restrictions on resources.
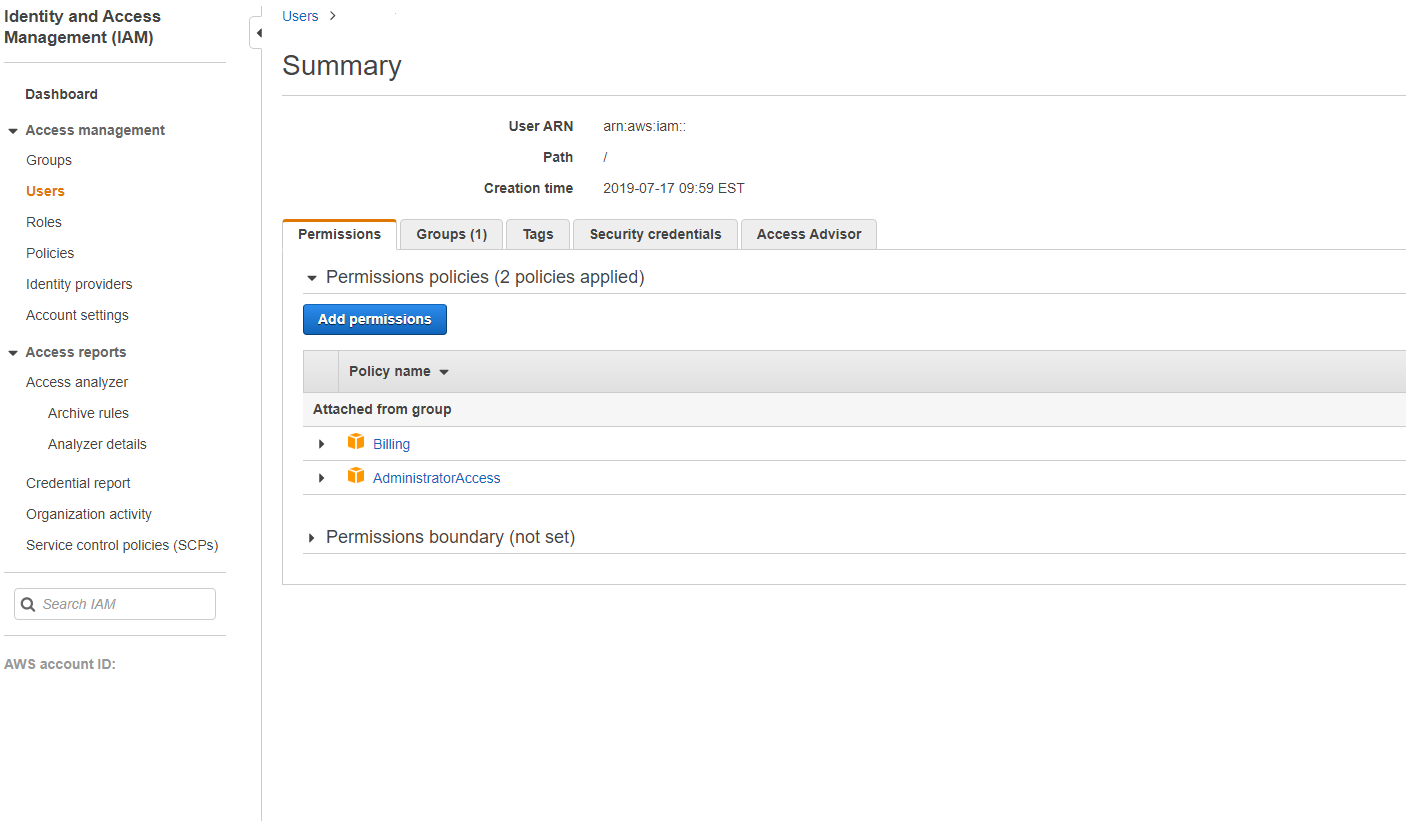
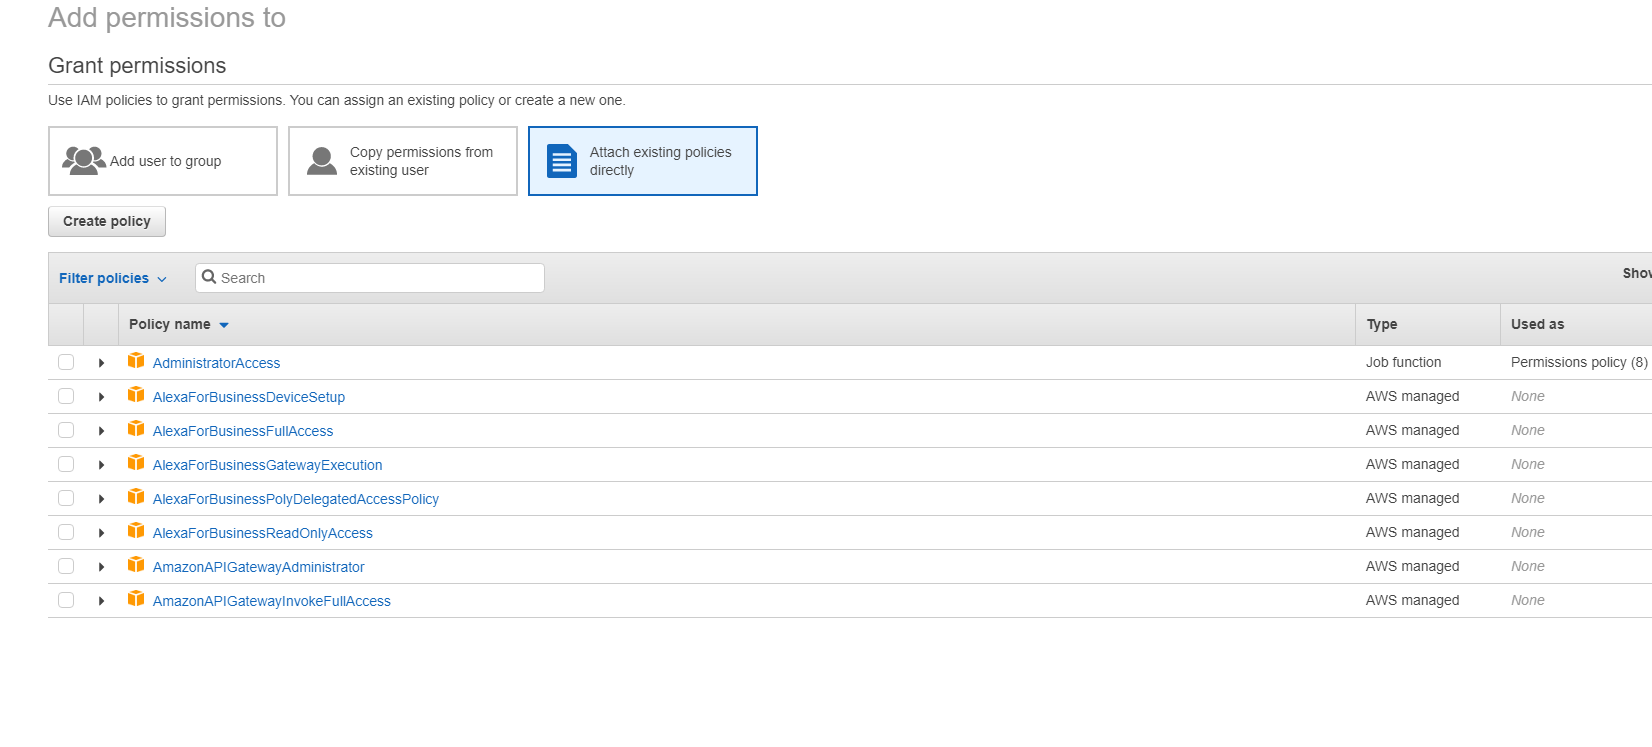
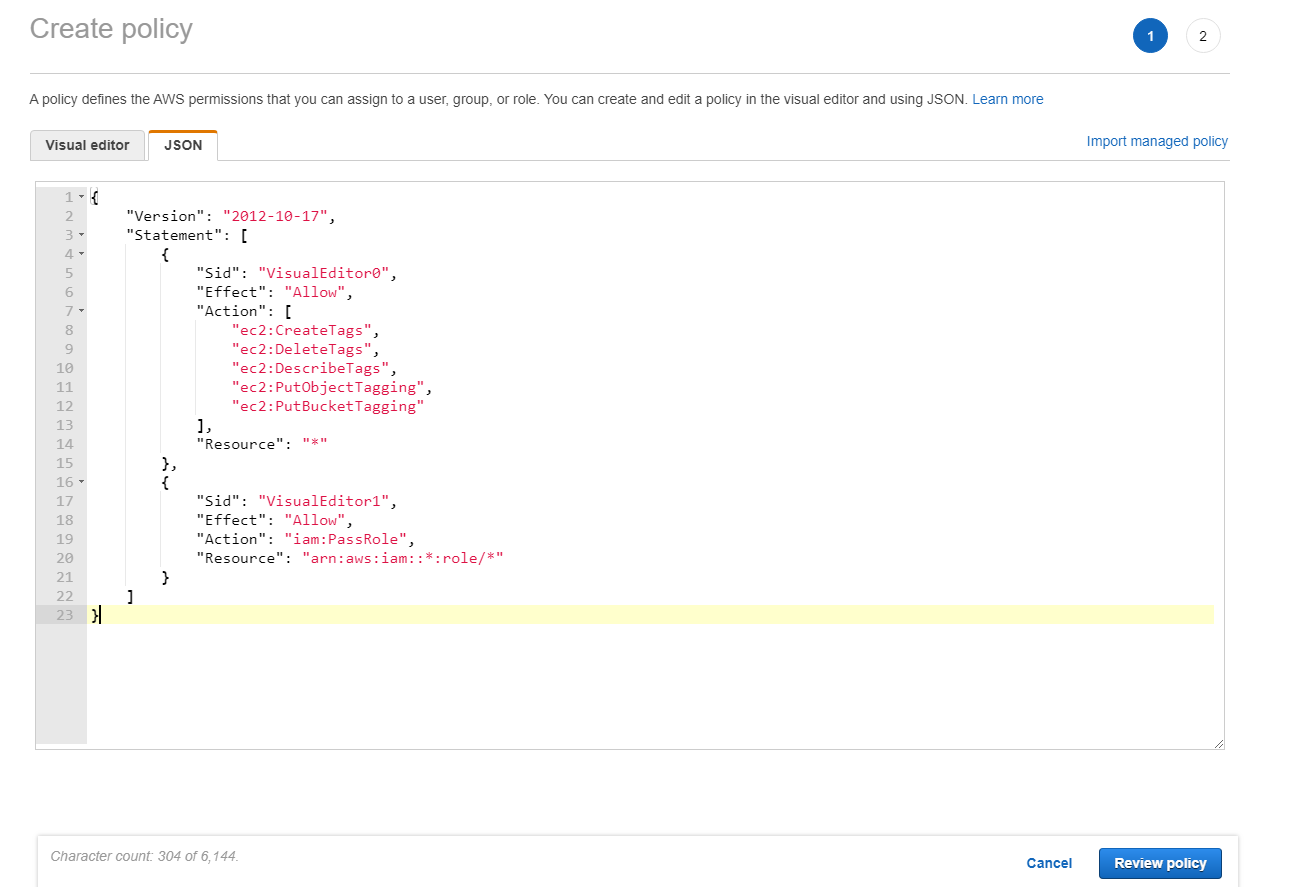
Add IAM permissions
Add the permissions in the IAM section of the AWS Management Console:
- In the Summary panel, select the Permissions tab.
-
Select Add permissions.
-
In the Add Permissions to screen, grant permissions:
-
In the JSON section, include Required AWS permissions for your environment.
Create a connection
You can create a connection to Amazon EC2 using:
Note:
Check your proxy server or firewall restrictions and ensure that the following address is contactable:
https://*.amazonaws.com. Also, make sure that all the addresses mentioned in Citrix Gateway service connectivity are contactable.If these are not contactable, it might cause failure while creating or updating the host connection.
Create a connection using Studio
- Navigate to Hosting > Add Connection and Resources page.
-
On the Connection page, follow these steps to configure the connection:
- Select Create a new connection.
- In Zone, select the resource location you have set up for your AWS environment.
- Select Amazon EC2 as the connection type.
-
Select one of the methods to provision the resources:
- If you select Use this AWS account to provision resources, then select Use IAM user access key or Use IAM role. For the IAM user access key, provide your API key and Secret key for the IAM user that has proper IAM permissions policy for Citrix to manage resources in your AWS account. For the IAM role, make sure that you’ve assigned an IAM role to the Citrix Cloud Connector instance with proper IAM permissions policy for Citrix to manage resources in your AWS account. See Role-based authentication guide for more information.
- If you select Use cross-account access to provision resources, then provide the ARN of the IAM role in Account B that the Cloud Connectors (or Delivery Controllers) in Account A must assume and perform provisioning operations in.
- Enter a connection name and click Next.
- On the Virtual Machine Location page, specify the location where the VMs must be provisioned. Select the cloud region, VPC, and availability zone or local zone for creating new VMs.
-
On the Network page:
- Enter a name for the resources that you selected previously in the availability zone or local zone.
- Select one or more subnets in the VPC that you configured in the previous menu.
- Click through the remaining pages till the Summary page.
- Click Finish to create the host connection to Amazon EC2.
Important considerations
When you create a connection using Studio:
- Define proper IAM permissions for Citrix to manage your AWS resources.
- If you use an IAM user access key for Citrix to manage your AWS resources, you must provide the API key and secret key values. You can export the key file containing those values from AWS and then import them. You must also provide the region, availability zone, VPC name, subnet addresses, domain name, security group names, and credentials.
- If you use an IAM role for Citrix to manage your AWS resources, you must make sure to assign a role with proper IAM permissions to all of your Cloud Connector(s). Role-based authentication guide for more information.
- The credentials file for the root AWS account (retrieved from the AWS console) is not formatted the same as credentials files downloaded for standard AWS users. Therefore, Citrix DaaS cannot use the file to populate the API key and secret key fields. Ensure that you are using AWS Identity Access Management (IAM) credentials files.
- The zone can be an availability zone or local zone.
Create a connection using PowerShell
- Open a PowerShell window.
- Run
asnp citrix*to load the Citrix-specific PowerShell modules. -
Run the following commands. Following is an example:
$connectionName = "demo-hostingconnection"
$cloudRegion = "us-east-1"
$apiKey = "aaaaaaaaaaaaaaaaaaaa"
$apiSecret = “bbbbb”
$secureKey = ConvertTo-SecureString -String $apiSecret
$zoneUid = "00000000-0000-0000-0000-000000000000"
$connectionPath = "XDHyp:\Connections\" + $connectionName

$connection = New-Item -Path $connectionPath -ConnectionType "<name of the connection>" -HypervisorAddress " "@("https://ec2.cn-north-1.amazonaws.com.cn") -Persist -Scope @() -UserName $apiKey -SecurePassword $secureKey -ZoneUid $zoneUid

New-BrokerHypervisorConnection -HypHypervisorConnectionUid $connection.HypervisorConnectionUid

$hostingUnitName = "demo-hostingunit"
$availabilityzone = "us-east-1a"
$vpcName = "Default VPC"
$jobGroup = [Guid]::NewGuid()
$hostingUnitPath = "XDHyp:\HostingUnits\" + $HostingUnitName
$rootPath = $connectionPath + "\" + $vpcName + ".virtualprivatecloud\"
$availabilityZonePath = @($rootPath + $availabilityzone + ".availabilityzone")
$networkPaths = (Get-ChildItem $availabilityZonePath[0] | Where ObjectType -eq "Network") | Select-Object -ExpandProperty FullPath # will select all the networks in the availability zone

New-Item -Path $hostingUnitPath -AvailabilityZonePath $availabilityZonePath -HypervisorConnectionName $connectionName -JobGroup $jobGroup -PersonalvDiskStoragePath @() -RootPath $rootPath -NetworkPath $networkPaths
<!--NeedCopy-->
Note:
To create a connection using Role-Based Authentication, specify apiKey and apiSecret as
role_based_auth.
Limitation
If you change the name of an AWS Virtual Private Cloud (VPC) in the AWS console, then the existing hosting unit in Citrix Cloud™ breaks. When the hosting unit is broken, you cannot create catalogs or add machines to existing catalogs. To resolve the issue, change the name of the AWS VPC back to the original name.
Enhanced proxy configuration for AWS host connection
AWS host connection can read the WinHTTP system proxy value that is configured during Cloud Connector installation if you set the custom property UseSystemProxyForHypervisorTrafficOnConnectors to true when creating or updating a host connection using PowerShell.
Advantages
- Simplifies proxy configuration for AWS host connections.
- Reduces the need for manual PowerShell configuration of server and port values.
- Ensures consistent proxy usage between the Cloud Connector and host connections.
- Improves the success rate of API calls that require proxy access.
- Decreases support requests related to proxy configuration.
Prerequisite
Before setting the custom property while creating the host connection using PowerShell, make sure that you configure the WinHTTP proxy on the Cloud Connector.
Create a new connection with automatic proxy
- Open PowerShell.
-
Add the Citrix snap-ins:
Add-PSSnapin citrix* <!--NeedCopy--> -
Define the variables for the connection.
$hypType = "AWS"

####################################################################################
The following items need to be set based on the installed environment
$customProperties is set to enable using the system proxy
$customProperties = '<CustomProperties xmlns="http://schemas.citrix.com/2014/xd/machinecreation" xmlns:xsi="http://www.w3.org/2001/XMLSchema-instance"><Property xsi:type="StringProperty" Name="UseSystemProxyForHypervisorTrafficOnConnectors" Value="True" /></CustomProperties>'

$awsEndPoint is set to the desired region for the connection

$awsEndPoint = "https://ec2.us-east-1.amazonaws.com"

$hypConnName is set to the connection name to use

$hypConnName = "ctx-test"

$apiKey is set to the AWS API Key ID or "role_based_auth" if the Cloud Connector instance has an appropriate role

$apiKey = "role_based_auth"

$secretKey is set to the AWS API Key Secret or "role_based_auth" if the Cloud Connector instance has an appropriate role

$secretKey = "role_based_auth"

$resourceLocation is set to the connector resource location name

$resourceLocation = "ctx-test"
####################################################################################

$secureSecretKey = ConvertTo-SecureString -String $secretKey -AsPlainText -Force
$zoneUid = (Get-ConfigZone|Where-Object Name -EQ "$resourceLocation").Uid
<!--NeedCopy-->
Note:
Ensure you replace the placeholder values in the
$customProperties,$awsEndPoint,$hypConnName,$apiKey,$secretKey, and$resourceLocationvariables with the appropriate values for your environment. -
Create the hypervisor connection.
$hypHc = New-Item -Path xdhyp:\Connections ` -Name $hypConnName ` -HypervisorAddress $awsEndPoint ` -UserName $apiKey ` -SecurePassword $secureSecretKey ` -ConnectionType $hypType ` -CustomProperties $customProperties ` -Persist ` -ZoneUid $zoneUid <!--NeedCopy--> -
Create the Broker hypervisor connection.
$bhc = New-BrokerHypervisorConnection -HypHypervisorConnectionUid $hypHc.HypervisorConnectionUid
<!--NeedCopy-->
Also, see Update an existing host connection with automatic proxy
Cross-account provisioning
There are use-cases where the Cloud Connectors would like to be placed in a separate AWS account (shared services account or site components account) with IAM roles that have cross-account access (cross-account IAM role) and MCS-provisioned machine catalogs in separate secondary AWS account (workloads accounts), without the need for additional Cloud Connectors in the separate accounts. To support such scenarios, this feature uses VPC peering and cross-account access using IAM roles to make provisioning across different AWS accounts possible for enterprises managing multiple AWS accounts.
With VPC peering, you can have your Cloud Connector, and provisioned VMs in different regions or accounts be able to communicate among each other.
With cross-account access using IAM roles, you allow the primary account (Cloud Connector account) to assume an IAM role to access AWS resources in the secondary account (machine catalog VMs).
To allow Cloud Connector to access the resources of the secondary account, create a host connection after assuming the IAM role from the secondary account.
Prerequisites
Set up the following before creating a host connection for cross-account provisioning:
- Set up VPC peering and configure the security groups in both regions or accounts. See Set up VPC peering.
- Delegate cross-account access using IAM roles. See Delegate cross-account access using IAM role.
Set up VPC peering
Let’s assume that VPC A is in the primary account (Account A) and it has the Cloud Connectors and Active Directory. VPC B is in the secondary account (Account B) where you want to provision the VMs.
To set up a VPC peering connection between Account A and Account B, do the following:
-
Create a VPC peering connection. See:
- Go to your VPC A and to the route table that is associated with the public subnet.
- Click Edit Routes > Add route. Add VPC B’s CIDR block in the Destination column and add the VPC peering you created in the Target column.
- Repeat Steps 2 and 3, but with the private subnets for VPC A and VPC B (add VPC A’s CIDR block). See Update your route tables for a VPC peering connection.
- Go to the private security group associated with VPC A.
- Select Actions, then Edit inbound rules.
-
Select Add rule. For type, select All Traffic, then in the Source Column add:
- If it is a different region, add VPC B’s CIDR Block.
- If it is a different account but the same region, add the account ID and private security group ID of VPC B separated by a forward slash (Example, 123456789012/sg-1a2b3c4d)
- Repeat Steps 5 through 7, but with the private security group for VPC B (but add VPC A’s CIDR Block or VPC A’s account ID and private security group ID of the same region, but different account). See Update your security groups to reference peer security groups.
Note:
There is no charge to create a VPC peering connection. However, while VPC peering within an Availability Zone is free, charges apply when data transfer over a VPC peering connection occurs across multiple Availability Zones and regions. See Pricing for a VPC peering connection.
Delegate cross-account access using IAM roles
After setting up VPC peering across accounts, you delegate cross-account access using IAM roles.
With cross-account access using IAM roles, you allow the primary account (Cloud Connector account) to assume an IAM role to access AWS resources in the secondary account (machine catalog VMs).
To access cross-account resources, do the following:
Remember:
Assumed, VPC A is in the primary account (Account A) and it has the Cloud Connector and Active Directory. VPC B is in the secondary account (Account B) where you want to provision the VMs
- Set up VPC peering across accounts with the steps mentioned before.
- Create an IAM role and policy in Account B with minimal Citrix IAM Permissions. See IAM tutorial: Delegate access across AWS accounts using IAM roles. Let’s say the arn of this role is “arn:aws:iam::5678:role/citrix-role”.
- Add the Trust policy to the role “arn:aws:iam::5678:role/citrix-role” so that it’s allowed to be accessed by Account A role “arn:aws:iam::1234:role/primary-account-citrix-role” as per - Cross account resource access in IAM.
- Create the IAM role and policy in Account A with the name mentioned before “primary-account-citrix role”, which can assume the IAM role and pass the IAM role from the Account B (arn:aws:iam::5678:role/citrix-role).
- Assign the role “arn:aws:iam::1234:role/primary-account-citrix-role” to all the Cloud Connectors in Account A.
Cloud Connectors can now assume the role from Account B (“arn:aws:iam::5678:role/citrix-role”).
Create host connection for cross-account provisioning
Create a host connection in the secondary account (Account B) where you want to provision the VMs. This allows Cloud Connectors of Account A to access the resources in Account B after assuming the role from Account B.
Use PowerShell commands to create the host connection and add the following two custom properties:
-
CrossAccountRoleArn: If you don’t provideCrossAccountRoleArnproperty, then the regular Host Connection is created. In this case,MaximumAssumeRoleDurationInSecondsis ignored even if it is provided. -
MaximumAssumeRoleDurationInSeconds:DurationInSecondsmust be between 900 seconds to 3600 seconds. The default is 900 seconds. If you provide a value provided more than 3600, thenDurationInSecondsis set to 3600.
Example:
$connectionName = "cross-account-conn"
$cloudRegion = "us-east-1"
$apiKey = "role_based_auth"
$secretKey = "role_based_auth"
$zoneUid = "xxxxxx"
$secureKey = (ConvertTo-SecureString -String $secretKey -AsPlainText -Force)
$connectionPath = "XDHyp:\Connections\" + $connectionName
$customProperties = '<CustomProperties xmlns="http://schemas.citrix.com/2014/xd/machinecreation" xmlns:xsi="http://www.w3.org/2001/XMLSchema-instance">
<Property xsi:type="StringProperty" Name="CrossAccountRoleArn" Value="arn:aws:iam::5678:role/citrix-role" /><Property xsi:type="StringProperty" Name="MaximumAssumeRoleDurationInSeconds" Value="3600" />
"</CustomProperties>'

$connection = New-Item -Path $connectionPath -ConnectionType "AWS" -HypervisorAddress "https://ec2.$($cloudRegion).amazonaws.com" -Persist -Scope @() -UserName $apiKey -SecurePassword $secureKey -ZoneUid $zoneUid -CustomProperties $customProperties

New-BrokerHypervisorConnection -HypHypervisorConnectionUid $connection.HypervisorConnectionUid
<!--NeedCopy-->
After the host connection is created, create hosting units using Studio or PowerShell. However, select VPC and Networks.
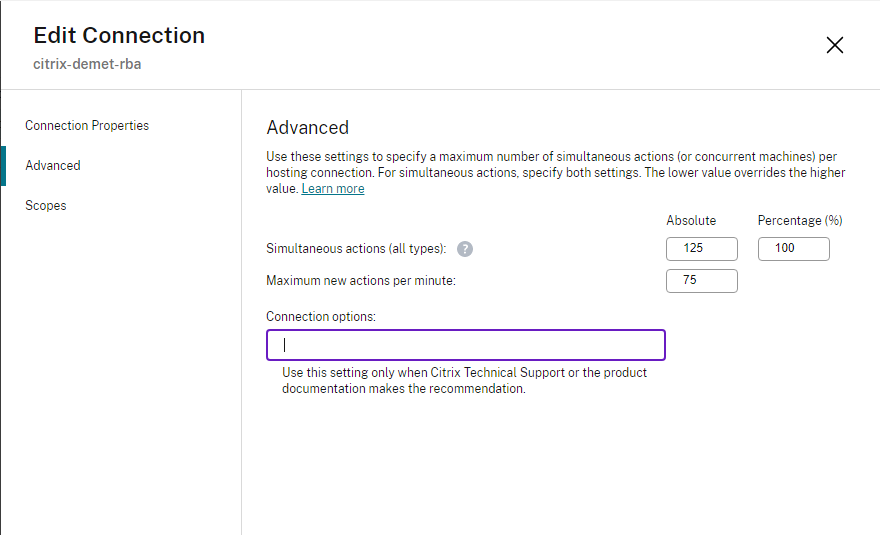
Edit a connection
You can edit an existing host connection to:
- Modify the option to provide IAM permissions for Citrix to manage resources
- Modify the maximum number of simultaneous actions (or concurrent machines) per hosting connection
- Modify the scope.
- Configure the maximum number of security groups allowed per elastic network interface (ENI) using PowerShell command
- Update an existing host connection with automatic proxy
Edit options to provide IAM permissions
- Right-click an existing Amazon EC2 connection.
- On the Connection Properties page, click Edit settings.
- Select one of the options to provide IAM permissions for Citrix to manage resources. Enter the required details and click Save.
Modify the maximum number of simultaneous actions
When you create host connections in Studio for Amazon EC2, the following default values display:
| Option | Absolute | Percentage |
|---|---|---|
| Simultaneous actions (all types) | 125 | 100 |
| Maximum new actions per minute | 150 | n/a |
| Maximum concurrent provisioning operations | 100 | n/a |
MCS supports 100 maximum concurrent provisioning operations by default.
Configure these values by accessing the Citrix Studio Advanced section on the Edit Connection screen.
Alternatively, you can use the Remote PowerShell SDK to set the maximum number of concurrent operations for optimal settings per your environment.
Use the PowerShell custom property, MaximumConcurrentProvisioningOperations, to specify the maximum number of concurrent AWS provisioning operations.
Before configuration:
- Ensure you have installed the PowerShell SDK for Cloud.
- Understand that the default value for
MaximumConcurrentProvisioningOperationsis 100.
Perform the following steps to customize the MaximumConcurrentProvisioningOperations value:
- Open a PowerShell window.
- Run
asnp citrix*to load the Citrix-specific PowerShell modules. - Enter
cd xdhyp:\Connections\. - Enter
dirto list the connections. -
Change or Initialize the Custom Properties string:
-
If the Custom Properties string has a value, copy the Custom Properties into Notepad. Next, change the
MaximumConcurrentProvisioningOperationsproperty to your preferred value. You can enter a value ranging 1–1000. For example,<Property xsi:type="IntProperty" Name="MaximumConcurrentProvisioningOperations" Value="xyz"/>. -
If the Custom Properties string is empty or null, you must initialize the string by entering the proper syntax for both the schema and the
MaximumConcurrentProvisioningOperationsproperty.
-
-
In the PowerShell window, paste the modified Custom Properties from Notepad and assign a variable to the modified Custom Properties. If you initialized the Custom Properties, add the following lines after the syntax:
$customProperties = '<CustomProperties xmlns="http://schemas.citrix.com/2014/xd/machinecreation" xmlns:xsi="http://www.w3.org/2001/XMLSchema-instance"><Property xsi:type="IntProperty" Name="MaximumConcurrentProvisioningOperations" Value="100"/></CustomProperties>'.This string sets the
MaximumConcurrentProvisioningOperationsproperty to 100. In the Custom Properties string, you must set theMaximumConcurrentProvisioningOperationsproperty to a value that aligns with your needs. - Enter
Get-XDAuthentication, which prompts you for your credentials. - Run
$cred = Get-Credential, which might prompt you for solely a Password (or a Name and Password). You might also be prompted for the application ID and associated secret. For connections using role-based authentication, role_based_auth is both the Name and Password. Otherwise, enter the AWS API ID and secret. - Run
set-item -PSPath 'XDHyp:\Connections<connection-name>' -CustomProperties $customProperties -username $cred.username -Securepassword $cred.password. You must set the <connection-name> to the name of the connection. - Enter
dirto verify the updated CustomProperties string.
Configure security groups per network interface
When editing a host connection, you can now configure the maximum number of security groups allowed per elastic network interface (ENI) using a PowerShell command. For information on AWS security groups quota values, see Security groups.
To configure security groups per network interface:
- Open a PowerShell window.
- Run
asnp citrix*to load the Citrix-specific PowerShell modules. - Run
cd xdhyp:\Connections\. - Run
dirto list the connections. -
Run the following PowerShell command to configure security groups per network interface:
Set-HypHypervisorConnectionMetadata -HypervisorConnectionName aws -Name "Citrix_MachineManagement_Options" -Value " AwsMaxENISecurityGroupLimit=<number>"
<!--NeedCopy-->
Note:
If you do not set a value for
AwsMaxENISecurityGroupLimit, then it takes the default value of 5.
Update an existing host connection with automatic proxy
- Open a PowerShell window.
- Run
asnp citrix*to load the Citrix-specific PowerShell modules. - Enter
cd xdhyp:\Connections\. - Enter
dirto list the connections. - Copy the CustomProperties to a notepad and append property setting
<Property xsi:type="StringProperty" Name="UseSystemProxyForHypervisorTrafficOnConnectors" Value="True". - In the PowerShell window, paste the modified Custom Properties from Notepad and assign a variable to the modified Custom Properties.
- Enter
Get-XDAuthentication, which prompts you for your credentials. - Run
$cred = Get-Credential, which might prompt you for solely a Password (or a Name and Password). You might also be prompted for the application ID and associated secret. For connections using role-based authentication, role_based_auth is both the Name and Password. Otherwise, enter the AWS API ID and secret. - Run
set-item -PSPath 'XDHyp:\Connections<connection-name>' -CustomProperties $customProperties -username $cred.username -Securepassword $cred.password. You must set the <connection-name> to the name of the connection. - Enter
dirto verify the updated CustomProperties string.
Service endpoint URL
Standard zone service endpoint URL
When you use MCS, a new AWS connection is added with an API key and an API secret. With this information, along with the authenticated account, MCS queries AWS for the supported zones using the AWS DescribeRegions EC2 API call. The query is made using a generic EC2 Service Endpoint URL https://ec2.amazonaws.com/. Use MCS to select the zone for the connection from the list of supported zones. The preferred AWS service endpoint URL is automatically selected for the zone. However, after you create the service endpoint URL, you can no longer set or modify the URL.
Non-standard service endpoint URL
There can be situations where you might not need the automatically chosen AWS Service Endpoint URL for the connection. For such cases, you can use Citrix Cloud SDK and PowerShell to create a connection with a non-standard service endpoint URL. For example, to create a connection using the service endpoint URL https://ec2.cn-north-1.amazonaws.com.cn:
- Set up the AWS hosted Cloud Connector and ensure that it has connectivity.
-
Run the following PowerShell commands to see the list of Cloud Connectors.
PS C:\> asnp citrix.* PS C:\> Get-XDAuthentication PS C:\> Get-ConfigEdgeServer <!--NeedCopy--> -
Find the ZoneUid from the newly created Cloud Connector and enter it into the following PowerShell commands. Replace the italicized items with the respective values.
PS C:\> $hyp= New-Item -Path xdhyp:\Connections -ZoneUid`*ZoneUid*`-Name`*"My New Connection”*`-ConnectionType "AWS" -HypervisorAddress @("https://ec2.cn-north-1.amazonaws.com.cn") -UserName`*"APIkey"* `-Password`*“API Secret”* `-Persist` `PS C:\> New-BrokerHypervisorConnection -HypHypervisorConnectionUid $hyp. HypervisorConnectionUid <!--NeedCopy--> - Refresh the Hosting tab to verify that the EC2 connection has been created.
- Add a resource location using the new connection.
Required AWS permissions
This section contains the complete list of AWS permissions. Use the complete set of permissions as given in the section for the functionality to work correctly.
Note:
The
iam:PassRolepermission is needed only for role_based_auth.
Creating a host connection
A new host connection is added using the information obtained from AWS.
{
    "Version": "2012-10-17",
    "Statement": [
        {
            "Action": [
                "ec2:DescribeAvailabilityZones",
                "ec2:DescribeSubnets",
                "ec2:DescribeVpcs",
                "ec2:DescribeRegions"
            ],
            "Effect": "Allow",
            "Resource": "*"
        }
    ]
}
<!--NeedCopy-->
Power management of VMs
VMs are powered on or off.
{
    "Version": "2012-10-17",
    "Statement": [
        {
            "Action": [
                "ec2:DescribeInstances",
                "ec2:StartInstances",
                "ec2:StopInstances",
                "ec2:RebootInstances",
                "ec2:DescribeInstanceStatus"
            ],
            "Effect": "Allow",
            "Resource": "*"
        }
    ]
}
<!--NeedCopy-->
Creating, updating, or deleting VMs
A machine catalog is created, updated, or deleted with VMs provisioned as AWS instances.
{
    "Version": "2012-10-17",
    "Statement": [
        {
            "Action": [
                "ec2:AttachVolume",
                "ec2:AssociateIamInstanceProfile",
                "ec2:AuthorizeSecurityGroupEgress",
                "ec2:RevokeSecurityGroupEgress",
                "ec2:AuthorizeSecurityGroupIngress",
                "ec2:CreateImage",
                "ec2:CreateLaunchTemplate",
                "ec2:CreateSecurityGroup",
                "ec2:CreateTags",
                "ec2:CreateVolume",
                "ec2:DeleteVolume",
                "ec2:DescribeAccountAttributes",
                "ec2:DescribeAvailabilityZones",
                "ec2:DescribeIamInstanceProfileAssociations",
                "ec2:DescribeImages",
                "ec2:DescribeInstances",
                "ec2:DescribeInstanceStatus",
                "ec2:DescribeInstanceTypes",
                "ec2:DescribeLaunchTemplates",
                "ec2:DescribeLaunchTemplateVersions",
                "ec2:DescribeNetworkInterfaces",
                "ec2:DescribeRegions",
                "ec2:DescribeSecurityGroups",
                "ec2:DescribeSnapshots",
                "ec2:DescribeSubnets",
                "ec2:DescribeTags",
                "ec2:DescribeSpotInstanceRequests",
                "ec2:DescribeInstanceCreditSpecifications",
                "ec2:DescribeInstanceAttribute",

                "ec2:GetLaunchTemplateData",
                "ec2:DescribeVolumes",
                "ec2:DescribeVpcs",
                "ec2:DetachVolume",
                "ec2:DisassociateIamInstanceProfile",
                "ec2:RunInstances",
                "ec2:StartInstances",
                "ec2:StopInstances",
                "ec2:TerminateInstances"
            ],
            "Effect": "Allow",
            "Resource": "*"
        },
        {
            "Action": [
                "ec2:CreateSecurityGroup",
                "ec2:DeleteSecurityGroup"
            ],
            "Effect": "Allow",
            "Resource": "*"
        },
        {
            "Action": [
                "ebs:StartSnapshot",
                "ebs:GetSnapshotBlock",
                "ebs:PutSnapshotBlock",
                "ebs:CompleteSnapshot",
                "ebs:ListSnapshotBlocks",
                "ebs:ListChangedBlocks",
                "ec2:CreateSnapshot"
            ],
            "Effect": "Allow",
            "Resource": "*"
        }
    ]
}
<!--NeedCopy-->
Note:
- The EC2 section related to SecurityGroups is only needed if an Isolation Security Group must be created for the Preparation VM during catalog creation. Once this is done, these permissions are not required.
Importing VMs
A machine catalog is created by importing VMs.
{
    "Version": "2012-10-17",
    "Statement": [
        {
            "Action": [
                "ec2:DescribeInstances",
                "ec2:DescribeSecurityGroups",
                "ec2:DescribeAvailabilityZones",
                "ec2:DescribeSubnets",
                "ec2:DescribeVolumes",
                "ec2:DescribeSpotInstanceRequests"
            ],
            "Effect": "Allow",
            "Resource": "*"
        }
    ]
}
<!--NeedCopy-->
Note:
The
ec2:DescribeSpotInstanceRequestsis needed only if there is a spot instance in the AWS region from where VMs are going to be imported.
Direct disk upload and download
Direct disk upload eliminates the volume worker requirement for machine catalog provisioning, and instead uses public APIs provided by AWS. This functionality reduces the cost associated with extra storage accounts and the complexity for maintaining volume worker operations.
Note:
The support for volume worker is removed. The direct disk upload and download permissions are required for machine catalog provisioning.
The following permissions must be added to the policy:
ebs:StartSnapshotebs:GetSnapshotBlockebs:PutSnapshotBlockebs:CompleteSnapshotebs:ListSnapshotBlocksebs:ListChangedBlocksec2:CreateSnapshotec2:DeleteSnapshotec2:DescribeLaunchTemplates
Important:
- You can add a new VM to existing machine catalogs without any volume worker resources such as volume worker AMI, and volume worker VM.
- If you delete an existing catalog that used any volume worker before, all artifacts that are volume worker related are deleted.
EBS encryption of created volumes
EBS can auto-encrypt newly created volumes if the AMI is encrypted, or EBS is configured to encrypt all new volumes. However, to implement the functionality, the following permissions must be included in the IAM policy.
{
     "Version": "2012-10-17",
     "Statement": [
        {
            "Effect": "Allow",
            "Action": [
                 "kms:CreateGrant",
                 "kms:Decrypt",
                 "kms:DescribeKey",
                 "kms:GenerateDataKeyWithoutPlainText",
                 "kms:GenerateDataKey",
                 "kms:ReEncryptTo",
                 "kms:ReEncryptFrom"
            ],
            "Resource": "*"
        }
    ]
}
<!--NeedCopy-->
Note:
The permissions can be limited to specific keys by including a Resource and Condition block at the discretion of the user. For example, KMS Permissions with Condition:
{
     "Version": "2012-10-17",
     "Statement": [
        {
            "Effect": "Allow",
            "Action": [
                 "kms:CreateGrant",
                 "kms:Decrypt",
                 "kms:DescribeKey",
                 "kms:GenerateDataKeyWithoutPlainText",
                 "kms:GenerateDataKey",
                 "kms:ReEncryptTo",
                 "kms:ReEncryptFrom"
            ],
            "Resource": [
                "arn:aws:kms:us-east-2:123456789012:key/abcd1234-a123-456d-a12b-a123b4cd56ef"
            ],
            "Condition": {
                "Bool": {
                    "kms:GrantIsForAWSResource": true
                }
            }
        }
    ]
}
<!--NeedCopy-->
The following key policy statement is the entire default key policy for KMS keys that is required to allow the account to use IAM policies to delegate permission for all actions (kms:*) on the KMS key.
{
"Sid": "Enable IAM policies",
"Effect": "Allow",
"Principal": {
"AWS": "arn:aws:iam::111122223333:root"
},
"Action": "kms:",
"Resource": ""
}
<!--NeedCopy-->
For more information, see the AWS Key Management Service official documentation.
IAM role-based authentication
The following permissions are added to support role-based authentication.
{
     "Version": "2012-10-17",
     "Statement": [
        {
            "Effect": "Allow",
            "Action": "iam:PassRole",
            "Resource": "arn:aws:iam::*:role/*"
        }
    ]
}
<!--NeedCopy-->
Minimal IAM permissions policy
The following JSON can be used for all currently supported features. You can create host connections, create, update, or delete VMs, and do power management using this policy. The policy can be applied to the users as explained in Defining IAM permissions sections or you can also use role-based authentication using role_based_auth security key and secret key.
Important:
To use role_based_auth, first configure the desired IAM role on the cloud connector ec2 instance when setting up the cloud connector. Using Citrix Studio, add the hosting connection and supply the role_based_auth for the authentication key and secret. A hosting connection with these settings then uses role-based authentication.
{
    "Version": "2012-10-17",
    "Statement": [
        {
            "Action": [
                "ec2:AttachVolume",
                "ec2:AssociateIamInstanceProfile",
                "ec2:AuthorizeSecurityGroupEgress",
                "ec2:RevokeSecurityGroupEgress",
                "ec2:AuthorizeSecurityGroupIngress",
                "ec2:CreateImage",
                "ec2:CreateLaunchTemplate",
                "ec2:CreateNetworkInterface",
                "ec2:CreateTags",
                "ec2:CreateVolume",
                "ec2:DeleteLaunchTemplate",
                "ec2:DeleteNetworkInterface",
                "ec2:DeleteSecurityGroup",
                "ec2:DeleteSnapshot",
                "ec2:DeleteTags",
                "ec2:DeleteVolume",
                "ec2:DeregisterImage",
                "ec2:DescribeAccountAttributes",
                "ec2:DescribeAvailabilityZones",
                "ec2:DescribeIamInstanceProfileAssociations",
                "ec2:DescribeImages",
                "ec2:DescribeInstances",
                "ec2:DescribeInstanceTypes",
                "ec2:DescribeInstanceStatus",
                "ec2:DescribeLaunchTemplates",
                "ec2:DescribeLaunchTemplateVersions",
                "ec2:DescribeNetworkInterfaces",
                "ec2:DescribeRegions",
                "ec2:DescribeSecurityGroups",
                "ec2:DescribeSnapshots",
                "ec2:DescribeSubnets",
                "ec2:DescribeTags",
                "ec2:DescribeSpotInstanceRequests",
                "ec2:DescribeInstanceCreditSpecifications",
                "ec2:DescribeInstanceAttribute",
                "ec2:GetLaunchTemplateData",
                "ec2:DescribeVolumes",
                "ec2:DescribeVpcs",
                "ec2:DetachVolume",
                "ec2:DisassociateIamInstanceProfile",
                "ec2:RebootInstances",
                "ec2:RunInstances",
                "ec2:StartInstances",
                "ec2:StopInstances",
                "ec2:TerminateInstances"
            ],
            "Effect": "Allow",
            "Resource": "*"
        },
        {
            "Action": [
                "ec2:CreateSecurityGroup",
                "ec2:DeleteSecurityGroup"
            ],
            "Effect": "Allow",
            "Resource": "*"
        },
        {
            "Action": [
                "ebs:StartSnapshot",
                "ebs:GetSnapshotBlock",
                "ebs:PutSnapshotBlock",
                "ebs:CompleteSnapshot",
                "ebs:ListSnapshotBlocks",
                "ebs:ListChangedBlocks",
                "ec2:CreateSnapshot"
            ],
            "Effect": "Allow",
            "Resource": "*"
        },
        {
            "Effect": "Allow",
            "Action": [
                 "kms:CreateGrant",
                 "kms:Decrypt",
                 "kms:DescribeKey",
                 "kms:GenerateDataKeyWithoutPlainText",
                 "kms:GenerateDataKey",
                 "kms:ReEncryptTo",
                 "kms:ReEncryptFrom"
            ],
            "Resource": "*"
        },
        {
            "Effect": "Allow",
            "Action": "iam:PassRole",
            "Resource": "arn:aws:iam::*:role/*"
        }
    ]
}
<!--NeedCopy-->
Note:
- The EC2 section related to SecurityGroups is only needed if an Isolation Security Group must be created for the Preparation VM during catalog creation. Once this is done, these permissions are not required.
- The KMS section is only required when using EBS volume encryption.
- The
iam:PassRolepermission section is needed only for role_based_auth.- Specific resource-level permissions can be added instead of full access based on your requirements and environment. Refer to AWS documents Demystifying EC2 Resource-Level Permissions and Access management for AWS resources for more details.
- Use
ec2:CreateNetworkInterfaceandec2:DeleteNetworkInterfacepermissions only if you are using the volume worker method.
Validate permissions on host connection
You can validate permissions on a host connection to do tasks related to creating and managing MCS machine catalogs. This implementation helps you to find out the missing permissions required for different scenarios such as creating, deleting, and updating VMs, power management of VMs, and EBS encryption, ahead of time so that you can avoid being blocked at critical times.
You can validate the permissions on a host connection using the PowerShell command Test-HypHypervisorConnection. The result from the command is captured as a list where each item in the list is broken into three sections.
- Category: The action or task a user can do to create and manage an MCS machine catalog.
- Corrective Action: The step an admin must do to resolve a users’ missing permissions discrepancy.
- Missing permission: The list of missing permissions for a category.
To validate the permissions, do the following:
- Create a host connection to AWS.
- Open a PowerShell window from the Delivery Controller™ host.
- Run
asnp citrix*to load the Citrix-specific PowerShell modules. -
Run the following command to verify if you have the required permissions to look up your permissions.
Test-HypHypervisorConnection -LiteralPath "XDHyp:\Connections\AWSCon" <!--NeedCopy--> -
After you add the missing permissions required to look up your permissions, run the following command to verify if you have permissions in the following categories:
- Create Update delete
- Power Management
- EBS encryption
Test-HypHypervisorConnection -LiteralPath "XDHyp:\Connections\AWSCon" [-SecurePassword -Password] "password" -UserName "" -CustomProperties ""
<!--NeedCopy-->
For more information on adding permissions, see Add IAM permissions.
Where to go next
- If you’re in the initial deployment process, see Create machine catalogs.
- For AWS specific information, see Create an AWS EC2 catalog.