-
-
-
Microsoft Entra joined
-
WebSocket communication between VDA and Delivery Controller™
-
-
-
-
-
-
This content has been machine translated dynamically.
Dieser Inhalt ist eine maschinelle Übersetzung, die dynamisch erstellt wurde. (Haftungsausschluss)
Cet article a été traduit automatiquement de manière dynamique. (Clause de non responsabilité)
Este artículo lo ha traducido una máquina de forma dinámica. (Aviso legal)
此内容已经过机器动态翻译。 放弃
このコンテンツは動的に機械翻訳されています。免責事項
이 콘텐츠는 동적으로 기계 번역되었습니다. 책임 부인
Este texto foi traduzido automaticamente. (Aviso legal)
Questo contenuto è stato tradotto dinamicamente con traduzione automatica.(Esclusione di responsabilità))
This article has been machine translated.
Dieser Artikel wurde maschinell übersetzt. (Haftungsausschluss)
Ce article a été traduit automatiquement. (Clause de non responsabilité)
Este artículo ha sido traducido automáticamente. (Aviso legal)
この記事は機械翻訳されています.免責事項
이 기사는 기계 번역되었습니다.책임 부인
Este artigo foi traduzido automaticamente.(Aviso legal)
这篇文章已经过机器翻译.放弃
Questo articolo è stato tradotto automaticamente.(Esclusione di responsabilità))
Translation failed!
Microsoft Entra joined
This article describes the requirements to create Microsoft Entra joined catalogs using Citrix DaaS™ in addition to the requirements outlined in the Citrix DaaS system requirements section.
Requirements
- Control plane: See Supported Configurations
- VDA type: Single-session (desktops only) or multi-session (apps and desktops)
- VDA version: 2203 or later
- Provisioning type: Machine Creation Services™ (MCS), Persistent and Non-persistent using Machine Profile workflow
- Assignment type: Dedicated and pooled
- Hosting platform: Azure only
- Rendezvous V2 must be enabled
- Single sign-on: See Microsoft Entra single sign-on for DaaS
Limitations
- Service continuity is not supported.
- Logging in with Windows Hello in the virtual desktop is only supported with PIN. Biometric authentication methods (facial recognition, fingerprint recognition, and iris recognition) are not supported at this time.
- Support only Microsoft Azure Resource Manager cloud environments.
- If single sign-on is disabled, the first time a virtual desktop session is launched, the Windows sign-in screen may show the logon prompt for the last logged on user without the option to switch to another user. The user must wait until the logon times out and the desktop’s lock screen appears, and then click the lock screen to reveal the logon screen once again. At this point, the user is able to select Other Users and enter their credentials. This is the behavior with every new session when the machines are non-persistent.
- When multiple machine catalogs are joined to the same Azure tenant, each catalog must use a unique
NamingScheme. If different catalogs use the sameNamingScheme, VMs might be created with duplicate names, which causes the Entra ID join to fail due to name conflicts.
Considerations
Image configuration
- Consider optimizing your Windows image using the Citrix Optimizer tool.
Microsoft Entra joined
-
Consider disabling Windows Hello so users are not prompted to set it up when they log into their virtual desktop. If you are using VDA 2209 or later, this is done automatically. For earlier versions, you can do this in one of two ways:
-
Group policy or local policy
- Navigate to Computer Configuration > Administrative Templates > Windows Components > Windows Hello for Business.
- Set Use Windows Hello for Business to:
- Disabled, or
- Enabled and select Do not start Windows Hello provisioning after sign-in.
-
Microsoft Intune
- Create a device profile that disables Windows Hello for Business. Refer to Microsoft documentation for details.
-
-
Users must be granted explicit access in Azure to log into the machines using their Microsoft Entra credentials. This can be facilitated by adding the role assignment at the resource group level:
- Sign into the Azure portal.
- Select Resource Groups.
- Click the resource group where the virtual desktop workloads reside.
- Select Access control (IAM).
- Click Add role assignment.
- Search for Virtual Machine User Login, select it on the list, and click Next.
- Select User, group, or service principal.
- Click Select members and select the users and groups you want to provide access to the virtual desktops.
- Click Select.
- Click Review + assign.
- Click Review + assign once again.
Note:
If you choose to let MCS create the resource group for the virtual desktops, you add this role assignment after the machine catalog is created.
- Master VMs can be Microsoft Entra joined or non-domain-joined. This functionality requires VDA version 2212 or later.
VDA installation and configuration
Follow the steps for installing the VDA:
-
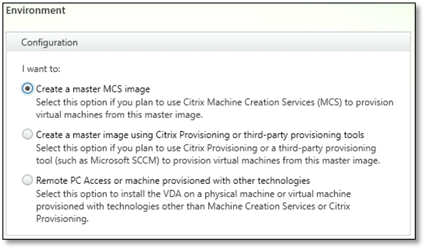
Make sure to select the following options in the installation wizard:
- In the Environment page, select Create a master MCS image.
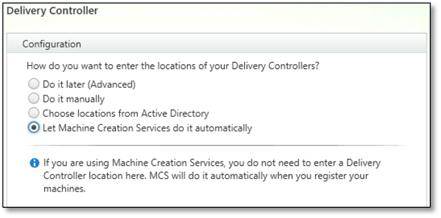
- In the Delivery Controller™ page, select Let Machine Creation Services do it automatically.
-
(Only for VDA versions earlier than 2311) After the VDA is installed, add the following registry value:
- Key: HKEY_LOCAL_MACHINE\SOFTWARE\Citrix\VirtualDesktopAgent
- Value type: DWORD
- Value name: GctRegistration
- Value data: 1
-
For Windows 11 22H2 based master VM, create a scheduled task in the master VM that executes the following command at system startup using SYSTEM account. This task of scheduling a task in the master VM is only required for VDA version 2212 or earlier.
reg ADD HKLM\Software\AzureAD\VirtualDesktop /v Provider /t REG_SZ /d Citrix /f <!--NeedCopy--> -
If you join the master VM to Microsoft Entra ID, and then manually remove the join by
dsregcmdutility, make sure that the value ofAADLoginForWindowsExtensionJoinedunder HKLM\Software\Microsoft\Windows Azure\CurrentVersion\AADLoginForWindowsExtension is zero.
Where to go next
Once the resource location and hosting connection are available, proceed to create the machine catalog. For more information on creating identity pool of Microsoft Entra joined machine identity, see Identity pool of Microsoft Entra joined machine identity.
Share
Share
This Preview product documentation is Citrix Confidential.
You agree to hold this documentation confidential pursuant to the terms of your Citrix Beta/Tech Preview Agreement.
The development, release and timing of any features or functionality described in the Preview documentation remains at our sole discretion and are subject to change without notice or consultation.
The documentation is for informational purposes only and is not a commitment, promise or legal obligation to deliver any material, code or functionality and should not be relied upon in making Citrix product purchase decisions.
If you do not agree, select I DO NOT AGREE to exit.