Automated actions
You create automated actions in Citrix Endpoint Management to program a reaction to:
- Events
- User or device properties
- The existence of apps on user devices
When you create an automated action, the triggers defined for the action determine what happens on the user device when it is connected to Citrix Endpoint Management. When an event is triggered, you can send a notification to the user to correct an issue before more serious action is taken.
The effects that you set to happen automatically range from the following:
- Fully or selectively wiping the device.
- Setting the device to out of compliance.
- Revoking the device.
- Sending a notification to the user to correct an issue before more severe action is taken.
You can configure app lock and app wipe actions for MAM-only mode.
You can use automated actions to mark Windows 10 and Windows 11 devices joined to Azure Active Directory (AD) out of compliance in Azure AD.
Note:
Before you can notify users, you must configure notification servers in the Citrix Endpoint Management settings for SMTP so that Citrix Endpoint Management can send the messages. For more information, see Notifications. Set up any notification templates you plan to use before proceeding. For more information, see Notifications. Set u, see Create, and update notification templates.
Example actions
Here are some examples of using automated actions:
Example one
- You want to detect an app that you previously blocked (for example, “Words with Friends”). You can specify a trigger that sets the user device out of compliance after detecting the “Words with Friends” app. The action then notifies users that they must remove the app to bring their device back into compliance. You can also set a time limit for how long to wait for users to comply. After that time limit, a defined action occurs, such as selectively wiping the device.
Example two
- You want to verify if customers are using the latest firmware and block access to resources if users have to update their devices. You can specify a trigger that sets the user device out of compliance when a user device doesn’t have the latest version. You use automated actions to block resources and to notify customers.
Example three
- A user device is put into an out-of-compliance state and the user then fixes the device. You can configure a policy to deploy a package that resets the device into a compliant state.
Example four
-
You want to mark user devices that have been inactive for a certain time period as out of compliance. You can create an automated action for inactive devices as follows:
- In the Citrix Endpoint Management console, go to Settings > Network Access Control and then select Inactive Devices. For more information about the Inactive Devices setting, see Network Access Control.
- Follow the steps to add an action, as outlined in Add, and manage actions. The only difference is that you configure the settings as follows on the Action details page:
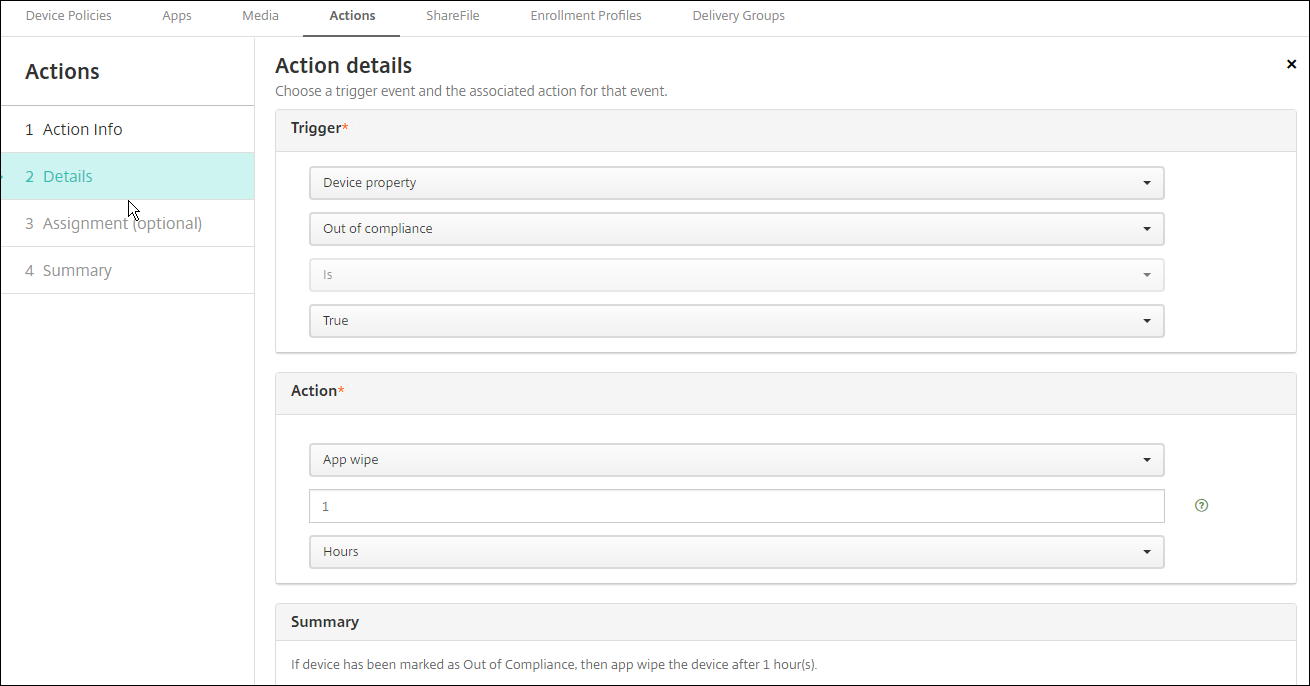
- Trigger. Select Device property, Out of compliance, and True.
- Action. Select Send notification and select a template that you created by using Notification Template in Settings. Then set the delay in days, hours, or minutes before doing the action. Set the interval at which the action repeats until the user addresses the triggering issue.
Tip:
To delete inactive devices in bulk, use the Citrix Endpoint Management Public REST API. You first manually get the device IDs for inactive devices that you want to delete and then run the delete API to delete them in bulk.
Add and manage actions
To add, edit, and filter automated actions:
-
From the Citrix Endpoint Management console, click Configure > Actions. The Actions page appears.
-
On the Actions page, do one of the following:
- Click Add to add an action.
- Select an existing action to edit or delete. Click the option that you want to use.
-
The Action Information page appears.
-
On the Action Information page, enter or modify the following information:
- Name: Type a name to identify the action. This field is required.
- Description: Describe what the action is meant to do.
-
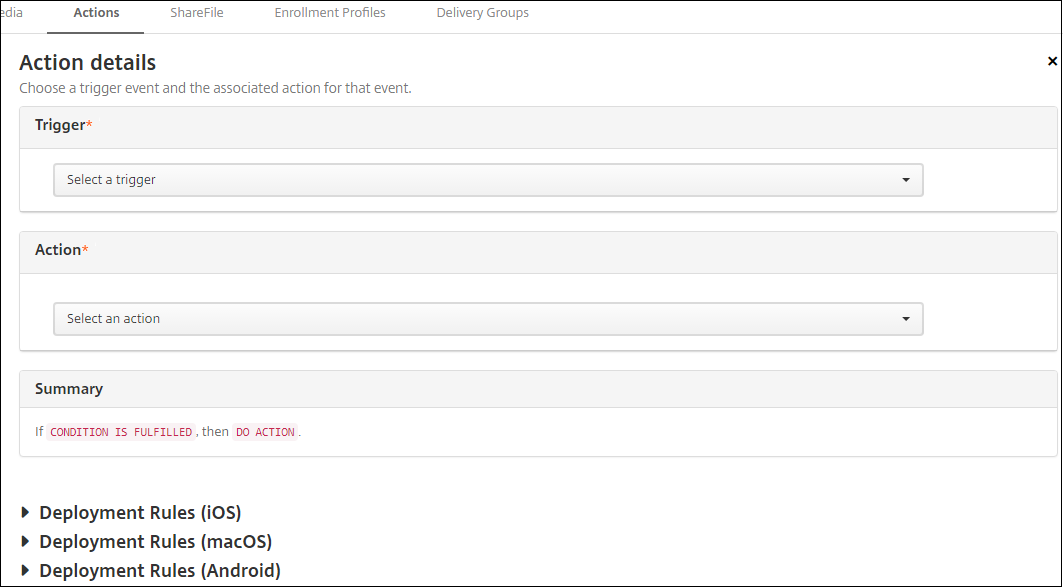
Click Next. The Action details page appears.
The following example shows how to set up a Event trigger. If you select a different trigger, the resulting options differ from the options shown here.
-
On the Action details page, enter or modify the following information:
In the Trigger list, click the event trigger type for this action. Select one of the following triggers:
- Event: Checks whether the device status matches the non-compliance event you choose, then reacts to it.
- Device property: Checks for a specific value for a device attribute on a device that is MDM-managed, then reacts to it. For more information, see the Device property names and values PDF.
- User property: Reacts to a specific value for a user attribute, usually from Active Directory.
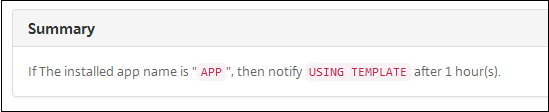
- Installed app name: Reacts to an app being installed. Doesn’t apply to MAM-only mode. Requires the app inventory policy to be enabled on the device. The app inventory policy is enabled on all platforms by default. For details, see App inventory device policy.
- Policy returned value: Checks if the value returned from PowerShell scripts meets certain logic criteria. The Windows Agent policy must be enabled and configured. For more information on the Windows Agent policy, see Windows Agent device policy.
-
In the next list, click the response to the trigger.
-
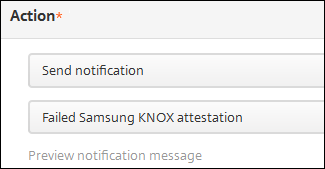
In the Action list, click the action to be done when the trigger criterion is met. Except for the Send notification action, you choose a time frame in which users can resolve the issue that caused the trigger. If the issue isn’t resolved within that time frame, the selected action is taken. For a definition of the actions, see Security actions.
If you pick Send notification, use the following steps to send a notification action.
-
In the next list, select the template to use for the notification. Notification templates relevant to the selected event appear. If there’s no template for the notification type, you are prompted to configure a template with the message: No template for this event type. Create a template using Notification Template in Settings.
To notify users, use Settings > Notification Server to configure settings for SMTP so that Citrix Endpoint Management can send the messages. See Notifications. Also, before proceeding, use Settings > Notification Template to set up any notification templates you plan to use. See Create and update notification templates.
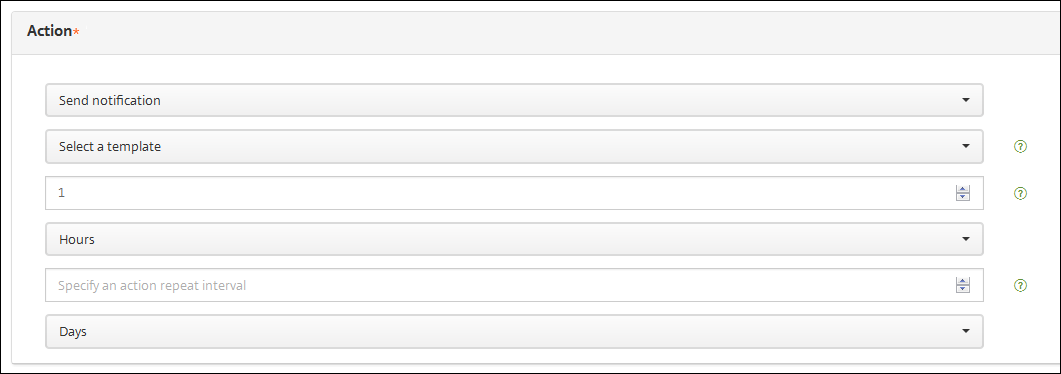
After you select the template, click Preview notification message.
-
In the following fields, set the delay in days, hours, or minutes before doing the action. Set the interval at which the action repeats until the user addresses the triggering issue.

-
In Summary, verify that you created the automated action as you intended.
-
After you configure the action details, you can configure the deployment rules for each platform individually. To do so, complete step 13 for each platform you choose.
-
Configure deployment rules. For general information about configuring deployment rules, see Deploy resources.
For this example:
- Device ownership must be BYOD.
- The device must be passcode compliant.
- Device mobile country code cannot be only Andorra.
-
When you are done configuring the platform deployment rules for the action, click Next. The Actions assignment page appears, where you assign the action to a delivery group or groups. This step is optional.
-
Next to Choose delivery groups, type to find a delivery group or select groups in the list. The groups you select appear in the Delivery groups to receive app assignment list.
-
Expand Deployment Schedule and then configure the following settings:
-
Next to Deploy, click On to schedule deployment or click Off to prevent deployment. The default option is set as On. If you choose Off, no other options are required.
-
Next to Deployment schedule, click Now, or Later. The default option is set as Now.
-
If you click Later, click the calendar icon and then select the date and time for deployment.
-
Next to Deployment condition, click On every connection, or Only when previous deployment has failed. The default option is set as On every connection.
-
Next to Deploy for always-on connection, click On, or Off. The default option is set as Off.
This option applies when you have configured the scheduling background deployment key in Settings > Server Properties.
Note:
This option applies when you have configured the scheduling background deployment key in Settings > Server Properties.
The always-on option:
- Is not available for iOS devices
- Is not available for Android and Android Enterprise customers who began using Citrix Endpoint Management with version 10.18.19 or later
- Is not recommended for Android and Android Enterprise customers who began using Citrix Endpoint Management with before version 10.18.19
The deployment schedule that you configure is the same for all platforms. Any changes you make apply to all platforms, except for Deploy for always-on connection.
-
-
Click Next. The Summary page appears, where you can verify the action configuration.
-
Click Save to save the action.
App lock and app wipe actions for MAM-only mode
You can wipe or lock apps on a device for all four categories of triggers listed in the Citrix Endpoint Management console: event, device property, user property, and installed app name.
To configure an automatic app wipe or app lock
-
In the Citrix Endpoint Management console, click Configure > Actions.
-
On the Actions page, click Add.
-
On the Action Information page, enter a name for the action and an optional description.
-
On the Action Details page, select the trigger you want.
-
In Action, select an action.
For this step, keep the following conditions in mind:
When the trigger type is set as Event and the value is not Active Directory disabled user, the App wipe and App lock actions don’t appear.
When the trigger type is set as Device property and the value is MDM lost mode enabled, the following actions don’t appear:
- Selectively wipe the device
- Completely wipe the device
- Revoke the device
For each option, a 1 hour delay is automatically set, but you can select the delay period in minutes, hours or days. The intent of the delay is to give users time to fix an issue before the action occurs. For more information about the App wipe and App lock actions, see Security actions.
Note:
If you set the trigger to event, the repeat interval is automatically a minimum of 1 hour. The device must carry out a refresh of the policies to synchronize with the server for the notification to come in. Typically, a device synchronizes with the server when users sign on or manually refresh their policies through Citrix Secure Hub.
An extra delay of approximately 1 hour might occur before any action is carried out, to allow the Active Directory database to synchronize with Citrix Endpoint Management.
-
Configure the deployment rules and then click Next.
-
Configure delivery group assignments and a deployment schedule and then click Next.
-
Click Save.
To check app lock or app wipe status
-
Go to Manage > Devices, click a device, and then click Show more.
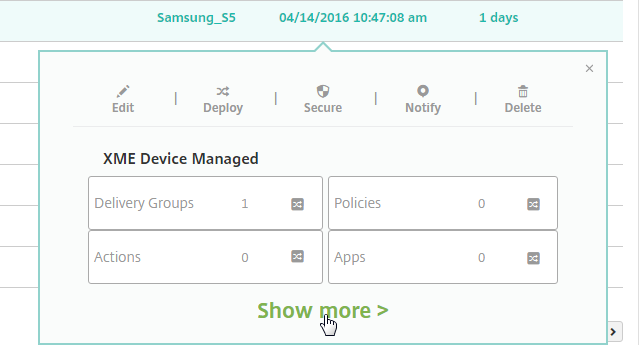
-
Scroll to Device App Wipe and Device App Lock.
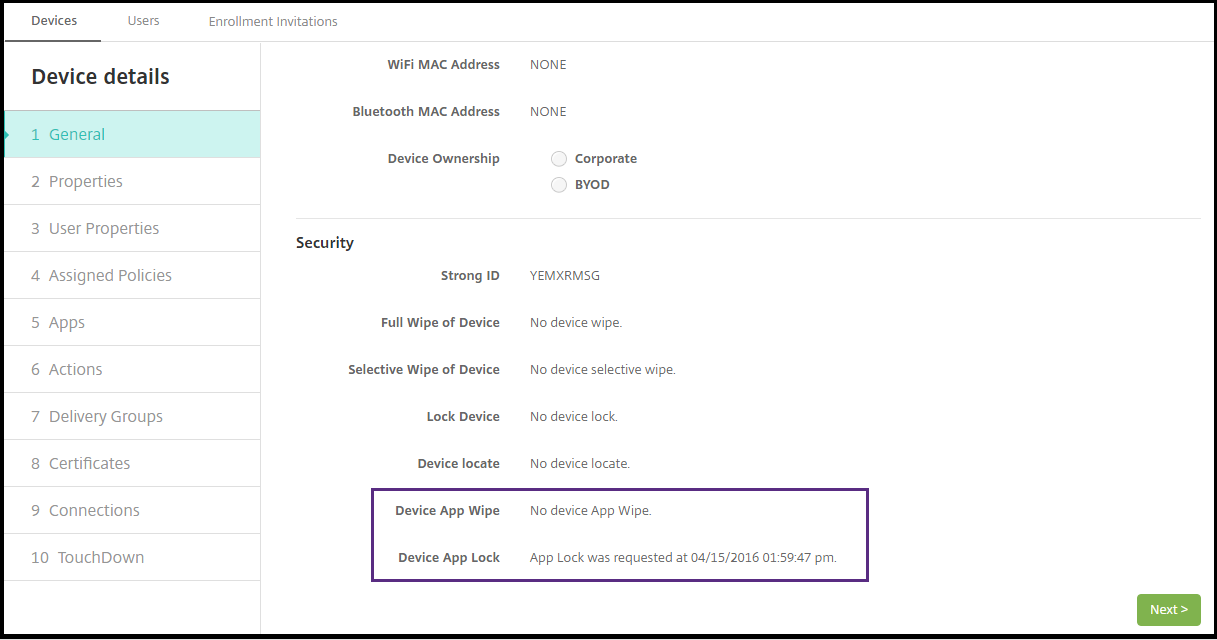
After a device gets wiped, the user is prompted to enter a PIN code. If the user forgets the code, you can look it up in the Device Details.

Marking Windows 10 and Windows 11 devices out of compliance in Azure AD
When Windows 10 and Windows 11 devices that are joined to Azure AD are marked out-of-compliance by Citrix Endpoint Management, they can also be marked out-of-compliance in Azure AD. To enable this functionality, add permissions to the on-premises MDM application to access the Microsoft Graph API in the Azure AD portal.
-
Log in to the Azure AD portal with your Azure AD administrator credentials.
-
In the Azure AD portal, navigate to Azure Active Directory > Mobility (MDM and MAM). Choose On-premises MDM application.
-
Click On-premises Application Settings > Required Permissions > Add > Select an API > Microsoft Graph. Click Select and save.
-
Under Required permissions, select Microsoft Graph. Under Enable Access, select Read and write directory data.
-
Under Required permissions, select Microsoft Graph. Then click Grant permissions.
-
Click Yes to grant permission.
When an Azure AD enrolled device running Windows 10 or Windows 11 is out of compliance, Citrix Endpoint Management also marks the device as out of compliance in Azure AD.
Create an automated action based on a Windows Agent device policy result
Use the Windows Agent device policy to deploy scripts that monitor registry values on managed Windows desktops and tablets. Based on the values returned from a script, you can then configure an automated action to run.
-
Configure a Windows Agent device policy and check the values returned by the script. For information on the Windows Agent device policy, see Windows Agent device policy.
That article and this section include a sample that’s based on a script named
EntApp_2019_checkFirewall. The related Windows Agent device policy defines a config namedcName_checkFirewall. That config runs the sample script.After the script runs on a device, you get the info required to create an action, as described in the Windows Agent device policy.
- In the Citrix Endpoint Management console, click Configure > Actions.
- On the Actions page, click Add.
- On the Action Information page, enter a name for the action and an optional description.
-
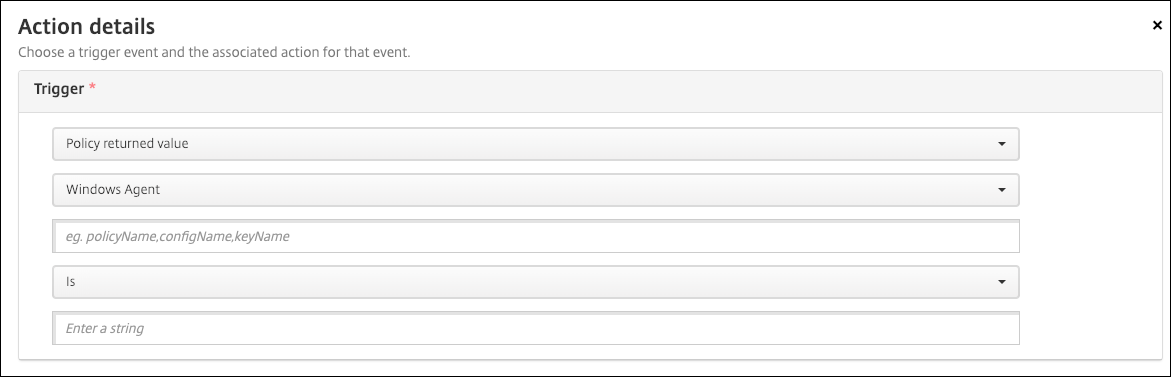
On the Action Details page, select the Policy returned value trigger.
-
In the fields that appear, define the trigger and the action:
- Windows Agent settings: Type the policy name, config name, and key name for the Windows Agent policy you created.
- Drop-down menu: Select Is, Is Not, Contains, or Does Not Contain logic. This logic applies to the next field and causes the action to trigger if the logic applies.
- Enter a string: Enter the string that resulted from running the PowerShell script uploaded in your policy. For information about finding that string, see Windows Agent device policy.
- Action: Select an action, a value for the action, and choose a time frame for resolving the action.
In our example: If the key name
firewallEnabledreturns the valuetrue, the following action marks the device as in compliance.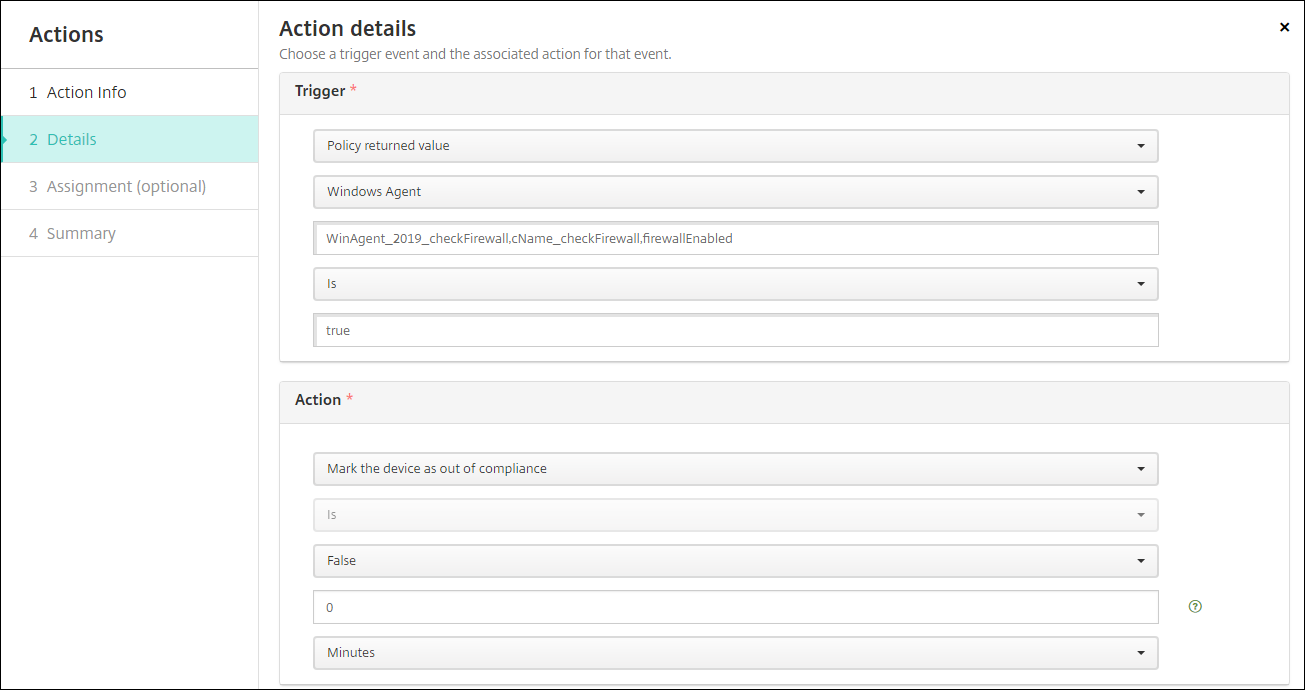
If the key name
firewallEnabledreturns the valuefalse, the following action marks the device as out of compliance.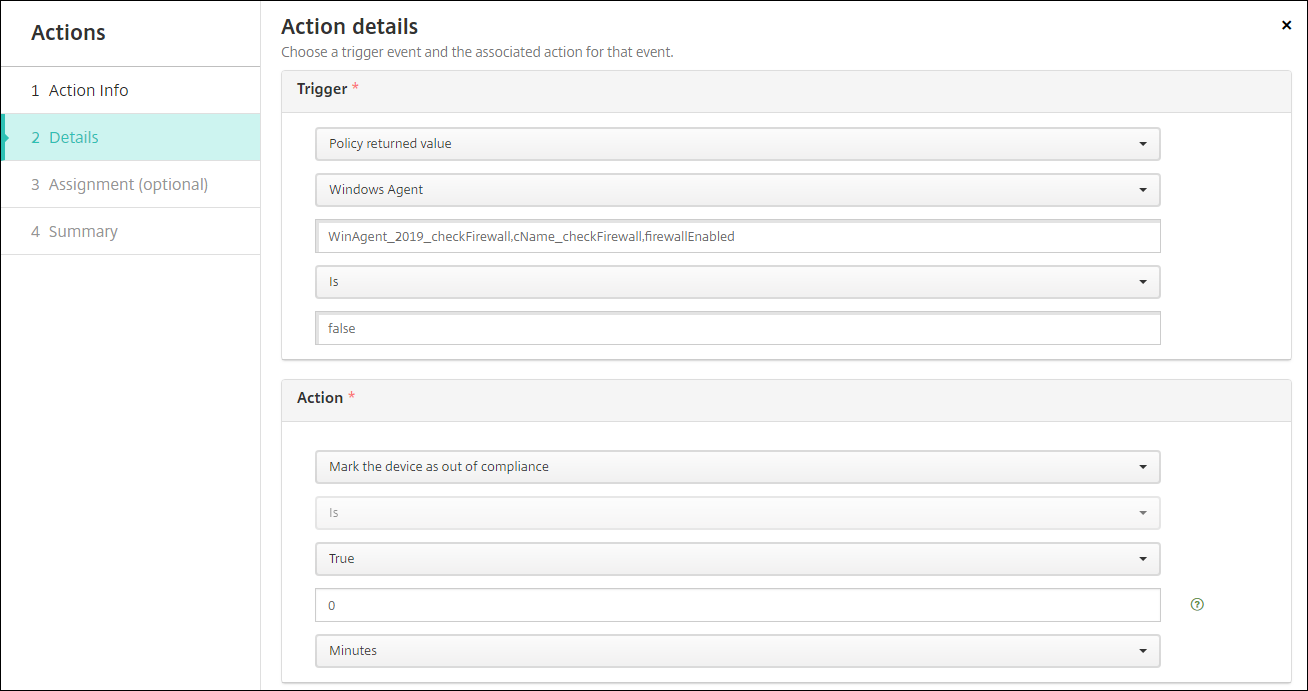
- If needed, set a deployment schedule and choose delivery groups.