User accounts, roles, and enrollment
You do user configuration tasks in the Citrix Endpoint Management console on the Manage tab and the Settings page. Unless otherwise indicated, the steps for the following tasks are provided in this article.
- Enrollment security mode and invitations
- From Settings > Enrollment, configure up to seven enrollment security modes and send enrollment invitations. Each enrollment security mode has its own level of security and the number of steps users must take to enroll their devices.
- Roles for user accounts and groups
- From Settings > Role-Based Access Control, assign predefined roles, or sets of permissions, to users and groups. These permissions control the level of access users have to system functions. For more information, see Configure roles with RBAC.
- From Settings > Notification Templates, to create or update the notification templates to use in automated actions, enrollment, and standard notification messages sent to users. You configure the notification templates to send messages over two different channels: Citrix Secure Hub or SMTP. For more information, see: Creating and updating Notification Templates.
- User accounts and groups:
-
From Manage > Users, you can add local user accounts manually or use a .csv provisioning file to import the accounts and to manage local groups. However, most Citrix Endpoint Management deployments connect to LDAP for user and group information. You might prefer to create user accounts locally in use cases such as the following:
- In environments, such as retail, where devices are shared rather than dedicated to individual users.
- If you use an unsupported directory, such as Novell eDirectory.
-
From Settings > Workflows, use workflows to manage the creation and removal of user accounts.
-
About user accounts
An Citrix Endpoint Management user account is either for a local, Active Directory, or cloud user.
-
Cloud users: A cloud user is a special user account that Citrix Cloud creates when an administrator is added to your Citrix Cloud customer account. A cloud user account uses the same user name as the administrator account on Citrix Cloud and defaults to the Admin role. The cloud user account provides a single sign-on and does other administrative functions.
To add administrators to a Citrix Cloud account, see Invite new administrators.
For cloud users:
- You can change the roles and user properties of cloud users through the Citrix Cloud console. See Manage Citrix Cloud administrators.
- To change the password, see Administrators.
- To delete a cloud user, in Citrix Cloud, go to Identity and access management > Administrators. Click the ellipsis at the end of the user’s row, and then select Delete Administrator.
- You cannot add cloud users to a local group.
Configure enrollment security modes
You configure a device enrollment security mode to specify a security level and notification template for device enrollment in Citrix Endpoint Management.
Citrix Endpoint Management offers six enrollment security modes, each with its own level of security and steps users must take to enroll their devices. You configure enrollment security modes in the Citrix Endpoint Management console from the Manage > Enrollment Invitations page. For information, see Enrollment invitations.
Note:
If you plan to use custom notification templates, you must set up the templates before you configure enrollment security modes. For more information about notification templates, see Creating or Updating Notification Templates.
-
On the Citrix Endpoint Management console, click the gear icon in the upper-right corner of the console. The Settings page appears.
-
Click Enrollment. The Enrollment page appears. It has a table of all available enrollment security modes. By default, all enrollment security modes are enabled.
-
Select any enrollment security mode in the list to edit it. Then, set the mode as the default or disable the mode.
Select the checkbox next to an enrollment security mode to view the options menu. Or, click anywhere else in the list to view the options menu on the right side of the listing.
Tip:
When you edit the enrollment security mode, you can specify an expiration deadline after which users cannot enroll their devices. For information, see To edit an enrollment security mode in this article. The value appears in the user and group enrollment invitation configuration pages.
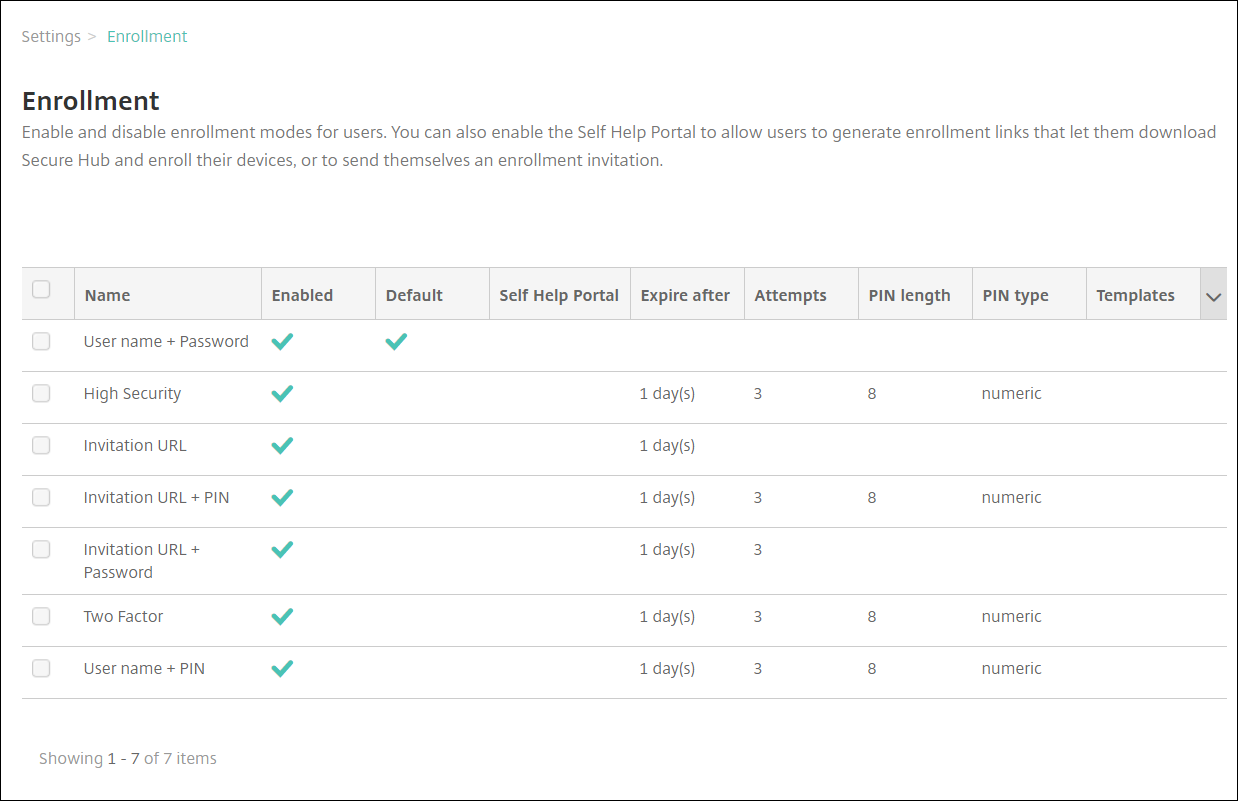
You have the following enrollment security mode choices depending on your platform:
- User name + Password
- Invitation URL
- Invitation URL + PIN
- Invitation URL + Password
- Two Factors
- User name + PIN
For information about platform-specific enrollment security modes, see Enrollment security modes by platform.
You can use enrollment invitations as an effective way to restrict the ability to enroll to specific users or groups. To send enrollment invitations, you can use only Invitation URL, Invitation URL + PIN, or Invitation URL + Password enrollment security modes. For devices enrolling with User name + Password, Two-factor authentication, or User name + PIN, users must manually enter their credentials in Citrix Secure Hub.
You can use one-time PIN (sometimes also called OTP) enrollment invitations as a two-factor authentication solution. One-time PIN enrollment invitations control the number of devices a user can enroll. OTP invitations aren’t available for Windows devices.
To edit an enrollment security mode
-
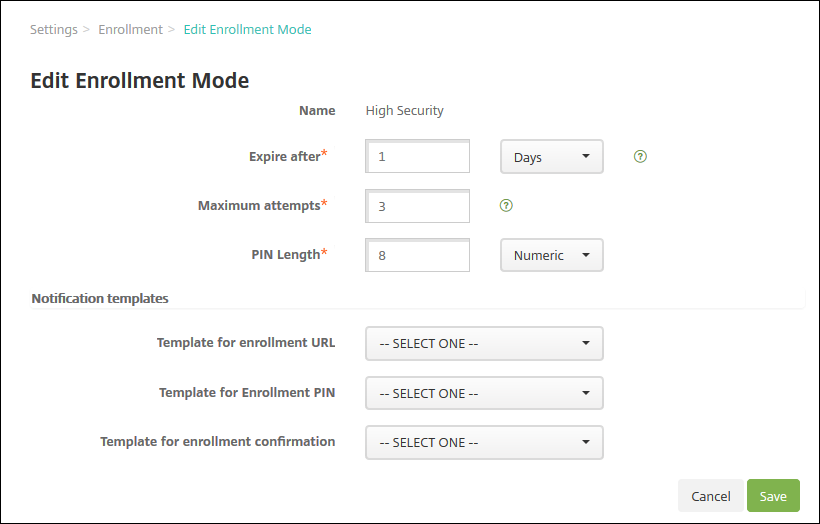
In the Enrollment list, select an enrollment security mode and then click Edit. The Edit Enrollment Mode page appears. Depending on the mode you select, you might see different options.
-
Change the following information as appropriate:
-
Expire after: Type an expiration deadline after which users cannot enroll their devices. This value appears in the user and group enrollment invitation configuration pages.
Type 0 to prevent the invitation from expiring.
- Days: Click Days or Hours in the drop-down list to correspond to the expiration deadline you entered in Expire after.
-
Maximum attempts: Type the number of attempts to enroll that a user can make before being locked out of the enrollment process. This value appears in the user and group enrollment invitation configuration pages.
Type 0 to allow unlimited attempts.
- PIN length: Type a numeral to set the length of the generated PIN.
-
Numeric: Click Numeric or Alphanumeric in the drop-down list for the PIN type.
-
Notification templates:
- Template for enrollment URL: Click a template in the drop-down list to use for the enrollment URL. For example, the Enrollment invitation template sends users an email. For more information on notification templates, see Create or update notification templates.
- Template for enrollment PIN: Click a template in the drop-down list to use for the enrollment PIN.
- Template for enrollment confirmation: Click a template in the drop-down list to use to inform a user that they enrolled successfully.
-
-
Click Save.
To set an enrollment security mode as default
The default enrollment security mode is used for all device enrollment requests unless you select a different enrollment security mode. If no enrollment security mode is set as the default, you must create an enrollment request for each device enrollment.
-
If the enrollment security mode that you want to use as a default isn’t enabled, select it and click Enable. The only enrollment security modes that you can use as a default are User name + Password, Two Factor, or User name + PIN.
-
Select the enrollment security mode and click Default. The selected mode is now the default. If any other enrollment security mode was set as the default, the mode is no longer the default.
To disable an enrollment security mode
Disabling an enrollment security mode makes it unavailable for use, both for group enrollment invitations and on the Self-Help Portal. You might change how you allow users to enroll their devices by disabling one enrollment security mode and enabling another.
-
Select an enrollment security mode.
You cannot disable the default enrollment security mode. If you want to disable the default enrollment security mode, you must first remove its default status.
-
Click Disable. The enrollment security mode is no longer enabled.
Add, edit, unlock, or delete local user accounts
You can add local user accounts to Citrix Endpoint Management manually or you can use a provisioning file to import the accounts. For the steps to import user accounts from a provisioning file, see Import user accounts.
All Citrix Cloud administrators get created as Citrix Endpoint Management administrators. If you create a Citrix Cloud administrator with custom access, make sure that access includes Citrix Endpoint Management. For information on adding Citrix Cloud administrators, see Add administrators.
-
In the Citrix Endpoint Management console, click Manage > Users. The Users page appears.

-
Click Show filter to filter the list.
To add a local user account
-
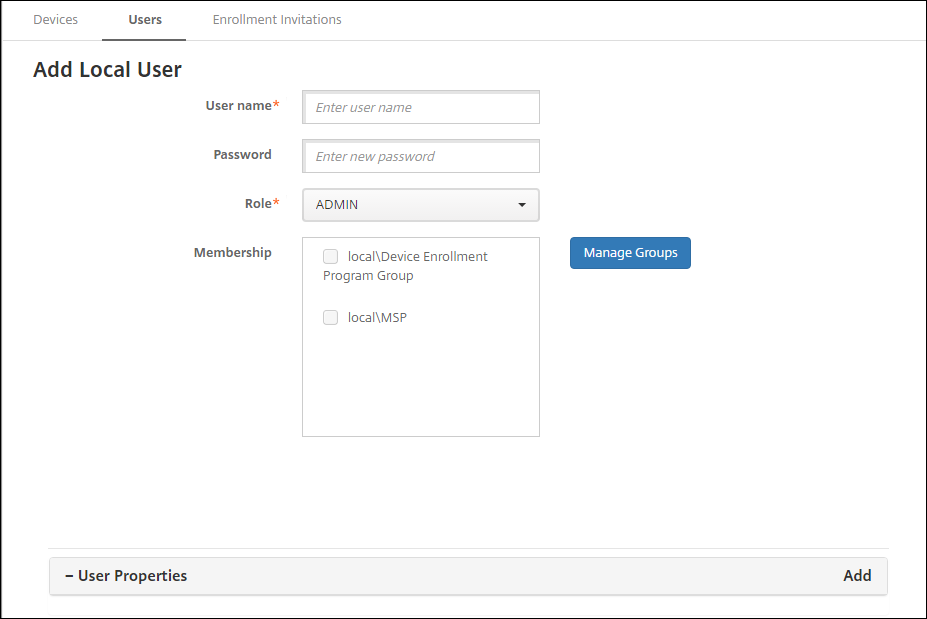
On the Users page, click Add Local User. The Add Local User page appears.
-
Configure these settings:
- User name: Type the name, a required field. You can include the following in names: spaces, uppercase letters, and lowercase letters.
-
Password: Type an optional user password. The password must be at least 14 characters long and meet all the following criteria:
- Include at least two numbers
- Include at least one uppercase and one lowercase letter
- Include at least one special character
- Don’t include dictionary words or restricted words, such as your Citrix® user name or email address
- Don’t include more than three sequential and repeating characters or keyboard patterns, such as 1111, 1234, or asdf
-
Role: Click the user role in the drop-down list. For more information about roles, see Configure roles with RBAC. Possible options are:
- ADMIN
- DEVICE_PROVISIONING
- SUPPORT
- USER
- Membership: Click the group or groups in the drop-down list to which to add the user.
-
User Properties: Add optional user properties. For each user property you want to add, click Add and do the following:
- User Properties: Click a property in the drop-down list and then type the user property attribute in the field next to the property.
- Click Done to save the user property or click Cancel.
To delete an existing user property, hover over the line that has the property and then click the X on the right side. The property is deleted immediately.
To edit an existing user property, click the property and make changes. Click Done to save the changed listing or Cancel to leave the listing unchanged.
-
Click Save. After you create a user, the User type field for a local user account stays empty.
To edit a local user account
-
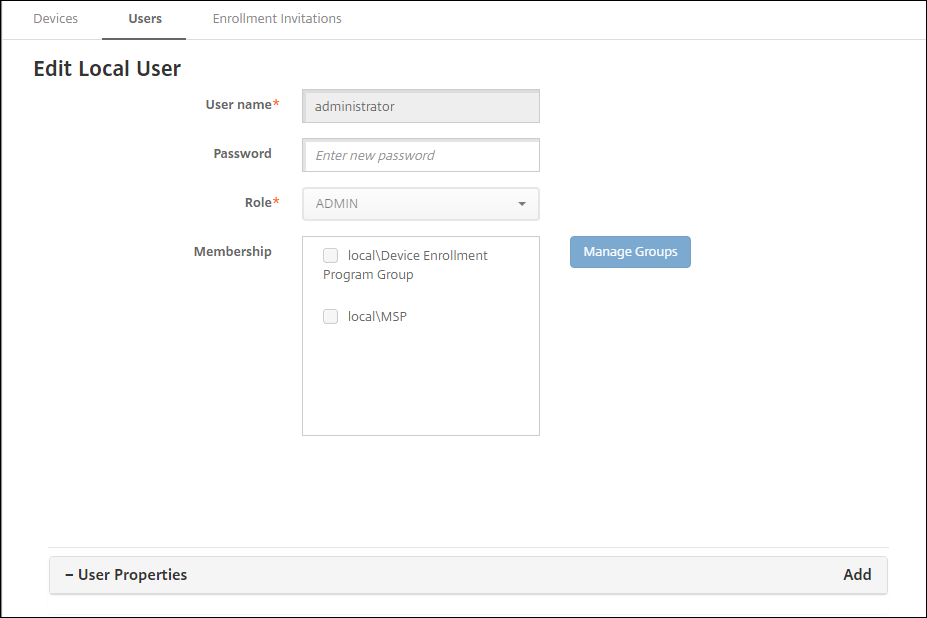
On the Users page, in the list of users, click to select a user and then click Edit. The Edit Local User page appears.
-
Change the following information as appropriate:
- User name: You cannot change the user name.
- Password: Change or add a user password.
- Role: Click the user role in the drop-down list.
- Membership: Click the group or groups in the drop-down list to which to add or edit the user account. To remove the user account from a group, clear the checkbox next to the group name.
-
User properties: Do one of the following:
- For each user property you want to change, click the property and make changes. Click Done to save the changed listing or Cancel to leave the listing unchanged.
- For each user property you want to add, click Add and do the following:
- User Properties: Click a property in the drop-down list and then type the user property attribute in the field next to the property.
- Click Done to save the user property or click Cancel.
- For each existing user property you want to delete, hover over the line that has the property and then click the X on the right side. The property is deleted immediately.
-
Click Save to save your changes or click Cancel to leave the user unchanged.
To unlock a local user account
A local user account gets locked according to these server properties:
local.user.account.lockout.time-
local.user.account.lockout.limitFor more information, see Server Property Definitions.
When a local user account gets locked, you can unlock the account from the Citrix Endpoint Management console.
-
On the Users page, in the list of user accounts, click to select a user account.
-
Click Unlock User. A confirmation dialog box appears.
-
Click Unlock to unlock the user account or click Cancel to leave the user unchanged.
You can’t open an Active Directory user from the Citrix Endpoint Management console. A locked Active Directory user must contact their Active Directory help desk for a password reset.
To delete a local user account
-
On the Users page, in the list of user accounts, click to select a user account.
You can select more than one user account to delete by selecting the checkbox next to each user account.
-
Click Delete. A confirmation dialog box appears.
-
Click Delete to delete the user account or click Cancel.
To delete Active Directory users
To delete one or more Active Directory users at a time, select the users and click Delete.
If a user that you delete has enrolled devices and you want to re-enroll those devices, delete the devices before re-enrolling them. To delete a device, go to Manage > Devices, select the device, and then click Delete.
Import user accounts
You can import local user accounts and properties from a .csv file called a provisioning file, which you can create manually. For more information about formatting provisioning files, see Provisioning file formats.
Note:
- For local users, use the domain name along with the user name in the import file. For example, specify
username@domain. If the local user that you create or import is for a managed domain in Citrix Endpoint Management, the user cannot enroll by using the corresponding LDAP credentials.- If importing user accounts to the Citrix Endpoint Management internal user directory, disable the default domain to speed up the import process. Keep in mind that disabling the domain affects enrollments. Reenable the default domain after the import of internal users is complete.
- Local users can be in User Principal Name (UPN) format. However, Citrix recommends that you do not use the managed domain. For example, if example.com is managed, do not create a local user with this UPN format: user@example.com.
After you prepare a provisioning file, follow these steps to import the file to Citrix Endpoint Management.
-
In the Citrix Endpoint Management console, click Manage > Users. The Users page appears.
-
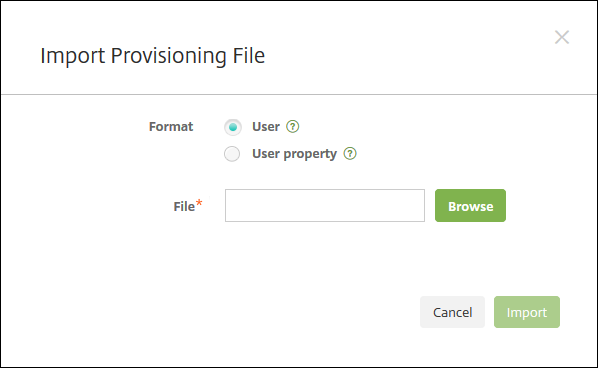
Click Import Local Users. The Import Provisioning File dialog box appears.
-
Select either User or Property for the format of the provisioning file that you are importing.
-
Select the provisioning file to use by clicking Browse and then navigating to the file location.
-
Click Import.
Provisioning file formats
You can create a provisioning file and use it to import user accounts and properties to Citrix Endpoint Management. Use one of the following formats for a provisioning file:
-
User provisioning file fields:
user;password;role;group1;group2 -
User attribute provisioning file fields:
user;propertyName1;propertyValue1;propertyName2;propertyValue2
Note:
- Separate the fields within the provisioning file with a semi-colon (;). If part of a field has a semi-colon, escape it with a backslash character (). For example, type the property propertyV; test;1;2 as propertyV\;test\;1\;2 in the provisioning file.
- Valid values for Role are the predefined roles USER, ADMIN, SUPPORT, and DEVICE_PROVISIONING, plus any other roles that you defined.
- Use the period character (.) as a separator to create a group hierarchy. Don’t use a period in group names.
- Use lowercase for property attributes in attribute provisioning files. The database is case sensitive.
Example of user provisioning content
The entry user01;pwd\\;o1;USER;myGroup.users01;myGroup.users02;myGroup.users.users01 means:
- User: user01
- Password: pwd; 01
- Role: USER
-
Groups:
- myGroup.users01
- myGroup.users02
- myGroup.users.users.users01
As another example, AUser0;1.password;USER;ActiveDirectory.test.net means:
- User: AUser0
- Password: 1.password
- Role: USER
- Group: ActiveDirectory.test.net
Example of user attribute provisioning content
The entry user01;propertyN;propertyV\;test\;1\;2;prop 2;prop2 value means:
- User: user01
-
Property 1
- name: propertyN
- value: propertyV;test;1;2
-
Property 2:
- name: prop 2
- value: prop2 value
Add or remove groups
You manage groups in the Manage Groups dialog box in the Citrix Endpoint Management console on these pages: Users, Add Local User, or Edit Local User. There is no group edit command.
To add a local group
-
Do one of the following:
- On the Users page, click Manage Local Groups.

- On either the Add Local User page or the Edit Local User page, click Manage Groups.
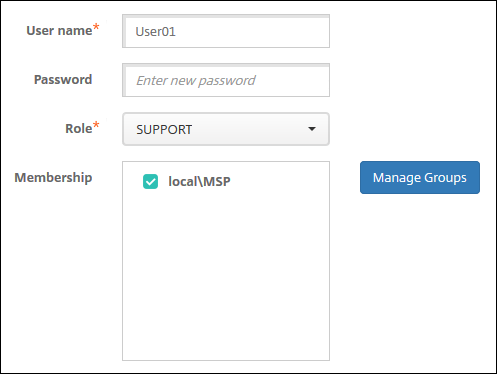
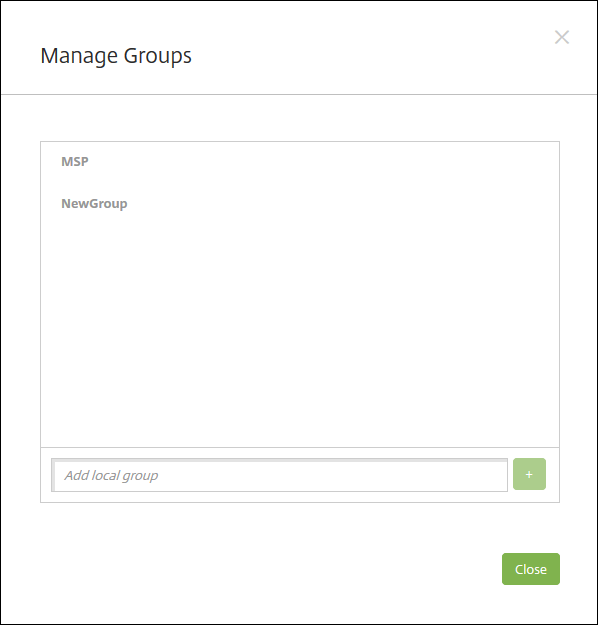
The Manage Group dialog box appears.
-
Below the group list, type a new group name and then click the plus sign (+). The user group is added to the list.
-
Click Close.
To remove a group
Removing a group has no effect on user accounts. Instead, removing a group only removes the user association with that group. Users also lose access to apps or profiles provided by the Delivery Groups that are associated with that group. But, any other group associations stay intact. If users aren’t associated with any other local groups, they are associated at the top level.
-
Do one of the following:
- On the Users page, click Manage Local Groups.
- On either the Add Local User page or the Edit Local User page, click Manage Groups.
The Manage Groups dialog box appears.
-
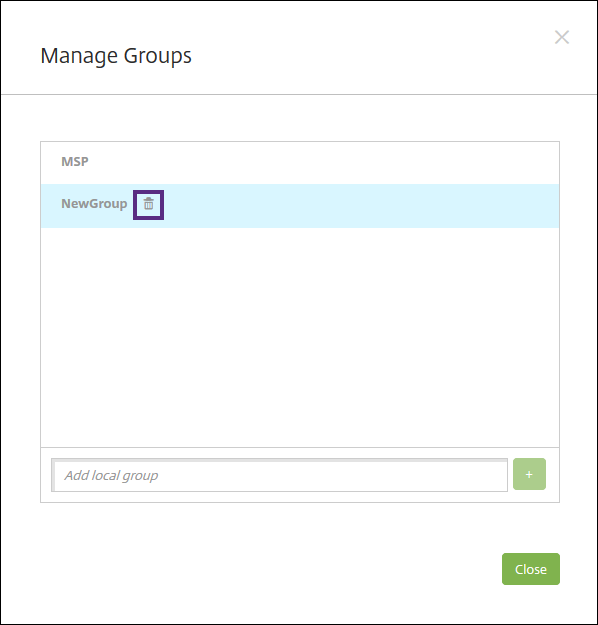
On the Manage Groups dialog box, click the group you want to delete.
-
Click the trash can icon to the right of the group name. A confirmation dialog box appears.
-
Click Delete to confirm the operation and remove the group.
Important:
You cannot undo this operation.
-
On the Manage Groups dialog box, click Close.
Create and manage workflows
You can use workflows to manage the creation and removal of user accounts. Before you create a workflow, identify individuals in your organization who have the authority to approve user account requests. Then, use the workflow template to create and approve user account requests.
When you set up Citrix Endpoint Management for the first time, you configure workflow email settings, which must be set before you can use workflows. You can change workflow email settings at any time. These settings include the email server, port, email address, and whether the request to create the user account requires approval.
You can configure workflows in two places in Citrix Endpoint Management:
- In the Settings > Workflows page in the Citrix Endpoint Management console. On the Workflows page, you can configure multiple workflows for use with app configurations. When you configure workflows on the Workflows page, you can select the workflow when you configure the app.
- When you configure an application connector in the app, provide a workflow name and then configure the individuals to approve the user account request. See Add apps.
You can assign up to three levels for manager approval of user accounts. If you need other persons to approve the user account, you can search for and select them by using their name or email address. When Citrix Endpoint Management finds the person, you then add them to the workflow. All individuals in the workflow receive emails to approve or deny the new user account.
-
In the Citrix Endpoint Management console, click the gear icon in the upper-right corner of the console. The Settings page appears.
-
Click Workflows. The Workflows page appears.
-
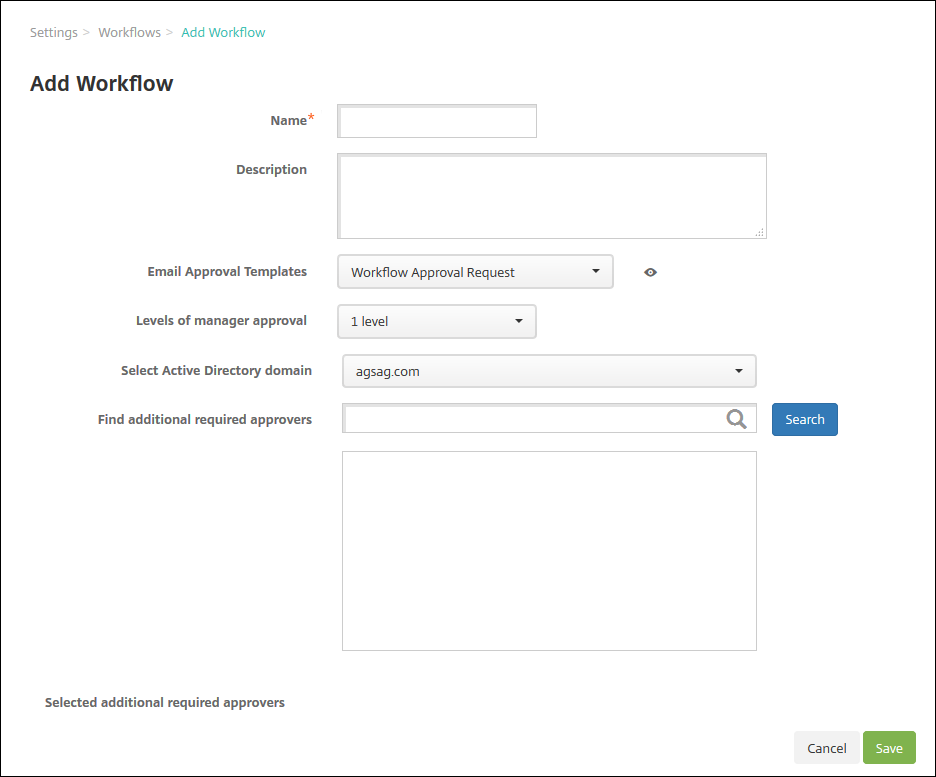
Click Add. The Add Workflow page appears.
-
Configure these settings:
- Name: Type a unique name for the workflow.
- Description: Optionally, type a description for the workflow.
- Email Approval Templates: In the list, select the email approval template to be assigned. You create email templates in the Notification Templates section under Settings in the Citrix Endpoint Management console. When you click the eye icon to the right of this field, you see a preview of the template you are configuring.
-
Levels of manager approval: In the list, select the number of levels of manager approval required for this workflow. The default is 1 level. Possible options are:
- Not Needed
- 1 level
- 2 levels
- 3 levels
- Select Active Directory domain: In the list, select the appropriate Active Directory domain to be used for the workflow.
- Find additional required approvers: Type a name in the search field and then click Search. Names originate in the Active Directory.
- When the name appears in the field, select the checkbox next to the name. The name and email address appear in the Selected additional required approvers list.
- To remove a name from the list, do one of the following:
- Click Search to see a list of everyone in the selected domain.
- Type a full or partial name in the search box, and then click Search to limit the search results.
- Persons in the Selected additional required approvers list have check marks next to their name in the search results list. Scroll through the list and clear the checkbox next to each name that you want to remove.
- To remove a name from the list, do one of the following:
-
Click Save. The created workflow appears on the Workflows page.
After you create the workflow, you can view the workflow details, view the apps associated with the workflow, or delete the workflow. You cannot edit a workflow after you create the workflow. If you need a workflow with different approval levels or approvers, create another workflow.
To view details and delete a workflow
-
On the Workflows page, in the list of existing workflows, select a specific workflow. To do that, click the row in the table or select the checkbox next to the workflow.
-
To delete a workflow, click Delete. A confirmation dialog box appears. Click Delete again.
Important:
You cannot undo this operation.