Citrix DaaS

Migrate workloads between Resource Locations using Image Portability Service

Image Portability Service simplifies the management of images across platforms. The Citrix Virtual Apps and Desktops REST APIs can be used to automate the administration of resources within a Citrix Virtual Apps and Desktops site.

The Image Portability workflow begins when you use Citrix Cloud to start the migration of an image between two Resource Locations. After exporting your image, Image Portability Service helps you transfer and prepare the image to run on the target hypervisor or public cloud. Finally, Citrix Provisioning or Machine Creation Services provisions the image in the target environment.

Components

Image Portability Service components include:

  • Citrix Cloud services
  • Citrix Credential Wallet
  • Citrix Connector Appliance
  • Compositing Engine VM
  • PowerShell Example Scripts

Citrix Cloud services

The Citrix Cloud Services API is a REST API service that interacts with the Image Portability Service. Using the REST API service, you can create and monitor Image Portability jobs. For example, you make an API call to start an Image Portability job, such as to export a disk, and then make calls to get the status of the job.

Citrix Credentials Wallet

The Citrix Credentials Wallet service securely manages system credentials, allowing the Image Portability Service to interact with your assets. For example, when exporting a disk from vSphere to an SMB share, Image Portability Service requires credentials to open a connection to the SMB share to write the disk. If the credentials are stored in the Credential Wallet, then the Image Portability Service can retrieve and use those credentials.

This service gives you the ability to fully manage your credentials. The Cloud Services API acts as an access point, giving you the ability to create, update, and delete credentials.

Compositing Engine

The Compositing Engine is the workhorse of the Image Portability Service. The Compositing Engine (CE) is a single VM created at the start of an Image Portability export or prepare job. These VMs are created in the same environment where the job is taking place. For example, when exporting a disk from vSphere, the CE is created on the vSphere server. Likewise, when running a prepare job in Azure, AWS, or Google Cloud, the CE is created in Azure, AWS, or Google Cloud respectively. The CE mounts your disk to itself, and then does the necessary manipulations to the disk. Upon completion of the prepare or export job, the CE VM and all of its components are deleted.

Connector Appliance

The Connector Appliance, running provider software to manage IPS resources, runs in your environment (both on-premises and in your Azure, AWS, or Google Cloud subscription) and acts as a controller for individual jobs. It receives job instructions from the cloud service, and creates and manages the Compositing Engine VMs. The Connector Appliance VM acts as a single, secure point of communication between the Cloud Services and your environments. Deploy one or more Connector Appliances in each of your Resource Locations (on-premises, Azure, AWS, or Google Cloud). A Connector Appliance is deployed to each Resource Location for security. By co-locating the Connector Appliance and the Compositing Engine, the deployment’s security posture increases greatly, as all components and communications are kept within your Resource Location.

PowerShell modules

We provide a collection of PowerShell modules for use within scripts as a starting point to develop your own custom automation. The supplied modules are supported as is, but you can modify them if necessary for your deployment.

The PowerShell automation uses supplied configuration parameters to compose a REST call to the Citrix Cloud API service to start the job and then provide you with periodic updates as the job progresses.

If you want to develop your own automation solution, you can make calls to the cloud service directly using your preferred programming language. See the API portal for detailed information about configuring and using the Image Portability Service REST endpoints and PowerShell modules.

Workflows

The Image Portability Service uses a multi-phase workflow to prepare a master catalog image from an on-premises resource location for your public cloud subscription. The service exports the image from the on-premises hypervisor platform and you upload it to your public cloud subscription (our provided PowerShell upload utility can help automate this). Then, Image Portability prepares the image to be compatible with your public cloud platform. Finally, the image is published and ready to be deployed as a new machine catalog within your cloud resource location.

Image Portability Workflow

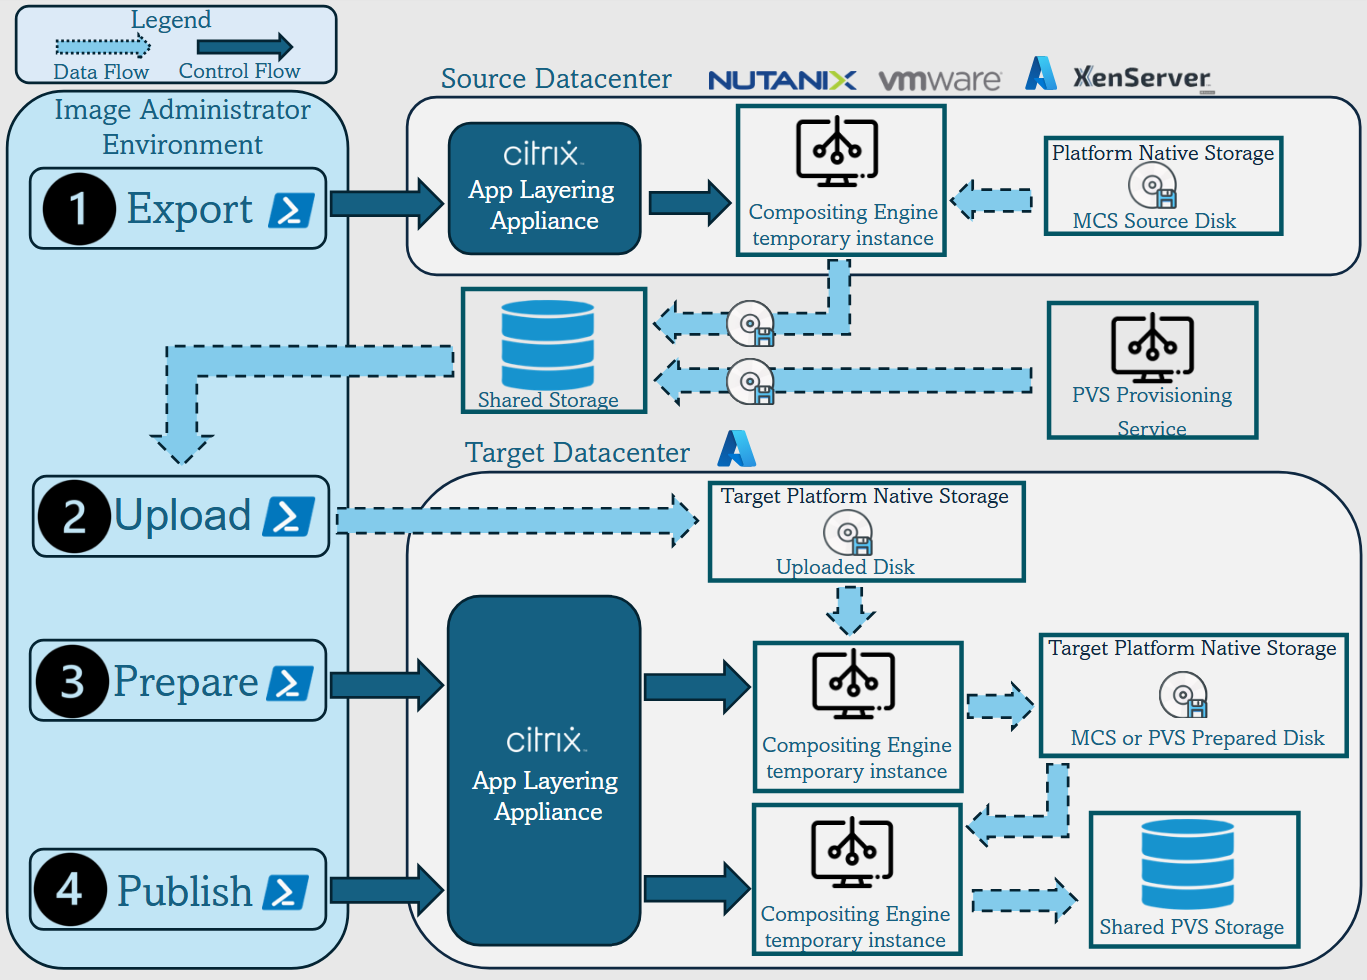
These high-level workflows are based on the image’s source and target provisioning configuration (Machine Creation or Citrix Provisioning). The chosen workflow determines which Image Portability Job Steps are required.

Refer to the following table to understand which jobs are required for each of the supported IPS workflows.

Workflow (Source to Target) Export Upload Prepare Publish
MCS to MCS Y Y Y N
PVS to MCS* N Y Y N
PVS to PVS N/A Y Y Y
MCS to PVS Y Y Y Y

*Assumes you have the original image as a Citrix Provisioning vDisk and do not need to export it directly out of the source platform hypervisor.

Requirements

To get started with Image Portability, you must meet the following requirements.

A Citrix Machine Catalog image

IPS requires using images that have one of the following tested configurations:

  • Windows Server 2016, 2019, and 2022H2

  • Windows 10 or 11

  • Provisioned using Machine Creation Services or Citrix Provisioning

  • Citrix Virtual Delivery Agent:
    • Most recent two cumulative updates for 1912 and 2203 LTSR
    • Most recent two current releases
  • Remote Desktop Services enabled for console access in Azure

Image portability service supports the following hypervisors and cloud platforms:

Source platforms:

  • VMware vSphere 7.0 and 8.0

  • XenServer 8/Citrix Hypervisor 8.2

  • Nutanix AHV (Prism Element only)

  • Microsoft Azure

  • Google Cloud Platform

Destination platforms:

  • VMware vSphere 8.0

  • XenServer 8/Citrix Hypervisor 8.2

  • Nutanix AHV (Prism Element only)

  • Microsoft Azure

  • AWS

  • Google Cloud Platform

A Citrix Connector Appliance

You need a Citrix Connector Appliance installed and configured in each Resource Location where you plan to use Image Portability. For example, if you use image portability to move an image from vSphere to Azure, AWS, and Google Cloud, you need at least four Citrix Connector Appliances:

See Deploy Connector Appliances for detailed instructions.

An SMB (Windows) file share

You need a Windows SMB file share for storage of the output of export jobs. The share must be accessible to the Compositing Engine VM which will be created in the Resource Location where you’re using the Image Portability Service. Make sure that the available free space on the share is at least twice the configured size of your image’s file system.

A machine for running PowerShell scripts

Make sure your machine running the PowerShell scripts has the following:

  • PowerShell version 5.1.

  • A fast network connection to the SMB file share. It can be the same machine that is hosting the file share.

  • A fast network connection to the public cloud platforms where you plan to use the Image Portability feature. For example, Azure, AWS, or Google Cloud.

    See the section Prepare a machine for PowerShell for details about how to download and configure the Image Portability modules from the PowerShell Gallery.

Your Citrix Cloud Customer ID

Make sure you have a valid Citrix DaaS subscription.

To continue, you need access to Citrix DaaS (formerly Citrix Virtual Apps and Desktops service). If you don’t have access, contact your Citrix representative.

Refer to the API Getting Started documentation for instructions to create and configure an API client to use with image portability.

Azure required permissions and configuration

For the Image Portability Service to perform actions on your Azure resource, you need to grant permissions to certain Azure capabilities to the Azure service principal used by the Image Portability Service. For the detailed list, see Microsoft Azure required permissions.

You can assign the Contributor role to the service principal in the associated resource. Or, to assign the minimum permissions required, you can create custom roles with the required permissions, and assign them to the service principal scoped to the appropriate resources.

See the Azure documentation for configuring security roles for your Azure service principal and for creating custom roles.

Google Cloud required permissions and configuration

For the Image Portability Service to perform actions in your Google Cloud project, you grant permissions to certain capabilities to the Google Cloud service principal used by the Image Portability Service.

For the detailed list, see Google Cloud required permissions.

You can assign these permissions using the following roles:

  • Cloud Build Editor
  • Compute Admin
  • Storage Admin
  • Service Account User

See the Google Cloud documentation for more information on configuring service account permissions.

Amazon Web Services required permissions and configuration

To perform image portability service workflows with an Amazon Web Services (AWS) account, the respective Identity and Access Management (IAM) identity must have the correct permissions.

For the detailed list, see AWS required permissions.

Set up the Image Portability Service

To set up the Image Portability Service you:

Deploy Connector Appliances

Image Portability requires Citrix Connector Appliances to create Image Portability jobs. Connector Appliances help secure interactions with your on-premises and public cloud environments. The Connector Appliances communicate back to the Image Portability Service to report on job status and overall service health.

To deploy and configure Connector Appliance in your environment, follow the steps in Connector Appliance for Cloud Services.

Note the required hardware configuration and network port access for the appliance when planning your deployment.

When your appliance is deployed and registered, the components needed to enable Image Portability are automatically installed.

Prepare a machine for PowerShell

To assist you in getting up and running with Image Portability, we have created PowerShell modules you can customize and use with the service.

The following sections describe how to prepare a machine to run the PowerShell scripts. These scripts are just a few examples. Modify or enhance them to suit your needs.

Note:

After the initial installation, use Update-Module to update the PowerShell module.

PowerShell requirements

To use the PowerShell scripts, you need the following:

  • A Windows machine to run the PowerShell scripts that drive image portability jobs. The machine:

    • Has the latest version of PowerShell.

    • Has a 10-Gbs or better network connection to the on-premises SMB file share and a fast connection to your public cloud (Azure, AWS, or Google Cloud, for example).

    • Can be the same machine hosting the file share.

    • Is a machine running Windows 10, Windows Server 2019, or Windows Server 2022, with the latest Microsoft patches.

    • Can connect to the Microsoft PowerShell Gallery to download the required PowerShell libraries.

Depending on your version of Windows, you might need to disable TLS 1.0/1.1 support. Refer to Microsoft PowerShell Gallery TLS support documentation for more information.

By default, PowerShell does not automatically authenticate through a proxy server. Make sure you’ve configured your PowerShell session to use your proxy server, per Microsoft, and your proxy vendor best practices.

If you see errors when running the PowerShell scripts relating to a missing or old version of PowerShellGet, you need to install the latest version as follows:

Install-Module -Name PowerShellGet -Force -Scope CurrentUser -AllowClobber
<!--NeedCopy-->

Install libraries and modules

Image Portability Service draws on libraries from the Microsoft PowerShell Gallery to drive portability operations.

Important:

After the initial installation, use Update-Module to install new versions.

  1. Run the following PowerShell command to download the latest modules:

    Install-Module -Name "Citrix.Workloads.Portability","Citrix.Image.Uploader" -Scope CurrentUser
    <!--NeedCopy-->
    
    • To change the PATH Environment Variable:

      Press Y and Enter to accept.

    • To install the NuGet provider:

      Press Y and Enter to accept.

    • If informed about an untrusted repository:

      Press A (Yes to All) and Enter to continue.

  2. Confirm that all necessary modules were downloaded by running the command:

    Get-InstalledModule -Name Citrix.*
    <!--NeedCopy-->
    

    This command returns an output similar to the following:

    Name Repository Description
    Citrix.Image.Uploader PSGallery Commands to Upload a VHD(x) to an Azure Storage Account, AWS, or GCP and Get information about a VHD(x)
    Citrix.Workloads.Portability PSGallery Standalone Cmdlet for the Image Job of Citrix Image Portability Service

Update modules to the latest version

Run the following command to update the script to the latest version.

Update-Module -Name "Citrix.Workloads.Portability","Citrix.Image.Uploader" -Force
<!--NeedCopy-->

Install the Citrix Virtual Apps and Desktops Remote PowerShell SDK

Image Portability Service requires the Citrix Virtual Apps and Desktops Remote PowerShell SDK to create and manage portability jobs within the Citrix Cloud.

Download and install the Remote PowerShell SDK on your machine.

Install platform-specific third-party components

The Image Portability Service PowerShell module does not install third-party dependencies. Hence, you can limit installation to only the platforms you’re targeting. If you’re using one of the following platforms, follow the relevant instructions for the installation of platform dependencies:

VMware

If you’re creating Image Portability jobs that communicate with your VMware environment, run the following command to install the required VMware PowerShell modules.

Install-Module -Name VMWare.PowerCLI -Scope CurrentUser -AllowClobber -Force -SkipPublisherCheck
<!--NeedCopy-->
Amazon Web Services

If you’re creating Image Portability jobs in AWS, download and install the AWS Command Line Interface, then run these commands to install the required AWS PowerShell modules:

Install-Module -Name AWS.Tools.Installer
Install-AWSToolsModule AWS.Tools.EC2,AWS.Tools.S3
<!--NeedCopy-->
Azure

If you’re creating Image Portability jobs in Azure, download and install the Azure command-line utilities, then run these commands to install the required Azure PowerShell modules:

Install-Module -Name Az.Accounts -Scope CurrentUser -AllowClobber -Force
Install-Module -Name Az.Compute -Scope CurrentUser -AllowClobber -Force
<!--NeedCopy-->
Google Cloud

If you’re creating Image Portability jobs in Google Cloud, download and install the Google Cloud SDK on your machine.

Uninstall scripts and modules

Run the following commands to uninstall modules used by the Image Portability software.

Note:

Third-party scripts and components aren’t automatically removed when uninstalling IPS modules.

To uninstall modules:

Get-InstalledModule -Name "Citrix.Workloads.Portability","Citrix.Images.Uploader" | Uninstall-Module
<!--NeedCopy-->

Add credentials to Credential Wallet

For end-to-end automation scenarios, you can configure the Image Portability Service to authenticate non-interactively with Citrix Cloud, your public cloud, and on-premises resources. Also, the Image Portability Service uses credentials stored in the Citrix Credential Wallet anytime our APIs are directly authenticated with your on-premises and public cloud resources. Setting credentials as described in this section is a required step for running export, prepare, and publish jobs.

When running jobs, the Image Portability Service requires access to resources you can control. For example, for the Image Portability Service to export a disk from a vSphere server to an SMB share, the service needs login access to both systems. To secure this account information, the Image Portability Service uses the Citrix Credential Wallet service. This service stores your credentials in the wallet with a user-defined name. When you want to run a job, provide the name of the credential to use. Also, these credentials can be updated or deleted from the wallet at any time.

Credentials are often stored for these platforms:

  • Microsoft Azure
  • AWS
  • Google Cloud
  • SMB Share
  • VMware vSphere
  • Nutanix AHV
  • XenServer

To manage credentials, refer to the Image Portability Service APIs and Credentials Management section of the Developer API Portal.

Use the Image Portability Service

Preparing images in your on-premises Resource Locations to your public cloud subscription requires creating Image Portability jobs within Citrix Cloud. You can create a job to make direct API calls to the service within your script or program, or by using the example PowerShell modules we’ve developed to automate API calls. Refer to the Image Portability Service Developer API Portal for information about using REST APIs and PowerShell modules to create IPS jobs.

Publish machine catalogs using Citrix Provisioning

The Image Portability Service (IPS) is used with Machine Creation Services (MCS) in Azure, AWS, and Google Cloud, or with Citrix Provisioning (PVS) in Azure or Google Cloud. You can combine the PowerShell and REST solutions described in this guide with your platform’s tools, your platform’s APIs, or Citrix DaaS SDKs to create a seamless and automated end-to-end workflow for creating a machine catalog based on the prepared image. Depending on your chosen cloud platform, there can be intermediate steps required between the completion of an IPS prepare job and the creation of a catalog or assignment to a PVS target.

AWS

IPS prepare jobs on AWS produce a volume. Machine Creation Services require an Amazon Machine Image (AMI) during catalog creation. To generate an AMI from your migrated image, you first need to create an image snapshot from the resulting volume, and then create an AMI based on that snapshot. This can be done with the AWS command line interface (CLI):

> aws ec2 create-snapshot --volume-id <VolumeId>
> aws ec2 register-image --name <AmiName> --architecture 'x86_64' --root-device-name '/dev/sda1 --boot-mode uefi --ena-support --virtualization-type 'hvm' --block-device-mappings 'DeviceName=/dev/sda1,Ebs={SnapshotId=<SnapshotID>}'
<!--NeedCopy-->

The <VolumeId> is the output from the IPS prepare job. The resulting AMI can be used as an MCS master image.

A PowerShell example script for automating this portion of the workflow is provided in the Citrix.Workloads.Portability module as a script named New-IpsAwsImage.ps1.

Azure

On Azure, IPS produces managed disks that are directly usable as MCS master images. To assign the resulting image to PVS targets, IPS provides a ‘publish’ operation for copying the managed disk into a VHD(x) file in your PVS store.

Google Cloud

IPS prepare jobs on Google Cloud produce a disk. MCS requires a Google Cloud instance template. The process for creating an MCS instance template from a disk is covered in detail in Prepare a master VM instance and a persistent disk.

For PVS targets on Google Cloud, IPS provides a ‘publish’ operation for copying the disk into a VHD(x) file in your PVS store.

Automate VDA configuration

When preparing a Citrix-managed image that originated on-premises, you can reconfigure the VDA within the image to support the target environment for which the image is being prepared. Image Portability Service can apply VDA configuration changes on the fly during the preparation phase of the workflow. The following configuration parameters define how the VDA operates in the migrated image: InstallMisa, XdReconfigure, and InstallMcsio. See Image Portability Service PowerShell examples to define these parameters when creating IPS jobs.

Configurations

  • Configuring InstallMisa to true enables the Image Portability Service to install any missing VDA components that is required to provision the image using MCS.

  • Configuring InstallMisa to true or InstallMcsio to true also requires configuring CloudProvisioningType to Mcs.

  • Set InstallPvs to the version of the PVS server where the image is being deployed. When InstallPvs is set, the Image Portability Service (IPS) automatically installs the specified version of the PVS target device software in the image during prepare jobs. IPS supports the latest two builds (base release or cumulative updates) for the latest two Long-Term Service Releases (LTSR) and Current Releases (CR).

Configuring InstallPvs also requires CloudProvisioningType to be configured to Pvs.

For both InstallMisa and InstallMcsio, note the following:

  • These features are only supported for recent LTSR and CR releases of the VDA.

  • If the necessary components are already present for the installed VDA, no changes are made, even if the parameters are configured.

  • For supported versions of the VDA, Image Portability installs the appropriate version of the required components, even if the necessary VDA components aren’t present.

  • For unsupported versions of the VDA, reconfiguration fails and a message is logged if the necessary VDA components aren’t present. The preparation job is completed even if the VDA reconfiguration does not.

XdReconfigure requires one of the following values: controllers or site_guid. Here are example configuration parameters using each value:

Using controllers:

XdReconfigure = @(
    [pscustomobject]@{
        ParameterName = 'controllers'
        ParameterValue = 'comma-separated-list-of-your-cloud-connectors-fqdns'
    }
)
<!--NeedCopy-->

where the ParameterValue is the list of FQDNs of the new DDCs where you want to point the VDA. Multiple DDCs can be specified in a comma-separated format.

Using site_guid:

XdReconfigure = @(
    [pscustomobject]@{
        ParameterName = 'site_guid'
        ParameterValue = 'active-directory-site-guid'
    }
)
<!--NeedCopy-->

XdReconfigure also accepts values that are supported when running the VDA command-line installer with the /reconfigure install switch, for example, XenDesktopVdaSetup.exe /reconfigure. Some examples of these values include wem_agent_port, wem_cached_data_sync_port, wem_cloud_connectors, or wem_server. For a complete list of VDA reconfigure command-line options, refer to the Citrix DaaS VDA documentation.

Configuring InstallMcsio to true automatically installs MCSIO on the image. To disable automatic MCSIO installation on the image, configure InstallMcsio to false.

Note:

You can use -DryRun while running your commands to validate your configuration and your connector appliance’s network settings.

Reference

This section details technical reference information, based on your needs.

Permissions required by the Image Portability Services

This section details the permissions required by the Image Portability Service on each of the supported on-premises and Cloud platforms.

Connector Appliance required permissions

The Connector Appliance needs access to the following URLs to prepare images in the Image Portability Service:

api-ap-s.cloud.com
api-eu.cloud.com
api-us.cloud.com
credentialwallet.citrixworkspaceapi.net
graph.microsoft.com
login.microsoftonline.com
management.azure.com
*.blob.storage.azure.net
<!--NeedCopy-->

VMware vCenter required permissions

The following vCenter permissions are necessary to run the IPS export disk job in a VMware environment. These permissions can be found under Roles in the Access Control section of the vCenter administration panel.

-  Cryptographic operations
    -  Direct Access

-  Datastore
    -  Allocate space
    -  Browse datastore
    -  Low level file operations
    -  Remove file

-  Folder
    -  Create folder
    -  Delete folder

-  Network
    -  Assign network

-  Resource
    -  Assign virtual machine to resource pool

-  Virtual machine
    -  Change Configuration
        -  Add existing disk
        -  Add new disk
        -  Remove disk

    -  Edit Inventory
        -  Create from existing
        -  Create new
        -  Remove

    -  Interaction
        -  Power off
        -  Power on
<!--NeedCopy-->

Microsoft Azure required permissions

Image Portability requires your Azure service account to have the following permissions.

When the resource group to use for the Compositing Engine is specified (that is, in the resourceGroup property in a REST request or the -AzureVmResourceGroup parameter when using the Citrix.Workloads.Portability PowerShell commands) the following permissions are required at the scope of the resource group.

Microsoft.Compute/disks/beginGetAccess/action
Microsoft.Compute/disks/endGetAccess/action
Microsoft.Compute/disks/delete
Microsoft.Compute/disks/read
Microsoft.Compute/disks/write
Microsoft.Compute/virtualMachines/delete
Microsoft.Compute/virtualMachines/powerOff/action
Microsoft.Compute/virtualMachines/read
Microsoft.Compute/virtualMachines/write
Microsoft.Network/networkInterfaces/delete
Microsoft.Network/networkInterfaces/join/action
Microsoft.Network/networkInterfaces/read
Microsoft.Network/networkInterfaces/write
Microsoft.Network/networkSecurityGroups/delete
Microsoft.Network/networkSecurityGroups/join/action
Microsoft.Network/networkSecurityGroups/read
Microsoft.Network/networkSecurityGroups/write
Microsoft.Resources/deployments/operationStatuses/read
Microsoft.Resources/deployments/read
Microsoft.Resources/deployments/write
Microsoft.Resources/subscriptions/resourcegroups/read
<!--NeedCopy-->

When the resource group to use for the Compositing Engine is left unspecified the following permissions are required at the scope of the subscription.

Microsoft.Compute/disks/beginGetAccess/action
Microsoft.Compute/disks/endGetAccess/action
Microsoft.Compute/disks/read
Microsoft.Compute/disks/write
Microsoft.Compute/virtualMachines/powerOff/action
Microsoft.Compute/virtualMachines/read
Microsoft.Compute/virtualMachines/write
Microsoft.Network/networkInterfaces/join/action
Microsoft.Network/networkInterfaces/read
Microsoft.Network/networkInterfaces/write
Microsoft.Network/networkSecurityGroups/join/action
Microsoft.Network/networkSecurityGroups/read
Microsoft.Network/networkSecurityGroups/write
Microsoft.Resources/deployments/operationStatuses/read
Microsoft.Resources/deployments/read
Microsoft.Resources/deployments/write
Microsoft.Resources/subscriptions/resourceGroups/delete
Microsoft.Resources/subscriptions/resourceGroups/write
Microsoft.Authorization/roleAssignments/read
Microsoft.Authorization/roleDefinitions/read
<!--NeedCopy-->

The following permissions are required at the scope of the specified target resource group (that is, the resource group specified in the targetDiskResourceGroupName property in a REST request or the -TargetResourceGroup parameter when using PowerShell).

Microsoft.Compute/disks/beginGetAccess/action
Microsoft.Compute/disks/delete
Microsoft.Compute/disks/read
Microsoft.Compute/disks/write
Microsoft.Compute/snapshots/delete
Microsoft.Compute/snapshots/read
Microsoft.Compute/snapshots/write
<!--NeedCopy-->

The following permissions are required at the scope of the specified virtual network resource group (that is, the resource group specified in the virtualNetworkResourceGroupName property in a REST request or the -AzureVirtualNetworkResourceGroupName parameter when using PowerShell).

Microsoft.Network/virtualNetworks/read
Microsoft.Network/virtualNetworks/subnets/join/action
<!--NeedCopy-->

Important:

The ceVmSku option for ‘prepare’ and ‘prepareAndPublish’ jobs controls the type of Azure VM that the resulting managed disk is suitable for. You must select a ceVmSku with the same family and version as the VMs you intend to provision from the output image. The default value of Standard_D2S_v3 is suitable to run on all v3 D family machines. With v4 and newer VM SKUs, Microsoft has made the temporary resource disk attached to VMs optional. This affects proper pagefile placement. If you intend to use a VM SKU without a temporary resource disk for the machines you provision using the output image, you must ensure that your ceVmSku also doesn’t have a temporary resource disk. If the ceVmSku is a type with a temporary resource disk, IPS moves the Windows pagefile to that disk. You receive a warning dialog on every login if you use a disk prepared this way on a SKU that does not have a temporary resource disk. If the ceVmSku doesn’t have a temporary disk, the pagefile is configured on the system root volume. This might result in unintended I/O charges if you use an image prepared this way on a SKU that includes a temporary resource disk.

Google Cloud required permissions

Image Portability requires your Google Cloud service account to have the following permissions:

cloudbuild.builds.create
cloudbuild.builds.get
cloudbuild.builds.list
compute.disks.create
compute.disks.delete
compute.disks.get
compute.disks.list
compute.disks.setLabels
compute.disks.use
compute.globalOperations.get
compute.images.create
compute.images.delete
compute.images.get
compute.images.list
compute.images.setLabels
compute.images.useReadOnly
compute.instances.create
compute.instances.delete
compute.instances.get
compute.instances.setLabels
compute.instances.setMetadata
compute.instances.setServiceAccount
compute.instances.setTags
compute.instances.stop
compute.instances.updateDisplayDevice
compute.networks.get
compute.subnetworks.use
compute.subnetworks.useExternalIp
compute.zoneOperations.get
compute.zones.list
iam.serviceAccounts.actAs
iam.serviceAccounts.get
iam.serviceAccounts.list
resourcemanager.projects.get
storage.buckets.create
storage.buckets.delete
storage.buckets.get
storage.objects.create
storage.objects.delete
storage.objects.get
storage.objects.list
<!--NeedCopy-->

AWS required permissions

Image Portability requires that you attach a JSON policy document with the following configuration to the Identity and Access Management (IAM) user:

{
    "Version": "2012-10-17",
    "Statement": [
        {
            "Action": [
                "ebs:StartSnapshot",
                "ebs:PutSnapshotBlock",
                "ebs:CompleteSnapshot",
                "ec2:CreateTags",
                "ec2:CreateImage",
                "ec2:DeleteSnapshot",
                "ec2:DeleteVolume",
                "ec2:DeregisterImage",
                "ec2:DescribeImages",
                "ec2:DescribeInstances",
                "ec2:DescribeRegions",
                "ec2:DescribeSecurityGroups",
                "ec2:DescribeSnapshots",
                "ec2:DescribeSubnets",
                "ec2:RebootInstances",
                "ec2:RegisterImage",
                "ec2:RunInstances",
                "ec2:TerminateInstances",
            ],
            "Effect": "Allow",
            "Resource": "*"
        }
    ]
}
<!--NeedCopy-->

Note:

You might want to further reduce the scope of the Resource as needed.

Nutanix AHV required permissions

Image Portability requires you to be a Cluster Admin in your Nutanix AHV configuration.

XenServer required permissions

Image Portability requires you to have at a minimum the ‘VM Admin’ role for the pool the XenServer host is in.

Networking

The Image Portability Service (IPS) creates a worker VM called the compositing engine (CE) to perform image operations. All of the connector appliances in the associated resource location must be able to communicate via HTTPS with the CE. All communication between a connector appliance (CA) and the CE is initiated by the CA except for a single exception in the case of vSphere where there’s bi-directional HTTPS communication between the CE and CA.

In cloud environments (Azure, AWS, Google Cloud) the CE is created with a private IP address. Hence the CE must be on the same virtual network as the CA or on a virtual network reachable from the CA.

Furthermore, for jobs that involve files on an SMB share (for example, export jobs), the CE must be on a network with connectivity to the SMB share.

See the Image Portability Service API documentation for details on how to specify the network to use for the CE in each supported platform.

For ‘prepare’ jobs, the operating system contained in the image is booted (on the CE) to do specialization and other tasks. If the image contains management or security agents that phone-in to a control server, these processes can interfere with the preparation process.

If the domain unjoin option is specified, network connectivity can affect the results. If the compositing engine VM can reach the Active Directory domain controller over the network, unjoin removes the computer account from the domain. This breaks the domain membership for the source VM from which the image was extracted.

Therefore, we recommend isolating the network provided for the operation from other network resources. This can be done by subnet isolation or with firewall rules. See Network isolation for details.

In some on-premises hypervisor environments the hypervisor might be configured with a TLS server certificate, which is either not trusted by the CA’s set of trusted root certificate authorities, or doesn’t match the server’s host name. For such situations, IPS provides job request properties which can be used to work around the problem. See TLS certificates for details.

Network proxies

If the network traffic between the CA and the internet traverses a proxy that performs TLS introspection, then it may be necessary to add the proxy’s Root Certificate Authority (that is, the certificate the proxy uses to sign the TLS certificates it generates) to the CA’s set of root certificate authorities. See Register your Connector Appliance with Citrix Cloud for further information.

Network isolation
  • Azure

    In Azure, the CE is by default created with a network security group (NSG) attached to its NIC if the Azure service principal used in the operation has the necessary Azure permissions 1.

    • Microsoft.Network/networkSecurityGroups/join/action
    • Microsoft.Network/networkSecurityGroups/read
    • Microsoft.Network/networkSecurityGroups/write

      Otherwise the following permissions at the scope of the subscription if no explicit resource group is being used:

      • Microsoft.Network/networkSecurityGroups/delete
      • Microsoft.Network/networkSecurityGroups/join/action
      • Microsoft.Network/networkSecurityGroups/read
      • Microsoft.Network/networkSecurityGroups/write

    This NSG is configured to block all traffic in/out of the CE except for:

    • SMB (port 445) outbound
    • HTTPS (port 443) inbound
    • that required for internal Azure services

    The use of the NSG can be forced by setting the networkIsolation property in the job request to true. In this case, the job fails if the service principal used in the operation doesn’t have the necessary permissions. Use of the NSG can be disabled by setting the networkIsolation property to false.

  • AWS

In AWS to achieve network isolation of the CE, you can create a network security group or groups which block all undesired traffic and then in the job request, assign the security groups to the CE instance using the securityGroupIds request parameter which takes a list of security group Ids as value.

  • Google Cloud

In Google Cloud to achieve network isolation of the CE, you can create firewall rules that block all undesired traffic and then apply those rules to the CE via network tags. IPS creates the CE with the network tag compositing-engine and you can assign it other network tags using the networkTags job request parameter which takes a list of tags as a value.

TLS certificates

If the hypervisor’s server certificate is signed by an authority not trusted by the CA, two alternate approaches can be used to resolve the problem.

  1. Specify in the job request an additional Root Certificate Authority certificate to use in certificate verification. This certificate must be the Root Certificate Authority used to sign the hypervisor’s server certificate.
  2. Specify in the job request the SHA-1 fingerprint of the hypervisor’s server certificate. In this case certificate validation is done by verifying that the SHA-1 fingerprint of the certificate returned by the hypervisor matches that provided in the job request. This method might not work if there’s a TLS intercepting proxy between the CE and the hypervisor.

The job request parameters for the above, given respectively below for each platform, are:

  • vSphere
    1. vCenterSslCaCertificate
    2. vCenterSslFingerprint
  • Nutanix
    1. prismSslCaCertificate
    2. prismSslFingerprint
  • XenServer
    1. xenSslCaCertificate
    2. xenSslFingerprint

See the Image Portability Service API documentation for further details.

Certificate validation errors can also occur when there’s a mismatch between the hypervisor server’s hostname and the hostname in its certificate. In this case, hostname matching can be disabled by setting the following parameter to true in the job request:

  • vSphere
    • vCenterSslNoCheckHostname
  • Nutanix
    • prismSslNoCheckHostname
  • XenServer
    • xenSslNoCheckHostname
  1. If an explicit resource group is being used for the operation then the following permissions at the scope of the resource group: 

Migrate workloads between Resource Locations using Image Portability Service