Connector Appliance for Cloud Services
The Connector Appliance is a Citrix component hosted in your hypervisor or cloud provider. It serves as a channel for communication between Citrix Cloud™ and your resource locations, enabling cloud management without requiring any complex networking or infrastructure configuration. The Connector Appliance enables you to manage and focus on the resources that provide value to your users.
Note:
The Connector Appliance cannot be used for VDA registration, Storefront XML traffic, Netscaler STA traffic, hypervisor management for MCS, or any other use cases related to DaaS resources. Use the Cloud Connector for these use cases.
Connector Appliance functions
-
Connecting Active Directory to Citrix Cloud enables AD management, allowing the use of AD forests and domains within your resource locations. It removes the need for adding any additional AD trusts. Unlike the Cloud Connector, a single Connector Appliance can be used to provide connectivity to multiple Active Directory domains. For more information, see Active Directory with Connector Appliance.
-
Image Portability Service simplifies the management of images across platforms. This feature is useful for managing images between an on-premises resource location and one in a public cloud. The Citrix Virtual Apps and Desktops™ REST APIs can be used to automate the administration of resources within a Citrix Virtual Apps and Desktops site.
The Image Portability workflow begins when you use Citrix Cloud to initiate the migration of an image from your on-premises location to your public cloud subscription. After preparing your image, the Image Portability Service helps you transfer the image to your public cloud subscription and prepare it to run. Finally, Citrix Provisioning or Machine Creation Services™ provisions the image in your public cloud subscription.
For more information, see Image Portability Service.
-
Citrix Secure Private Access enables administrators to provide a cohesive experience that integrates single sign-on, remote access, and content inspection into a single solution for end-to-end access control. For more information, see Secure Private Access with Connector Appliance.
There might be other services in preview that also depend on the Connector Appliance.
The Connector Appliance platform is part of Citrix Cloud Platform and Citrix Identity Platform and can process data, including the following information:
- IP addresses or FQDNs
- Device, user, and resource location identifiers
- Timestamps
- Event data
- User and group details from Active Directory (for example, used for authenticating and searching for users and groups)
Details of specific information processed by the Connector Appliance are available in the Data Collected by Citrix Cloud Platform table in the Citrix Cloud Services Data Protection Overview.
Connector Appliance availability and load management
For continuous availability and to manage load, install multiple Connector Appliances in each of your resource locations. Citrix recommends at least two Connector Appliances in each resource location. If one Connector Appliance is unavailable for any time, the other Connector Appliances can maintain the connection. Since each Connector Appliance is stateless, the load can be distributed across all available Connector Appliances. There is no need to configure this load balancing function. It is automated. If at least one Connector Appliance is available, there is no loss in communication with Citrix Cloud.
If you have only one connector configured for a resource location, Citrix Cloud shows a warning on the Resource Locations page.
Connector Appliance updates
The Connector Appliance is updated automatically. You are not required to take any actions to update your connector.
You can configure your resource location to apply updates either immediately as they become available or after a scheduled time.
For more information about configuring updates, see Connector updates
As part of the update, the Connector Appliance becomes temporarily unavailable. Updates are applied to only one Connector Appliance in a tenant at a time. For this reason, register at least two Connector Appliances in each Resource Location to ensure that at least one Connector Appliance is always available.
Connector Appliance communication
The Connector Appliance authenticates and encrypts all communication between Citrix Cloud and your resource locations. Once installed, the Connector Appliance initiates communication with Citrix Cloud through an outbound connection. All connections are established from the Connector Appliance to the cloud using the standard HTTPS port (443) and the TCP protocol. No incoming connections are allowed.
The following table lists the ports that the Connector Appliance requires access to:
| Service | Port | Supported Domain Protocol | Configuration details |
|---|---|---|---|
| DNS | 53 | TCP/UDP | This port must be open to the local setup |
| NTP | 123 | UDP | This port must be open to the local setup |
| HTTPS | 443 | TCP | Connector Appliance requires outbound access to this port |
To configure the Connector Appliance, IT administrators must be able to access the administration interface on port 443 (HTTPS) of the Connector Appliance.
Note:
To access the administration interface you must include
https://at the start of the IP address.
The Connector Appliance can communicate with both on-premises systems in your resource location and with external systems. If you define one or more web proxies on the Connector Appliance administration interface, only traffic from the Connector Appliance to external systems is routed through this web proxy. If your on-premises system is located in a private address space, traffic from Connector Appliance to this system is not routed through the web proxy.
The Connector Appliance defines private address spaces as the following IPv4 address ranges:
- 10.0.0.0 – 10.255.255.255
- 172.16.0.0 – 172.31.255.255
- 192.168.0.0 – 192.168.255.255
Internet connectivity requirements
Connecting to the Internet from your data centers requires opening port 443 to outbound connections. However, to operate within environments containing an Internet proxy server or firewall restrictions, further configuration might be needed.
To properly operate and consume the Citrix Cloud services, the following addresses must be contactable with unmodified HTTPS connections:
https://*.cloud.comhttps://*.citrixworkspacesapi.nethttps://*.citrixnetworkapi.net-
https://*.nssvc.net- Customers who can’t enable all subdomains can use the following addresses instead:
https://*.g.nssvc.nethttps://*.c.nssvc.net
- Customers who can’t enable all subdomains can use the following addresses instead:
https://*.servicebus.windows.nethttps://ctxccopspacrconnappprod.azurecr.iohttps://ctxccopspacrconnappprod.eastus.data.azurecr.io
Network requirements
Ensure that your environment has the following configuration:
- Either the network allows the Connector Appliance to use DHCP to get DNS and NTP servers, an IP address, a host name, and a domain name or you can manually set the network settings in the Connector Appliance console.
- The network is not configured to use the link-local IP ranges 169.254.0.1/24, 169.254.64.0/18 or 169.254.192.0/18, which are used internally by the Connector Appliance.
- Either the hypervisor clock is set to Coordinated Universal Time (UTC) and is synchronized with a time server or DHCP provides NTP server information to the Connector Appliance.
- If you use a proxy with Connector Appliance, the proxy must be unauthenticated or use basic authentication.
System requirements
The Connector Appliance is supported on the following hypervisors:
- VMware ESXi version 7 update 2
- VMware ESXi version 8
- Hyper-V on Windows Server 2016, Windows Server 2019, Windows Server 2022, or Windows Server 2025.
- Nutanix AHV
- Microsoft Azure
- AWS
- Google Cloud Platform
- XenServer® 8.4
Your hypervisor must provide the following minimum capabilities:
- 20 GB root disk
- 2 vCPUs
- 4 GB memory
- An IPv4 network
You can host multiple Connector Appliances on the same hypervisor host. The number of Connector Appliances on the same host is only constrained by the hypervisor and hardware limitations.
Note:
Cloning, suspending, and taking snapshots of the Connector Appliance VM are not supported.
Obtain the Connector Appliance
Download the Connector Appliance software from within Citrix Cloud.
-
Sign in to Citrix Cloud.
-
From the menu in the top left of the screen, select Resource Locations.
-
If you do not already have a resource location, click the plus icon (+) or select Add a Resource Location. For more information, see create a resource location.
-
In the resource location where you want to register the Connector Appliance, click the Connector Appliances plus icon (+).
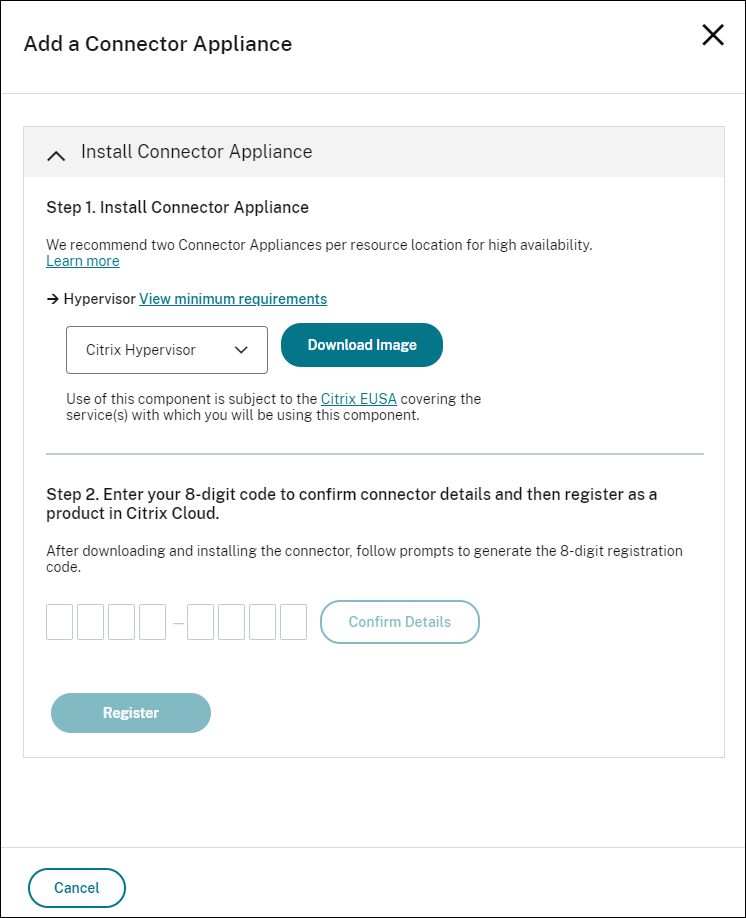
The Add a Connector Appliance task opens.
-
From the Hypervisor list in Step 1, choose the type of hypervisor or cloud provider that you use to host your Connector Appliance.
-
For on-premises hypervisors and cloud environments, you can download the Connector Appliance within Citrix Cloud:
- Click Download Image.
- Review the Citrix End User Service Agreement and, if you agree, select Agree and Continue.
-
When prompted, save the provided Connector Appliance file.
The file name extension of the Connector Appliance file depends on the hypervisor that you choose.
-
For some cloud environments, you can get the Connector Appliance from the marketplace:
-
-
Keep the Install Connector Appliance task open. After installing the Connector Appliance, you input your registration code into Step 2.
You can also get to the Install Connector Appliance task from the Connectors page. Select the plus icon (+) to add a connector and choose to add a Connector Appliance.
Install Connector Appliance on your hypervisor
XenServer
This section describes how to import the Connector Appliance to a XenServer host by using XenCenter.
- Connect to your XenServer host or pool by using XenCenter on a system that has access to the downloaded Connector Appliance XVA file.
- Select File > Import.
- Specify or browse to the path where the Connector Appliance XVA file is located. Click Next.
- Select the XenServer host where you want to host the Connector Appliance. Alternatively, you can select the pool to host the Connector Appliance in and XenServer chooses a suitable available server. Click Next.
- Specify the storage repository to use for your Connector Appliance. Click Import.
- Click Add to add a virtual network interface. From the Network list, select the network for the Connector Appliance to use. Click Next.
- Review the options to use to deploy the Connector Appliance. If any are incorrect, use Previous to change these options.
- Ensure that Start the new VM(s) automatically as soon as the import is complete is selected. Click Finish.
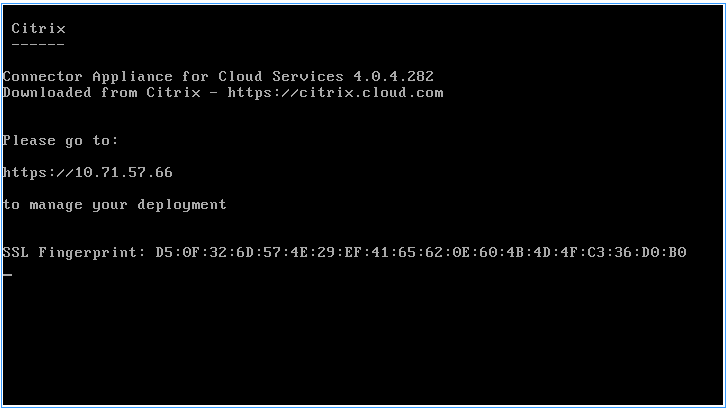
After the Connector Appliance is deployed and has successfully started up, its console displays a landing page that contains the Connector Appliance IP address. Use this IP address to connect to the Connector Appliance administration page and complete the registration process.
By default, the Connector Appliance uses DHCP to set its network configuration. If DHCP is not available in your environment, you must set the network configuration at the Connector Appliance console before you can access the Connector Appliance management console. For more information, see Set the network configuration by using the Connector Appliance console.
Next step: Register your Connector Appliance with Citrix Cloud.
VMware ESXi
This section describes how to deploy Connector Appliance on a VMware ESXi host by using the VMware vSphere Client.
- Connect to your ESXi host by using the vSphere Client on a system that has access to the downloaded Connector Appliance OVA file.
- Select File > Deploy OVF Template….
- Specify or browse to the path where the Connector Appliance OVA file is located. Click Next.
- Review the template details. Click Next.
- You can specify a unique name for your Connector Appliance instance. By default, the name is set to Connector Appliance. Ensure that you choose a name that distinguishes this instance of the Connector Appliance from other instances hosted on this ESXi host. Click Next.
- Specify the destination storage for your Connector Appliance. Click Next.
- Choose the format to store the virtual disks in. Click Next.
- Review the options to use to deploy the Connector Appliance. If any are incorrect, use Back to change these options.
- Select Power on after deployment. Click Finish.
After the Connector Appliance is deployed and has successfully started up, its console displays a landing page that contains the Connector Appliance IP address. Use this IP address to connect to the Connector Appliance administration page and complete the registration process.
By default, the Connector Appliance uses DHCP to set its network configuration. If DHCP is not available in your environment, you must set the network configuration at the Connector Appliance console before you can access the Connector Appliance UI. For more information, see Set the network configuration by using the Connector Appliance console.
Next step: Register your Connector Appliance with Citrix Cloud.
Hyper-V
This section describes how to deploy Connector Appliance on a Hyper-V host. You can deploy the VM by using the Hyper-V Manager or by using the included PowerShell script.
Deploy the Connector Appliance by using the Hyper-V Manager
- Connect to your Hyper-V host.
- Copy or download the Connector Appliance ZIP file to the Hyper-V host.
- Extract the contents of the ZIP file. The ZIP file contains a PowerShell script and the connector-appliance.vhdx file.
- Copy the VHDX file to where you want to keep your VM disks. For example,
C:\ConnectorApplianceVMs. - Open Hyper-V Manager.
- Right-click on your server name and select New > Virtual Machine.
- In the New Virtual Machine Wizard, on the Specify Name and Location panel, enter a unique name to identify your Connector Appliance. Click Next.
- On the Specify Generation panel, select Generation 1. Click Next.
-
On the Assign Memory panel, configure the following settings and then click Next:
- Assign 4 GB of RAM.
- Disable dynamic memory.
- On the Configure Networking panel, select a switch from the list (for example, Default Switch). Click Next.
- On the Connect Virtual Hard Disk panel, select Use an existing virtual hard disk.
- Browse to the location of the connector-appliance.vhdx file and select it. Click Next.
- On the Summary panel, review the values you have chosen and click Finish to create the VM.
- On the Virtual Machines panel, right-click on the Connector Appliance VM and select Settings.
- In the Settings window, select Hardware > Processors and perform the following actions:
- In Number of virtual processors, change the value to 2.
- Click Apply.
- Click OK.
- On the Virtual Machines panel, right-click on the Connector Appliance VM and select Start.
- Right-click on the Connector Appliance VM and select Connect to open the console.
After the Connector Appliance is deployed and has successfully started up, connect to the console using the Hyper-V Manager. The console displays a landing page that contains the Connector Appliance IP address. Use this IP address to connect to the Connector Appliance administration page and complete the registration process.
By default, the Connector Appliance uses DHCP to set its network configuration. If DHCP is not available in your environment, you must set the network configuration at the Connector Appliance console before you can access the Connector Appliance UI. For more information, see Set the network configuration by using the Connector Appliance console.
Next step: Register your Connector Appliance with Citrix Cloud.
Deploy the Connector Appliance by using a PowerShell script
The connector-appliance.zip file contains a PowerShell script that creates and starts a new VM.
Note:
To run this unsigned PowerShell script, you might have to change the execution policies on the Hyper-V system. For more information, see https://go.microsoft.com/fwlink/?LinkID=135170. Alternatively, you can use the provided script as the basis to create or amend your own local script.
- Connect to your Hyper-V host.
- Copy or download the Connector Appliance ZIP file to the Hyper-V host.
- Extract the contents of the ZIP file: A PowerShell script and a VHDX file.
-
In a PowerShell console, change the current directory to where the ZIP file contents are located and run the following command:
.\connector-appliance-install.ps1 <!--NeedCopy--> - When prompted, type a name for your VM or select Enter to accept the default value of Connector Appliance.
- When prompted, type a destination for the root disk or press Enter to use the system default directory for VHDs.
- When prompted, type a file name for the root disk or select Enter to accept the default value of connector-appliance.vhdx.
- When prompted, select the switch to use. Select Enter.
- Review the summary of the VM import information. If the information is correct, select Enter to continue. The script creates and starts the Connector Appliance VM.
After the Connector Appliance is deployed and has successfully started up, its console displays a landing page that contains the Connector Appliance IP address. Use this IP address to connect to the Connector Appliance and complete the registration process.
Next step: Register your Connector Appliance with Citrix Cloud.
Nutanix AHV
This section describes how to deploy Connector Appliance from the connector-appliance.vhdx file onto a Nutanix AHV host by using the Nutanix Prism web console.
- On the main menu of the Nutanix Prism web console, select the Storage view.
- Click + Storage Container to create a storage container to hold the Connector Appliance image file. Alternatively, you can use an existing storage container.
- Upload the
connector-appliance.vhdxfile to your storage container.- On the main menu of the web console, select Settings.
- Select the Image Configuration tab and click + Upload Image
- In Create Image, specify a Name for your image.
- From the Image Type list, select DISK.
- From the Storage Container list, select the storage container you created.
- Select Upload a file.
- Click Choose file and navigate to the
connector-appliance.vhdxfile on your local system. - Click Save.
- Wait until the image is created and its state shows as ACTIVE in the Image Configuration page.
- Select the Network Configuration tab.
- Click + Create Network to create a network for the Connector Appliance to use.
- In the Create Network page, specify the following information:
- The network name.
- The network VLAN ID.
- On the main menu of the web console, select the VM view.
- Click + Create VM to create a Connector Appliance instance.
- In Create VM, specify the following information:
- The VM name
- The number of vCPUs
- The amount of memory in GiB
- Select to use Legacy BIOS.
- Click + Add New Disk to add a disk to the VM.
- In Add Disk, complete the following information:
- For Type, select DISK.
- For Operation, select Clone from Image Service.
- For Bus Type, select SCSI
- For Image, select the image you created when you uploaded the Connector Appliance file.
- Click Add to finish adding the disk.
- In Create VM, click + Add New NIC.
- In Create NIC, select the network to add the VM to.
- For Network Connection State, select Connected.
- Click Add to finish adding the NIC.
-
Click Save to create the VM.
By default, the new VM is powered off.
- In the VM view, select the VM and click Power on.
- Wait for the VM to start up. This process can take several minutes.
After the Connector Appliance is deployed and has successfully started up, you can find the Connector Appliance IP address in one of the following places:
- In the VM view of the Nutanix Prism web console.
- In the Connector Appliance console.
Use this IP address to connect to the Connector Appliance administration page and complete the registration process.
Next step: Register your Connector Appliance with Citrix Cloud.
Microsoft Azure
This section describes how to deploy Connector Appliance in Microsoft Azure. You can deploy the Connector Appliance from the Azure Marketplace or from the downloaded disk image by using the included PowerShell script.
Deploy the Connector Appliance from the Azure Marketplace
To deploy the Connector Appliance from the Azure Marketplace complete the following steps:
-
Go to the Connector Appliance in the Azure Marketplace. (Azure Marketplace)
Alternatively, you can search for “Connector Appliance for Cloud Services” in the marketplace search.
-
Click Get It Now and then Create.
-
On the Create Citrix Connector™ Appliance for Cloud Services page, complete the following information:
- Select the Subscription to use.
- Select the Resource group to use.
- Select the Region to locate the Connector Appliance in.
- Specify a VM name.
- Select a Virtual network to add the Connector Appliance to. This network is used to access Citrix Cloud, the local resources, and the Connector Appliance administration page. This network cannot be changed later.
- Specify a value for Subnet.
Click Next : Tags >.
-
On the Tags tab, add required tags if needed.
Click Next : Review + create >.
-
After you have reviewed the deployment details, click Create.
After the Connector Appliance is deployed and has successfully started up, its console displays a landing page that contains the Connector Appliance IP address. Use this IP address to connect to the Connector Appliance administration page and complete the registration process.
Next step: Register your Connector Appliance with Citrix Cloud.
Deploy the Connector Appliance VM by using a PowerShell script
The connector-appliance-azure.zip file contains a PowerShell script that creates and starts a new VM. You can use the provided script as the basis to create or amend your own local script.
Before running the script ensure that you have the following prerequisites:
- Install the Az PowerShell module into your local PowerShell environment.
- Run the PowerShell script in the directory where the VHD file is located.
Complete the following steps:
- Copy or download the Connector Appliance ZIP file to your Windows system.
- Extract the contents of the ZIP file: A PowerShell script and a VHD file.
- Open a PowerShell console as Administrator.
-
Change the current directory to where the ZIP file contents are located and run the following command:
.\connector-appliance-upload-Azure.ps1 - A dialog appears, prompting you to log into Microsoft Azure. Enter your credentials.
- When prompted by the PowerShell script, select the subscription to use. Press Enter.
- Follow the prompts in the script, which guide you through uploading the image and creating a virtual machine.
-
After you have created the first VM, the script asks if you want to create another VM from the uploaded image.
- Type
yto create another VM. - Type
nto exit the script.
- Type
After the Connector Appliance is deployed and has successfully started up, its console displays a landing page that contains the Connector Appliance IP address. Use this IP address to connect to the Connector Appliance administration page and complete the registration process.
Next step: Register your Connector Appliance with Citrix Cloud.
AWS
This section describes how to deploy Connector Appliance in AWS. Connector Appliance is available as an AMI in the AWS marketplace and we recommend that you install the Connector Appliance from the AMI. Alternatively, you can deploy a downloaded disk image by using the AWS UI or by using the included PowerShell script.
Networking prerequisites
To deploy the Connector Appliance on AWS, ensure that you have access to Citrix Cloud from the subnet in which the Connector Appliance is created.
We recommend using a private IP address for the appliance, which requires specific configuration to provide access to Citrix Cloud. To achieve this configuration, complete the following steps in the AWSManagement Console:
-
Create the NAT gateway.
- In the top navigation bar, select Services > VPC > NAT Gateways.
-
On the top right, click Create NAT Gateway. Enter the following information:
- Enter Name.
- Select subnet from the list.
- Set Connectivity type as Public.
- Select an Elastic IP allocation ID from the list. If there is no available Elastic IP, click Allocate Elastic IP and follow the instructions to create one.
- Click Create NAT Gateway.
-
Create a route table entry including the NAT gateway.
- In the top navigation bar, select Services > VPC > Route Tables.
-
On the top right, click Create route table. Enter the following information:
- Enter Name.
- From the list, select the VPC that contains the subnet you selected when creating the NAT gateway.
- Click Create route table.
- In the Routes tab of the route table you created, click Edit routes > Add route.
-
Input the Destination and Target for the new route entry.
- Set the destination as 0.0.0.0/0.
- For the target, select the NAT Gateway you created from the list.
- Click Save change.
-
Attach the subnet to be used for the Connector Appliance to this route table.
- In the top navigation bar, Select Services > VPC > Route Tables.
- Select the route table that contains the NAT gateway.
- In the display page, go to the Subnet Associations tab.
- Click Edit subnet associations.
- Select the subnet or subnets to attach to the route table.
- Click Save Associations.
Deploy the Connector Appliance from the AWS Marketplace
Before beginning, ensure you meet the following prerequisites:
-
You have permissions to operate EC2 resources.
-
You have completed the configuration in Networking prerequisites.
-
(Optional) You can create a security group that restricts which IP addresses are permitted to access your Connector Appliance.
Complete the following steps:
- Log in to the AWSManagement Console.
-
Find the Connector Appliance AMI in the AWS marketplace. You can do this in one of the following ways:
-
Follow the marketplace link provided in Citrix Cloud. (AWS Marketplace)
-
Search for the AMI in the AWS Management Console:
- Go to Services > Compute > EC2 > AMIs
- Ensure that you are in the US East (Ohio) region.
- In Public images, search for “Citrix Connector Appliance” or for the AMI ID “ami-026eaf9b3b232577f”.
-
-
Verify that you have the correct AMI by checking the AMI ID (ami-026eaf9b3b232577f) and owner ID (414337923189).
-
Copy the AMI to your subscription:
- Go to Actions > Copy AMI.
- In the Copy AMI dialog, you can select the Destination Region that you require.
- Click Copy AMI
-
From your copied AMI summary page, click Launch instance from AMI.
-
In the Launch an instance dialog, complete the following steps:
- Select the number of instances to create. For resiliency, we recommend that you have two or more Connector Appliances in each resource location.
- Specify a name for the instance.
- For the Instance type, select t2.medium. The instance type must have at least 4 GB and 2 CPUs.
- For the Key pair (login), select Proceed without a key pair. SSH login to the Connector Appliance is not permitted, so a key pair is not needed.
- For the Network settings, in the Firewall (security group) section, configure the following settings:
- Choose whether to Create security group or Select existing security group.
- Deselect Allow SSH traffic from the internet
- Select Allow HTTPs traffic from the internet
- Select Allow HTTP traffic from the internet
Click Launch instance.
-
After the instance is created, in the Success section, click the instance ID link to view your Connector Appliance instance.
Alternatively, you can click the View All Instances button on this page or go to Services > EC2 >Instances in the AWS Management Console to see a list of your instances.
- When your Instance state has changed to Running, go into the instance details and use the Private IPv4 address to connect to the Connector Appliance administration page and complete the registration process.
You might need to use a bastion host to go to the Connector Appliance administration page at the internal IP address from your browser and complete the registration process.
By default, the Connector Appliance uses DHCP to set its network configuration. You can edit this network configuration using the Connector Appliance web interface. For more information, see Configuring network settings on the Connector Appliance administration page.
Next step: Register your Connector Appliance with Citrix Cloud.
Deploy the Connector Appliance by using the AWS UI
Before beginning, ensure you meet the following prerequisites:
-
You have permissions to operate S3 and EC2 resources.
-
You have created a service role and policy that has VM import access. For more information, see https://docs.aws.amazon.com/vm-import/latest/userguide/required-permissions.html#vmimport-role.
Note:
To create a service role, you must create an S3 bucket. When creating the policy, set the S3 bucket you have created with VM import access.
-
You have access to AWS CloudShell. It is only available in certain regions. For the list of regions where AWS CloudShell is supported, see https://docs.aws.amazon.com/cloudshell/latest/userguide/supported-aws-regions.html.
-
You have completed the configuration in Networking prerequisites.
Complete the following steps:
- On your local system, extract the contents of
connector-appliance-aws.zip. - Log in to the AWSManagement Console.
- Create a storage bucket by completing the following steps. (Alternatively, you can skip these steps and use an existing storage bucket.)
- In the top navigation bar, select Services > S3 > Create bucket.
- Enter a unique name for your bucket. For naming conventions for buckets in Amazon S3, see https://docs.aws.amazon.com/AmazonS3/latest/userguide/bucketnamingrules.html.
- Select the region for your bucket. Ensure that you choose the same region as your AWS Region, because you cannot use the files in the bucket if these regions are different.
- Keep the remaining settings set to the defaults, then click Create bucket.
- Click the name of the bucket that you have created. Click Upload > Add files, then select the
connector-appliance.vhdfile. Keep the remaining settings set to the defaults then click Upload. - Click the file you uploaded. Click Copy S3 URI.
- Click the AWS CloudShell icon in the top navigation bar and run the following commands:
-
Create a task to convert your VHD file to a snapshot:
aws ec2 import-snapshot --disk-container Format=VHD,Url="<S3_URI>"Replace the placeholder value with your S3 URI that you copied from the previous step. For example,
aws ec2 import-snapshot --disk-container Format=VHD,Url="s3://my-aws-bucket/connector-appliance.vhd".This command is complete when the following command returns a JSON string containing
"Status": "completed". Make note of theImportTaskIdvalue in the JSON output. -
Run the following command:
aws ec2 describe-import-snapshot-tasks --import-task-ids <ImportTaskId>Replace the placeholder value with the
ImportTaskIdcopied from the previous step. For example,aws ec2 describe-import-snapshot-tasks --import-task-ids import-snap-0273h2836153itg5.
-
- On the AWSManagement Console, in the top navigation bar, select Services > EC2.
- From the menu on the left of the screen, click Snapshots.
- Right-click on the snapshot that you created and click Create Image.
- In the pane that opens, complete the following steps:
- Enter a name for your AMI.
- Select Hardware-assisted virtualization.
Click Create.
- From the menu on the left of the screen, click AMIs.
- Right-click on the AMI that you created and click Launch.
- In the pane that opens, complete the following steps:
- Choose the instance type.
- (Optional) Customize the network on the Configure Instance tab.
- (Optional) Attach another volume on the Add Storage tab.
- Set security group rules on the Configure Security Group tab.
After you have reviewed the instance launch, click Review and Launch.
After the Connector Appliance is deployed and has successfully started up, go to Services > EC2 > Instances and select the instance you have created. Use the Private IPv4 address to connect to the Connector Appliance administration page and complete the registration process. You might need to use a bastion host to go to the Connector Appliance administration page at the internal IP address from your browser to continue the installation process.
By default, the Connector Appliance uses DHCP to set its network configuration. You can edit this network configuration using the Connector Appliance web interface. For more information, see Configuring network settings on the Connector Appliance administration page.
Next step: Register your Connector Appliance with Citrix Cloud.
Deploy the Connector Appliance by using a PowerShell script
The connector-appliance-aws.zip file contains a PowerShell script that creates and starts a new VM. Before running the script ensure that you have the following prerequisites:
-
You have either AWS.Tools, AWSPowerShell.NetCore or AWSPowerShell installed on your system. For more information, see https://docs.aws.amazon.com/powershell/latest/userguide/pstools-getting-set-up.html.
-
You have created a service role and policy that has VM import access. Both the service role and the policy must be named
vmimportfor this PowerShell script to work. For more information, see https://docs.aws.amazon.com/vm-import/latest/userguide/required-permissions.html#vmimport-role.Note:
To create a service role, you must create an S3 bucket. When creating the policy, set the S3 bucket you have created with VM import access.
-
You have created an Amazon EC2 security group.
-
You have S3 permissions and API access.
-
You have completed the configuration in Networking prerequisites.
Complete the following steps:
- On your local system, extract the contents of
connector-appliance-aws.zipto a folder. - In PowerShell, run the following commands:
-
To be able to run an AWS cmdlet in your local environment, run the following command to add a new profile to the AWS SDK store:
Set-AWSCredential -AccessKey <access_key_ID> -SecretKey <secret_key> -StoreAs MyProfileReplace the placeholder values with your access key and secret key. Provide a unique profile name. In the example we have provided, it is
MyProfile. -
Set the profile to the default:
Initialize-AWSDefaultConfiguration -ProfileName MyProfile -
Change the current directory to the folder where the extracted files are located and run the following command:
.\connector-appliance-upload-aws.ps1
-
-
Follow the prompts in the script, which guide you through selecting the region for your Connector Appliance deployment, uploading the image to your chosen bucket, and entering a name for your VM.
- You must use the bucket with VM import access that you created earlier.
- When asked to select the VPC to use, select the VPC where the NAT gateway and route tables are configured.
- When asked to select the subnet to use, select the subnet attached to the route table containing the NAT gateway.
For more information, see Networking prerequisites.
After the Connector Appliance is deployed and has successfully started up, the script displays the private IP address of the Connector Appliance. You might need to use a bastion host to go to the Connector Appliance administration page at the internal IP address from your browser and complete the registration process.
By default, the Connector Appliance uses DHCP to set its network configuration. You can edit this network configuration using the Connector Appliance web interface. For more information, see Configuring network settings on the Connector Appliance administration page.
Next step: Register your Connector Appliance with Citrix Cloud.
Google Cloud Platform
This section describes how to deploy Connector Appliance on the Google Cloud Platform. You can install the Connector Appliance from the Google Cloud Marketplace. Alternatively, you can deploy a downloaded disk image by using the Google Cloud Platform Console or by using the included PowerShell script.
The file connector-appliance-gcp.zip contains:
-
connector-appliance.tar.gz, which is a disk image of the Connector Appliance -
connector-appliance-upload-gcp.ps1, which is a PowerShell script that can be used to automatically deploy the Connector Appliance
Deploy the Connector Appliance from the Google Cloud marketplace
-
Log in to your Google account.
-
Follow the marketplace link provided in Citrix Cloud. (Google Cloud Marketplace)
Alternatively, you can search for “Connector Appliance for Cloud Services” in the marketplace search.
-
Click Launch.
-
On the New Citrix Connector Appliance for Cloud Services deployment page, complete the following information:
- Specify a Deployment name for the deployment job.
- Select the Zone to locate the Connector Appliance in.
- Select the Machine family, Series, and Machine type to use.
- Select the Boot disk type and Boot disk size in GB to use.
- In the Networking section, specify the networking interface to be used by the Connector Appliance. If you want to be able to connect to the administration page from a public network, specify an External IP.
Click Deploy. You are directed to the Deployment Manager page.
Note:
After the Connector Appliance is deployed and has successfully started up, you receive an email to confirm that the Connector Appliance is deployed on Google Cloud Platform.
-
On the Deployment Manager page, click on the instance name. Alternatively, you can search for the Connector Appliance instance that you created in the Compute Engine.
-
If you previously specified an External IP when setting up the networking interface for your Connector Appliance, copy the External IP address in the Network interfaces section in the Details tab. Use this IP address to connect to the Connector Appliance administration page and complete the registration process. Alternatively, you can use the Primary internal IP address to visit the Connector Appliance administration page from another machine that is in the same subnet as your Connector Appliance.
Next step: Register your Connector Appliance with Citrix Cloud.
Deploy the Connector Appliance by using the Google Cloud Platform console
- On your local system, extract the contents of
connector-appliance-gcp.zip. -
In your Google Cloud Platform project, create a storage bucket. (Alternatively, you can use an existing storage bucket.)
- From the main menu, select Cloud Storage.
- On the main pane, select Create bucket.
- Specify a name for your bucket.
- Configure the data storage and access settings that you require. You can leave these settings as the defaults.
- Click Create.
- Inside your storage bucket, select Upload files and choose the file
connector-appliance.tar.gz. Wait while the file uploads. - Select the uploaded file to view its details. Copy the value of gsutil URI to the clipboard.
- Open the Cloud Shell by clicking the Activate Cloud Shell icon in the header bar.
-
In your Cloud Shell, run the following command to create an image:
gcloud compute images create "Image name" --guest-os-features=MULTI_IP_SUBNET --source-uri="gsutil URI of uploaded connector-appliance.tar.gz file" - From the main menu, select Compute Engine > VM Instances.
-
Select Create Instance. In the pane that opens, specify the following information:
- In the Name field, specify a name for the Connector Appliance instance.
- Choose a region to locate the Connector Appliance in.
- Choose the machine configuration.
- In the Boot disk section, click Change.
- In the section that opens, go to the Custom images tab.
- From the Image list, select the image you created.
- Click Select.
- In the Firewall section, enable HTTPS traffic to allow access to the Connector Appliance administration page.
- Specify any additional configuration required. For example, you might not want to use the default networking configuration.
Click Create.
- In the VM Instances section, select your newly created VM to view its details.
After the Connector Appliance is deployed and has successfully started up, the VM Instances section displays the Connector Appliance IP addresses.
If the Connector Appliance has an external IP address, you can use this IP address to go to the Connector Appliance administration page from your browser and complete the registration process.
If the Connector Appliance has only an internal IP address, use a bastion host to go to the Connector Appliance administration page from your browser and complete the registration process. For more information, see https://cloud.google.com/compute/docs/connect/ssh-using-bastion-host.
Next step: Register your Connector Appliance with Citrix Cloud.
Deploy the Connector Appliance by using a PowerShell script
To use the provided PowerShell script to deploy the Connector Appliance, you must have the Google Cloud SDK installed on your system.
- On your local system, extract the contents of
connector-appliance-gcp.zipto a folder. - In PowerShell, change the directory to the folder where the extracted files are located.
- Run the command
.\connector-appliance-upload-GCP.ps1. - In the browser window that opens, authenticate with the Google Cloud SDK with an account that has access to the project you want to deploy the Connector Appliance to.
- In Google Cloud Tools for PowerShell, when prompted by the PowerShell script, select the project to use. Press Enter.
- Follow the prompts in the script, which guide you through uploading the disk, creating an image, and creating a virtual machine.
-
After you have created the first VM, the script asks if you want to create another VM from the uploaded image.
- Type
yto create another VM. - Type
nto exit the script.
- Type
After the Connector Appliance is deployed and has successfully started up, the script displays the internal IP address of the Connector Appliance. Alternatively, you can go to the Google Cloud Platform console to find the Connector Appliance internal IP address. The Compute Engine > VM Instances section displays the Connector Appliance IP address.
Use a bastion host to go to the Connector Appliance administration page at the internal IP address from your browser and complete the registration process. For more information, see https://cloud.google.com/compute/docs/connect/ssh-using-bastion-host.
Next step: Register your Connector Appliance with Citrix Cloud.
Register your Connector Appliance with Citrix Cloud
Register a Connector Appliance with Citrix Cloud to provide a channel for communication between Citrix Cloud and your resource locations.
After you install your Connector Appliance on the hypervisor and start it, the console displays the IP address of the Connector Appliance. The console also displays an SSL fingerprint that you can use to validate your connection to the Connector Appliance UI.
-
Copy the Connector Appliance IP address to your browser address bar.
Note:
You may have to include
https://at the start of the IP address.The Connector Appliance UI uses a self-signed certificate, which is valid for five years. As a result, you might see a message about the connection not being secure. To verify the connection to your Connector Appliance, you can compare the SSL fingerprint in the console with the fingerprint the browser receives from the webpage.
For example, in the Google Chrome browser, complete the following steps:
- Click the Not Secure marker next to the address bar.
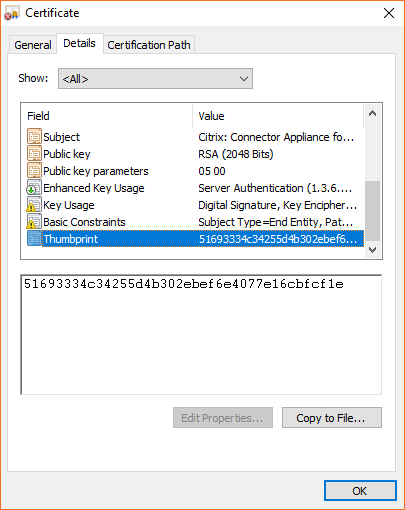
- Select Certificate. The Certificate window opens.
-
Go to the Details tab and find the Thumbprint field.
If the value of the Thumbprint field and the SSL fingerprint provided in the console match, you can confirm that your browser is connecting directly to the Connector Appliance UI.
You can replace this self-signed certificate with one of your own that is signed by your organization or generated by using your organization’s chain of trust. For more information, see Managing certificates.
-
If your browser requires an extra step to confirm that you want to continue to the site, complete this step now.
The Create new password webpage opens.
-
Create a password for your Connector Appliance UI and click Set password.
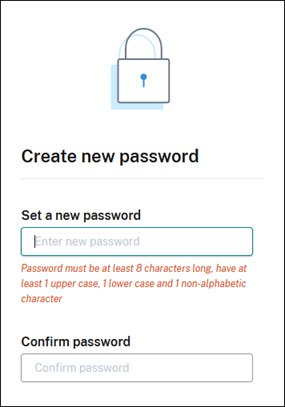
The password you set must meet the following requirements:
- 8 or more characters long
- Contains both upper and lower case letters
- Contains at least one non-alphabetic character
Ensure that you store this password in a safe place for future use.
-
Sign in with the password you set. The Connector administration page opens.
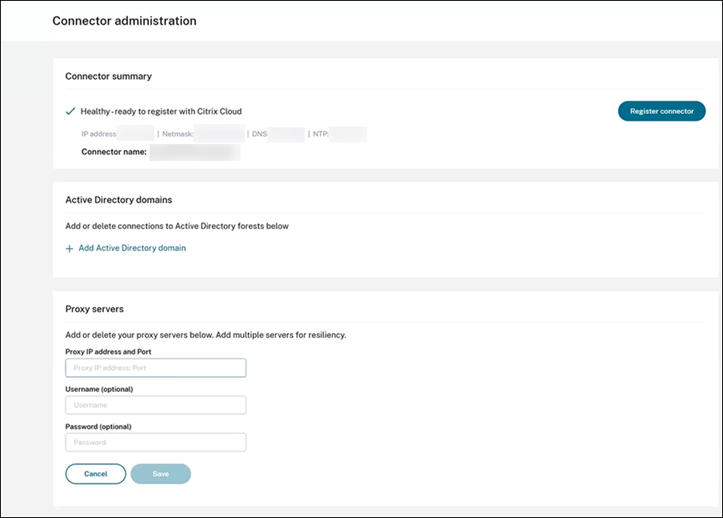
-
(Optional) If you use one or more web proxies, you can add the proxy addresses in the Proxy servers section. Both unauthenticated and authenticated proxies are supported. To add an unauthenticated proxy, provide a valid Proxy IP Address and Port. To add an authenticated proxy, provide a valid Username and Password as well.
Note:
Only basic proxy authentication is supported. Other forms of authentication are not supported.
Only traffic to external systems is routed through the web proxy. For more information, see Connector Appliance communication.
- (Optional) If your network uses TLS intercepting web proxies to access the internet you may require your Connector to trust its Root Certificate Authority to successfully communicate with the cloud.
- Under Root certificate authorities, select Add certificate.
-
Copy the contents of the certificate in PEM format:
-----BEGIN CERTIFICATE----- <certificate-base64-bytes> -----END CERTIFICATE----- <!--NeedCopy--> - In Full Certificate Details, paste the certificate contents.
- Select Add Certificate.
To add a RootCA using the Connector Appliance APIs, see Managing root certificate authorities in the Citrix Developer documentation.
Note:
Certificates which are expired or will expire in the next 30 days will show a warning.
-
Click Register Connector to open the registration task.
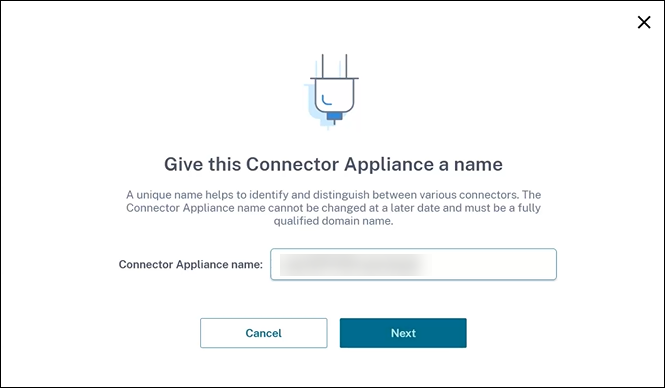
-
Choose a name for your Connector Appliance. This name can help you distinguish between the various Connector Appliances that exist in your resource location. After you register your Connector Appliance, the name cannot be changed.
Enter the name in the Connector Appliance name field and click Next.
The webpage provides a code to use to register with Citrix Cloud. This code expires in 15 minutes.
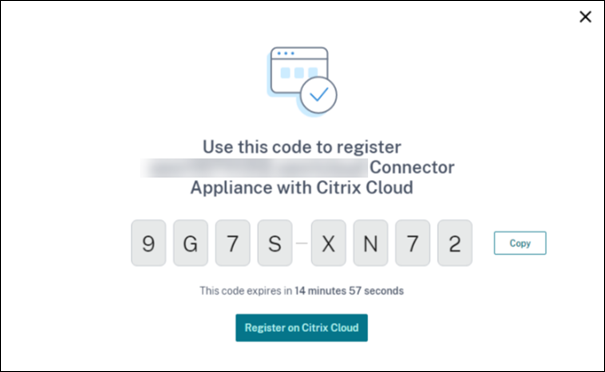
-
Use the Copy button to copy the code to the clipboard.
-
Return to the Resource Locations webpage.
-
Paste the code into Step 2 of the Install Connector Appliance task. Click Confirm Details.
Citrix Cloud verifies that the Connector Appliance is present and can be contacted. If the registration code has expired, you are prompted to generate a new code.
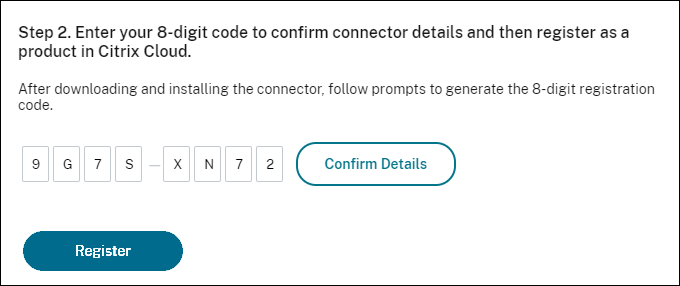
-
Click Register.
The page shows whether the registration was successful. If the registration failed, you are prompted to try again.
- Click Close.
The Connector Appliance administration page also enables you to download a diagnostic report for the Connector Appliance. For more information, see Generating a diagnostic report.
After registering your Connector Appliance
For each resource location, we advise that you install and register two or more Connector Appliances. This configuration ensures continuous availability and enables the connectors to balance the load.
You cannot directly manage your Connector Appliance.
The Connector Appliance is updated automatically. You are not required to take any actions to update your connector. You can specify the time and day that you want Connector Appliance updates to be applied in your resource location. For more information, see Connector updates.
Do not clone, suspend, or take a snapshot of your Connector Appliance VMs. These actions are not supported.
You are only presented with the Create new password page the first time that you connect to the Connector Appliance UI. Ensure that you store this password in a safe place for future use. This password cannot be reset. If you forget the password, you must reinstall the Connector Appliance. On subsequent connections to the UI, you are asked to input the password you set when registering the Connector Appliance.
Connector Appliance Connectivity Checks
The Connector Appliance implements a set of automated connectivity checks to ensure that all requirements for Connector Appliance connectivity are met. For more information on the connectivity requirements, see Internet connectivity requirements.
These checks can be manually triggered, and the results can be viewed from the Connector Appliance Admin user interface.
Steps to Access and Run Connectivity Checks
- From the Connector Appliance console in your hypervisor, copy the IP address to your browser’s address bar.
- Enter the password that you set when you registered your Connector Appliance.
- The tests automatically run upon loading the page.
- To rerun the tests, click Run Checks.
- To copy the results to the clipboard, click the Copy icon.
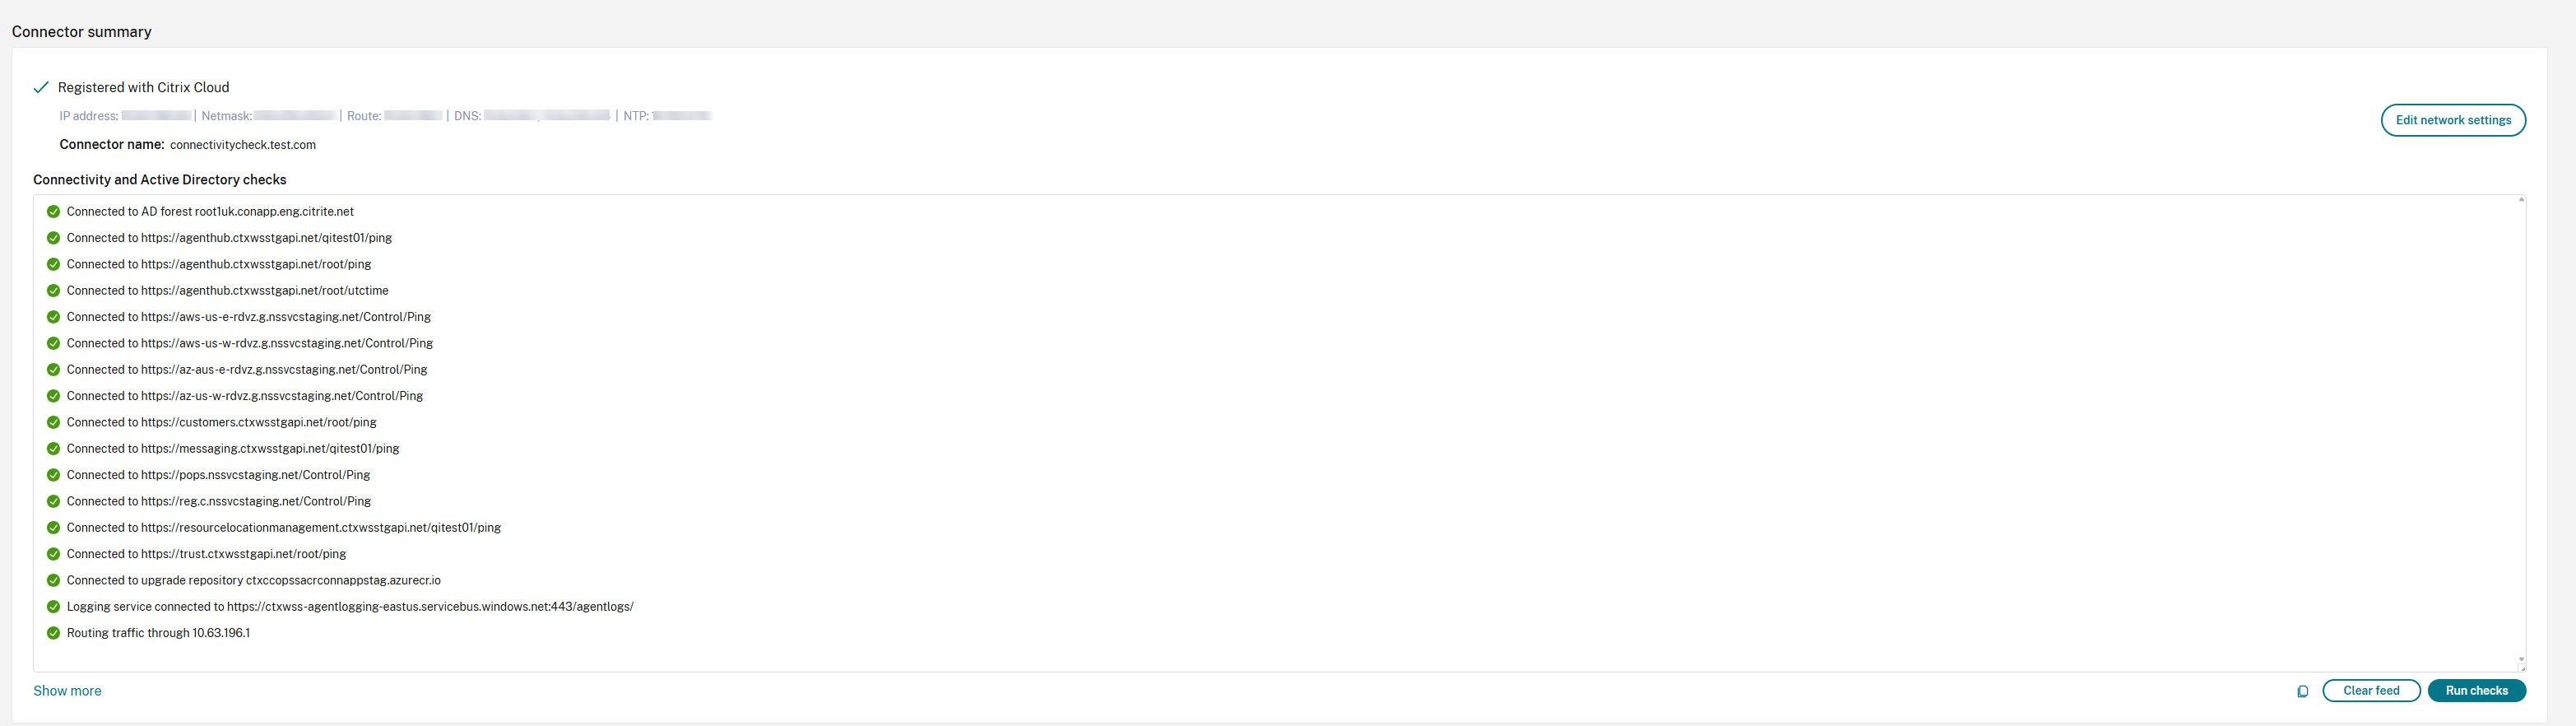
Active Directory Checks
The checks related to Active Directory are grouped by domain. If the appliance has not been joined to any domains then no Active Directory tests will be run.
For each joined domain, the following checks are run:
- Domain connectivity
- Query time synchronization with the domain
- Validate the ability to handle requests to the domain from Citrix Cloud
Gateway Service Provider
For the gateway service, the connector performs a query for the list of points of presence and validates connectivity.
Core Connector Services
For the core connector services, the Connector Appliance performs HTTP GET requests to a range of Cloud Services used as part of core functionality. The appliance also tests connectivity to the Azure Container Registry (ACR), which is used for downloading new versions of the connector.
Generating a diagnostic report
You can generate and download a diagnostic report from the Connector Appliance administration page.

- From the Connector Appliance console in your hypervisor, copy the IP address to your browser address bar.
- Enter the password that you set when you registered your Connector Appliance.
- In the Diagnostic report section of the page, click Download Report.
The diagnostic reports are provided in a .zip file.
Verify your network connection
You can check your network connection from the Connector Appliance administration page by using the TCP Capture diagnostic check.
- On the Connector Appliance administration page, click your account name in the header bar and select Network Diagnostics.
- (Optional) In the TCP Capture section, enter the target IP address, host name, or port to restrict the TCP capture.
- From the Trace Duration menu, select the duration for which you want your trace to run.
-
(Optional) Enable Packet Tracing to capture the contents of the packets.
When packet tracing is disabled, the TCP capture functionality uses a best-effort approach to capture the headers for diagnosis. This best-effort approach captures the first 512 bytes of each packet. However, as headers are not a fixed size, this approach might not capture all of the header.
- Click Start trace.
- Wait until the trace has completed. After the trace has completed, you can download a trace report or start a new trace.
- Click Download to download the trace report. The trace report is provided in a
.pcapfile. - Click Start new trace to begin another trace.
- Click Download to download the trace report. The trace report is provided in a
Network Connectivity Probe Tool
The Connector Appliance Network Connectivity Probe provides an on‑demand way to test connectivity to supported network targets using multiple protocols, with optional proxy selection and packet capture. For details on supported protocols, proxy behavior, allowed targets, and interpreting probe results, see the Connector Appliance Network Connectivity Probe page.
Connecting Active Directory to Citrix Cloud
You can use Connector Appliance to connect a resource location to forests which do not contain Citrix Virtual Apps and Desktops resources. For example, in the case of Citrix Secure Private Access™ customers or Citrix Virtual Apps and Desktops customers with some forests only used for user authentication.
For more information, see Active Directory with Connector Appliance.
Validating your Kerberos configuration
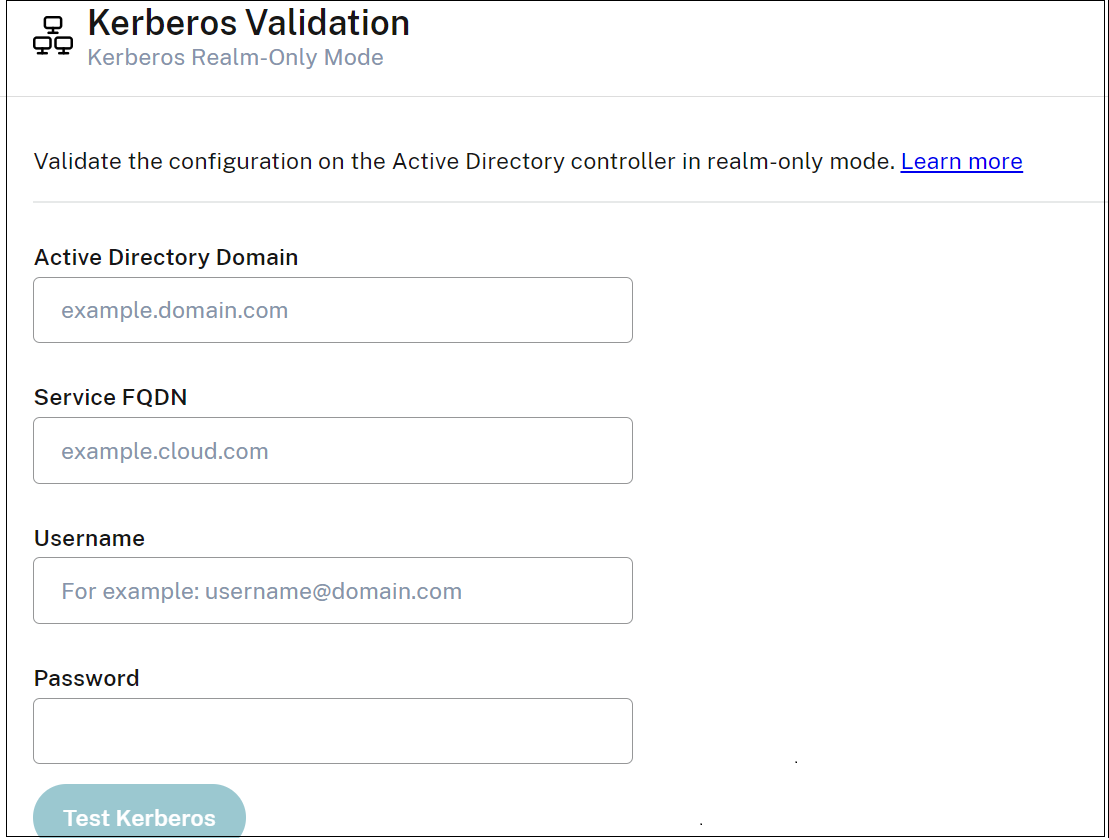
If you use Kerberos for single sign-on, you can verify that the configuration on your Active Directory controller is correct from the Connector Appliance administration page. The Kerberos validation feature enables you to validate a Kerberos realm-only mode configuration or a Kerberos Constrained Delegation (KCD) mode configuration.
Validate Kerberos realm-only configuration:
- Go to the Connector Appliance administration page.
- From the Connector Appliance console in your hypervisor, copy the IP address to your browser address bar.
- Enter the password that you set when you registered your Connector Appliance.
- To validate your realm-only Kerberos configuration select the Kerberos Validation Realm-Only in the Active Directory domains section.
- Specify the Active Directory Domain.
- If you’re validating a Kerberos realm-only mode configuration, you can specify any Active Directory domain. This mode doesn’t depend on being joined to the domain.
- Specify the Service FQDN. The default service name is assumed to be “https”. If you specify “computer.example.com”, this value is considered the same as “https://computer.example.com”.
- Specify the Username.
- Specify the Password.
- Click Test Kerberos.
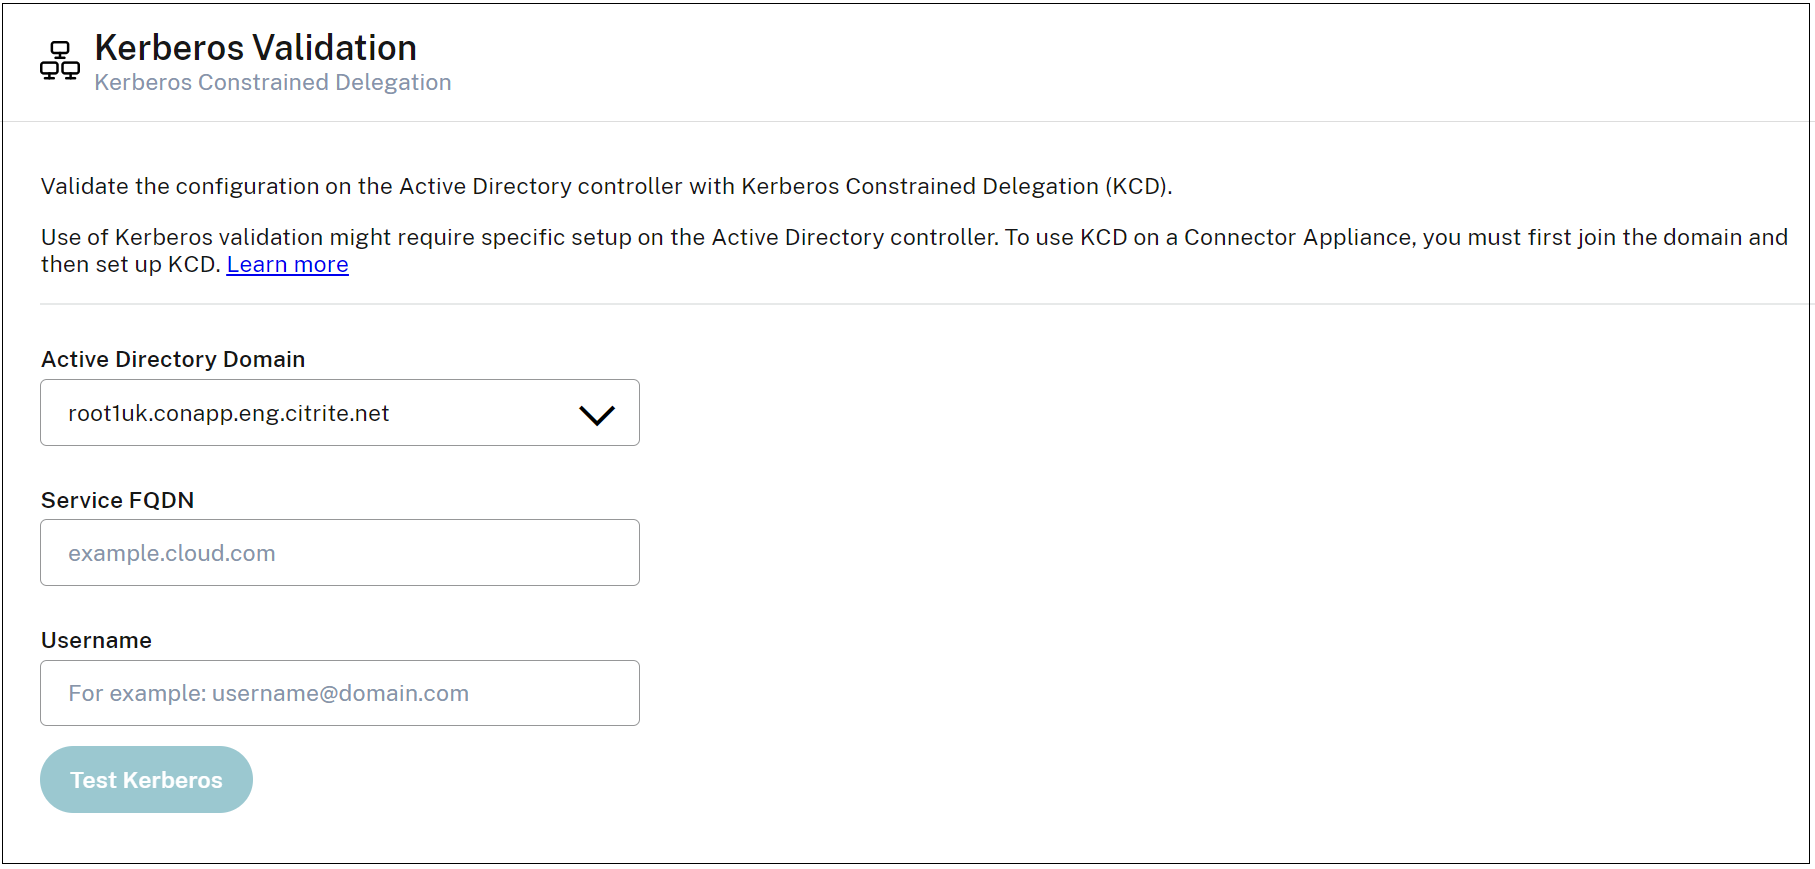
Validate Kerberos Constrained Delegation (KCD) configuration:
- Go to the Connector Appliance administration page.
- To validate Kerberos Constrained Delegation (KCD) mode for domains to which the Connector Appliance has been joined, select Kerberos validation from the ellipsis menu (…) of the relevant domain.
- Specify the Active Directory Domain.
- If you’re validating a Kerberos Constrained Delegation configuration, you must select from a list of joined domains.
- Specify the Service FQDN. The default service name is assumed to be “https”. For example, specify “computer.example.com”, this value is considered the same as “https://computer.example.com”.
- Specify the Username.
- For the Kerberos Constrained Delegation mode, you can also validate the kerberos setup using service accounts by selecting the Service Accounts tab.
- Click Test Kerberos.
If the Kerberos configuration is correct, you see the message “Successfully validated Kerberos setup”. If the Kerberos configuration is not correct, you see an error message that provides information about how the validation failed.
For more information about Kerberos, see the Microsoft documentation.
Network settings for your Connector Appliance
By default, the IP address and network settings of your Connector Appliance are automatically assigned by using DHCP.
After registering your Connector Appliance by using DHCP, you can edit its network settings in the Connector Appliance administration page.
However, if DHCP is not available in your environment or if you do not have access to the Connector Appliance administration page, you can set the network configuration directly on the Connector Appliance console.
Configuring network settings on the Connector Appliance administration page
After registering your Connector Appliance by using DHCP, you can edit its network settings in the Connector Appliance administration page.
To manually configure your network settings:
- In the Connector Summary section, select Edit network settings.
- In the Network settings dialog, choose Configure your own network settings.
- Enter the IP address, Subnet mask, and Default gateway.
- Add one or more DNS servers.
- Add one or more NTP servers.
- Click Save.
When you save changes to your network settings, the Connector Appliance restarts. During the restart, the Connector Appliance is temporarily unavailable. You are logged out of the Connector Appliance administration page and the URL of this page changes. You can find the new URL in the Connector Appliance console or by looking at the network information in your hypervisor.
To change your network configuration to use automatically assigned values:
- In the Connector Summary section, select Edit network settings.
- In the Network settings dialog, choose Obtain IP address automatically.
- Click Save.
When you save changes to your network settings, the Connector Appliance restarts. During the restart, the Connector Appliance is temporarily unavailable. You are logged out of the Connector Appliance administration page and the URL of this page changes. You can find the new URL in the Connector Appliance console or by looking at the network information in your hypervisor.
Set the network configuration by using the Connector Appliance console
By default, the IP address and network settings of your Connector Appliance are automatically assigned by using DHCP. However, if DHCP is not available in your environment or if you do not have access to the Connector Appliance administration page, you can set the network configuration directly on the Connector Appliance console.
To set the network configuration:
- In your hypervisor, restart the Connector Appliance.
- While the Connector Appliance starts up, watch the console for the message
Welcome to GRUB!. - When you see this message, press Esc to enter the GRUB menu.
-
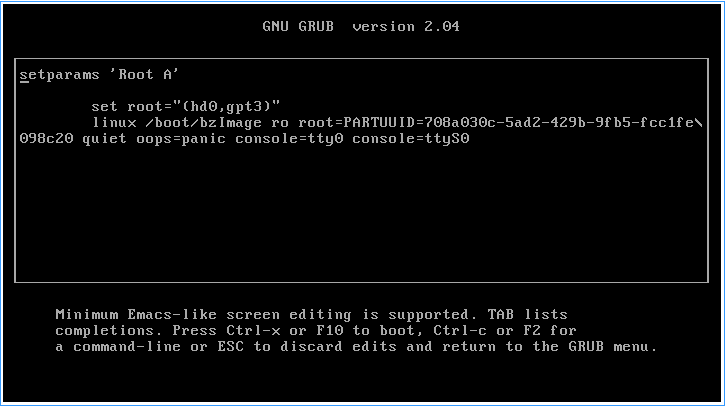
To edit the boot parameters, press e.
You see a view that looks like the following image:
-
Edit the line that begins with
linuxto include your required network configuration.- To specify DHCP networking, append
network=dhcpto the end of the line. -
To specify static networking, append the following parameters to the end of the line:
 network=static:ip=<static_ip_address>:netmask=<netmask>:route=<default_gateway>:dns=<dns_server_1>,<dns_server_2>:ntp=<ntp_server_1>,<ntp_server_2>
 <!--NeedCopy-->
Replace the placeholder values with the values for your configuration.
- To specify DHCP networking, append
- Press Ctrl+X to start the Connector Appliance with the new configuration.
Change the administrator user password for the Connector Appliance
-
From the user menu in the top-right of the console, select Change password.
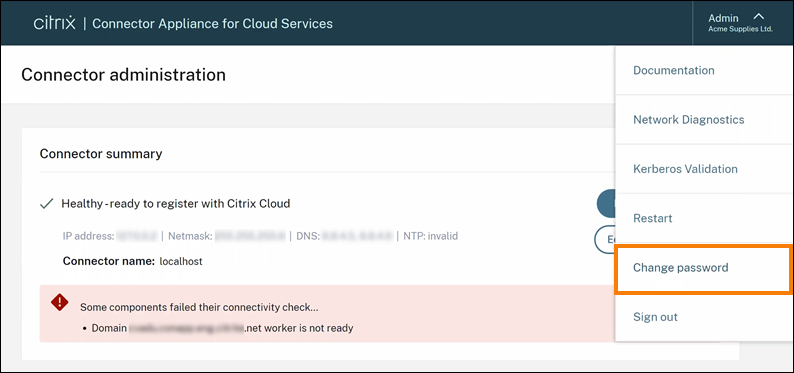
The change password page is displayed.
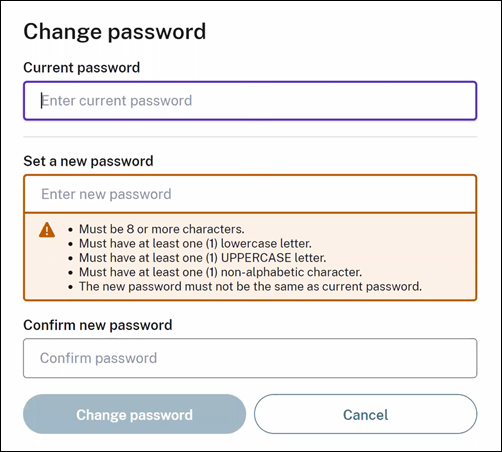
-
Enter your current password and then enter and confirm the new password. The new password you set must meet the following requirements:
- 8 or more characters long
- Contains both upper and lower case letters
- Contains at least one non-alphabetic character
- Must not be the same as current password
-
Select Change password to save your changes.
Citrix Cloud signs you out automatically and redirects you to the sign-in page.
Replace Server Certificate
The Connector Appliance allows administrators to replace the default self-signed SSL or TLS certificate used by its administration web interface. Administrators can use a custom certificate signed by their organization or generated using their organization’s chain of trust.
To access the server certificate management interface, go to the Connector Appliance administrator interface. Navigate to Certificates and select the Server certificates tab.
By default, the Connector Appliance uses a self-signed certificate. After you replace it with a custom certificate, a trusted certificate authority must issue the certificate for the browser to trust the administration page.

Viewing the current server certificate
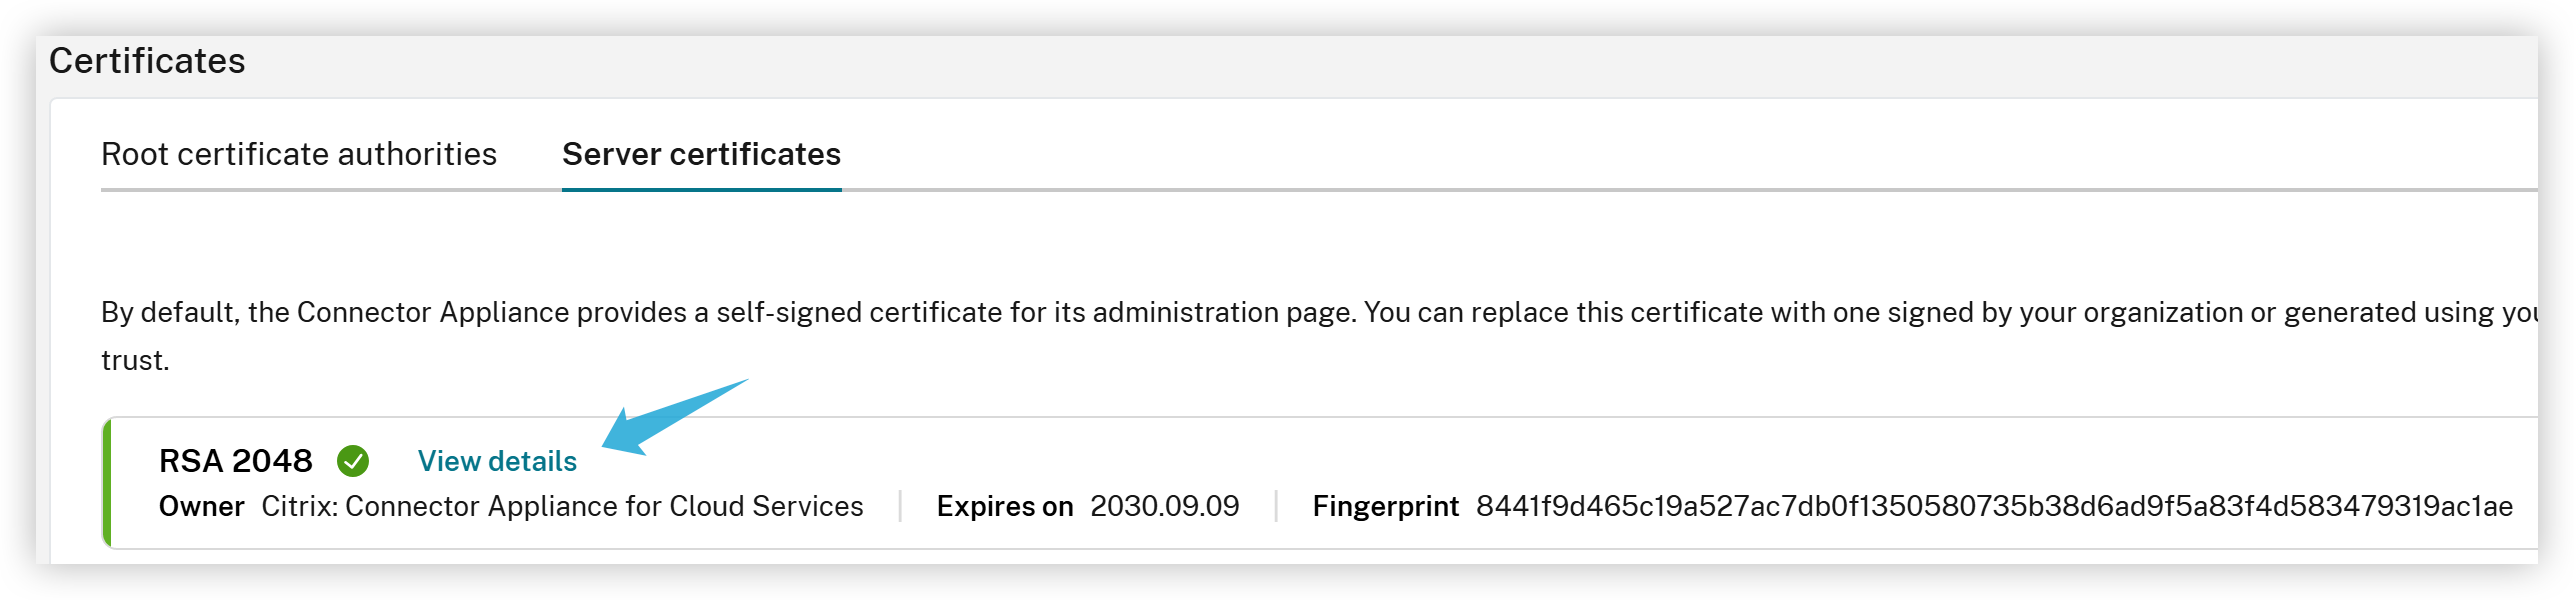
The Server certificates tab displays a card with information about the current certificate:
- Subject — the certificate algorithm and key length (for example, RSA 2048).
- Owner — the certificate issuer or owner, if available.
- Expires on — the certificate expiry date.
- Fingerprint — the SHA-256 fingerprint of the certificate.
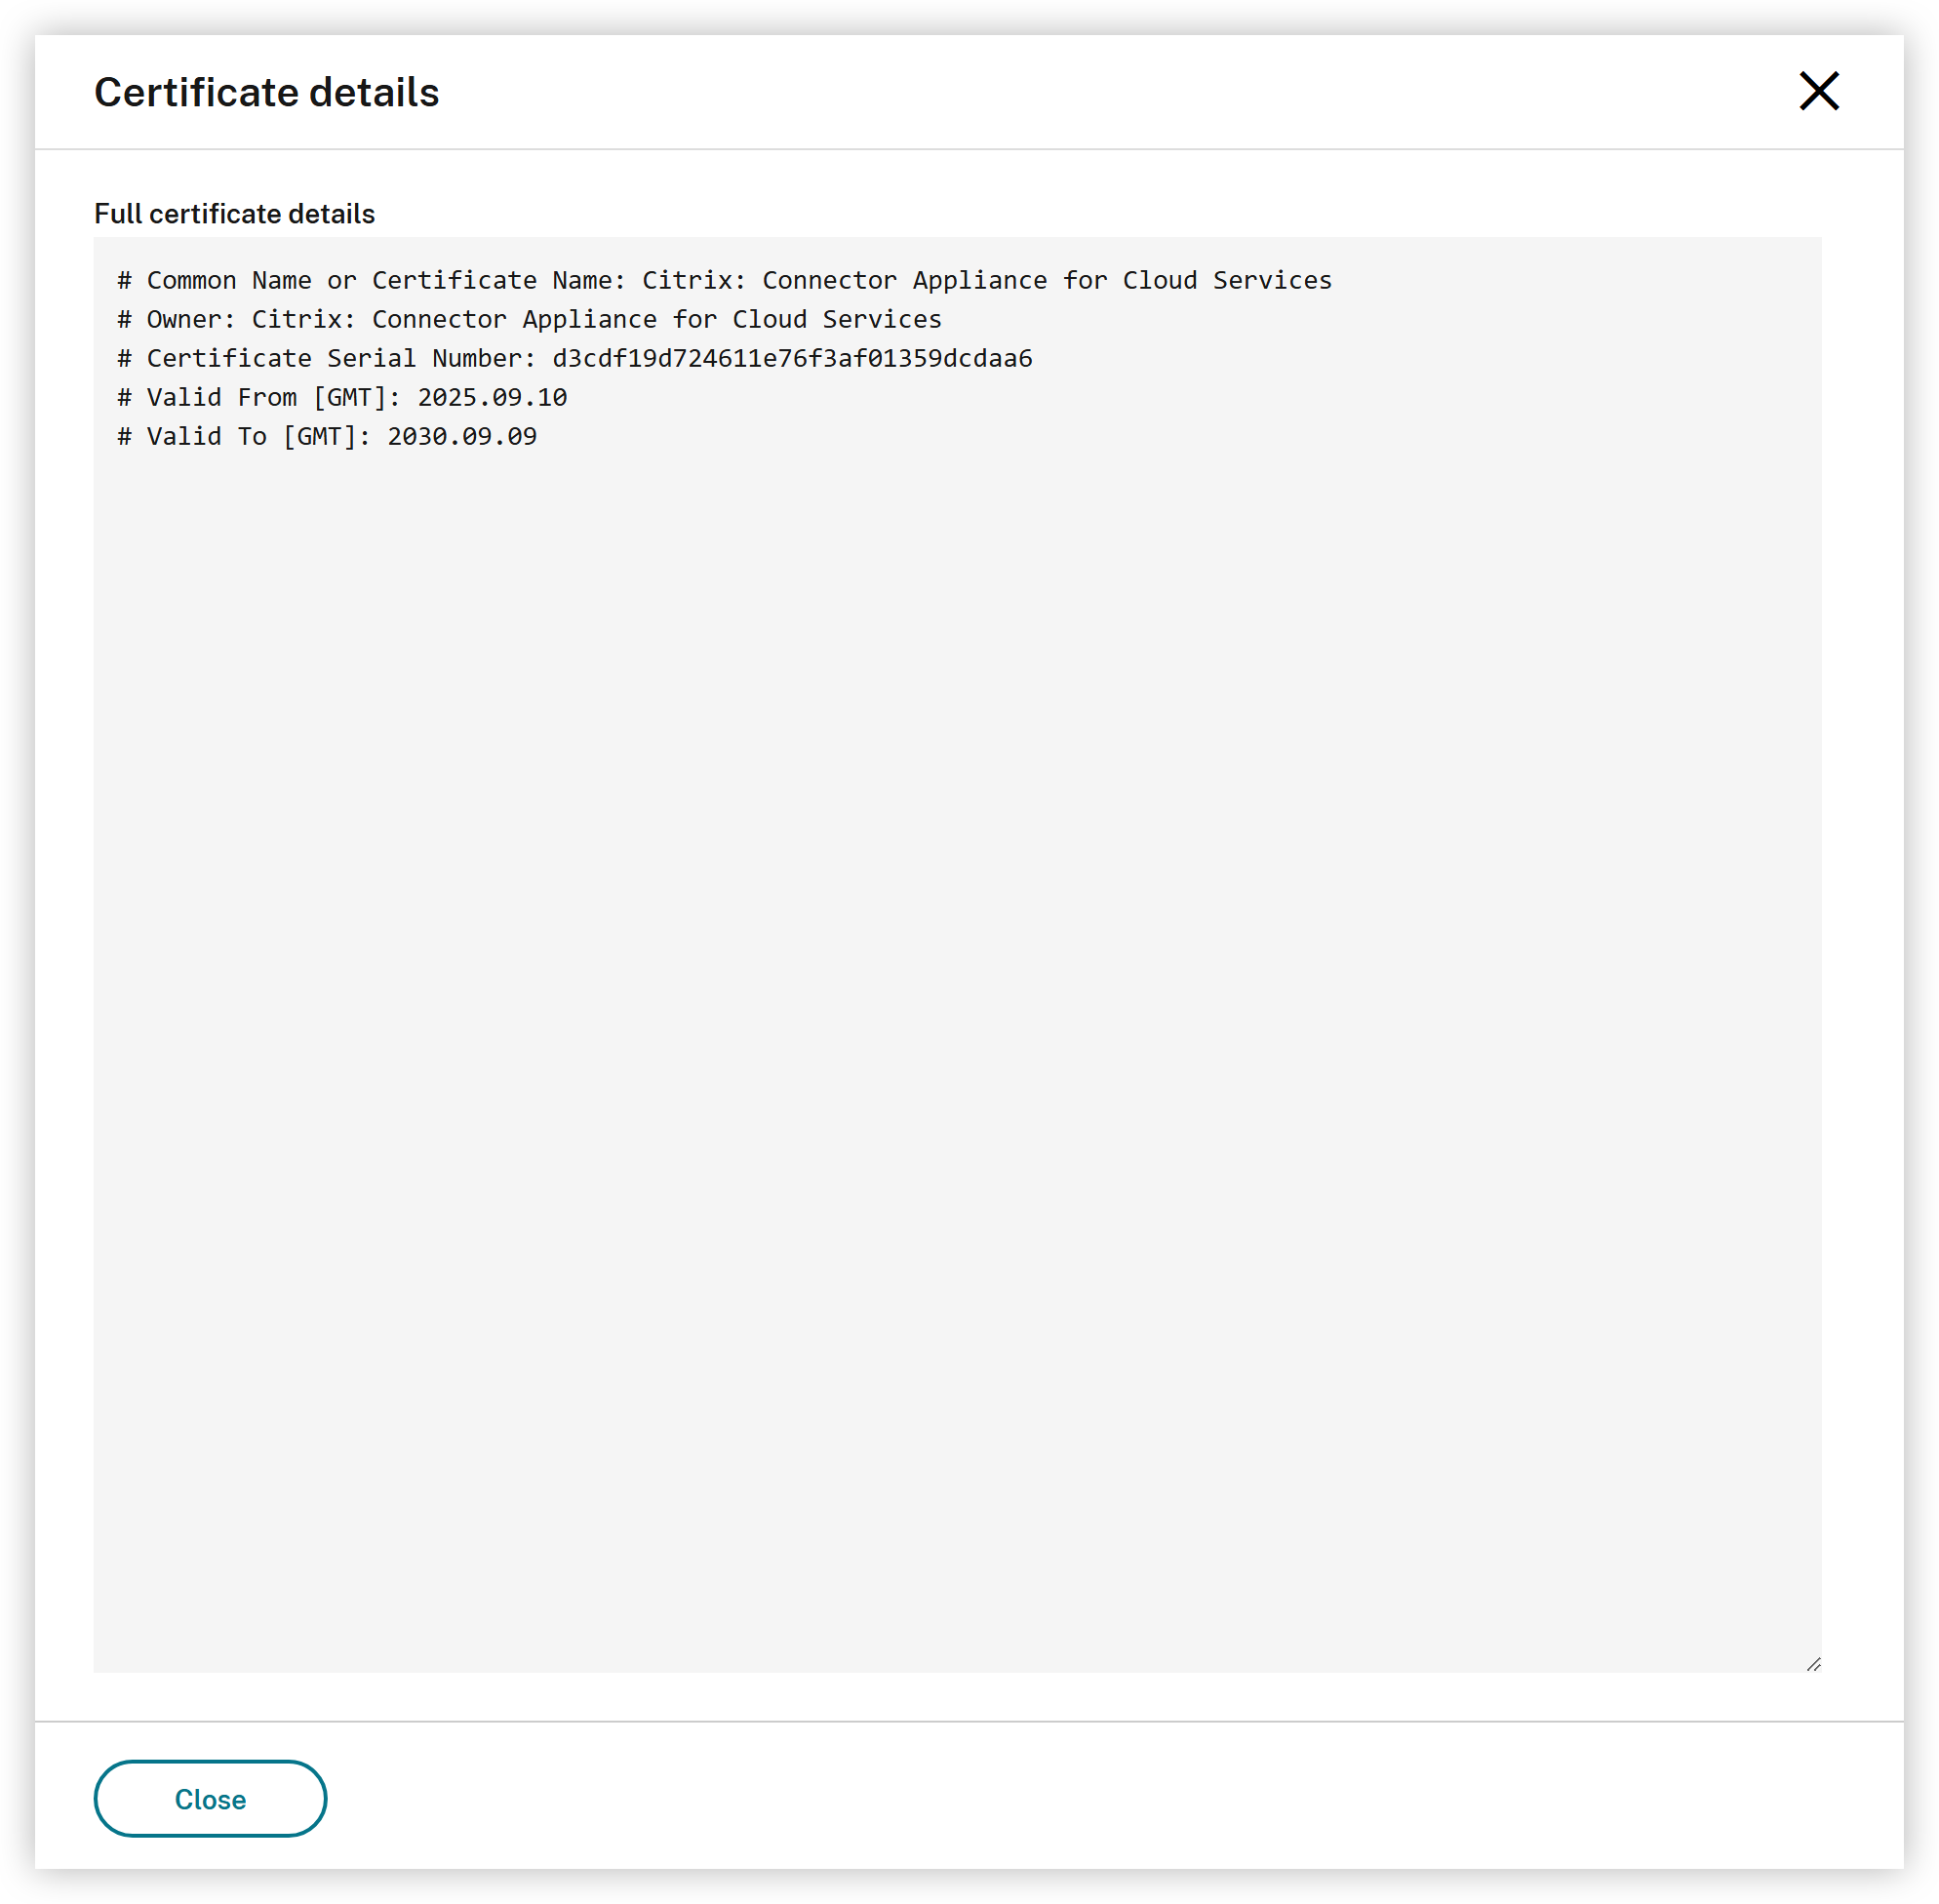
To view full certificate details, click the View details link on the certificate card. A side panel opens and displays the complete parsed certificate information. Click Close to dismiss the details panel.
Replacing the server certificate
You can replace the server certificate with a custom certificate signed by your organization.
Prerequisites: Before replacing the certificate, ensure that you have the following
- A certificate file in PEM format. The certificate should be issued by a certificate authority trusted by the browsers that access the Connector Appliance administration page.
- The corresponding private key in PEM format.
- The passphrase for the private key, if the key is encrypted (optional).
Steps to replace the certificate
- From the Connector Appliance console in your hypervisor, copy the IP address and paste it into your browser’s address bar.
- Enter the password that you set when you registered your Connector Appliance.
- Navigate to Certificates in the left-hand menu.
- Select the Server certificates tab.
- Click the Replace certificate button.
- In the Replace server certificate dialog:
- Paste the certificate content in PEM format into the Certificate (PEM format) field. The certificate should begin with
-----BEGIN CERTIFICATE-----and end with-----END CERTIFICATE-----. - Paste the private key in PEM format into the Private key (PEM format) field. The key should begin with
-----BEGIN PRIVATE KEY-----and end with-----END PRIVATE KEY-----. - (Optional) If the private key is encrypted, enter the passphrase in the Passphrase (optional) field.
- Paste the certificate content in PEM format into the Certificate (PEM format) field. The certificate should begin with
- Click Replace certificate to submit.
If the replacement is successful, the system displays a success message and updates the certificate card with the new certificate information.

Certificate format requirements
- Both the certificate and private key must be in PEM format.
- The certificate field supports a full certificate chain. If an intermediate CA signs your certificate, paste the full chain (server certificate followed by intermediate certificates).
- Supported key types are RSA and ECDSA.
Error handling
If the certificate replacement fails, the dialog displays an error message. Common reasons for failure include:
- The certificate and private key do not match.
- The certificate or private key is not in valid PEM format.
- The private key passphrase is incorrect.
Review the error message, correct the issue, and try again. Click Cancel to close the dialog without making changes.

Reverting to the self-signed certificate
To revert to the default self-signed certificate, you must re-deploy the Connector Appliance. There is currently no option to revert the certificate independently.
Notes
- After you replace the certificate, the Connector Appliance administration page uses the new certificate for all subsequent HTTPS connections.
- The certificate information shown on the Server certificates tab is refreshed automatically every 30 seconds.
- The certificate replacement operation requires you to be logged in with a valid session token.
In this article
- Connector Appliance functions
- Connector Appliance availability and load management
- Connector Appliance updates
- Connector Appliance communication
- System requirements
- Obtain the Connector Appliance
- Install Connector Appliance on your hypervisor
- Register your Connector Appliance with Citrix Cloud
- After registering your Connector Appliance
- Network settings for your Connector Appliance
- Change the administrator user password for the Connector Appliance
- Replace Server Certificate