Citrix DaaS

Install VDAs

Introduction

This article begins with a description of Windows VDAs and the available VDA installers. The remainder of the article describes the steps in the VDA installation wizard. Command-line equivalents are provided. For details, see Install VDAs using the command line.

For information about Linux VDAs, see Linux Virtual Delivery Agent.

View an introduction to VDAs.

Video of introduction to VDAs

Installation considerations

The Citrix DaaS article describes what VDAs are and what they do. Here’s more information.

  • Analytics collection: Analytics are collected automatically when you install or upgrade components. By default, that data is uploaded to Citrix automatically when the installation completes. Also, when you install components, you are automatically enrolled in the Citrix Customer Experience Improvement Program (CEIP), which uploads anonymous data. Also, during an installation or upgrade, you’re offered the opportunity to enroll in Call Home.

    If a VDA installation fails, an MSI analyzer parses the failing MSI log, displaying the exact error code. The analyzer suggests a CTX article, if it is a known issue. The analyzer also collects anonymized data about the failure error code. This data is included with other data collected by CEIP. If you end enrollment in CEIP, the collected MSI analyzer data is no longer sent to Citrix.

    For information about these programs, see Citrix Insight Services.

  • Citrix Workspace app: Citrix Workspace app for Windows is not installed by default when you install a VDA. You can download and install or upgrade Citrix Workspace app for Windows and other Citrix Workspace apps from the Citrix website. Alternatively, you can make those Citrix Workspace apps available from the Workspace or a StoreFront server.

  • Print Spooler Service: The Microsoft Print Spooler Service must be enabled. You cannot successfully install a VDA if that service is disabled.

  • Microsoft Media Foundation: Most supported Windows editions come with Media Foundation already installed. If the machine on which you’re installing a VDA does not have Microsoft Media Foundation (such as N editions), several multimedia features are not installed and do not work.

    • Flash Redirection
    • Windows Media Redirection
    • HTML5 Video Redirection
    • HDX RealTime Webcam Redirection

    You can acknowledge the limitation, or end the VDA installation and restart it later, after installing Media Foundation. In the graphical interface, this choice is presented in a message. In the command line, you can use the /no_mediafoundation_ack option to acknowledge the limitation.

  • Local user group: When you install the VDA, a new local user group called Direct Access Users is created automatically. For a single-session OS VDA, this group applies only to RDP connections. For a multi-session OS VDA, this group applies to ICA and RDP connections.

  • Cloud Connector address requirement: The VDA must have at least one valid Cloud Connector address (in the same resource location) with which to communicate. Otherwise, sessions cannot be established. You specify Cloud Connector addresses when you install the VDA. For information about other ways to specify Cloud Connector addresses where VDAs can register, see VDA registration.

  • Operating system considerations:
    • Review the System requirements for supported platforms, operating systems, and versions.
    • Ensure that each operating system maintains the latest updates.
    • Ensure that VDAs have synchronized system clocks. The Kerberos infrastructure that secures communication between the machines requires synchronization.
    • Optimization guidance for Windows 10 machines is available in CTX216252.
    • If you try to install (or upgrade to) a Windows VDA on an OS that is not supported for that VDA version, a message describes your options. For example, if you try to install the latest VDA on an older Windows machine, a message guides you to CTX139030. For more information, see Earlier operating systems.
  • Installed MSIs: Several MSIs are installed automatically when you install a VDA. You can prevent the installation of some MSIs on the Additional Components page of the graphical interface or with the /exclude option in the CLI. For others, the only way to prevent their installation is with the /exclude CLI option.

  • Domain-joined: Ensure that the machine is domain-joined before installing the VDA software.

VDA supportability tools

Each VDA installer includes a supportability MSI that contains Citrix tools for checking the VDA’s performance, such as its overall health and the quality of connections. Enable or disable installation of this MSI on the Additional Components page of the VDA installer’s graphical interface. From the command line, disable installation with the /exclude "Citrix Supportability Tools" option.

By default, the supportability MSI is installed in C:\Program Files (x86)\Citrix\Supportability Tools\. You can change this location on the Components page of the VDA installer’s graphical interface, or with the /installdir command-line option. Keep in mind that changing the location changes it for all installed VDA components, not just the supportability tools.

Current tools in the supportability MSI:

  • Citrix Health Assistant: For details, see CTX207624.
  • VDA Cleanup Utility: For details, see CTX209255.

If you do not install the tools when you install the VDA, the CTX article contains a link to the current download package.

Restarts during VDA installation

A restart is required at the end of the VDA installation. That restart occurs automatically by default.

To minimize the number of other restarts needed during VDA installation:

  • Ensure that a supported Microsoft .NET Framework version is installed before beginning the VDA installation.
  • For Windows multi-session OS machines, install and enable the RDS role services before installing the VDA.

If you do not install those prerequisites before installing the VDA:

  • If you are using the graphical interface or the command line interface without the /noreboot option, the machine restarts automatically after installing the prerequisite.
  • If you are using the command line interface with the /noreboot option, you must initiate the restart.

After each restart, the VDA installation continues. If you’re installing from the command line, you can prevent the automatic resumption with the /noresume option.

When upgrading a VDA to version 7.17 or a later supported version, a restart occurs during the upgrade. This restart cannot be avoided.

Restore on install or upgrade failure

Note:

This feature is available only for single-session VDAs.

If a single-session VDA installation or upgrade fails, and the “restore on failure” feature is enabled, the machine is returned to a restore point that was set before the installation or upgrade began.

When a single-session VDA installation or upgrade starts with this feature enabled, the installer creates a system restore point before beginning the actual install or upgrade. If the VDA installation or upgrade fails, the machine is returned to the restore point state. The %temp%/Citrix folder contains deployment logs and other information about the restore.

By default, this feature is disabled.

If you plan to enable this feature, make sure that system restore is not disabled through a GPO setting (Computer Configuration > Administrative Templates > System > System Restore).

To enable this feature when installing or upgrading a single-session VDA:

  • When using a VDA installer’s graphical interface (such as using Autostart or the XenDesktopVDASetup.exe command without any restore or quiet options), select the Enable automatic restore if update fails check box on the Summary page.

    If the install/upgrade completes successfully, the restore point is not used, but is retained.

  • Run a VDA installer with either the /enablerestore or /enablerestorecleanup option.

    • If you use the /enablerestorecleanup option, and the install/upgrade completes successfully, the restore point is removed automatically.

    • If you use the /enablerestore option, and the install/upgrade completes successfully, the restore point is not used, but is retained.

VDA installers

VDA installers can be downloaded directly from the Citrix Cloud console.

By default, files in the self-extracting installers are extracted to the Temp folder. The files extracted to the Temp folder are automatically deleted after the installation completes. Alternatively, you can use the/extract command with an absolute path.

Three standalone VDA installers are available for download.

VDAServerSetup.exe Installs a multi-session OS VDA.

VDAWorkstationSetup.exe Installs a single-session OS VDA.

VDAWorkstationCoreSetup.exe Installs a single-session OS VDA that is optimized for Remote PC Access deployments or core VDI installations. Remote PC Access uses physical machines. Core VDI installations are VMs that are not being used as an image. This installer deploys only the core services necessary for VDA connections. Therefore, it supports only a subset of the options that are valid with the VDAWorkstationSetup installer.

This installer for the current release does not install or contain the components used for:

  • App-V.
  • Profile Management. Excluding Citrix Profile Management from the installation affects Monitor displays.
  • Machine Identity Service.
  • Citrix Workspace app for Windows.
  • Citrix Supportability Tools.
  • Citrix Files for Windows.
  • Citrix Files for Outlook.
  • MCSIO write cache for storage optimization.

This installer does not install or contain a Citrix Workspace app for Windows.

This installer automatically installs the Browser Content Redirection MSI. Automatic installation applies to VDA release 2003 and later supported releases.

Using VDAWorkstationCoreSetup.exe is equivalent to using the VDAWorkstationSetup.exe installer to install a single-session OS VDA and either:

  • In the graphical interface: Selecting the Remote PC Access option on the Environment page.
  • In the command-line interface: Specifying the /remotepc option.
  • In the command line interface: Specifying /components vda and /exclude "Citrix Personalization for App-V - VDA" "Personal vDisk" "Machine Identity Service" "Citrix Profile Management" "Citrix Profile Management WMI Plugin" "Citrix Supportability Tools" "Citrix Files for Windows" "Citrix Files for Outlook" "Citrix MCS IODriver".

If you install a VDA with the VDAWorkstationCoreSetup.exe installer and later upgrade that VDA using theVDAWorkstationSetup.exe installer, you can optionally install the omitted components and features.

Step 1. Download the product software and launch the wizard

  1. On the machine where you’re installing the VDA, sign in to Citrix Cloud.
  2. In the upper left menu, select the Citrix DaaS in the My Services list.
  3. On the right side, click Downloads and select Download VDA. You are redirected to the VDA download page. Find the VDA installer you want and then select Download File.
  4. After the download completes, right-click the file and select Run as administrator. The installation wizard launches.

As an alternative to steps 1-3, you can download the VDA directly from the Citrix download page.

Step 2. Specify how the VDA will be used

Environment image

On the Environment page, specify how you plan to use the VDA, indicating whether you’ll use this machine as an image to provision machines. The option you choose affects which Citrix provisioning tools are installed automatically (if any), and the default values on the Additional Components page of the VDA installer.

Choose one of the following:

  • Create a master MCS image: Select this option to install a VDA on a VM image, if you plan to use Machine Creation Services to provision VMs. This option installs the Machine Identity Service. This is the default option.

    Command-line option: /mastermcsimage or /masterimage

  • Create a master image using Citrix Provisioning or third-party provisioning tools: Select this option to install a VDA on a VM image, if you plan to use Citrix Provisioning or third-party provisioning tools (such as Microsoft System Center Configuration Manager). Use this option for previously provisioned VMs that were booted from a Citrix Provisioning read/write disk.

    Command-line option: /masterpvsimage

  • (Appears only on multi-session OS machines) Enable brokered connections to a server: Select this option to install a VDA on a physical or virtual machine that will not be used as an image.

    Command-line option: /remotepc

  • (Appears only on multi-session OS machines) Enable Remote PC Access: Select this option to install a VDA on a physical machine for use with Remote PC Access.

    Command-line option: /remotepc

Select Next.

This page does not appear:

  • When upgrading a VDA.
  • When using the VDAWorkstationCoreSetup.exe installer.

Step 3. Select the components to install and the installation location

Select the components to install and the installation location image

On the Core components page:

  • Location: By default, components are installed in C:\Program Files\Citrix. This default is fine for most deployments. If you specify a different location, that location must have execute permissions for the network service.

    Command-line option: /installdir

  • Components: By default, Citrix Workspace app for Windows is not installed with the VDA. If you are using the VDAWorkstationCoreSetup.exe installer, Citrix Workspace app for Windows is never installed, so this check box is not displayed.

    Command-line option: /components vda,plugin to install the VDA and the Citrix Workspace app for Windows

Select Next.

Step 4. Install additional components

Install additional components image

The Additional Components page contains check boxes to enable or disable installation of other features and technologies with the VDA. In a command-line installation, you can use the /exclude or /includeadditional option to omit or include one or more available components.

The following table indicates the default setting of items on this page. The default setting depends on the option you selected on the Environment page.

Additional Components page Environment page: “Master image with MCS” or “Master image with Citrix Provisioning …” selected Environment page: “Enable brokered connections to server” (for multi-session OS) or “Remote PC Access” (for single-session OS) selected
Citrix Personalization for App-V Not selected Not selected
User Personalization Layer Not selected Not shown because it’s not valid for this use case
Citrix Supportability tools Selected Not selected
Citrix Profile Management Selected Not selected
Citrix Profile Management WMI Plug-in Selected Not selected
Citrix VDA Upgrade Agent Not selected Not selected
Citrix Backup and Restore Not selected Not selected
Citrix Files for Windows Not selected Not selected
Citrix Files for Outlook Not selected Not selected
Machine Creation Services (MCS) storage optimization Not selected Not selected
Rendezvous protocol configuration Not selected Not selected

This page does not appear when:

  • Using the VDAWorkstationCoreSetup.exe installer. Also, the command-line options for the additional components are not valid with that installer.
  • Upgrading a VDA and all the additional components are already installed. If some of the additional components are already installed, the page lists only the components that are not installed.

The components list can include:

  • Citrix Personalization for App-V: Install this component if you use applications from Microsoft App-V packages. For details, see App-V.

    Command-line option: /includeadditional "Citrix Personalization for App-V – VDA" to enable component installation, /exclude "Citrix Personalization for App-V – VDA" to prevent component installation

  • Citrix User Personalization Layer: Installs the MSI for the user personalization layer. For details, see User personalization layer.

    This component appears only when installing a VDA on a single-session Windows 10 machine.

    Command-line option: /includeadditional "User Personalization Layer" to enable component installation, /exclude "User Personalization Layer" to prevent component installation

  • Citrix Supportability Tools: Installs the MSI that contains Citrix supportability tools.

    Command-line option: /includeadditional "Citrix Supportability Tools" to enable component installation, /exclude "Citrix Supportability Tools" to prevent component installation

  • Citrix Profile Management: This component manages user personalization settings in user profiles. For details, see Profile Management.

    Excluding Citrix Profile Management from the installation affects the monitoring and troubleshooting of VDAs in Citrix Cloud.

    • On the User details and EndPoint pages of the Monitor tab, the Personalization panel and the Logon Duration panel fail.
    • On the Dashboard and Trends pages, the Average Logon Duration panel display data only for machines that have Profile Management installed.

    Even if you are using a third-party user profile management solution, Citrix recommends that you install and run the Citrix Profile Management Service. Enabling the Citrix Profile Management Service is not required.

    Command-line option: /includeadditional "Citrix Profile Management" to enable component installation, /exclude "Citrix Profile Management" to prevent component installation

  • Citrix Profile Management WMI Plug-in: This plug-in provides Profile Management runtime information in WMI (Windows Management Instrumentation) objects (for example, profile provider, profile type, size, and disk usage). WMI objects provide session information to Director.

    Command-line option: /includeadditional "Citrix Profile Management WMI Plugin" to enable component installation, /exclude "Citrix Profile Management WMI Plugin" to prevent component installation

  • VDA Upgrade Agent: (Applicable only to Citrix DaaS deployments.) Enables the VDA to participate in the VDA Upgrade feature. You can use that feature to upgrade a catalog’s VDAs from the management console, immediately or at a scheduled time. If this agent is not installed, you can upgrade a VDA by running the VDA installer on the machine.

    Command-line options: /includeadditional "Citrix VDA Upgrade Agent" to enable component installation, /exclude "Citrix VDA Upgrade Agent" to prevent component installation

  • Citrix Files for Windows: This component enables users to connect to their Citrix Files account. They can then interact with Citrix Files through a mapped drive in the Windows file system, without requiring a full sync of their content.

    Command-line options: /includeadditional "Citrix Files for Windows" to enable component installation, /exclude "Citrix Files for Windows" to prevent component installation

  • Citrix Files for Outlook: This component allows you to bypass file size restrictions and add security to your attachments or emails by sending them through Citrix Files. You can provide a secure file upload request directly in your email. For more information, see Citrix Files for Outlook.

    Command-line options: /includeadditional "Citrix Files for Outlook" to enable component installation, /exclude "Citrix Files for Outlook" to prevent component installation

  • Machine Creation Services (MCS) storage optimization: Installs the Citrix MCS IO driver. For more information, see Storage shared by hypervisors and Configure cache for temporary data.

    Command-line options: /includeadditional "Citrix MCS IODriver" to enable component installation, /exclude "Citrix MCS IODriver" to prevent component installation

  • Rendezvous Proxy Configuration: Install this component if you plan to use the Rendezvous protocol with the Citrix Gateway Service in your environment, and you have a non-transparent proxy in your network for outbound connections. Only HTTP proxies are supported.

    If you install this coponent, specify the address of the proxy or PAC file path on the Rendezvous Proxy Configuration page. For feature details, see Rendezvous protocol.

    Command-line option: /includeadditional "Citrix Rendezvous V2" to enable component installation, /exclude "Citrix Rendezvous V2" to prevent component installation

  • Citrix Backup and Restore: If a VDA installation or upgrade fails, then this component can return the machine to a backup that was done before the installation or upgrade.

    Command-line option: /includeadditional "Citrix Backup and Restore" to enable component installation, /exclude "Citrix Backup and Restore" to prevent component installation.

Step 5. Cloud Connector addresses

Cloud connector addresses image

On the Delivery Controller page, select Do it manually. Enter the DNS name of an installed Cloud Connector and then select Add. If you’ve installed additional Cloud Connectors in the resource location, add their DNS names.

Select Next.

Considerations:

  • The address can contain only alphanumeric characters.
  • Successful VDA registration requires that the firewall ports used to communicate with the Cloud Connector are open. That action is enabled by default on the Firewall page of the wizard.

Command-line option: /controllers

Step 6. Rendezvous Proxy Configuration

Rendezvous Proxy Configuration page in VDA installer

The Rendezvous Proxy Configuration page appears only if you enabled the Rendezvous Proxy Configuration check box on the Additional Components page.

  1. Select whether you will specify the proxy source by proxy address or PAC file path.
  2. Specify the proxy address or PAC file path.

    • Proxy address format: http://<url-or-ip>:<port>
    • PAC file format: http://<url-or-ip>:<port>/<path>/<filename>.pac

The firewall for the proxy port must be open for the connection test to succeed. If a connection cannot be made to the proxy, you can choose whether to continue with the VDA installation.

Command-line option: /proxyconfig

Step 7. Enable or disable features

Enable or disable features image

On the Features page, use the check boxes to enable or disable features you want to use.

  • Use Windows Remote Assistance: When this feature is enabled, Windows Remote Assistance is used with the user shadowing feature of the Director component in Citrix Cloud. Windows Remote Assistance opens the dynamic ports in the firewall. (Default = disabled)

    Command-line option: /enable_remote_assistance

  • Use Real-Time Audio Transport for audio: Enable this feature if voice-over-IP is widely used in your network. The feature reduces latency and improves audio resilience over lossy networks. It allows audio data to be transmitted using RTP over UDP transport. (Default = disabled)

    Command-line option: /enable_real_time_transport

  • Use screen sharing: When enabled, ports used by screen sharing are opened in the Windows firewall. (Default = disabled)

    Command-line option: /enable_ss_ports

  • Is this VDA installed on a VM in a cloud: This setting helps Citrix to correctly identify resource locations for on-premises and service (Citrix Cloud) VDA deployments for telemetry purposes. This feature has no impact on customer side utilization. Enable this setting if your deployment uses Citrix DaaS. (Default = disabled)

    Command-line option: /xendesktopcloud

Select Next.

If this page contains a feature named MCS I/O, do not use it. The MCS IO feature is configured on the Additional Components page.

Step 8. Firewall ports

Firewall ports image

The Firewall page indicates which ports the VDA and Cloud Connectors use to communicate with each other. By default, these ports are opened automatically if the Windows Firewall Service is running, even if the firewall is not enabled. This default setting is fine for most deployments.

For port information, see Network ports.

Select Next.

Command-line option: /enable_hdx_ports

Step 9. Review prerequisites and confirm installation

Summary image

The Summary page lists what will be installed. You can return to earlier wizard pages and change selections, if needed.

(Single-session VDAs only) Select the Enable automatic restore if update fails check box to enable the restore on failure feature. For details, see Restore on install or upgrade failure.

When you’re ready, select Install.

Step 10. Diagnose

Diagnose page in VDA installer

On the Diagnostics page, choose whether to participate in Citrix Call Home. If you choose to participate (the default), select Connect. When prompted, enter your Citrix account credentials.

After your credentials are validated (or if you choose not to participate), select Next.

For more information, see Call Home.

Step 11. Complete this installation

Finish installation image

The Finish page contains green check marks for all prerequisites and components that installed and initialized successfully.

Select Finish. By default, the machine restarts automatically. Although you can disable this automatic restart, the VDA cannot be used until the machine restarts.

If you are installing a VDA on individual machines (rather than an image), repeat the steps above to install a VDA on other machines, as needed.

Troubleshoot

In the Manage > Full Configuration display for a delivery group, the Installed VDA version entry in the details pane might not be the version installed on the machines. The machine’s Windows Programs and Features display shows the actual VDA version.

Citrix Optimizer

Citrix Optimizer is a tool for Windows OS that helps Citrix administrators optimize VDAs by removing and optimizing various components.

After installing a VDA and completing the final restart, download and install Citrix Optimizer. See CTX224676. The CTX article contains the download package, plus instructions about installing and using Citrix Optimizer.

Customize a VDA

Later, to customize (change information for) an installed VDA:

  1. From the Windows feature for removing or changing programs, select Citrix Virtual Delivery Agent or Citrix Remote PC Access/VDI Core Services VDA. Then right-click and select Change.
  2. Select Customize Virtual Delivery Agent Settings.

When the installer launches, change any available settings.

Customize the port for communicating with Cloud Connectors

You can customize the port that VDAs use to communicate with Cloud Connectors based on your specific security requirements. This feature is useful if your security team doesn’t allow the default port (port 80) to be open or if the default port is already in use.

To customize the port, complete the following steps:

  1. Add the Controller port number on Citrix Cloud Connectors.

  2. Add the VDA port number on VDAs.

Add the Controller port number on Citrix Cloud Connectors

Go to the Citrix Cloud Connector and run the following two PowerShell commands:

  • PS C:\> & 'C:\Program Files\Citrix\XaXdCloudProxy\XaXdCloudProxy.exe' -VdaPort <port number>
  • PS C:\> & 'C:\Program Files\Citrix\Broker\Service\HighAvailabilityService.exe' -VdaPort <port number> -ConfigureFirewall

Example:

  • PS C:\> & 'C:\Program Files\Citrix\XaXdCloudProxy\XaXdCloudProxy.exe' -VdaPort 18000
  • PS C:\> & 'C:\Program Files\Citrix\Broker\Service\HighAvailabilityService.exe' -VdaPort 18000 -ConfigureFirewall

When customizing the port, consider the following:

  • You must use the same port number in both commands.
  • You must run both commands on all Cloud Connectors.
  • To successfully communicate with Cloud Connectors, ensure that all VDAs use the same port number.
  • The port you configure persists across connector updates.

Add the VDA port number on VDAs

Install the VDA with default settings and configure as follows. If the VDA is already installed, continue with the steps below.

  1. On the VDA, open XenDesktopVdaSetup.exe, which is located at C:\Program Files\Citrix\XenDesktopVdaSetup\XenDesktopVdaSetup.exe.

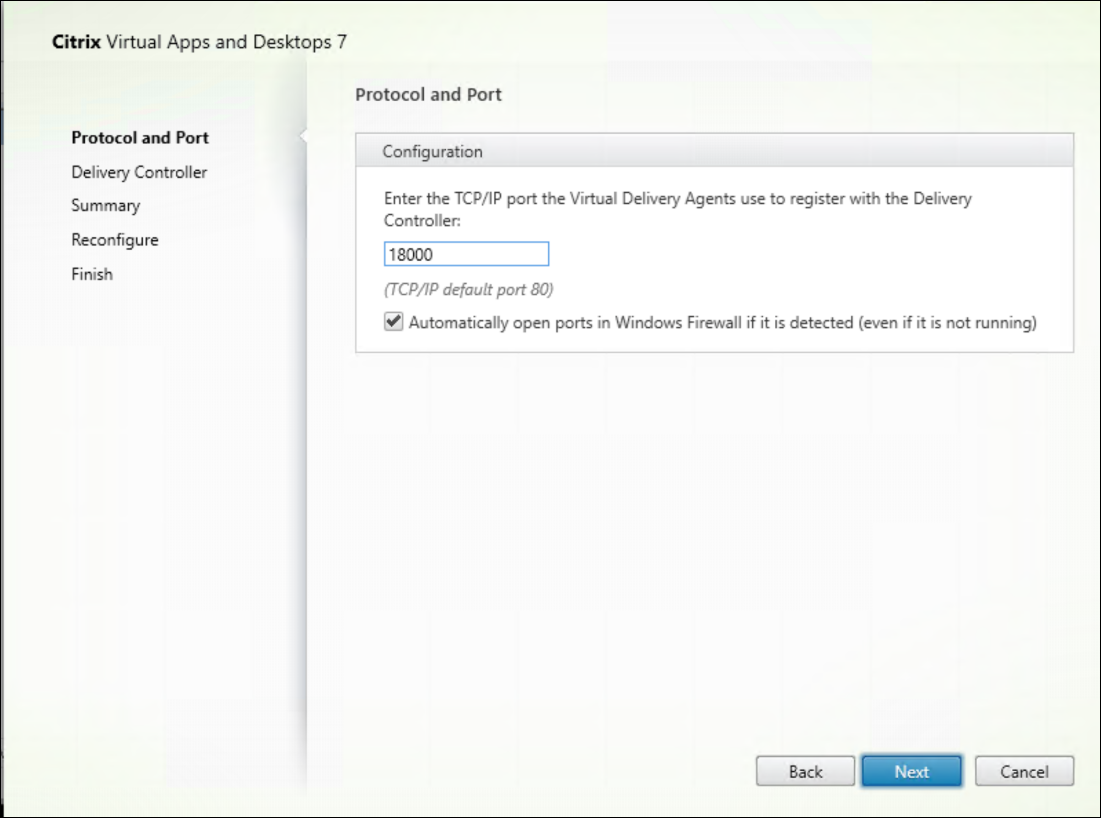
  2. On the Protocol and Port page, add the custom port number.
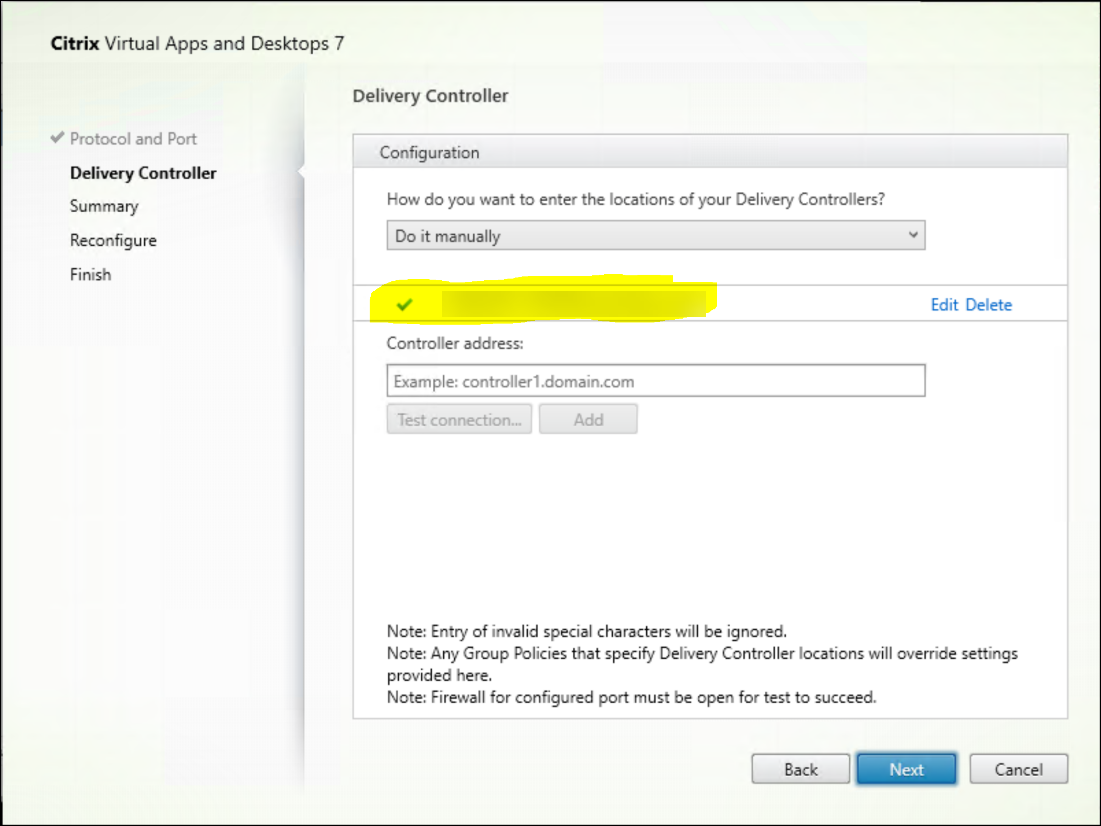
    Protocol and Port page

  3. On the Delivery Controller page, enter the FQDN of the Controller.

    Delivery Controller page

  4. Click Next to proceed through the wizard to complete the configuration.

The port numbers are then reconfigured successfully.

Note:

You might see the following error message when you test a Controller connection: No running instance of a Controller found on < the Controller address you entered >. If the address is correct, you can dismiss the message.

Troubleshooting

To check whether the custom ports are configured correctly, go to the Cloud Connector and perform the following troubleshooting steps:

  1. Verify that the following two registry keys exist.

    HKEY_LOCAL_MACHINE\SOFTWARE\Citrix\XaXdCloudProxyPersist Name: CustomVDAPortNumber Type: REG_DWORD Data: 18000

    HKEY_LOCAL_MACHINE\SOFTWARE\Citrix\XaXdCloudProxyPersist Name: CustomVDAPortNumberHA Type: REG_DWORD Data: 18000

  2. Run the following command to create a .txt file.

    • netsh http show urlacl > <filepath>.txt

    Example:

    • netsh http show urlacl > c:\reservations.txt
  3. Open the .txt file and check the following four URLs to verify that the correct port is used.

    • http://+:18000/Citrix/CdsController/IRegistrar/
    • http://+:18000/Citrix/CdsController/ITicketing/
    • http://+:18000/Citrix/CdsController/IDynamicDataSink/
    • http://+:18000/Citrix/CdsController/INotifyBroker/
  4. Verify that the following two firewall rules are created and required ports are open.

    • Citrix XaXdProxy
    • Citrix Broker Service (TCP-In)

Other information

  • After you install a VDA, you can check the health and availability of the site and its components with a Cloud Health check.

Where to go next

Create machine catalogs.

To review the entire configuration process, see Plan and build a deployment.