Install VDAs
Introduction
This article begins with a description of Windows VDAs and the available VDA installers. The remainder of the article describes the steps in the VDA installation wizard. Command-line equivalents are provided. For details, see Install VDAs using the command line.
For information about Linux VDAs, see Linux Virtual Delivery Agent.
View an introduction to VDAs.
Installation considerations
The Citrix DaaS article describes what VDAs are and what they do. Here’s more information.
-
Analytics collection: Analytics are collected automatically when you install or upgrade components. By default, that data is uploaded to Citrix automatically when the installation completes. Also, when you install components, you are automatically enrolled in the Citrix Customer Experience Improvement Program (CEIP), which uploads anonymous data. Also, during an installation or upgrade, you’re offered the opportunity to enroll in Call Home.
If a VDA installation fails, an MSI analyzer parses the failing MSI log, displaying the exact error code. The analyzer suggests a CTX article, if it is a known issue. The analyzer also collects anonymized data about the failure error code. This data is included with other data collected by CEIP. If you end enrollment in CEIP, the collected MSI analyzer data is no longer sent to Citrix.
For information about these programs, see Citrix Insight Services.
-
Citrix Workspace™ app: Citrix Workspace app for Windows is not installed by default when you install a VDA. You can download and install or upgrade Citrix Workspace app for Windows and other Citrix Workspace apps from the Citrix website. Alternatively, you can make those Citrix Workspace apps available from the Workspace or a StoreFront™ server.
-
Print Spooler Service: The Microsoft Print Spooler Service must be enabled. You cannot successfully install a VDA if that service is disabled.
-
Microsoft Media Foundation: Most supported Windows editions come with Media Foundation already installed. If the machine on which you’re installing a VDA does not have Microsoft Media Foundation (such as N editions), several multimedia features are not installed and do not work.
- Flash Redirection
- Windows Media Redirection
- HTML5 Video Redirection
- HDX™ RealTime Webcam Redirection
You can acknowledge the limitation, or end the VDA installation and restart it later, after installing Media Foundation. In the graphical interface, this choice is presented in a message. In the command line, you can use the
/no_mediafoundation_ackoption to acknowledge the limitation. -
Local user group: When you install the VDA, a new local user group called Direct Access Users is created automatically. For a single-session OS VDA, this group applies only to RDP connections. For a multi-session OS VDA, this group applies to ICA® and RDP connections.
-
Cloud Connector address requirement: The VDA must have at least one valid Cloud Connector address (in the same resource location) with which to communicate. Otherwise, sessions cannot be established. You specify Cloud Connector addresses when you install the VDA. For information about other ways to specify Cloud Connector addresses where VDAs can register, see VDA registration.
-
Operating system considerations:
- Review the System requirements for supported platforms, operating systems, and versions.
- Ensure that each operating system maintains the latest updates.
- Ensure that VDAs have synchronized system clocks. The Kerberos infrastructure that secures communication between the machines requires synchronization.
- Optimization guidance for Windows 10 machines is available in CTX216252.
- If you try to install (or upgrade to) a Windows VDA on an OS that is not supported for that VDA version, a message describes your options. For more information, see System requirements and Earlier operating systems.
-
Installed MSIs: Several MSIs are installed automatically when you install a VDA. You can prevent the installation of some MSIs on the Additional Components page of the graphical interface or with the
/excludeoption in the CLI. For others, the only way to prevent their installation is with the/excludeCLI option. - Domain-joined: Ensure that the machine is domain-joined before installing the VDA software.
Restarts during VDA installation
A restart is required at the end of the VDA installation. That restart occurs automatically by default.
To minimize the number of other restarts needed during VDA installation:
- Ensure that a supported Microsoft .NET Framework version is installed before beginning the VDA installation.
- For Windows multi-session OS machines, install and enable the RDS role services before installing the VDA.
If you do not install those prerequisites before installing the VDA:
- If you are using the graphical interface or the command line interface without the
/norebootoption, the machine restarts automatically after installing the prerequisite. - If you are using the command line interface with the
/norebootoption, you must initiate the restart.
After each restart, the VDA installation continues. If you’re installing from the command line, you can prevent the automatic resumption with the /noresume option.
When upgrading a VDA to version 7.17 or a later supported version, a restart occurs during the upgrade. This restart cannot be avoided.
Restore on install or upgrade failure
Note:
This feature is available only for single-session VDAs.
If a single-session VDA installation or upgrade fails, and the “restore on failure” feature is enabled, the machine is returned to a restore point that was set before the installation or upgrade began.
When a single-session VDA installation or upgrade starts with this feature enabled, the installer creates a system restore point before beginning the actual install or upgrade. If the VDA installation or upgrade fails, the machine is returned to the restore point state. The %temp%/Citrix folder contains deployment logs and other information about the restore.
By default, this feature is disabled.
If you plan to enable this feature, make sure that system restore is not disabled through a GPO setting (Computer Configuration > Administrative Templates > System > System Restore).
To enable this feature when installing or upgrading a single-session VDA:
-
When using a VDA installer’s graphical interface (such as using Autostart or the
XenDesktopVDASetup.execommand without any restore or quiet options), select the Enable automatic restore if update fails check box on the Summary page.If the install/upgrade completes successfully, the restore point is not used, but is retained.
-
Run a VDA installer with either the
/enablerestoreor/enablerestorecleanupoption.-
If you use the
/enablerestorecleanupoption, and the install/upgrade completes successfully, the restore point is removed automatically. -
If you use the
/enablerestoreoption, and the install/upgrade completes successfully, the restore point is not used, but is retained.
-
VDA installers
VDA installers can be downloaded directly from the Citrix Cloud™ console.
By default, files in the self-extracting installers are extracted to the Temp folder. The files extracted to the Temp folder are automatically deleted after the installation completes. Alternatively, you can use the/extract command with an absolute path.
Three standalone VDA installers are available for download.
VDAServerSetup.exe Installs a multi-session OS VDA.
VDAWorkstationSetup.exe Installs a single-session OS VDA.
VDAWorkstationCoreSetup.exe Installs a single-session OS VDA that is optimized for Remote PC Access deployments or core VDI installations. Remote PC Access uses physical machines. Core VDI installations are VMs that are not being used as an image. This installer deploys only the core services necessary for VDA connections. Therefore, it supports only a subset of the options that are valid with the VDAWorkstationSetup installer.
For more information, see Install VDA for your respective versions.
Troubleshoot
In the Studio display for a delivery group, the Installed VDA version entry on the Details pane mightn’t be the version installed on the machines. The machine’s Windows Programs and Features display shows the actual VDA version.
Citrix Optimizer
Citrix Optimizer is a tool for Windows OS that helps Citrix administrators optimize VDAs by removing and optimizing various components.
After installing a VDA and completing the final restart, download and install Citrix Optimizer. See CTX224676. The CTX article contains the download package, plus instructions about installing and using Citrix Optimizer.
Customize a VDA
Later, to customize (change information for) an installed VDA:
- From the Windows feature for removing or changing programs, select Citrix Virtual Delivery Agent or Citrix Remote PC Access/VDI Core Services VDA. Then right-click and select Change.
- Select Customize Virtual Delivery Agent Settings.
When the installer launches, change any available settings.
Customize the port for communicating with Cloud Connectors
You can customize the port that VDAs use to communicate with Cloud Connectors based on your specific security requirements. This feature is useful if your security team doesn’t allow the default port (port 80) to be open or if the default port is already in use.
Note:
When changing the default port number, only values within the range 1024–65535 are supported.
To customize the port, complete the following steps:
- Add the VDA port number on Citrix Cloud Connectors
- Additional Citrix Cloud Connector™ configuration when using Rendezvous V1
- Add the VDA port number on VDAs
Add the VDA port number on Citrix Cloud Connectors
Go to the Citrix Cloud Connector and run the following two PowerShell commands:
PS C:\> & 'C:\Program Files\Citrix\XaXdCloudProxy\XaXdCloudProxy.exe' -VdaPort <port number>PS C:\> & 'C:\Program Files\Citrix\Broker\Service\HighAvailabilityService.exe' -VdaPort <port number> -ConfigureFirewall
Example:
PS C:\> & 'C:\Program Files\Citrix\XaXdCloudProxy\XaXdCloudProxy.exe' -VdaPort 18000PS C:\> & 'C:\Program Files\Citrix\Broker\Service\HighAvailabilityService.exe' -VdaPort 18000 -ConfigureFirewall
When customizing the port, consider the following:
- You must use the same port number in both commands.
- You must run both commands on all Cloud Connectors.
- To successfully communicate with Cloud Connectors, ensure that all VDAs use the same port number.
- The port you configure persists across connector updates.
Additional Citrix Cloud Connector configuration when using Rendezvous V1
Set the following registry key on each Citrix Cloud Connector:
HKEY_LOCAL_MACHINE\SOFTWARE\Citrix\XaXdCloudProxyPersist
Name: WorkerPortNumber
Type: REG_DWORD
Value: <port number>
Add the VDA port number on VDAs
Install the VDA with default settings and configure as follows. If the VDA is already installed, continue with the steps below.
-
On the VDA, open XenDesktopVdaSetup.exe, which is located at
C:\Program Files\Citrix\XenDesktopVdaSetup\XenDesktopVdaSetup.exe. -
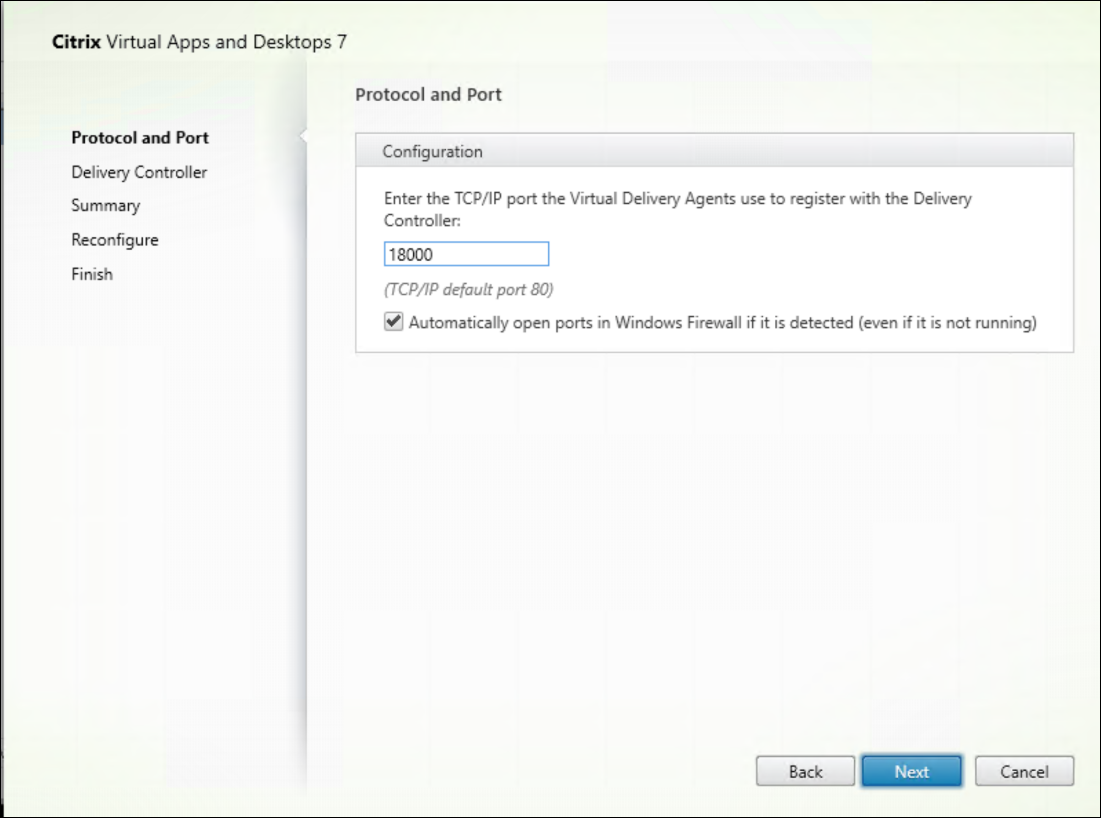
On the Protocol and Port page, add the custom port number.

-
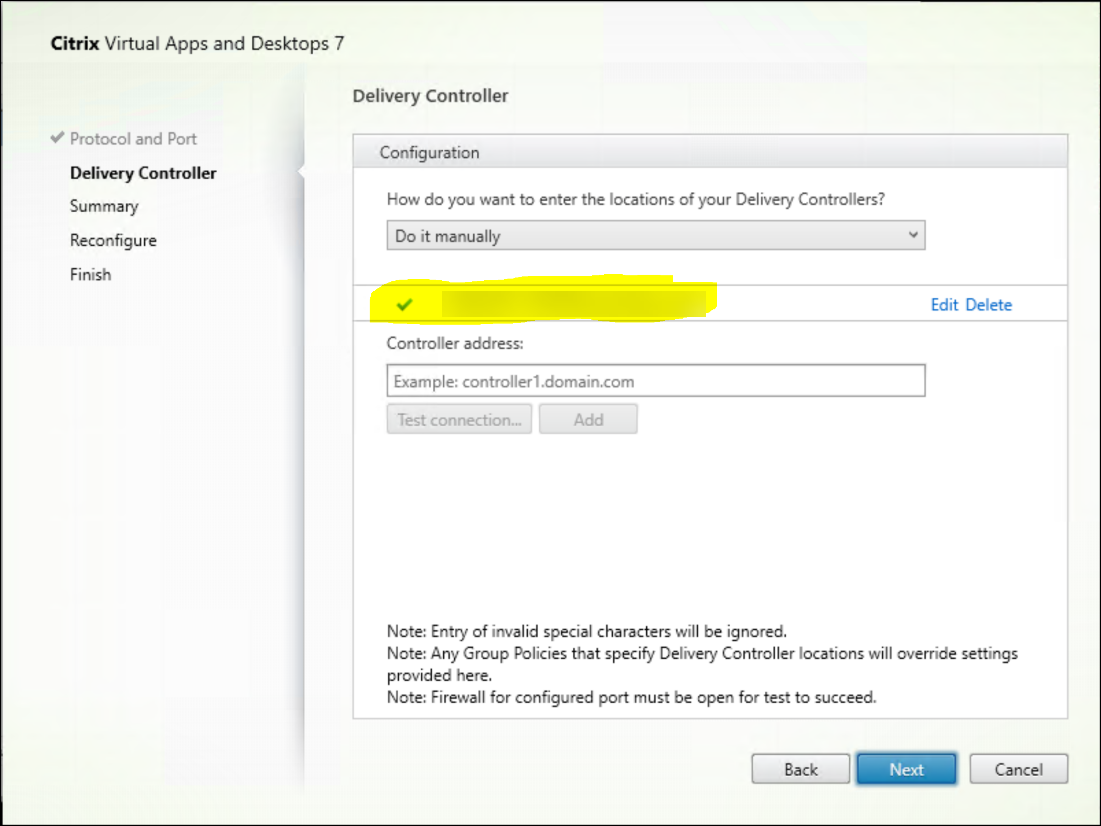
On the Delivery Controller™ page, enter the FQDN of the Controller.

-
Click Next to proceed through the wizard to complete the configuration.
The port numbers are then reconfigured successfully.
Note:
You might see the following error message when you test a Controller connection: No running instance of a Controller found on < the Controller address you entered >. If the address is correct, you can dismiss the message.
Troubleshooting
To check whether the custom ports are configured correctly, go to the Cloud Connector and perform the following troubleshooting steps:
-
Verify that the following two registry keys exist.
HKEY_LOCAL_MACHINE\SOFTWARE\Citrix\XaXdCloudProxyPersist Name: CustomVDAPortNumber Type: REG_DWORD Data: 18000
HKEY_LOCAL_MACHINE\SOFTWARE\Citrix\XaXdCloudProxyPersist Name: CustomVDAPortNumberHA Type: REG_DWORD Data: 18000
-
Run the following command to create a .txt file.
netsh http show urlacl > <filepath>.txt
Example:
netsh http show urlacl > c:\reservations.txt
-
Open the .txt file and check the following four URLs to verify that the correct port is used.
http://+:18000/Citrix/CdsController/IRegistrar/http://+:18000/Citrix/CdsController/ITicketing/http://+:18000/Citrix/CdsController/IDynamicDataSink/http://+:18000/Citrix/CdsController/INotifyBroker/
-
Verify that the following two firewall rules are created and required ports are open.
- Citrix XaXdProxy
- Citrix Broker Service (TCP-In)
Other information
- After you install a VDA, you can check the health and availability of the site and its components with a Cloud Health check.
Where to go next
To review the entire configuration process, see Plan and build a deployment.
