-
-
WebSocket communication between VDA and Delivery Controller™
-
-
-
-
-
-
-
-
Prerequisites for upgrading VDAs using VUS
-
This content has been machine translated dynamically.
Dieser Inhalt ist eine maschinelle Übersetzung, die dynamisch erstellt wurde. (Haftungsausschluss)
Cet article a été traduit automatiquement de manière dynamique. (Clause de non responsabilité)
Este artículo lo ha traducido una máquina de forma dinámica. (Aviso legal)
此内容已经过机器动态翻译。 放弃
このコンテンツは動的に機械翻訳されています。免責事項
이 콘텐츠는 동적으로 기계 번역되었습니다. 책임 부인
Este texto foi traduzido automaticamente. (Aviso legal)
Questo contenuto è stato tradotto dinamicamente con traduzione automatica.(Esclusione di responsabilità))
This article has been machine translated.
Dieser Artikel wurde maschinell übersetzt. (Haftungsausschluss)
Ce article a été traduit automatiquement. (Clause de non responsabilité)
Este artículo ha sido traducido automáticamente. (Aviso legal)
この記事は機械翻訳されています.免責事項
이 기사는 기계 번역되었습니다.책임 부인
Este artigo foi traduzido automaticamente.(Aviso legal)
这篇文章已经过机器翻译.放弃
Questo articolo è stato tradotto automaticamente.(Esclusione di responsabilità))
Translation failed!
Pre-requisites for Upgrading VDAs Using VUS
To perform VDA upgrades using VUS, the following prerequisites must be met.
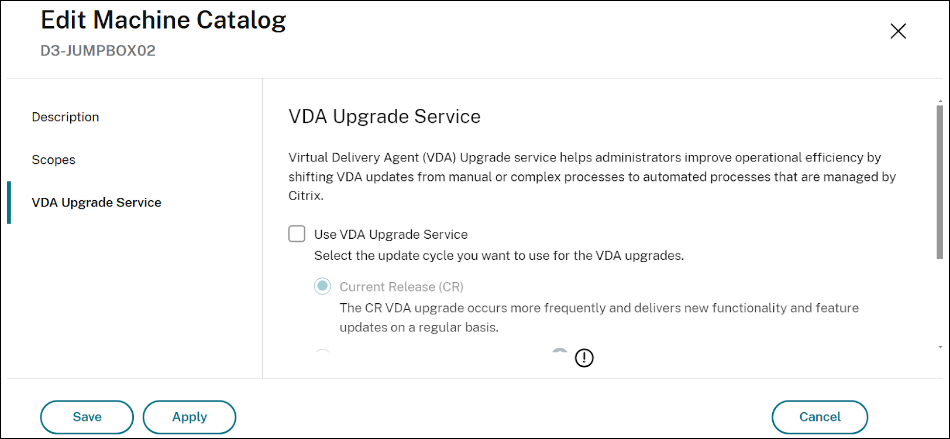
Enable the VDA Upgrade Service
To enable the VDA Upgrade Service feature, use the VDA Upgrade option when creating or editing a Machine Catalog. Admins must choose from the following upgrade cycles when enabling the VUS:
- LTSR
- CR
- LTSR Early Access Release (EAR)
- CR EAR
To enable the VDA Upgrade Service for a machine catalog from the DaaS full configuration interface, right-click on a catalog, click “Edit Catalog”, select the “VDA Upgrade Service” tab, check the “Use VDA Upgrade Service” box, and select an upgrade track.
To enable the VDA Upgrade Service for a machine catalog using PowerShell, use the Set-VusCatalogUpgradeType cmdlet.
The upgrade type can be set as “LTSR”, “CR”, “EAR_CR”, or “EAR_LTSR”.
Example: Set-VusCatalogUpgradeType -CatalogName "Workstation catalog" -UpgradeType LTSR
Note:
Enabling the VDA Upgrade option will not result in the automatic upgrade of VDAs. All VDA upgrades through VUS must be initiated as a separate task explicitly performed by administrators.
VDA Requirements
VDA Version
2109 CR or later, or 2203 LTSR or later
Provisioning Type
- Single or multi-session persistent machines provisioned using non-Citrix provisioning™ services or technologies.
- Single-session MCS-provisioned persistent machines (AD joined, Microsoft Entra joined, and non-domain-joined).
- Remote PC Access machines.
- Citrix HDX™ Plus for Windows 365.
VDA Upgrade Agent
- The VDA Upgrade Agent must be installed and active on the VDA. The agent can be installed:
- As an additional component, when upgrading your VDA or modifying the VDA installation.
- Using the standalone MSI that is available in the Citrix Virtual Apps and Desktops™ iso.
- MSI name: CitrixUpgradeAgent_x64.msi
- Path: x64\Virtual Desktop Components
-
To upgrade LTSR VDAs to LTSR CU versions, the VDA Upgrade Agent must be version 7.36.0.7 or later.
Note:
The VDA upgrade agent updates automatically if the VDA has access to the URLs listed in Connectivity.
Permissions
You must have the Full Administrator or Machine Catalog Administrator role in Citrix DaaS.
VDA State
For upgrades scheduled through VUS to proceed as intended, the VDAs targeted for upgrade must meet the following prerequisites:
- The VDA must not be manually put in maintenance mode.
- For a VDA upgrade to occur successfully, no users can be logged on.
- VDAs are placed in maintenance mode when the upgrade process begins draining user sessions throughout the upgrade window. They are removed from maintenance mode once the upgrade is completed successfully.
- If a user has an active or disconnected session throughout the duration of the upgrade window, the upgrade will be canceled at the end of the Upgrade Window.
Note:
Active and disconnected sessions can be terminated using the forced logoff option in VUS.
- VDAs not provisioned through MCS (manually provisioned) must be added to a Delivery Group before performing an upgrade through VUS.
- VDAs must be powered on.
Note:
AutoScale™ does not cease power managing machines when VDA upgrades are scheduled. Consider disabling AutoScale schedules on the Delivery Group when upgrades are in progress.
Connectivity
- VDAs must be able to communicate with the following URLs:
- If using the Citrix content delivery network (CDN) for downloading the VDA installer, VDAs must be able to communicate with the following URLs.
- Production - United States (US): https://prod-us-vus-storage-endpoint.azureedge.net/*
- Production - European Union (EU): https://prod-eu-vus-storage-endpoint.azureedge.net/*
- Production - Asia Pacific South (APS): https://prod-aps-vus-storage-endpoint.azureedge.net/*
- Production - Japan (JP): https://prod-jp-vus-storage-endpoint.azureedge.net/*
- To verify that the VDA installer is signed by a valid certificate, VDAs must communicate with the following URLs.
- http://crl3.digicert.com/*
- http://crl4.digicert.com/*
- http://ocsp.digicert.com/*
- http://cacerts.digicert.com/*
- The VDA Upgrade Agent communicates with DaaS at the following URLs.
- https://[customerId].xendesktop.net/citrix/VdaUpdateService/*, where [customerid] is the customer ID parameter displayed on the Secure Clients tab (Identity and Access Management > API Access > Secure Clients) of the Citrix Cloud management console.
- If using the Citrix content delivery network (CDN) for downloading the VDA installer, VDAs must be able to communicate with the following URLs.
VDAs with Proxy configurations
- Supported for VDA Upgrade Agent version 7.40 and higher.
- Only proxies in the form of Hostname: Port (IP:Port) and PAC file are supported. SOCKS5 proxies are not supported.
- The VDA Upgrade Agent must be configured to use a proxy using the full configuration interface or the registry.
- VDA Upgrade Agent proxy configuration using the full configuration interface
- Enable the VDA upgrade proxy configuration Citrix Policy setting for the VDAs that use a proxy.
- Input the proxy address or the path to the PAC file in the settings.
- VDA Upgrade Agent proxy configuration using the registry
- Key: HKEY_LOCAL_MACHINE\SOFTWARE\Citrix\VirtualDesktopAgent
- Value type: String
- Value name: ProxySettings
- Value data: Proxy address or path to pac file.
- For example:
- Proxy address: http://<URL or IP>:<port>
- Pac file: http://<URL or IP>/<path/<filename>.pac
- Key: HKEY_LOCAL_MACHINE\SOFTWARE\Citrix\VirtualDesktopAgent
- VDA Upgrade Agent proxy configuration using the full configuration interface
- Certificate validation uses the Windows CryptoAPI, which does not support proxy communication.
- To configure the system proxy on the VDA to facilitate outbound CRL calls. Input one of the following commands into the command line of the VDA to configure the system proxy:
- To copy proxy settings from Internet Explorer:
- netsh winhttp import proxy source=ie
- To utilize a separate proxy setting:
- netsh winhttp set proxy proxy-server=http://Proxy_Server:Port
- To copy proxy settings from Internet Explorer:
- To configure the system proxy on the VDA to facilitate outbound CRL calls. Input one of the following commands into the command line of the VDA to configure the system proxy:
VDAs installed using the VDAWorkstationCoreSetup.exe
If the VDA was originally installed using VDAWorkstationCoreSetup.exe, it can still be upgraded using VUS, which utilizes VDAWorkstationSetup.exe. When upgrading VDAs that were installed with VDAWorkstationCoreSetup.exe using VUS, you should review the installation options to ensure only the desired features are enabled, especially if migrating from a minimal core installation.
Share
Share
In this article
This Preview product documentation is Citrix Confidential.
You agree to hold this documentation confidential pursuant to the terms of your Citrix Beta/Tech Preview Agreement.
The development, release and timing of any features or functionality described in the Preview documentation remains at our sole discretion and are subject to change without notice or consultation.
The documentation is for informational purposes only and is not a commitment, promise or legal obligation to deliver any material, code or functionality and should not be relied upon in making Citrix product purchase decisions.
If you do not agree, select I DO NOT AGREE to exit.