-
-
WebSocket communication between VDA and Delivery Controller™
-
-
Migrate workloads between resource locations using Image Portability Service
-
-
-
-
This content has been machine translated dynamically.
Dieser Inhalt ist eine maschinelle Übersetzung, die dynamisch erstellt wurde. (Haftungsausschluss)
Cet article a été traduit automatiquement de manière dynamique. (Clause de non responsabilité)
Este artículo lo ha traducido una máquina de forma dinámica. (Aviso legal)
此内容已经过机器动态翻译。 放弃
このコンテンツは動的に機械翻訳されています。免責事項
이 콘텐츠는 동적으로 기계 번역되었습니다. 책임 부인
Este texto foi traduzido automaticamente. (Aviso legal)
Questo contenuto è stato tradotto dinamicamente con traduzione automatica.(Esclusione di responsabilità))
This article has been machine translated.
Dieser Artikel wurde maschinell übersetzt. (Haftungsausschluss)
Ce article a été traduit automatiquement. (Clause de non responsabilité)
Este artículo ha sido traducido automáticamente. (Aviso legal)
この記事は機械翻訳されています.免責事項
이 기사는 기계 번역되었습니다.책임 부인
Este artigo foi traduzido automaticamente.(Aviso legal)
这篇文章已经过机器翻译.放弃
Questo articolo è stato tradotto automaticamente.(Esclusione di responsabilità))
Translation failed!
Manage a Nutanix catalog
Manage machine catalogs describes the wizards that manage a machine catalog. The following information covers details specific to Nutanix AHV Prism Central environments.
Note:
Before managing a machine catalog on Nutanix AHV Prism Central, you need to finish creating a machine catalog on Nutanix AHV Prism Central. See Create a Nutanix catalog.
You can manage a machine catalog on Nutanix AHV Prism Central using:
Use Studio
Following are the options to manage a machine catalog on Nutanix AHV Prism Central using Studio:
| Option | Description |
|---|---|
| Add Machines | Create and add VMs to the machine catalog. |
| Delete Machine Catalog | Delete a machine catalog. You can choose to delete VMs at the same time or leave persistent VMs intact. |
| Change Master Image | Change the master image used as a template for all VMs in the catalog. |
| Manage Configuration Set | Bind a catalog to a Workspace Environment Management™ configuration set or switch to a different configuration. |
| Edit Machine Catalog | Modify configurations for the catalog, such as NICs and Virtual Machines. |
| View Machines | Jump to the Search node to see all VMs that belong to the catalog. |
| Rename Machine Catalog | Change the catalog name. |
| Upgrade VDAs | Upgrade VDAs on a per-catalog basis. This feature only applies to static persistent machines. |
| Change Functional Level | Select the minimum functional level for the catalog. Setting a functional level makes all features available. |
| Test Machine Catalog | Test whether the catalog has errors or warnings. |
| Manage Tags | Create, edit, and delete tags. Select tags to apply to the catalog. |
| Move Machine Catalog | Move the catalog to another folder. |
Note:
Currently, the Clone option is not available.
Change master image
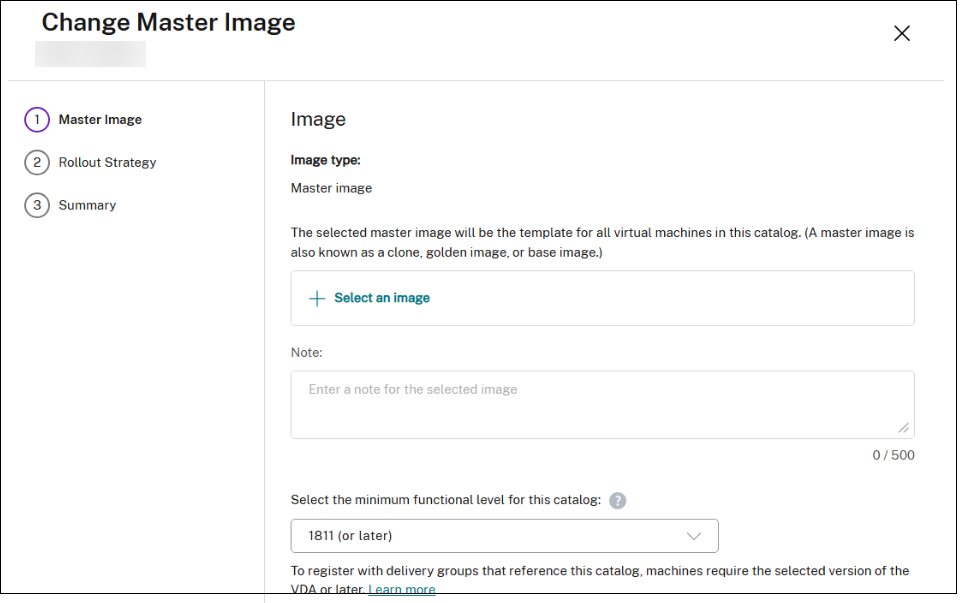
To change the master image for a catalog, follow these steps:
- On the Machine Catalogs page, right-click the machine catalog you want to update, and select Change Master Image.
-
On the Change Master Image page, click Select an image.

- On the Select an image page, expand a template and select a template version to use as the master image. You can filter machine templates by name.
- On the Rollout Strategy page, choose when you want the update to be applied.
Note:
For an MCS provisioned non-persistent catalog with the Nutanix AHV Prism Central host connection plug-in, updating the master image to switch the boot configuration between Legacy and UEFI, prevents existing VMs from starting at their next boot.
Change NICs
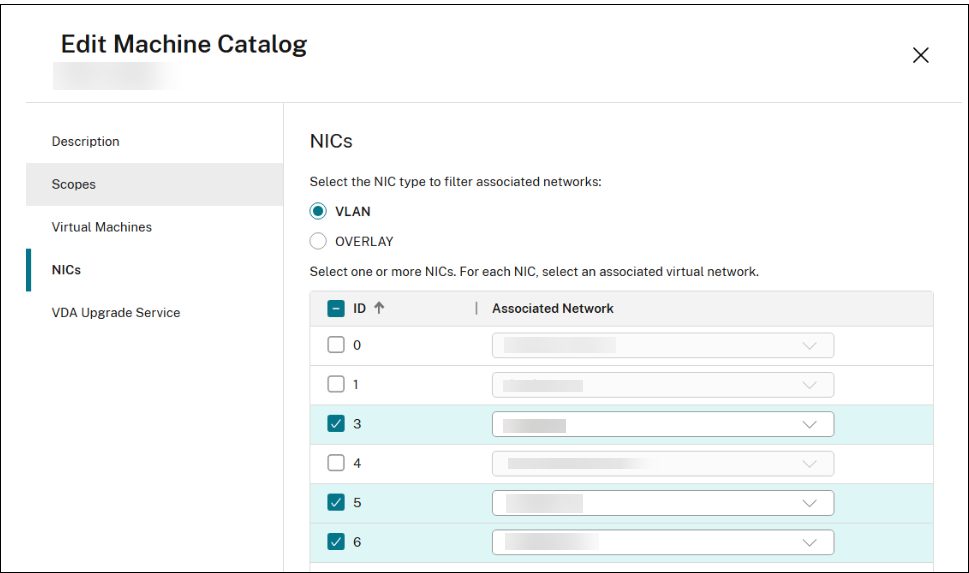
To change NICs for a catalog, follow these steps:
- On the Machine Catalogs page, right-click the machine catalog you want to modify, and select Edit Machine Catalog.
-
On the NICs page:
- Select an NIC type
- Select or clear the boxes to select NICs, and choose an associated virtual network for each NIC.

Change VMs configuration
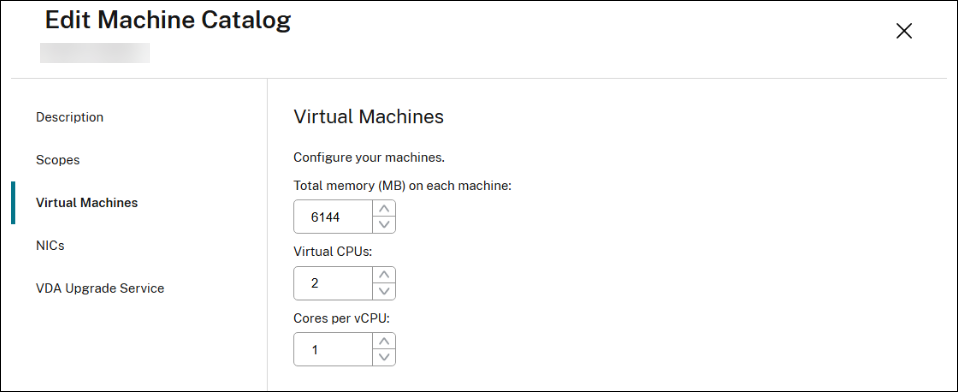
To change the configuration of VMs, including Memory, CPU count, and Cores per vCPU, follow these steps:
- On the Machine Catalogs page, right-click the machine catalog you want to modify, and select Edit Machine Catalog.
-
On the Virtual Machines page, use the up or down arrow, or enter values directly to adjust the Memory, CPU count, and Cores per vCPU for the VMs.

Use PowerShell
Change master image
The required parameters are:
-
ProvisioningSchemeName: Name of the provisioning scheme to edit. -
MasterImage: Literal path to the new master image.
Run the following command. For example:
Set-ProvSchemeMetadata  -Name "ImageManagementPrep_DoImagePreparation" -ProvisioningSchemeName "<ProvisioningSchemeName>" -Value "True"

Publish-ProvMasterVMImage  -MasterImageVM "<Literal path to the new master image- template version> -ProvisioningSchemeName "<ProvisioningSchemeName>" -RunAsynchronously
<!--NeedCopy-->
Change NIC and VM’s configuration
The required parameters are:
-
ProvisioningSchemeName: Name of the provisioning scheme to edit. -
NetworkMapping: Updated network mapping.
Run the following command. For example:
Set-ProvScheme  -CustomProperties "<CustomProperties xmlns=`"http://schemas.citrix.com/2014/xd/machinecreation`" xmlns:xsi=`"http://www.w3.org/2001/XMLSchema-instance`"><Property xsi:type=`"StringProperty`" Name=`"ClusterId`" Value=`"000xxxx-1fb0-xxxxx-4fc8-5c257335xxxx`" /><Property xsi:type=`"StringProperty`" Name=`"CPUCores`" Value=`"1`" /></CustomProperties>"  -NetworkMapping @{"6"="XDHyp:\HostingUnits\<Hosting Unit Name>\Clusters.folder\<Cluster Name>\<Network name>.network"} -ProvisioningSchemeName "<ProvisioningSchemeName>" -VMCpuCount 4
<!--NeedCopy-->
More information
Share
Share
In this article
This Preview product documentation is Citrix Confidential.
You agree to hold this documentation confidential pursuant to the terms of your Citrix Beta/Tech Preview Agreement.
The development, release and timing of any features or functionality described in the Preview documentation remains at our sole discretion and are subject to change without notice or consultation.
The documentation is for informational purposes only and is not a commitment, promise or legal obligation to deliver any material, code or functionality and should not be relied upon in making Citrix product purchase decisions.
If you do not agree, select I DO NOT AGREE to exit.