Create a Microsoft Azure catalog
Create machine catalogs describes the wizards that create a machine catalog. The following information covers details specific to Microsoft Azure Resource Manager cloud environments.
Note:
Before creating a Microsoft Azure catalog, you need to finish creating a connection to Microsoft Azure. See Connection to Microsoft Azure.
Create a machine catalog
You can create a machine catalog in two ways:
- Create a machine catalog using an Azure Resource Manager image in Web Studio
- Create a machine catalog using PowerShell
Create a machine catalog using an Azure Resource Manager image in Web Studio
An image can be a disk, snapshot, or an image version of an image definition inside the Azure Compute Gallery that is used to create the VMs in a machine catalog. Before creating the machine catalog, create an image in the Azure Resource Manager. For general information about images, see Create machine catalogs.
Note:
Support for using a master image from a region different from that configured in the host connection is deprecated. Use Azure Compute Gallery to replicate the master image to the desired region.
When creating an MCS machine catalog, a temporary VM is created based on the original VM to perform preparation tasks such as enabling DHCP and license rearm. This temporary VM is called a preparation VM. The name of this preparation VM follows the format Preparati-84x9n, where the last five characters are randomly generated to avoid duplication. The naming convention for this preparation VM is fixed and cannot be customized. After the preparation tasks are completed, the preparation VM is destroyed.
To disconnect the network from the preparation VM, a network security group is created to deny all inbound and outbound traffic. The network security group is created automatically once per catalog. The network security group’s name is Citrix-Deny-All-a3pgu-GUID, where GUID is randomly generated. For example, Citrix-Deny-All-a3pgu-3f161981-28e2-4223-b797-88b04d336dd1.
In the machine catalog creation wizard:
-
The Machine Type and Machine Management pages do not contain Azure-specific information. Follow the guidance in the Create machine catalogs article.
-
On the Image page, choose an image that you want to use as the template for creating machines in this catalog.
If you select Master image as the image type to use, click Select an image and follow these steps to select a master image as necessary:
- (Applicable only to connections configured with shared images within or across tenants) Select a subscription where the image resides.
- Select a resource group.
- Navigate to the Azure VHD, the Azure Compute Gallery, or the Azure image version. Add a note for the selected image if needed.
When selecting an image, consider the following:
- Verify that a Citrix VDA is installed on the image.
- If you select a VHD attached to a VM, you must shut down the VM before proceeding to the next step.
Note:
- The subscription corresponding to the connection (host) that created the machines in the catalog is denoted with a green dot. The other subscriptions are those that have the Azure Compute Gallery shared with that subscription. In those subscriptions, only shared galleries are shown. For information about how to configure shared subscriptions, see Share images within a tenant (across subscriptions) and Share images across tenants.
- Using a machine profile with Trusted Launch as Security Type is mandatory when you select an image or snapshot that has Trusted Launch enabled. You can then enable or disable SecureBoot and vTPM by specifying their values in the machine profile. Trusted Launch is not supported for Shared Image Gallery. For information about Azure Trusted Launch, see https://docs.microsoft.com/en-us/azure/virtual-machines/trusted-launch.
- You can create a provisioning scheme using ephemeral OS disk on Windows with Trusted Launch. When you select an image with Trusted launch, then you must select a machine profile with Trusted Launch that is enabled with vTPM. To create machine catalogs using ephemeral OS disk, see How to create machines using ephemeral OS disks.
- When image replication is in progress, you can proceed and select the image as the master image and complete the setup. However, catalog creation might take longer to complete while the image is being replicated. MCS requires the replication to complete within an hour starting from catalog creation. If the replication times out, catalog creation fails. You can verify the replication status in Azure. Try again if the replication is still pending or after the replication completes.
- When you select a master image for machine catalogs in Azure, MCS identifies the OS type based on the master image and machine profile you select. If MCS can’t identify it, select the OS type that matches the master image.
- You can provision a Gen2 VM catalog by using a Gen2 image to improve boot time performance. However, creating a Gen2 machine catalog using a Gen1 image is not supported. Similarly, creating a Gen1 machine catalog using a Gen2 image is also not supported. Also, any older image that does not have generation information is a Gen1 image.
If you select Prepared image as the image type to use, click Select an image and select a prepared image as necessary.
To ensure successful VM creation, verify that the image has Citrix VDA 2311 or later installed and MCSIO is present on the VDA.
Once you select an image, the Use a machine profile (mandatory for Microsoft Entra ID) checkbox is automatically selected. Click Select a machine profile to browse to a VM or an ARM template spec from a list of resource groups. VMs in the catalog can inherit configurations from the selected machine profile.
Validate the ARM template spec to make sure whether it can be used as a machine profile to create a machine catalog. There are two ways to validate the ARM template spec:
- After you select the ARM template spec from the resource group list, click Next. Error messages appear if the ARM template spec has errors.
- Run one of the following PowerShell commands:
Test-ProvInventoryItem -HostingUnitName <string> -InventoryPath <string>Test-ProvInventoryItem -HostingUnitUid <Guid> -InventoryPath <string>
Examples of configurations that VMs can inherit from a machine profile include:
- Accelerated networking
- Boot diagnostics
- Host disk caching (relating to OS and MCSIO disks)
- Machine size (unless otherwise specified)
- Tags placed on the VM
After you create the catalog, you can view the configurations that the image inherits from the machine profile. On the Machine Catalogs node, select the catalog to view its details in the lower pane. Then, click the Template Properties tab to view machine profile properties. The Tags section displays up to three tags. To view all tags placed on the VM, click View all.
If you want MCS to provision VMs on an Azure dedicated host, enable the Use a dedicated host group checkbox and then select a host group from the list. A host group is a resource that represents a collection of dedicated hosts. A dedicated host is a service that provides physical servers that host one or more VMs. Your server is dedicated to your Azure subscription, not shared with other subscribers. When you use a dedicated host, Azure ensures that your VMs are the only machines running on that host. This feature is suitable for scenarios where you must meet regulatory or internal security requirements. To learn more about host groups and considerations for using them, see Azure dedicated hosts.
Important:
- Only host groups that have Azure auto-placement enabled are shown.
- Using a host group changes the Virtual Machines page offered later in the wizard. Only machine sizes that the selected host group contains are shown on that page. Also, Availability Zones are selected automatically and not available for selection.
-
The Storage and License Types page appears only when you use an Azure Resource Manager image.
- Select the Storage redundancy type:
- Local redundant storage (LRS): LRS allows you to choose from all available storage types. When using LRS, Azure deploys the Virtual Machines (VMs) exclusively within the specified availability zone.
- Zone redundant storage (ZRS): ZRS allows for greater flexibility in VM placement, as Azure can launch VMs in any available zone. This is a key advantage over Local Redundant Storage (LRS), ensuring VM availability even if the disk’s original zone becomes inaccessible. ZRS, however, is only compatible with Premium SSD and Standard SSD storage types.
-
Select the Storage types to use for the machine catalog: The storage type determines which machine sizes are offered on the Virtual Machines page of the wizard.
- Premium SSD. Offers a high-performance, low-latency disk storage option suitable for VMs with I/O-intensive workloads.
- Standard SSD. Offers a cost-effective storage option that is suitable for workloads that require consistent performance at lower IOPS levels.
- Standard HDD. Offers a reliable, low-cost disk storage option suitable for VMs that run latency-insensitive workloads.
-
Azure ephemeral OS disk. Offers a cost-effective storage option that reuses the local disk of the VMs to host the operating system disk. Alternatively, you can use PowerShell to create machines that use ephemeral OS disks. For more information, see Azure ephemeral disks. Consider the following when using an ephemeral OS disk:
- Azure ephemeral OS disk and MCS I/O cannot be enabled at the same time.
- To update machines that use ephemeral OS disks, you must select an image whose size does not exceed the size of the VM’s cache disk or temporary disk.
- You cannot use the Retain VM and system disk during power cycles option offered later in the wizard.
Note:
- The identity disk is always created using Standard SSD irrespective of the storage type that you choose.
- If you select ZRS as the Storage redundancy, you get the option to only select Premium SSD and Standard SSD.
For details about Azure storage types and storage replication, see the following:
- https://docs.microsoft.com/en-us/azure/storage/common/storage-introduction/
- https://docs.microsoft.com/en-us/azure/virtual-machines/premium-storage-performance/
- https://docs.microsoft.com/en-us/azure/storage/common/storage-redundancy/
Select whether to use existing Windows licenses or Linux licenses.
-
Windows licenses: Using Windows licenses along with Windows images (Azure platform support images or custom images) lets you run Windows VMs in Azure at a reduced cost. There are two types of licenses:
-
Windows Server license. Lets you use your Windows Server or Azure Windows Server licenses, allowing you to use Azure Hybrid Benefits. For details, see https://azure.microsoft.com/en-us/pricing/hybrid-benefit/. Azure Hybrid Benefit reduces the cost of running VMs in Azure to the base compute rate, waiving the cost of extra Windows Server licenses from the Azure gallery.
-
Windows Client license. Lets you bring your Windows 10 and Windows 11 licenses to Azure, allowing you to run Windows 10 and Windows 11 VMs in Azure without the need for extra licenses. For details, see Client Access Licenses and Management Licenses.
-
You can verify that the provisioned VM is using the licensing benefit by running the following PowerShell command:
Get-AzVM -ResourceGroup MyResourceGroup -Name MyVM.-
For the Windows Server license type, verify that the license type is Windows_Server. More instructions are available at https://docs.microsoft.com/en-us/azure/virtual-machines/windows/hybrid-use-benefit-licensing/.
-
For the Windows Client license type, verify that the license type is Windows_Client. More instructions are available at https://docs.microsoft.com/en-us/azure/virtual-machines/windows/windows-desktop-multitenant-hosting-deployment/.
Alternatively, you can use the
Get-ProvschemePowerShell SDK to do the verification. For example:Get-Provscheme -ProvisioningSchemeName "My Azure Catalog". For more information about this cmdlet, see https://developer-docs.citrix.com/projects/citrix-virtual-apps-desktops-sdk/en/latest/MachineCreation/Get-ProvScheme/.-
Linux licenses: With bring-your-own-subscription (BYOS) Linux licenses, you do not have to pay for the software. The BYOS charge only includes the compute hardware fee. There are two types of licenses:
- RHEL_BYOS: To use RHEL_BYOS type successfully, enable Red Hat Cloud Access on your Azure subscription.
- SLES_BYOS: The BYOS versions of SLES include support from SUSE.
You can set the LicenseType value to Linux options at
New-ProvSchemeandSet-ProvScheme.Example of setting LicenseType to RHEL_BYOS at
New-ProvScheme:New-ProvScheme -CleanOnBoot -ProvisioningSchemeName "azureCatalog" -RunAsynchronously -Scope @() -SecurityGroup @() -CustomProperties '<CustomProperties xmlns="http://schemas.citrix.com/2014/xd/machinecreation" xmlns:xsi="http://www.w3.org/2001/XMLSchema-instance"><Property xsi:type="StringProperty" Name="UseManagedDisks" Value="true" /><Property xsi:type="StringProperty" Name="StorageAccountType" Value="StandardSSD_LRS" /><Property xsi:type="StringProperty" Name="ResourceGroups" Value="hu-dev-mcs" /><Property xsi:type="StringProperty" Name="OsType" Value="Linux" /><Property xsi:type="StringProperty" Name="LicenseType" Value="RHEL_BYOS" /></CustomProperties>' <!--NeedCopy-->Example of setting LicenseType to SLES_BYOS at
Set-ProvScheme:Set-ProvScheme -ProvisioningSchemeName "azureCatalog" -CustomProperties '<CustomProperties xmlns="http://schemas.citrix.com/2014/xd/machinecreation" xmlns:xsi="http://www.w3.org/2001/XMLSchema-instance"><Property xsi:type="StringProperty" Name="UseManagedDisks" Value="true" /><Property xsi:type="StringProperty" Name="StorageAccountType" Value="StandardSSD_LRS" /><Property xsi:type="StringProperty" Name="ResourceGroups" Value="hu-dev-mcs" /><Property xsi:type="StringProperty" Name="OsType" Value="Linux" /><Property xsi:type="StringProperty" Name="LicenseType" Value="SLES_BYOS" /></CustomProperties>' <!--NeedCopy-->Note:
If
LicenseTypevalue is empty, then the default values are Azure Windows Server License or Azure Linux License, depending on OsType value.Example of setting LicenseType to empty:
Set-ProvScheme -ProvisioningSchemeName "azureCatalog" -CustomProperties '<CustomProperties xmlns="http://schemas.citrix.com/2014/xd/machinecreation" xmlns:xsi="http://www.w3.org/2001/XMLSchema-instance"><Property xsi:type="StringProperty" Name="UseManagedDisks" Value="true" /><Property xsi:type="StringProperty" Name="StorageAccountType" Value="StandardSSD_LRS" /><Property xsi:type="StringProperty" Name="ResourceGroups" Value="hu-dev-mcs" /><Property xsi:type="StringProperty" Name="OsType" Value="Linux" /></CustomProperties>'
<!--NeedCopy-->
See the following documents to understand License types and their benefits:
Azure Compute Gallery (formerly Azure Shared Image Gallery) is a repository for managing and sharing images. It lets you make your images available throughout your organization. We recommend that you store an image in SIG when creating large non-persistent machine catalogs because doing that enables faster resets of VDA OS disks. After you select Place prepared image in Azure Compute Gallery, the Azure Compute Gallery settings section appears, letting you specify more Azure Compute Gallery settings:
-
Ratio of virtual machines to image replicas. Lets you specify the ratio of virtual machines to image replicas that you want Azure to keep. By default, Azure keeps a single image replica for every 40 non-persistent machines. For persistent machines, that number defaults to 1,000.
-
Maximum replica count. Lets you specify the maximum number of image replicas that you want Azure to keep. The default is 100.
Note:
A gallery is created in ACG to store the image. This gallery is accessible only to MCS for VM creation and doesn’t appear on the Select an image page.
- Select the Storage redundancy type:
-
On the Virtual Machines page, indicate how many VMs you want to create and the machine size. After catalog creation, you can change the machine size by editing the catalog.
-
The NICs page does not contain Azure-specific information. Follow the guidance in the Create machine catalogs article.
-
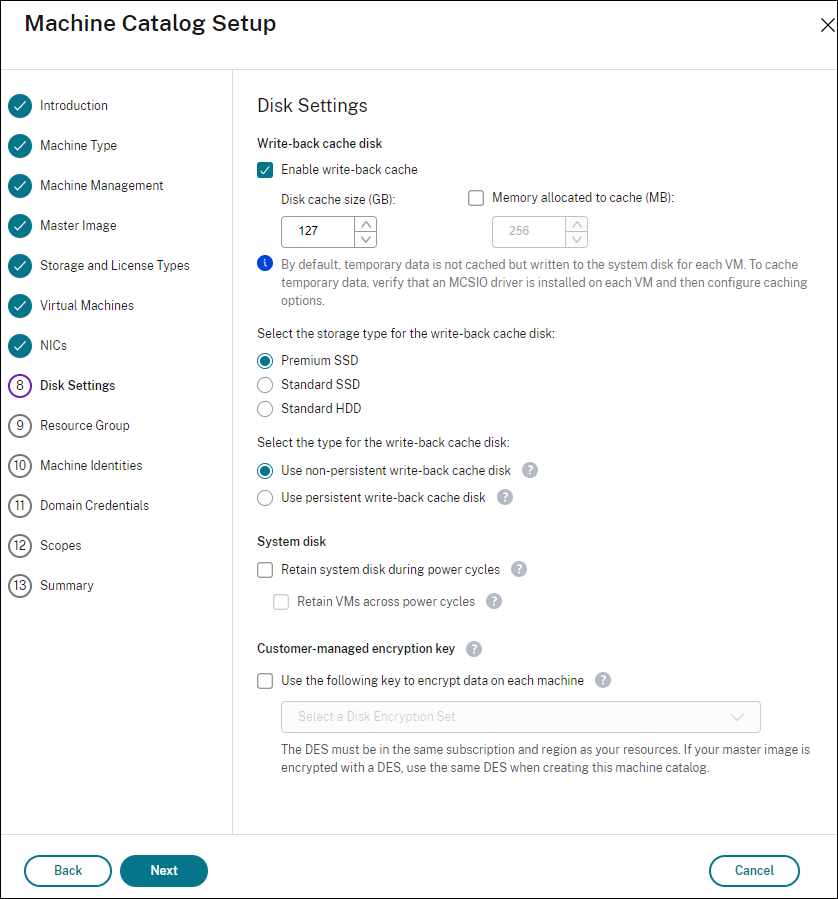
On the Disk Settings page, choose whether to enable write-back cache. With the MCS storage optimization feature enabled, you can configure the following settings when creating a catalog. These settings apply to both Azure and GCP environments.
After enabling write-back cache, you can do the following:
-
Configure the size of the disk and RAM used for caching temporary data. For more information, see Configure cache for temporary data.
-
Select the storage type for the write-back cache disk. The following storage options are available to use for the write-back cache disk:
- Premium SSD
- Standard SSD
- Standard HDD
Note:
If you select ZRS as Storage redundancy on the Storage and License Types page, then write-back cache disk storage redundancy is set as ZRS by default
-
Choose whether you want the write-back cache disk to persist for the provisioned VMs. Select Enable write-back cache to make the options available. By default, Use non-persistent write-back cache disk is selected.
-
Select the type for the write-back cache disk.
- Use non-persistent write-back cache disk. If selected, the write-back cache disk is deleted during power cycles. Any data redirected to it will be lost. If the VM’s temporary disk has sufficient space, it is used to host the write-back cache disk to reduce your costs. After catalog creation, you can check whether the provisioned machines use the temporary disk. To do so, click the catalog and verify the information on the Template Properties tab. If the temporary disk is used, you see Non-persistent Write-back Cache Disk and its value is Yes (using VM’s temporary disk). If not, you see Non-persistent Write-back Cache Disk and its value is No (not using VM’s temporary disk).
- Use persistent write-back cache disk. If selected, the write-back cache disk persists for the provisioned VMs. Enabling the option increases your storage costs.
Note:
A catalog automatically uses Azure Temp Disk for WBC disk if all the following criteria are met:
- MCSIO is enabled.
- The WBC disk is non-persistent.
- The VM size includes a Temp Disk large enough for the WBC disk.
- No drive letter is specified for the WBC disk.
This feature applies to both catalog creation and editing, helping reduce your storage costs.
-
Choose whether to retain VMs and system disks for VDAs during power cycles.
Retain VM and system disk during power cycles. Available when you’ve selected Enable write-back cache. By default, VMs and the system disks are deleted on shutdown and recreated on startup. If you want to reduce VM restart times, select this option. Keep in mind that enabling this option also increases storage costs.
-
Choose whether to enable Storage cost savings. If enabled, save storage costs by downgrading the storage disk to Standard HDD when the VM shuts down. The VM switches to its original settings on restart. The option applies to both storage and write-back cache disks. Alternatively, you can also use PowerShell. See Change the storage type to a lower tier when a VM is shut down.
Note:
Microsoft imposes restrictions on changing the storage type during VM shutdown. It’s also possible that Microsoft will block storage type changes in the future. For more information, see this Microsoft article.
-
Choose whether to encrypt data on machines in this catalog and which encryption key to use. Server-side encryption with a customer-managed key (CMK) lets you manage encryption at a managed disk level and protect data on the machines in the catalog. Default settings are inherited from either the machine profile or the master image, with the profile taking priority:
- If you’re using a machine profile with a CMK, the Use the following key to encrypt data on each machine option is auto-selected and defaults to the key from the machine profile.
- If you’re using a machine profile with a Platform Managed Key (PMK) and the master image is CMK encrypted, the Use the following key to encrypt data on each machine option is auto-selected and defaults to the key from the master image.
- If you’re not using a machine profile and the master image is CMK encrypted, the Use the following key to encrypt data on each machine option is auto-selected and defaults to the key from the master image.
For more information, see Azure server side encryption.
-
-
On the Resource Group page, choose whether to create resource groups or use existing groups.
- If you choose to create resource groups, select Next.
- If you choose to use existing resource groups, select groups from the Available Provisioning Resource Groups list. Remember: Select enough groups to accommodate the machines you’re creating in the catalog. A message appears if you choose too few. You might want to select more than the minimum required if you plan to add more VMs to the catalog later. You can’t add more resource groups to a catalog after the catalog is created.
For more information, see Azure resource groups.
-
On the Machine Identities page, choose an identity type and configure identities for machines in this catalog. If you select the VMs as Microsoft Entra joined, you can add them to a Microsoft Entra security group. Detailed steps are as follows:
- From the Identity type field, select Microsoft Entra joined. The Microsoft Entra security group (optional) option appears.
- Click Microsoft Entra security group: Create new.
- Enter a group name, and then click Create.
- Follow the onscreen instructions to sign in to Azure. If the group name doesn’t exist in Azure, a green icon appears. Otherwise, an error message appears requesting you to enter a new name.
- Enter the machine account naming scheme for the VMs.
After catalog creation, Citrix Virtual Apps and Desktops accesses Azure on your behalf and creates the security group and a dynamic membership rule for the group. Based on the rule, VMs with the naming scheme specified in this catalog are automatically added to the security group.
Adding VMs with a different naming scheme to this catalog requires you to sign in to Azure. Citrix Virtual Apps™ and Desktops can then access Azure and create a dynamic membership rule based on the new naming scheme.
When deleting this catalog, deleting the security group from Azure also requires signing in to Azure.
-
The Domain Credentials and Summary pages do not contain Azure-specific information. Follow the guidance in the Create machine catalogs article.
Tip:
On the Summary page, you can view the estimated monthly cost for the virtual machines in this machine catalog based on Azure’s public list price. If the connection hosting the catalog has the
Microsoft.Consumption/pricesheets/readpermission in Azure, the estimate is calculated using your organization’s contracted pricing instead.Select the cost estimate to see detailed information. For a more accurate estimate, adjust settings such as daily power-on hours, workdays per week, and savings options based on your usage.
Complete the wizard.
Conditions for Azure temporary disk to be eligible for write-back cache disk
You can use the Azure temporary disk as write-back cache disk only if all the following conditions are satisfied:
-
The write-back cache disk must non-persist as the Azure temporary disk is not appropriate for persistent data.
-
The chosen Azure VM size must include a temporary disk.
-
The ephemeral OS disk is not required to be enabled.
-
Accept to place the write-back cache file on Azure temporary disk.
-
The Azure temporary disk size must be greater than the total size of (write-back cache disk size + reserved space for paging file + 1 GB buffer space).
Non-persistent write-back cache disk scenarios
The following table describes three different scenarios when temporary disk is used for write-back cache while creating machine catalog.
| Scenario | Outcome |
|---|---|
| All conditions to use temporary disk for write-back cache are satisfied. | The WBC file mcsdif.vhdx is placed on the temporary disk. |
| Temporary disk has insufficient space for write-back cache usage. | A VHD disk MCSWCDisk is created and WBC file mcsdif.vhdx is placed on this disk. |
Temporary disk has sufficient space for write-back cache usage but UseTempDiskForWBC is set to false. |
A VHD disk MCSWCDisk is created and WBC file mcsdif.vhdx is placed on this disk. |
Create an Azure template spec
You can create an Azure template spec in the Azure portal and use it in Web Studio and PowerShell commands to create or update an MCS machine catalog.
To create an Azure template spec for an existing VM:
- Go to the Azure portal. Select a resource group, and then select the VM and network interface. From the … menu on the top, click Export template.
-
Clear the Include parameters checkbox if you want to create a template spec for catalog provisioning. Verify in the JSON file that the
parametersandvariablessections are:"parameters": {}, "variables": {} <!--NeedCopy--> - Click Download to save the template as JSON file.
- On the Azure portal, select Template specs and click Import Template.
- Browse and import the machine profile (in JSON) saved on your computer.
- Provide the Name, Subscription, Resource Group, Location, and Version. Click Next: Edit Template.
- Create Review+Create and create the template spec.
- On the Template Specs page, verify the template spec you just created. Click the template spec. On the left panel, click Versions.
- You can create a new version by clicking Create new version. Specify a new version number, change to the current template spec, and click Review + Create to create the new version of the template spec.
You can get information about the template spec and template version using the following PowerShell commands:
-
To get information about the template spec, run:
get-item XDHyp:\HostingUnits\East\machineprofile.folder\abc.resourcegroup\bggTemplateSpec.templatespec <!--NeedCopy--> -
To get information about the template spec version, run:
 get-item XDHyp:\HostingUnits\East\machineprofile.folder\abc.resourcegroup\bggTemplateSpec.templatespec\bgg1.0.templatespecversion
 <!--NeedCopy-->
Use template spec in creating or updating a catalog
You can create or update an MCS machine catalog using a template spec as a machine profile input. To do this, you can use the Web Studio or PowerShell commands.
- For Web Studio, see Create a machine catalog using an Azure Resource Manager image in Web Studio
- For PowerShell, see Use template spec in creating or updating a catalog using PowerShell
Azure server-side encryption
Citrix Virtual Apps and Desktops supports customer-managed encryption keys for Azure managed disks through Azure Key Vault. With this support you can manage your organizational and compliance requirements by encrypting the managed disks of your machine catalog using your own encryption key. For more information, see Server-side encryption of Azure Disk Storage.
When using this feature for managed disks:
-
To change the key that the disk is encrypted with, you change the current key in the
DiskEncryptionSet. All resources associated with thatDiskEncryptionSetchange to be encrypted with the new key. -
When you disable or delete your key, any VMs with disks using that key automatically shut down. After shutting down, the VMs are not usable unless the key is enabled again or you assign a new key. Any catalog using the key cannot be powered on, and you cannot add VMs to it.
Important considerations when using customer-managed encryption keys
Consider the following when using this feature:
- All resources related to your customer-managed keys (Azure Key Vaults, disk encryption sets, VMs, disks, and snapshots) must reside in the same subscription and region.
- Disks, snapshots, and images encrypted with customer-managed keys cannot move to another resource group and subscription.
- Refer to the Microsoft site for limitations on disk encryption sets per region.
Note:
See Quickstart: Create a Key Vault using the Azure portal for information on configuring Azure server-side encryption.
Azure Customer-managed encryption key
When creating a machine catalog, you can choose whether to encrypt data on the machines provisioned in the catalog. Server-side encryption with a customer-managed encryption key lets you manage encryption at a managed disk level and protect data on the machines in the catalog. A Disk Encryption Set (DES) represents a customer-managed key. To use this feature, you must first create your DES in Azure. A DES is in the following format:
/subscriptions/12345678-1234-1234-1234-123456789012/resourceGroups/Sample-RG/providers/Microsoft.Compute/diskEncryptionSets/SampleEncryptionSet
Select a DES from the list. The DES you select must be in the same subscription and region as your resources.
See Creating a machine catalog using customer-managed key.
Azure disk encryption at host
You can create an MCS machine catalog with encryption at host capability. Currently, MCS supports only the machine profile workflow for this feature. You can use a VM or a template spec as an input for a machine profile.
This encryption method does not encrypt the data through the Azure storage. The server hosting the VM encrypts the data and then the encrypted data flows through the Azure storage server. Hence, this method of encryption encrypts data end to end.
Restrictions:
Azure disk encryption at host is:
- Not supported for all Azure machine sizes
- Incompatible with Azure disk encryption
To create a machine catalog with encryption at host capability:
- Check if the subscription has the encryption at host feature enabled or not. To do this, see https://learn.microsoft.com/en-us/rest/api/resources/features/get?tabs=HTTP/. If not enabled, you must enable the feature for the subscription. For information on enabling the feature for your subscription, see https://learn.microsoft.com/en-us/azure/virtual-machines/disks-enable-host-based-encryption-portal?tabs=azure-powershell#prerequisites/.
-
Check if a particular Azure VM size supports encryption at host or not. To do this, in a PowerShell window, run one of the following:
PS XDHyp:\Connections\<your connection>\east us.region\serviceoffering.folder>
<!--NeedCopy-->
PS XDHyp:\HostingUnits\<your hosting unit>\serviceoffering.folder> <!--NeedCopy--> -
Create a VM or a template spec, as an input for machine profile, in Azure portal with encryption at host enabled.
- If you want to create a VM, select a VM size that supports encryption at host. After you create the VM, the VM property Encryption at host is enabled.
- If you want to use a template spec, assign the parameter
Encryption at Hostas true insidesecurityProfile.
-
Create an MCS machine catalog with machine profile workflow by either selecting a VM or a template spec.
- OS disk / Data Disk: Gets encrypted through Customer-managed key and Platform-managed key
- Ephemeral OS Disk: Gets encrypted only through Platform-managed key
- Cache Disk: Gets encrypted through Customer-managed key and Platform-managed key
You can create the machine catalog using Web Studio or running PowerShell commands.
Retrieve encryption at host information from a machine profile
You can retrieve the encryption at host information from a machine profile when you run the PowerShell command with the AdditionalData parameter. If EncryptionAtHost parameter is True, it indicates that the encryption at host is enabled for the machine profile.
For example: When the machine profile input is a VM, run the following command:
(get-item XDHyp:\HostingUnits\myAzureNetwork\machineprofile.folder\abc.resourcegroup\def.vm).AdditionalData
<!--NeedCopy-->
For example: When the machine profile input is a template spec, run the following command:
(get-item XDHyp:\HostingUnits\myAzureNetwork\machineprofile.folder\abc.resourcegroup\def_templatespec.templatespec\EncryptionAtHost.templatespecversion).AdditionalData
<!--NeedCopy-->
Double encryption on managed disk
You can create a machine catalog with double encryption. Any catalogs created with this feature have all disks server side encrypted with both platform and customer-managed keys. You own and maintain the Azure Key Vault, Encryption Key, and the Disk Encryption Sets (DES).
Double encryption is platform-side encryption (default) and customer-managed encryption (CMEK). Therefore, if you are a high security sensitive customer who is concerned about the risk associated with any encryption algorithm, implementation, or a compromised key, you can opt for this double encryption. Persistent OS and data disks, snapshots, and images are all encrypted at rest with double encryption.
Note:
- You can create and update a machine catalog with double encryption using Web Studio and PowerShell commands. See Create a machine catalog with double encryption for PowerShell commands.
- You can use a non-machine profile-based workflow or machine profile-based workflow for creating or updating a machine catalog with double encryption.
- If you use non-machine profile-based workflow to create a machine catalog, you can reuse the stored
DiskEncryptionSetId.- If you use a machine profile, you can use a VM or template spec as a machine profile input.
Limitations:
- Double encryption is not supported for Ultra Disks or Premium SSD v2 disks.
- Double encryption is not supported on unmanaged disks.
- If you disable a DiskEncryptionSet key associated with a catalog, then the VMs of the catalog are disabled.
- All resources related to your customer-managed keys (Azure Key Vaults, disk encryption sets, VMs, disks, and snapshots) must be in the same subscription and region.
- You can only create up to 50 disk encryption sets per region per subscription.
Azure resource groups
Azure provisioning resource groups provide a way to provision the VMs that provide applications and desktops to users. You can create a resource group or use an existing resource group to provision VMs in an MCS machine catalog. You can use the same resource group in multiple machine catalogs. For information about Azure resource groups, see the Microsoft documentation.
Azure Resource Group Usage
There is no limit on the number of virtual machines, managed disks, snapshots, and images per Azure Resource Group. (The limit of 240 VMs per 800 managed disks per Azure Resource Group has been removed.)
- When using a full-scope service principal to create a machine catalog, MCS creates only one Azure Resource Group and uses that group for the catalog.
- When using a narrow scope service principal to create a machine catalog, you must supply an empty, pre-created Azure Resource Group for the catalog.
Azure ephemeral disks
An Azure ephemeral disk allows you to repurpose the cache disk or temporary disk or NVMe disk to store the OS disk for an Azure-enabled virtual machine. This functionality is useful for Azure environments that require a higher performant SSD disk over a standard HDD disk. For information on creating a catalog with an Azure ephemeral disk, see Create a catalog with an Azure ephemeral disks.
Note:
Persistent catalogs do not support ephemeral OS disks.
Ephemeral OS disks require that your provisioning scheme uses managed disks and a Shared Image Gallery.
Store an ephemeral OS temporary disk
You have the option of storing an ephemeral OS disk on the VM temp disk, a resource disk, or an NVMe Disk. This functionality enables you to use an ephemeral OS disk with a VM that either doesn’t have a cache, or has insufficient cache. Such VMs have a temp or resource disk or a NVMe Disk to store an ephemeral OS disk, such as Ddv4.
Consider the following:
- An ephemeral disk is stored in the VM cache disk, or the VMs temporary (resource) disk or the NVMe disk. The cache disk is preferred over the temporary disk, unless the cache disk is not large enough to hold the contents of the OS disk.
- For updates, a new image that is larger than the cache disk but smaller than the temp disk results in replacing the ephemeral OS disk with the VM’s temp disk.
Azure ephemeral disk and Machine Creation Services (MCS) storage optimization (MCS I/O)
Azure ephemeral OS disk and MCS I/O cannot be enabled at the same time.
The important considerations are as follows:
-
You cannot create a machine catalog with both ephemeral OS disk and MCS I/O enabled at the same time.
- The PowerShell parameters (
UseWriteBackCacheandUseEphemeralOsDisk) fail with proper error messages if you set them to true inNew-ProvSchemeorSet-ProvScheme. - For existing machine catalogs created with both features enabled, you can still:
- update a machine catalog.
- add or delete VMs.
- delete a machine catalog.
Azure Compute Gallery
Use Azure Compute Gallery (formerly Azure Shared Image Gallery) as a published image repository for MCS provisioned machines in Azure. You can store a published image in the gallery to accelerate the creation and hydration of OS disks, improving start and application launch times for non-persistent VMs. The shared image gallery contains the following three elements:
- Gallery: Images are stored here. MCS creates one gallery for each machine catalog.
- Gallery Image Definition: This definition includes information (operating system type and state, Azure region) about the published image. MCS creates one image definition for each image created for the catalog.
- Gallery Image Version: Each image in a Shared Image Gallery can have multiple versions, and each version can have multiple replicas in different regions. Each replica is a full copy of the published image.
Note:
Shared Image Gallery functionality is only compatible with managed disks. It is not available for legacy machine catalogs.
For more information, see Azure Compute Gallery overview.
For information on creating or updating a machine catalog using Azure Compute Gallery image using PowerShell, see Create or update a machine catalog using an Azure Compute Gallery image.
Azure confidential VMs
Azure confidential computing VMs ensure that your virtual desktop is encrypted in memory and protected in use.
You can use MCS to create a catalog with Azure confidential VMs. You must use the machine profile workflow to create such a catalog. You can use both VM and ARM template spec as a machine profile input.
You can also use a confidential VM type Azure master image and a confidential VM type Azure machine profile to create a prepared image, and then use this prepared image to create an MCS catalog.
Important considerations for confidential VMs
The important considerations for supported VM sizes and creating machine catalog with confidential VMs are as follows:
-
To check the VM sizes supported by Confidential VMs, see Sizes.
-
Create machine catalogs with confidential VMs.
- You can create a machine catalog with Azure Confidential VMs using Web Studio and PowerShell commands.
- You must use machine profile-based workflow for creating a machine catalog with Azure Confidential VMs. You can use a VM or template spec as a machine profile input.
-
The master image and the machine profile input must be both enabled with the same confidential security type. Different Azure resources use different labels to indicate the confidential VM type.
For Azure snapshot, managed disk or virtual machine, the security types are:
- ConfidentialVM_DiskEncryptedWithCustomerKey.
- ConfidentialVM_DiskEncryptedWithPlatformKey.
- ConfidentialVM_VMGuestStateOnlyEncryptedWithPlatformKey
For Azure ARM template spec version, the security types are:
- VMGuestStateOnly: Confidential VM with only VM guest state encrypted
- DiskWithVMGuestState: Confidential VM with both OS disk and VM guest state encrypted with platform managed key or customer managed key. Both normal and Ephemeral OS disk can be encrypted.
-
You can get confidential VM information of various resource types such as managed disk, snapshot, Azure Compute Gallery image, VM, and ARM template spec using the AdditionalData parameter. For example:
 PS C:\Users\username> (get-item XDHyp:\HostingUnits\mynetwork\image.folder\username-dev-testing-rg.resourcegroup\username-dev-tsvda.vm).AdditionalData
 <!--NeedCopy-->
The additional data fields are:
- DiskSecurityType
- ConfidentialVMDiskEncryptionSetId
-
DiskSecurityProfiles
To get the confidential computing property of a machine size, run the following command:
(Get-Item -path "XDHyp:\Connections\my-connection-name\East US.region\serviceoffering.folder\abc.serviceoffering").AdditionalDataThe additional data field is
ConfidentialComputingType. - You cannot change the master image or machine profile from confidential to non-confidential security type, or from non-confidential to confidential security type.
- You get appropriate error messages for any incorrect configuration.
Prepare master images and machine profiles
Before creating a set of confidential VMs, follow these steps to prepare a master image and a machine profile for them:
- In the Azure portal, create a confidential VM with specific settings, such as:
- Security Type: Confidential virtual machines
- Confidential OS disk encryption: Enabled.
- Key management: Confidential disk encryption with a platform-managed key For more information about creating confidential VMs, see this Microsoft article.
-
Prepare the master image on the VM created. Install the necessary applications and VDA on the created VM.
Note:
Creating confidential VMs using VHD is not supported. Instead, use Azure Compute Gallery, managed disks, or snapshots for this purpose.
-
Create the machine profile using either of these ways:
- Use the existing VM created in step 1 if it possesses the needed machine properties.
-
If you opt for an ARM template spec as the machine profile, create the template spec as needed. Specifically, configure parameters that meet your confidential VM requirements, such as SecurityEncryptionType and diskEncryptionSet (for customer-managed key). For more information, see Create an Azure template spec.
Note:
- Ensure the master image and the machine profile have the same security key type.
- To create confidential VMs requiring confidential OS disk encryption with a customer-managed key, make sure that the disk encryption set IDs in both the master image and the machine profile are identical.
If you want to use a confidential VM type prepared image to create an MCS catalog, then create a prepared image using the confidential VM type master image and a confidential VM type machine profile. See Create an image definition and initial image version for information on creating prepared images.
Create confidential VMs using Web Studio or PowerShell commands
To create a set of confidential VMs, create a machine catalog using a master image and a machine profile derived from a desired confidential VM.
To create the catalog using Web Studio, follow the steps described in Create machine catalogs. Keep the following considerations in mind:
- On the Image page, select a master image and a machine profile you’ve prepared for the confidential VM creation. The machine profile selection is mandatory and only profiles that match the same security encryption type as the selected master image are available for selection.
- On the Virtual Machines page, only machine sizes that support confidential VMs appear for selection.
- On the Disk Settings page, you can’t specify the disk encryption set because it’s inherited from the selected machine profile.
Boot Integrity Monitoring
If your VM has Secure Boot and virtual Trusted Platform Module (vTPM) enabled, and GuestAttestation extension installed, Microsoft Defender for Cloud can remotely validate that your VM boots in a healthy way. This monitoring is called Boot Integrity Monitoring. For more information on Boot Integrity Monitoring, see Boot integrity monitoring overview.
You can enable Boot Integrity Monitoring for MCS machine catalog VMs (persistent and non-persistent VMs) using a machine profile (VM or template spec). Boot Integrity Monitoring is only supported for Trusted Launch and Confidential VMs.
You can update an existing catalog to use boot integrity using Set-ProvScheme to point to a boot integrity enabled machine profile. New VMs added to the catalog are then enabled with integrity monitoring.
You can also update an existing VM in a catalog using Set-ProvVmUpdateTimeWindow, Set-ProvVm, or Maintenance Cycles. You can convert a:
- VM without integrity monitoring to have integrity monitoring
- VM with integrity monitoring to without integrity monitoring
Create machine catalog enabled with integrity monitoring
Required permissions:
Ensure that you have the following permissions:
Microsoft.Compute/virtualMachines/extensions/readMicrosoft.Compute/virtualMachines/extensions/write
Do the following to create an MCS machine catalog enabled with integrity monitoring:
- Create a machine profile (VM or template spec) with
GuestAttestationextension installed. (link to the content below) -
Create an MCS machine catalog using the machine profile input using the Web Studio or PowerShell commands.
Note:
You can check the
GuestAttestationExtensionEnabledstatus of a VM or template spec using theGet-ItemPowerShell command with theAdditionalDataparameter. - Add VMs to the catalog.
Create a machine profile enabled with GuestAttestation extension installed
Create a VM or template spec as a machine profile input with integrity monitoring enabled, which implies GuestAttestation extension is installed.
To create a VM with integrity monitoring enabled, do the following:
- Sign in to the Azure portal.
-
If you are creating a new VM:
- Select Security type as Trusted launch virtual machines or Confidential virtual machines.
-
Click Configure security features and select Integrity monitoring checkbox.
Note:
For integrity monitoring, you must enable Secure boot and vTPM.
- On the Overview page, go to the Security type section and verify that the Security type is Trusted launch or Confidential virtual machines and Integrity monitoring is enabled.
- Navigate to the Extensions + applications page to verify that
GuestAttestationis installed.
To enable integrity monitoring of an existing VM, see Enable integrity monitoring-Azure portal.
To create a template spec with GuestAttestation extension installed:
-
You can install GuestAttestation using a template spec. See Enable integrity monitoring-template spec.
Note:
In this template spec, under Settings, you can configure the endpoints to use for attestation. If you do not configure, then Azure decides what endpoints to configure
Azure Marketplace
Citrix Virtual Apps and Desktops supports using a master image on Azure that contains plan information to create a machine catalog. For more information, see Microsoft Azure Marketplace.
Tip:
Some images found on the Azure Marketplace, like the standard Windows Server image, do not append plan information. Citrix Virtual Apps and Desktops feature is for paid images.
Ensure that the image created in Shared Image Gallery contains Azure plan information
Use the procedure in this section to view Shared Image Gallery images in Web Studio. These images can optionally be used for a master image. To put the image into a Shared Image Gallery, create an image definition in a gallery.

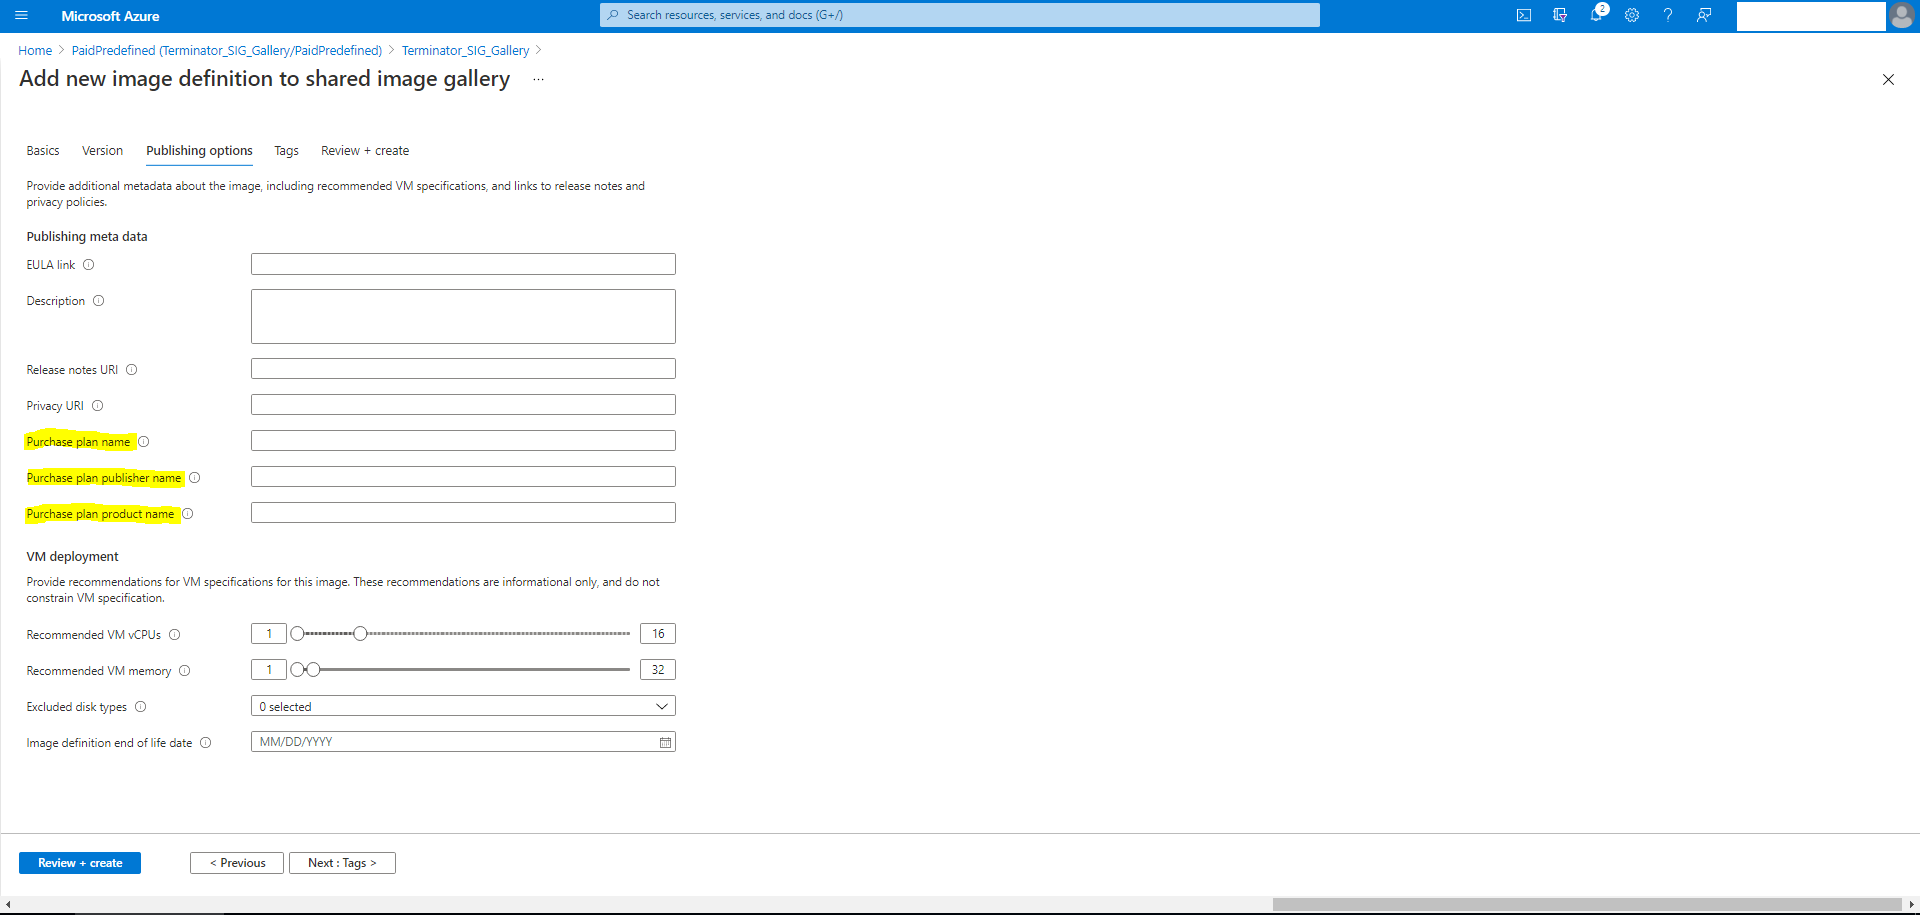
In the Publishing options page, verify the purchase plan information.
The purchase plan information fields are initially empty. Populate those fields with the purchase plan information used for the image. Failure to populate purchase plan information can cause the machine catalog process to fail.
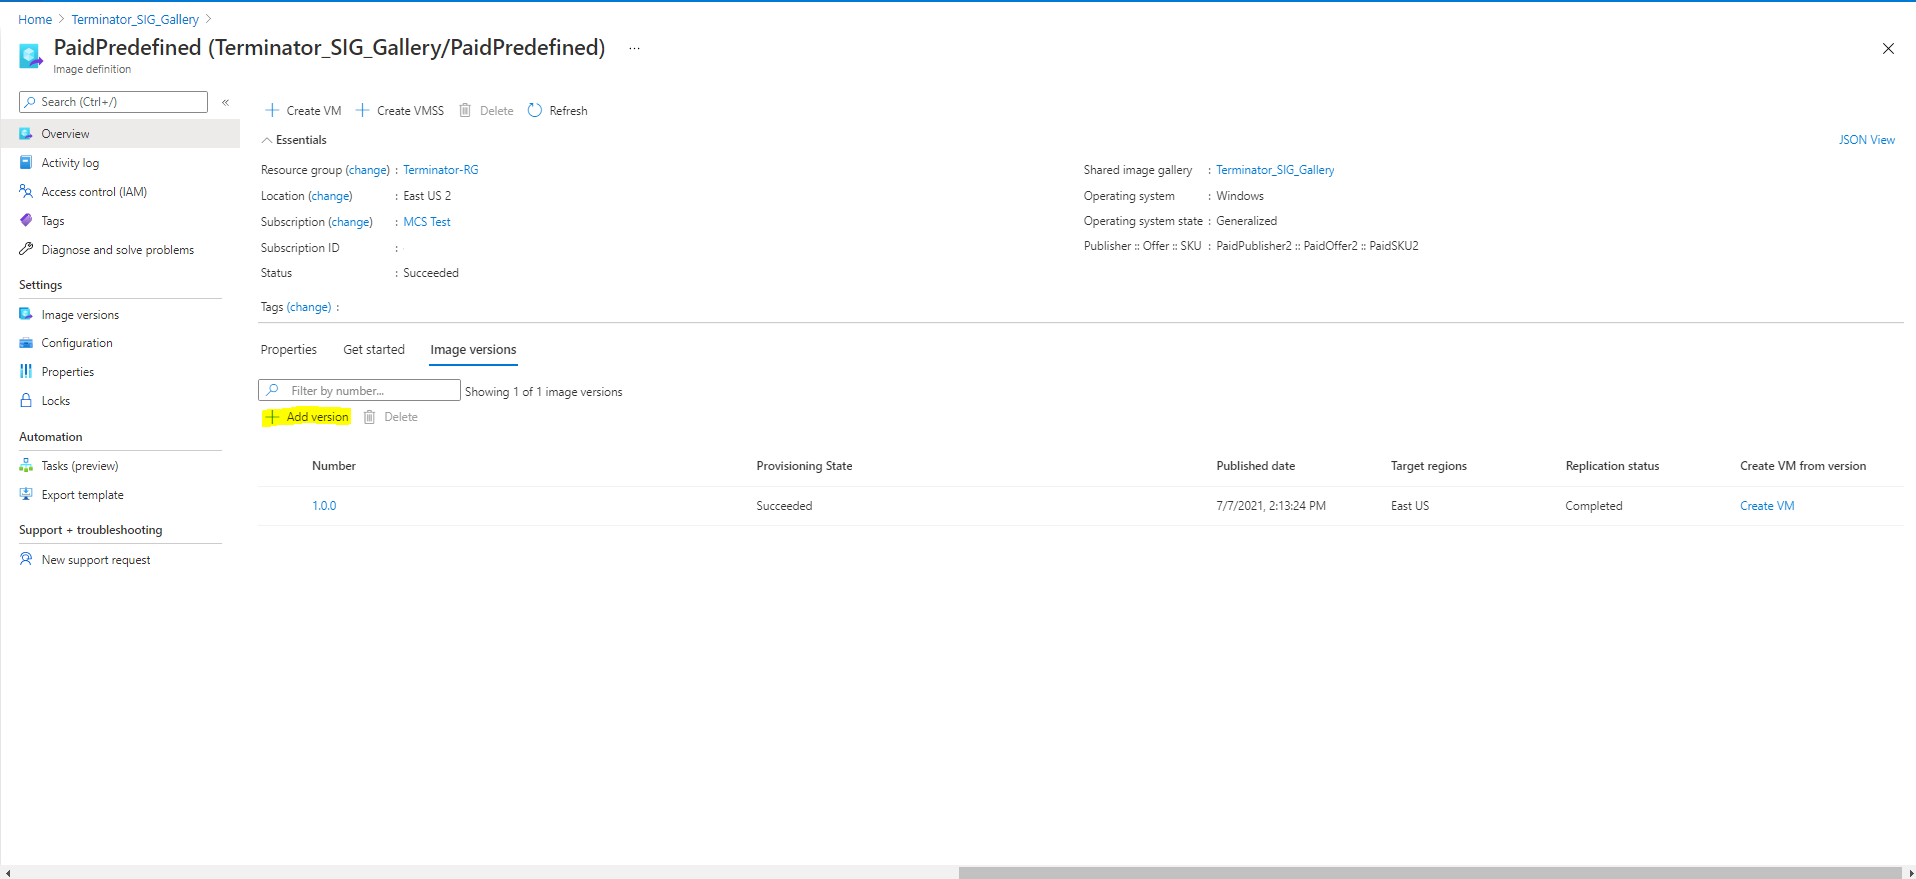
After verifying the purchase plan information, create an image version within the definition. This is used as the master image. Click Add version:
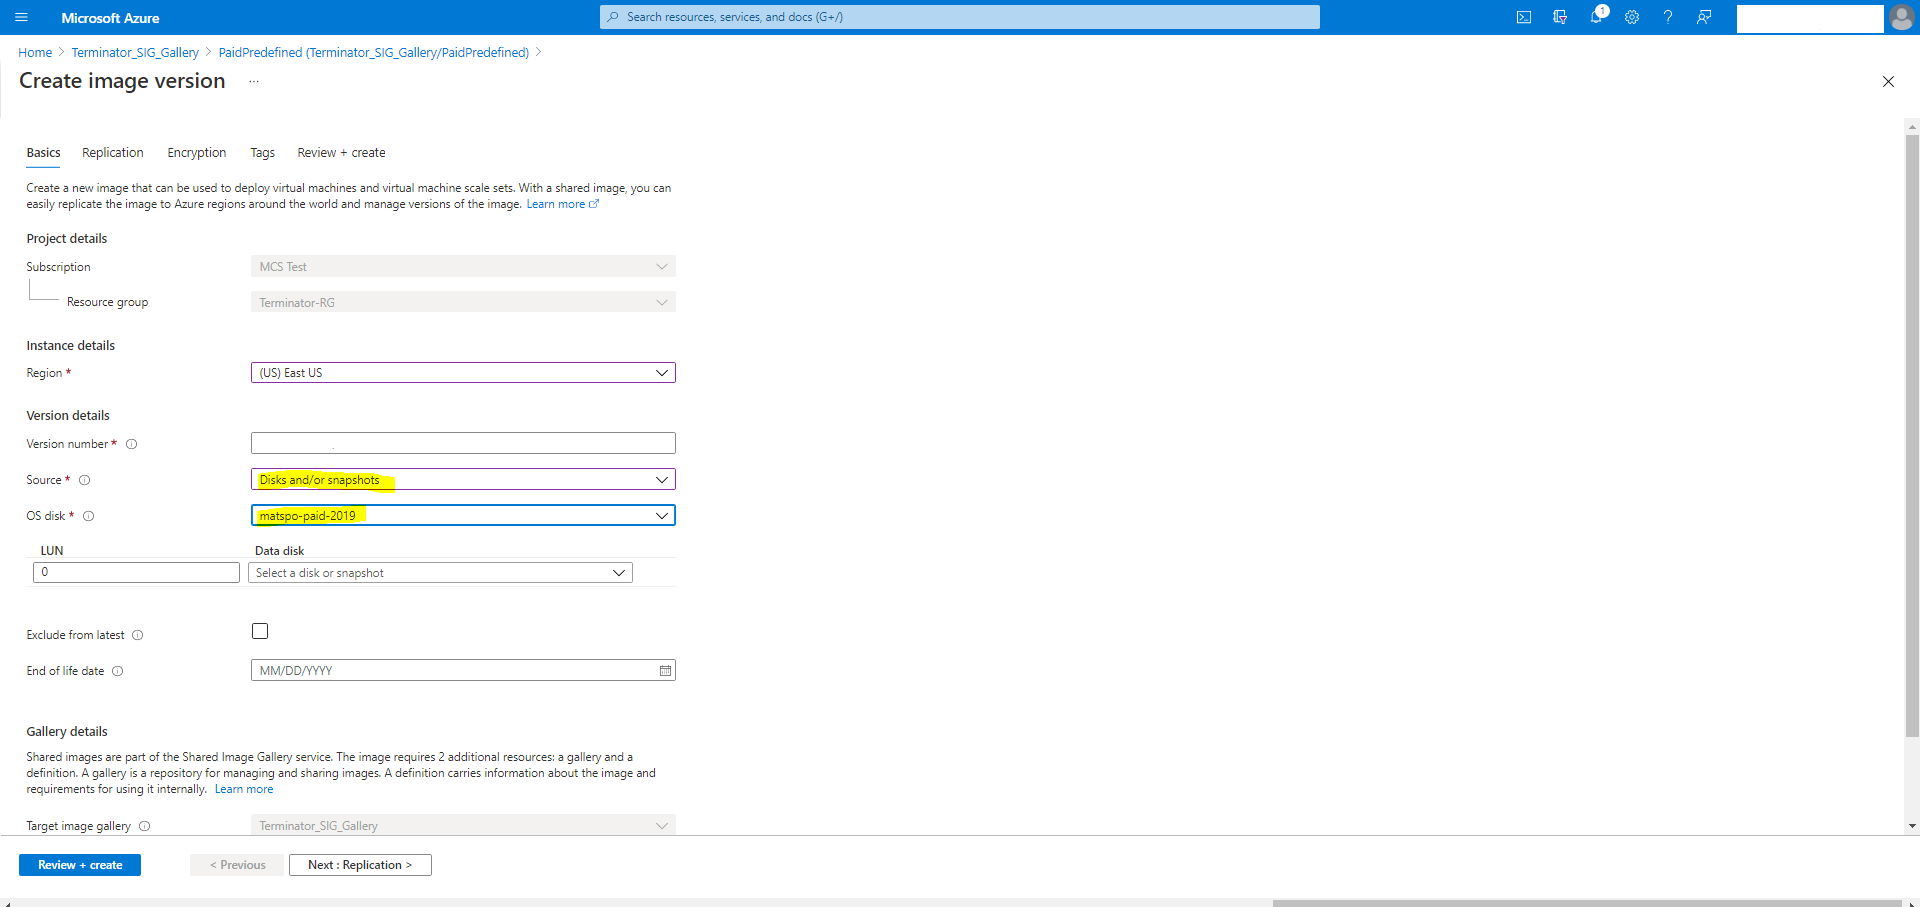
In the Version details section, select the image snapshot or managed disk as the source:
Create a catalog of on-demand capacity reservation VMs
On-demand capacity reservation enables you to reserve compute capacity in an Azure region or an Availability Zone for any duration of time. For more information on Azure on-demand capacity reservation, see the Microsoft documentation On-demand Capacity Reservation.
You can create an MCS machine catalog of Azure VMs with on-demand capacity reservation using a machine profile (VM or template spec). You can also update an existing machine catalog and existing VMs to have or remove on-demand capacity reservation.
This feature is applicable to persistent and non-persistent machine catalogs.
Limitations
This feature is not applicable to:
- Spot VMs
- Host group
- Hibernation enabled VMs
For more information on limitations, see the Microsoft documentation Limitations and restrictions.
Steps to create a catalog of on-demand capacity reservation VMs
- Create a machine profile source (VM or ARM template spec). For creating a VM or an ARM template spec, see Associate a VM to a Capacity Reservation group.
-
Run the following PowerShell command to check if a machine profile has on-demand capacity reservation enabled or not. If the machine profile is enabled with on-demand capacity reservation, then you get the
capacityReservationGroup id.For example,
If the machine profile source is a VM, run the following command:
(Get-Item "XDHyp:\HostingUnits\azure-res-conn2\machineprofile.folder\fifthcolumn.resourcegroup\demand-capacity.vm").AdditionalData
<!--NeedCopy-->
If the machine profile source is a template spec, run the following command:
(Get-Item "XDHyp:\HostingUnits\azure-res-conn2\machineprofile.folder\fifthcolumn.resourcegroup\fc-aeh-templatespec.templatespec\14.0.0-capacity-reservation.templatespecversion").AdditionalData <!--NeedCopy--> - Create a machine catalog using a machine profile using Web Studio or PowerShell commands.
You can update a catalog using the Set-ProvScheme command. You can also update existing VMs using the PowerShell command Set-ProvVmUpdateTimeWindow. The machine profile is updated on the next power on.
Nested virtualization
If you configure the master VM with nested virtualization enabled, then all VMs in the MCS machine catalog created using that master VM, have nested virtualization enabled. This feature is applicable to both persistent and non-persistent VMs. You can update an existing MCS machine catalog and existing VMs to have nested virtualization through image update.
Currently, only Dv3 and Ev3 VM sizes support nested virtualization.
For information on nested virtualization, see the Microsoft blog Nested Virtualization in Azure.
NVMe-only SKUs
Typically, the older generations of general purpose, memory optimized, and compute optimized VMs (D/Ev5 or Fv2 and older) support SCSI. The newer generations (Da/Ea/Fav6 and newer) typically support only the NVMe storage interface. MCS supports the NVMe storage controller type to support the new VM SKUs on Azure.
For information on NVMe, see the Microsoft documentation General FAQ for NVMe.
You can create an MCS catalog using a service offering that:
- supports both SCSI and NVMe, see Create a catalog using a service offering that supports both SCSI and NVMe
- supports only NVMe, see Create a catalog using a service offering that supports only NVMe
Limitations
- All service offerings that support NVMe do not support Trusted Launch at the same time.
- NVMe isn’t supported for Gen 1 VMs.
- Some OS images might not support NVMe. In that case, the NVMe option is grayed out on the Azure UI.
Create a catalog using a service offering that supports both SCSI and NVMe
-
Create a VM to be used as a master image.
- Use a marketplace image that supports NVMe. A list of Azure Marketplace images that support NVMe can be found at Supported OS images for remote NVMe.
-
Take a snapshot of the OS Disk of the VM to use in the
MasterImageVMparameter of theNew-ProvSchemecommand or use the managed disk directly.Check whether your master image supports NVMe or not using one of the following ways:
-
Check the
SupportedDiskControllerTypesin theAdditionalDatafield ofGet-Item. For example:(get-item XDHyp:\HostingUnits\mynetwork\image.folder\abc.resourcegroup\deg-snapshot).AdditionalData <!--NeedCopy-->The
SupportedDiskControllerTypesmust beSCSI, NVMe. -
Use Azure CLI and PowerShell
-
- Use a service offering that supports both NVMe and SCSI.
- Use a VM or template spec as a machine profile that has NVMe enabled. Take any VM that has
DiskControllerTypeset to NVMe. Use the VM directly as a machine profile or export template and use the template spec as a machine profile.
Create a catalog using a service offering that supports only NVMe
- Create a VM to be used as a master image. Use a marketplace image that supports NVMe. A list of Azure Marketplace images that support NVMe can be found at Supported OS images for remote NVMe.
-
Use a service offering that supports only NVMe.
Note:
As the service offering supports NVMe, you do not need a machine profile with
DiskControllerTypeset toNVMeto enable NVMe on the catalog. However, if you use a machine profile, it must have theDiskControllerTypeeither set toNVMeor must have it blank or not specified.
Modify existing persistent VMs
NVMe configuration cannot be changed on a VM once it is created. The way to change NVMe configuration for a persistent VM is to redeploy the VM. The logic to do this is:
- Save the current state of the VM.
-
After powering on an existing VM, detect whether the VM requires redeployment.
- If the configuration change is from NVMe to NVMe or SCSI to SCSI, redeployment of the VM is not required.
- If the configuration change is from SCSI to NVMe and conversely, redeploy and recreate the VM.
Create a machine catalog using PowerShell
This section details how you can create catalogs using PowerShell:
- Create a catalog with non-persistent write-back cache disk
- Create a catalog with persistent write-back cache disk
- Improve boot performance with MCSIO
- Use template spec in creating or updating a catalog using PowerShell
- Machine catalogs with Trusted Launch
- Use machine profile property values
- Create a machine catalog with customer-managed encryption key
- Create a machine catalog with double encryption
- Create a catalog with an Azure ephemeral disks
- Azure dedicated hosts
- Create or update a machine catalog using an Azure Compute Gallery image
- Configure Shared Image Gallery
- Provision machines into specified Availability Zones
- Storage types
- Create a catalog using Azure Spot VMs
- Configure backup VM sizes
- Copy tags on all resources
- Provision catalog VMs with Azure Monitor Agent installed
Create a catalog with non-persistent write-back cache disk
To configure a catalog with non-persistent write-back cache disk, use the PowerShell parameter New-ProvScheme CustomProperties. The custom property UseTempDiskForWBC indicates whether you are accepting to use the Azure temporary storage to store the write-back cache file. This must be configured to true when running New-ProvScheme if you want to use the temporary disk as write-back cache disk. If this property is not specified, the parameter is set to False by default.
For example, using the CustomProperties parameter to set UseTempDiskForWBC to true:
-CustomProperties '<CustomProperties xmlns=" http://schemas.citrix.com/2014/xd/machinecreation" xmlns:xsi=" http://www.w3.org/2001/XMLSchema-instance"> `
<Property xsi:type="StringProperty" Name="PersistWBC" Value="false"/> `
<Property xsi:type="StringProperty" Name="PersistOsDisk" Value="false"/> `
<Property xsi:type="StringProperty" Name="PersistVm" Value="false"/> `
<Property xsi:type="StringProperty" Name="StorageAccountType" Value="Premium_LRS"/> `
<Property xsi:type="StringProperty" Name="WBCDiskStorageType" Value="Premium_LRS"/> `
<Property xsi:type="StringProperty" Name="LicenseType" Value="Windows_Client"/> `
<Property xsi:type="StringProperty" Name="UseTempDiskForWBC" Value="true"/> `
</CustomProperties>'
<!--NeedCopy-->
Note:
After you commit the machine catalog to use Azure local temporary storage for write-back cache file, it cannot be changed to use VHD later.
Create a catalog with persistent write-back cache disk
To configure a catalog with persistent write-back cache disk, use the PowerShell parameter New-ProvScheme CustomProperties. This parameter supports an extra property, PersistWBC, used to determine how the write-back cache disk persists for MCS provisioned machines. The PersistWBC property is only used when the UseWriteBackCache parameter is specified, and when the WriteBackCacheDiskSize parameter is set to indicate that a disk is created.
Examples of properties found in the CustomProperties parameter before supporting PersistWBC include:
<CustomProperties xmlns="http://schemas.citrix.com/2014/xd/machinecreation" xmlns:xsi="http://www.w3.org/2001/XMLSchema-instance">
<Property xsi:type="StringProperty" Name="UseManagedDisks" Value="true" />
<Property xsi:type="StringProperty" Name="StorageAccountType" Value="Premium_LRS" />
<Property xsi:type="StringProperty" Name="ResourceGroups" Value="benvaldev5RG3" />
</CustomProperties>
<!--NeedCopy-->
When using these properties, consider that they contain default values if the properties are omitted from the CustomProperties parameter. The PersistWBC property has two possible values: true or false.
Setting the PersistWBC property to true does not delete the write-back cache disk when the Citrix Virtual Apps and Desktops administrator shuts down the machine using Web Studio.
Setting the PersistWBC property to false deletes the write-back cache disk when the Citrix Virtual Apps and Desktops administrator shuts down the machine using Web Studio.
Note:
If the
PersistWBCproperty is omitted, the property defaults to false and the write-back cache is deleted when the machine is shutdown using Web Studio.
For example, using the CustomProperties parameter to set PersistWBC to true:
<CustomProperties xmlns="http://schemas.citrix.com/2014/xd/machinecreation" xmlns:xsi="http://www.w3.org/2001/XMLSchema-instance">
<Property xsi:type="StringProperty" Name="UseManagedDisks" Value="true" />
<Property xsi:type="StringProperty" Name="StorageAccountType" Value="Premium_LRS" />
<Property xsi:type="StringProperty" Name="ResourceGroups" Value="benvaldev5RG3" />
<Property xsi:type="StringProperty" Name="PersistWBC" Value="true" />
</CustomProperties>
<!--NeedCopy-->
Important:
The
PersistWBCproperty can only be set using theNew-ProvSchemePowerShell cmdlet. Attempting to alter theCustomPropertiesof a provisioning scheme after creation has no impact on the machine catalog and the persistence of the write-back cache disk when a machine is shut down.
For example, set New-ProvSchemeto use the write-back cache while setting the PersistWBC property to true:
New-ProvScheme
-CleanOnBoot
-CustomProperties "<CustomProperties xmlns=`"http://schemas.citrix.com/2014/xd/machinecreation`" xmlns:xsi=`"http://www.w3.org/2001/XMLSchema-instance`"><Property xsi:type=`"StringProperty`" Name=`"UseManagedDisks`" Value=`"true`" /><Property xsi:type=`"StringProperty`" Name=`"StorageAccountType`" Value=`"Premium_LRS`" /><Property xsi:type=`"StringProperty`" Name=`"ResourceGroups`" Value=`"benvaldev5RG3`" /><Property xsi:type=`"StringProperty`" Name=`"PersistWBC`" Value=`"true`" /></CustomProperties>"
-HostingUnitName "adSubnetScale1"
-IdentityPoolName "BV-WBC1-CAT1"
-MasterImageVM "XDHyp:\HostingUnits\adSubnetScale1\image.folder\GoldImages.resourcegroup\W10MCSIO-01_OsDisk_1_a940e6f5bab349019d57ccef65d2c7e3.manageddisk"
-NetworkMapping @{"0"="XDHyp:\HostingUnits\adSubnetScale1\\virtualprivatecloud.folder\CloudScale02.resourcegroup\adVNET.virtualprivatecloud\adSubnetScale1.network"}
-ProvisioningSchemeName "BV-WBC1-CAT1"
-ServiceOffering "XDHyp:\HostingUnits\adSubnetScale1\serviceoffering.folder\Standard_D2s_v3.serviceoffering"
-UseWriteBackCache
-WriteBackCacheDiskSize 127
-WriteBackCacheMemorySize 256
<!--NeedCopy-->
Improve boot performance with MCSIO
You can improve boot performance for Azure and GCP managed disks when MCSIO is enabled. Use the PowerShell PersistOSDisk custom property in the New-ProvScheme command to configure this feature. Options associated with New-ProvScheme include:
<CustomProperties xmlns="http://schemas.citrix.com/2014/xd/machinecreation" xmlns:xsi="http://www.w3.org/2001/XMLSchema-instance">
<Property xsi:type="StringProperty" Name="UseManagedDisks" Value="true" />
<Property xsi:type="StringProperty" Name="StorageAccountType" Value="Premium_LRS" />
<Property xsi:type="StringProperty" Name="Resource <!--NeedCopy-->
``````<!--NeedCopy-->
<!--NeedCopy-->
````````Groups" Value="benvaldev5RG3" />
<Property xsi:type="StringProperty" Name="PersistOsDisk" Value="true" />
</CustomProperties>
<!--NeedCopy-->
To enable this feature, set the PersistOSDisk custom property to true. For example:
New-ProvScheme
-CleanOnBoot
-CustomProperties "<CustomProperties xmlns=`"http://schemas.citrix.com/2014/xd/machinecreation`" xmlns:xsi=`"http://www.w3.org/2001/XMLSchema-instance`"><Property xsi:type=`"StringProperty`" Name=`"UseManagedDisks`" Value=`"true`" /><Property xsi:type=`"StringProperty`" Name=`"StorageAccountType`" Value=`"Premium_LRS`" /><Property xsi:type=`"StringProperty`" Name=`"ResourceGroups`" Value=`"benvaldev5RG3`" /><Property xsi:type=`"StringProperty`" Name=`"PersistOsDisk`" Value=`"true`" /></CustomProperties>"
-HostingUnitName "adSubnetScale1"
-IdentityPoolName "BV-WBC1-CAT1"
-MasterImageVM "XDHyp:\HostingUnits\adSubnetScale1\image.folder\GoldImages.resourcegroup\W10MCSIO-01_OsDisk_1_a940e6f5bab349019d57ccef65d2c7e3.manageddisk"
-NetworkMapping @{"0"="XDHyp:\HostingUnits\adSubnetScale1\\virtualprivatecloud.folder\CloudScale02.resourcegroup\adVNET.virtualprivatecloud\adSubnetScale1.network"}
-ProvisioningSchemeName "BV-WBC1-CAT1"
-ServiceOffering "XDHyp:\HostingUnits\adSubnetScale1\serviceoffering.folder\Standard_D2s_v3.serviceoffering"
-UseWriteBackCache
-WriteBackCacheDiskSize 127
-WriteBackCacheMemorySize 256
<!--NeedCopy-->
Use template spec in creating or updating a catalog using PowerShell
You can create or update an MCS machine catalog using a template spec as a machine profile input. To do this, you can use the Web Studio or PowerShell commands.
For Web Studio, see Create a machine catalog using an Azure Resource Manager image in Web Studio
Using PowerShell commands:
- Open the PowerShell window.
- Run
asnp citrix*. - Create or update a catalog.
- To create a catalog:
-
Use the
New-ProvSchemecommand with a template spec as a machine profile input. For example:New-ProvScheme -MasterImageVM "XDHyp:/HostingUnits/azure/image.folder/fgthj.resourcegroup/nab-ws-vda_OsDisk_1_xxxxxxxxxxa.manageddisk" MachineProfile "XDHyp:/HostingUnits/azure/machineprofile.folder/fgthj.resourcegroup/test.templatespec/V1.templatespecversion" -ProvisioningSchemeName <String> -HostingUnitName <String> -IdentityPoolName <String> [-ServiceOffering <String>][-CustomProperties <String> [-LoggingId <Guid>] [-BearerToken <String>][-AdminAddress <String>] [<CommonParameters>] <!--NeedCopy--> -
Finish creating the catalog.
-
-
To update a catalog, use
Set-ProvSchemecommand with a template spec as a machine profile input. For example:Set-ProvScheme -MasterImageVm 'XDHyp://Connections/Azure/East Us.region/vm.folder/MasterDisk.vm' MachineProfile 'XDHyp:/HostingUnits/azure/machineprofile.folder/fgthj.resourcegroup/testing.templatespec/V1.templatespecversion' [-ProvisioningSchemeName] <String> [-CustomProperties <String>][-ServiceOffering <String>] [-PassThru] [-LoggingId <Guid>] [-BearerToken <String>][-AdminAddress <String>] [<CommonParameters>] <!--NeedCopy-->
- To create a catalog:
Machine catalogs with Trusted Launch
To successfully create a machine catalog with Trusted Launch, use:
- A master image enabled with Trusted Launch. You must use a machine profile, however, it is not necessary for the machine profile to be Trusted Launch enabled. If you use a master image enabled with Trusted Launch and a machine profile not enabled with Trusted Launch, you get a warning message because of the mismatched Trusted Launch configuration between master image and machine profile.
- A VM size that supports Trusted Launch
- A Windows VM version that supports Trusted Launch. Currently, Windows 10, Windows 11, Windows Server 2016, 2019, and 2022 support Trusted Launch.
To view the Citrix Virtual Apps and Desktops offering inventory items, and to determine whether the VM size supports Trusted Launch, run the following command:
- Open a PowerShell window.
- Run asnp citrix* to load the Citrix-specific PowerShell modules.
-
Run the following command:
$s = (ls XDHyp:\HostingUnits\<name of hosting unit>\serviceoffering.folder\"<VM size>.serviceoffering) <!--NeedCopy--> - Run
$s | select -ExpandProperty Additionaldata -
Check the value of the
SupportsTrustedLaunchattribute.- If
SupportsTrustedLaunchis True, the VM size supports Trusted Launch. - If
SupportsTrustedLaunchis False, the VM size does not support Trusted Launch.
- If
As per Azure’s PowerShell, you can use the following command to determine the VM sizes that support Trusted Launch:
(Get-AzComputeResourceSku | where {$_.Locations.Contains($region) -and ($_.Name -eq "<VM size>") })[0].Capabilities
<!--NeedCopy-->
Following are the examples that describe whether the VM size supports Trusted Launch after you run the Azure PowerShell command.
-
Example 1: If the Azure VM supports only Generation 1, that VM does not support Trusted Launch. Therefore, the
TrustedLaunchDisabledcapability is not displayed after you run the Azure PowerShell command. -
Example 2: If the Azure VM supports only Generation 2 and the
TrustedLaunchDisabledcapability is True, the Generation 2 VM size is not supported for Trusted Launch. -
Example 3: If the Azure VM supports only Generation 2 and the
TrustedLaunchDisabledcapability is not displayed after you run the PowerShell command, the Generation 2 VM size is supported for Trusted Launch.
For more information on Trusted Launch for Azure virtual machines, see the Microsoft document Trusted Launch for Azure virtual machines.
Create a machine catalog with Trusted Launch
- Create a master image enabled with Trusted Launch. See the Microsoft documentation Trusted Launch VM Images.
- Create a VM or template spec with security type as trusted launch virtual machines. For more information on creating a VM or template spec, see the Microsoft document Deploy a trusted launch VM.
-
Create a machine catalog using the Web Studio or PowerShell commands.
- If you want to use Web Studio, see Create a machine catalog using an Azure Resource Manager image in Web Studio.
-
If you want to use PowerShell commands, use the
New-ProvSchemecommand with the VM or the template spec as a machine profile input. For the complete list of commands to create a catalog, see Creating a catalog.Example of
New-ProvSchemewith VM as machine profile input:New-ProvScheme -CleanOnBoot -HostingUnitName "name" -IdentityPoolName "name" -InitialBatchSizeHint 1 -MasterImageVM "XDHyp:/HostingUnits/azure/image.folder/fgthj.resourcegroup/nab-ws-vda_OsDisk_1_xxxxxxxxxxa.manageddisk" -MachineProfile "XDHyp:\HostingUnits\<adnet>\machineprofile.folder\<def.resourcegroup>\<machine profile vm.vm>" -ProvisioningSchemeName <String> -HostingUnitName <String> -IdentityPoolName <String> [-ServiceOffering <String>][-CustomProperties <String>] [<CommonParameters>] <!--NeedCopy-->Example of
New-ProvSchemewith template spec as machine profile input:New-ProvScheme -CleanOnBoot -HostingUnitName "name" -IdentityPoolName "name" -InitialBatchSizeHint 1 -MasterImageVM "XDHyp:/HostingUnits/azure/image.folder/fgthj.resourcegroup/nab-ws-vda_OsDisk_1_xxxxxxxxxxa.manageddisk" MachineProfile "XDHyp:/HostingUnits/azure/machineprofile.folder/fgthj.resourcegroup/test.templatespec/V1.templatespecversion" -ProvisioningSchemeName <String> -HostingUnitName <String> -IdentityPoolName <String> [-ServiceOffering <String>][-CustomProperties <String>] [<CommonParameters>] <!--NeedCopy-->
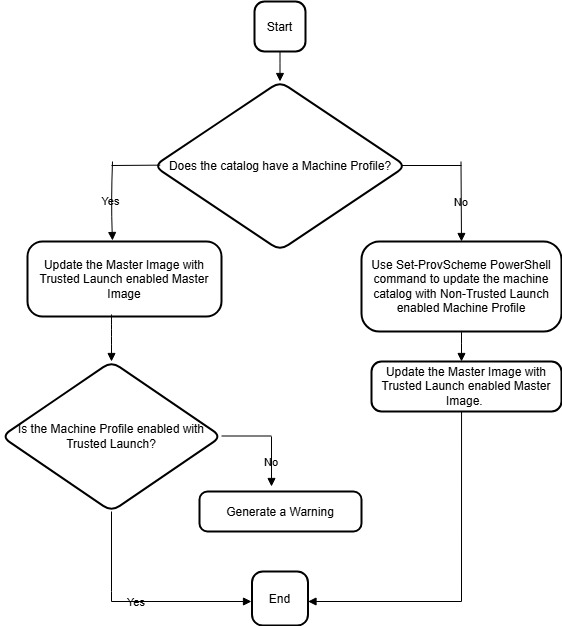
Update a machine catalog with Trusted Launch
You can update both persistent and non-persistent machine catalogs:
For persistent machine catalog:
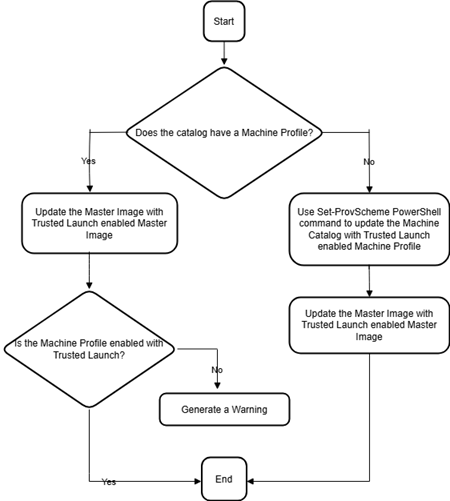
For non-persistent machine catalog:
Errors while creating machine catalogs with Trusted Launch
You get appropriate errors in the following scenarios while creating a machine catalog with Trusted Launch:
| Scenario | Error |
|---|---|
| If you select a machine profile while creating an unmanaged catalog | MachineProfileNotSupportedForUnmanagedCatalog |
| If you do not select a machine profile while creating a managed catalog with a master image source with Trusted Launch as the security type | MachineProfileNotFoundForTrustedLaunchMasterImage |
| If you select a machine profile with a security type different from the security type of the master image | SecurityTypeConflictBetweenMasterImageAndMachineProfile |
| If you select a VM size that does not support Trusted Launch but use a master image that supports Trusted Launch while creating a catalog | MachineSizeNotSupportTrustedLaunch |
Use machine profile property values
The machine catalog uses the following properties that are defined in the custom properties:
- Availability zone
- Dedicated Host Group Id
- Disk Encryption Set Id
- OS type
- License type
- Storage type
If these custom properties are not defined explicitly, then the property values are set from the ARM template spec or VM, whichever is used as the machine profile. In addition, if ServiceOffering is not specified, then it is set from the machine profile.
Note:
If some of the properties are missing from the machine profile and not defined in the custom properties, then the default values of the properties take place wherever applicable.
The following section describes some scenarios at New-ProvScheme and Set-ProvScheme when CustomProperties either have all the properties defined or values are derived from the MachineProfile.
-
New-ProvScheme Scenarios
-
MachineProfile has all the properties and CustomProperties are not defined. Example:
New-ProvScheme -MachineProfile "XDHyp:\HostingUnits\azureunit\machineprofile.folder\azure.resourcegroup\mpA.vm"The following values are set as custom properties for the catalog:
Get-ProvScheme | select CustomProperties <CustomProperties xmlns="http://schemas.citrix.com/2014/xd/machinecreation" xmlns:xsi="http://www.w3.org/2001/XMLSchema-instance"> <Property xsi:type="StringProperty" Name="StorageAccountType" Value="<mpA-value>"/> <Property xsi:type="StringProperty" Name="OSType" Value="<mpA-value>"/> <Property xsi:type="StringProperty" Name="LicenseType" Value="<mpA-value>"/> <Property xsi:type="StringProperty" Name="DiskEncryptionSetId" Value="<mpA-value>"/> <Property xsi:type="StringProperty" Name="DedicatedHostGroupId" Value="<mpA-value>"/> <Property xsi:type="StringProperty" Name="Zones" Value="<mpA-value>"/> </CustomProperties> <!--NeedCopy--> -
MachineProfile has some properties and CustomProperties are not defined. Example: MachineProfile only has LicenseType and OsType.
New-ProvScheme -MachineProfile "XDHyp:\HostingUnits\azureunit\machineprofile.folder\azure.resourcegroup\mpA.vm"The following values are set as custom properties for the catalog:
Get-ProvScheme | select CustomProperties <CustomProperties xmlns="http://schemas.citrix.com/2014/xd/machinecreation" xmlns:xsi="http://www.w3.org/2001/XMLSchema-instance"> <Property xsi:type="StringProperty" Name="OSType" Value="<mpA-value>"/> <Property xsi:type="StringProperty" Name="LicenseType" Value="<mpA-value>"/> </CustomProperties> <!--NeedCopy--> -
Both MachineProfile and CustomProperties define all properties. Example:
New-ProvScheme -MachineProfile "XDHyp:\HostingUnits\azureunit\machineprofile.folder\azure.resourcegroup\mpA.vm" -CustomProperties $CustomPropertiesACustom properties take priority. The following values are set as custom properties for the catalog:
Get-ProvScheme | select CustomProperties <CustomProperties xmlns="http://schemas.citrix.com/2014/xd/machinecreation" xmlns:xsi="http://www.w3.org/2001/XMLSchema-instance"> <Property xsi:type="StringProperty" Name="StorageAccountType" Value="<CustomPropertiesA-value>"/> <Property xsi:type="StringProperty" Name="OSType" Value="<CustomPropertiesA-value>"/> <Property xsi:type="StringProperty" Name="LicenseType" Value="<CustomPropertiesA-value>"/> <Property xsi:type="StringProperty" Name="DiskEncryptionSetId" Value="<CustomPropertiesA-value>"/> <Property xsi:type="StringProperty" Name="DedicatedHostGroupId" Value="<CustomPropertiesA-value>"/> <Property xsi:type="StringProperty" Name="Zones" Value="<CustomPropertiesA-value>"/> </CustomProperties> <!--NeedCopy--> - Some properties are defined in MachineProfile and some properties are defined in CustomProperties. Example:
- CustomProperties define LicenseType and StorageAccountType
- MachineProfile define LicenseType, OsType, and Zones
New-ProvScheme -MachineProfile "XDHyp:\HostingUnits\azureunit\machineprofile.folder\azure.resourcegroup\mpA.vm" -CustomProperties $CustomPropertiesAThe following values are set as custom properties for the catalog:
Get-ProvScheme | select CustomProperties <CustomProperties xmlns="http://schemas.citrix.com/2014/xd/machinecreation" xmlns:xsi="http://www.w3.org/2001/XMLSchema-instance"> <Property xsi:type="StringProperty" Name="StorageAccountType" Value="<CustomPropertiesA-value>"/> <Property xsi:type="StringProperty" Name="OSType" Value="<mpA-value>"/> <Property xsi:type="StringProperty" Name="LicenseType" Value="<CustomPropertiesA-value>"/> <Property xsi:type="StringProperty" Name="Zones" Value="<mpA-value>"/> </CustomProperties> <!--NeedCopy--> -
Some properties are defined in MachineProfile and some properties are defined in CustomProperties. In addition, ServiceOffering is not defined. Example:
- CustomProperties define StorageType
- MachineProfile define LicenseType
 New-ProvScheme -MachineProfile "XDHyp:\HostingUnits\azureunit\machineprofile.folder\azure.resourcegroup\mp.vm"
 -ServiceOffering "XDHyp:\HostingUnits\azureunit\serviceoffering.folder\<explicit-machine-size>.serviceoffering"
 <!--NeedCopy-->
The following values are set as custom properties for the catalog:
Get-ProvScheme | select ServiceOffering serviceoffering.folder\<explicit-machine-size>.serviceoffering Get-ProvScheme | select CustomProperties <CustomProperties xmlns="http://schemas.citrix.com/2014/xd/machinecreation" xmlns:xsi="http://www.w3.org/2001/XMLSchema-instance"> <Property xsi:type="StringProperty" Name="StorageAccountType" Value="explicit-storage-type"/> <Property xsi:type="StringProperty" Name="LicenseType" Value="value-from-machineprofile"/> </CustomProperties> <!--NeedCopy--> - If the OsType is in neither in the CustomProperties nor in the MachineProfile, then:
- The value is read from the master image.
- If the master image is an unmanaged disk, the OsType is set to Windows. Example:
New-ProvScheme -MachineProfile "XDHyp:\HostingUnits\azureunit\machineprofile.folder\azure.resourcegroup\mpA.vm" -MasterImageVM "XDHyp:\HostingUnits\azureunit\image.folder\linux-master-image.manageddisk"The value from the master image is written to the custom properties, in this case Linux.
 Get-ProvScheme | select CustomProperties
 <CustomProperties xmlns="http://schemas.citrix.com/2014/xd/machinecreation" xmlns:xsi="http://www.w3.org/2001/XMLSchema-instance">
 <Property xsi:type="StringProperty" Name="OSType" Value="Linux"/>
 </CustomProperties>
 <!--NeedCopy-->
-
-
Set-ProvScheme Scenarios
-
An existing catalog with:
- CustomProperties for
StorageAccountTypeand OsType - MachineProfile
mpA.vmthat defines zones
- CustomProperties for
-
Updates:
- MachineProfile mpB.vm that defines StorageAccountType
- A new set of custom properties $CustomPropertiesB that defines LicenseType and OsType
Set-ProvScheme -MachineProfile "XDHyp:\HostingUnits\azureunit\machineprofile.folder\azure.resourcegroup\mpB.vm" -CustomProperties $CustomPropertiesBThe following values are set as custom properties for the catalog:
Get-ProvScheme | select CustomProperties <CustomProperties xmlns="http://schemas.citrix.com/2014/xd/machinecreation" xmlns:xsi="http://www.w3.org/2001/XMLSchema-instance"> <Property xsi:type="StringProperty" Name="StorageAccountType" Value="<mpB-value>"/> <Property xsi:type="StringProperty" Name="OSType" Value="<CustomPropertiesB-value>"/> <Property xsi:type="StringProperty" Name="LicenseType" Value="<CustomPropertiesB-value>"/> </CustomProperties> <!--NeedCopy--> - An existing catalog with:
- CustomProperties for S
torageAccountTypeand OsType - MachineProfile
mpA.vmthat defines StorageAccountType and LicenseType
- CustomProperties for S
- Updates:
- A new set of custom properties $CustomPropertiesB that defines StorageAccountType and OsType.
Set-ProvScheme -CustomProperties $CustomPropertiesBThe following values are set as custom properties for the catalog:
Get-ProvScheme | select CustomProperties <CustomProperties xmlns="http://schemas.citrix.com/2014/xd/machinecreation" xmlns:xsi="http://www.w3.org/2001/XMLSchema-instance"> <Property xsi:type="StringProperty" Name="StorageAccountType" Value="<CustomPropertiesB-value>"/> <Property xsi:type="StringProperty" Name="OSType" Value="<CustomPropertiesB-value>"/> <Property xsi:type="StringProperty" Name="LicenseType" Value="<mp-A-value>"/> </CustomProperties> <!--NeedCopy--> - An existing catalog with:
- CustomProperties for
StorageAccountTypeand OsType - MachineProfile
mpA.vmthat defines Zones
- CustomProperties for
- Updates:
- A MachineProfile mpB.vm that defines StorageAccountType and LicenseType
-
ServiceOfferingis not specified
Set-ProvScheme -MachineProfile "XDHyp:\HostingUnits\azureunit\machineprofile.folder\azure.resourcegroup\mpB.vm"The following values are set as custom properties for the catalog:
 Get-ProvScheme | select ServiceOffering
 serviceoffering.folder\<value-from-machineprofile>.serviceoffering

 Get-ProvScheme | select CustomProperties
 <CustomProperties xmlns="http://schemas.citrix.com/2014/xd/machinecreation" xmlns:xsi="http://www.w3.org/2001/XMLSchema-instance">
 <Property xsi:type="StringProperty" Name="StorageAccountType" Value="<mpB-value>"/>
 <Property xsi:type="StringProperty" Name="OSType" Value="<prior-CustomProperties-value>"/>
 <Property xsi:type="StringProperty" Name="LicenseType" Value="<mpB-value>"/>
 </CustomProperties>
 <!--NeedCopy-->
-
Create or update a catalog with multiple NICs per VM
MCS supports multiple NICs per VM. You can associate multiple NICs on a VM to multiple subnets, however, those subnets must be in the same virtual network (VNet). You can use PowerShell command to:
- Create a catalog with multiple NICs on a VM
- Update an existing catalog configuration to have multiple NICs on a VM so that newly created VMs have multiple NICs
- Update an existing VM to have multiple NICs
You can create or update a non-machine profile-based machine catalog and machine profile-based machine catalog to have multiple NICs on a VM. Currently, for a machine profile-based machine catalog, you can only have the same number of NICs as specified in the machine profile source.
Property such as accelerated networking is derived from the machine profile source.
Note:
The VM size must support the same number of NICs and corresponding accelerated networking, otherwise you get an error.
You can retrieve the maximum number of NICs associated with a selected VM size. A PowerShell property called MaxNetworkInterfaces displays the maximum NIC count when you run the PowerShell get-item command with the AdditionalData parameter.
Retrieve the maximum NIC count
To retrieve the maximum NIC count:
- Open a PowerShell window from the Delivery Controller™ host.
- Run
asnp citrix*to load the Citrix-specific PowerShell modules. - Run
Get-ChildItem -Path "XDHyp:\Connections\abc-connection\East US.region\serviceoffering.folder"to list all available VM sizes. - Run
get-item -Path "XDHyp:\Connections\abc-connection\East US.region\serviceoffering.folder\Standard_M416ms_v2.serviceoffering").AdditionalData - Check
MaxNetworkInterfacesto know the maximum NIC count.
Create a catalog with multiple NICs on a VM
To create a catalog with multiple NICs on a VM, do the following:
- Open a PowerShell window from the Delivery Controller host.
- Run
asnp citrix*to load the Citrix-specific PowerShell modules. - Create an identity pool if not already created.
- Create the provisioning scheme:
-
If creating a non-machine profile-based machine catalog, run
New-ProvSchemecommand withNetworkMappingsparameter. You can add multiple subnets to the parameterNetworkMappings. For example:New-Provscheme -NetworkMappings @{"0"="subnetpath1";"1"="subnetpath1"} <!--NeedCopy--> -
If creating a machine profile-based machine catalog:
- Create a VM in Azure to have multiple NICs. For information, see Create and manage a Windows virtual machine that has multiple NICs. You can also create a new VM, and then attach a network interface in the Networking page of Azure portal.
- Run
New-ProvSchemecommand with the VM as a machine profile input.
Note:
When creating a machine profile-based machine catalog, the count of
NetworkMappingsmust be the same as theNetworkInterfaceCountof the machine profile. TheNetworkInterfaceCountcan be retrieved fromAdditionalDataofGet-item -Path "machine profile path".
-
- Finish creating the catalog.
Update a catalog to have multiple NICs on a VM
To update a catalog to have multiple NICs on a VM, do the following:
- Open a PowerShell window from the Delivery Controller host.
- Run
asnp citrix*to load the Citrix-specific PowerShell modules. -
Update the provisioning scheme:
-
If creating a non-machine profile-based machine catalog, run the
Set-ProvSchemecommand withNetworkMappingsparameter. You can add multiple subnets to parameterNetworkMappings. For example:Set-Provscheme -NetworkMappings @{"0"="subnetpath1";"1"="subnetpath1"} <!--NeedCopy--> -
If creating a machine catalog based on a machine profile:
- Create a VM in Azure to have multiple NICs. For information, see Create and manage a Windows virtual machine that has multiple NICs.
- Run
Set-ProvSchemecommand with the VM as a machine profile input.
-
Update an existing VM to have multiple NICs on a VM
You can also update an existing VM using Set-ProvVMUpdateTimeWindow and also perform power cycle on existing VM during the update time window.
Provision catalog VMs with Azure Monitor Agent installed
Azure monitoring is a service which you can use to collect, analyze, and act on telemetry data from your Azure and on-premises environments.
Azure Monitor Agent (AMA) collects monitoring data from compute resources like virtual machines and delivers the data to Azure monitor. It currently supports the collection of Event Logs, Syslog and Performance metrics and sends it to Azure Monitor Metrics and Azure Monitor Logs data sources.
To enable monitoring by uniquely identifying the VMs in monitoring data, you can provision the VMs of an MCS machine catalog with AMA installed as an extension.
Requirements
-
Permissions: Ensure that you have the minimum Azure permissions as specified in Required Azure permissions and the following permissions to use Azure Monitor:
Microsoft.Compute/virtualMachines/extensions/readMicrosoft.Compute/virtualMachines/extensions/writeMicrosoft.Insights/DataCollectionRuleAssociations/ReadMicrosoft.Insights/dataCollectionRuleAssociations/writeMicrosoft.Insights/DataCollectionRules/Read
- Data Collection Rule: Set up a data collection rule in Azure portal. For information about setting up a DCR, see Create a data collection rule. A DCR is platform specific (Windows or Linux). Ensure that you create a DCR as per the required platform. The AMA uses Data Collection Rules (DCR) to manage the mapping between the resources, such as VMs, and data sources, like Azure Monitor Metrics and Azure Monitor Logs.
- Default Workspace: Create a workspace in Azure portal. For information on creating a workspace, see Create a Log Analytics workspace. When you collect logs and data, the information is stored in a workspace. A workspace has a unique workspace ID and resource ID. The workspace name must be unique for a given resource group. After you create a workspace, configure data sources and solutions to store their data in the workspace.
- Whitelisted the monitor extension: The extensions
AzureMonitorWindowsAgentandAzureMonitorLinuxAgentare Citrix defined whitelisted extensions. To view the list of whitelisted extensions, use the PoSH command,Get-ProvMetadataConfiguration. - Master Image: Microsoft recommends removing extensions from an existing machine before creating a new machine from it. If the extensions are not removed, it might lead to leftover files and unexpected behavior. For more information, see If the VM is recreated from an existing VM.
To provision catalog VMs with AMA enabled:
-
Set up a machine profile template.
-
If you want to use a VM as a machine profile template:
- Create a VM on Azure portal.
- Power on the VM.
- Add the VM to the data collection rule under Resources. This invokes agent installation on the template VM.
Note:
If you must create a Linux catalog, set up a Linux machine.
-
If you want to use template spec as a machine profile template:
- Set up a template spec.
-
Add the following extension and data collection rule association to the generated template spec:
{
"type": "Microsoft.Compute/virtualMachines/extensions",
"apiVersion": "2022-03-01",
"name": "<vm-name>/AzureMonitorWindowsAgent",
"dependsOn": [
    "Microsoft.Compute/virtualMachines/<vm-name>"
],
"location": "<azure-region>",
"properties": {
    "publisher": "Microsoft.Azure.Monitor",
    "type": "AzureMonitorWindowsAgent",
    "typeHandlerVersion": "1.0",
    "autoUpgradeMinorVersion": true,
    "enableAutomaticUpgrade": true
}
},
 {
    "type": "Microsoft.Insights/dataCollectionRuleAssociations",
    "apiVersion": "2021-11-01",
    "name": "<associatio-name>",
    "scope": "Microsoft.Compute/virtualMachines/<vm-name>",
    "dependsOn": [
     "Microsoft.Compute/virtualMachines/<vm-name>",
    "Microsoft.Compute/virtualMachines/<vm-name>/extensions/AzureMonitorWindowsAgent"
    ],
    "properties": {
       "description": "Association of data collection rule. Deleting this association will break the data collection for this Arc server.",
     "dataCollectionRuleId": "/subscriptions/<azure-subscription>/resourcegroups/<azure-resource-group>/providers/microsoft.insights/datacollectionrules/<azure-data-collection-rule>"
     }
    }
<!--NeedCopy-->
-
-
Create or update an existing MCS machine catalog.
-
To create a new MCS catalog:
- Select that VM or template spec as a machine profile in the Web Studio.
- Proceed with the next steps to create the catalog.
-
To update an existing MCS catalog, use the following PoSH commands:
-
To have the new VMs get the updated machine profile template, run the following command:
Set-ProvScheme -ProvisioningSchemeName "name" -MachineProfile "XDHyp:\HostingUnits\Unit1\machineprofile.folder\abc.resourcegroup\ab-machine-profile.vm" <!--NeedCopy--> -
To update existing VMs with the updated machine profile template:
 Set-ProvVMUpdateTimeWindow -ProvisioningSchemeName my-catalog -StartsNow -DurationInMinutes -1
 <!--NeedCopy-->
-
-
- Power on catalog VMs.
- Go to Azure portal and check if the monitor extension is installed on the VM and the VM is showing up under DCR’s Resources. After a few minutes monitoring data is displayed on the Azure Monitor.
Troubleshooting
For information in troubleshooting guidance for Azure Monitor Agent, see the following:
- https://learn.microsoft.com/en-us/azure/azure-monitor/agents/azure-monitor-agent-troubleshoot-windows-vm/
- https://learn.microsoft.com/en-us/azure/azure-resource-manager/troubleshooting/create-troubleshooting-template/
Create a machine catalog with customer-managed encryption key
The detailed steps on how to create a machine catalog with customer-managed encryption key are:
- Open a PowerShell window.
- Run
asnp citrix*to load the Citrix-specific PowerShell modules. - Enter
cd xdhyp:/. - Enter
cd .\HostingUnits\(your hosting unit). - Enter
cd diskencryptionset.folder. - Enter
dirto get the list of the Disk Encryption Sets. - Copy the Id of a Disk Encryption Set.
-
Create a custom property string to include the Id of the Disk Encryption Set. For example:
$customProperties = "<CustomProperties xmlns=`"http://schemas.citrix.com/2014/xd/machinecreation`" xmlns:xsi=`"http://www.w3.org/2001/XMLSchema-instance`"> <Property xsi:type=`"StringProperty`" Name=`"StorageAccountType`" Value=`"Standard_LRS`" /> <Property xsi:type=`"StringProperty`" Name=`"persistWBC`" Value=`"False`" /> <Property xsi:type=`"StringProperty`" Name=`"PersistOsDisk`" Value=`"false`" /> <Property xsi:type=`"StringProperty`" Name=`"UseManagedDisks`" Value=`"true`" /> <Property xsi:type=`"StringProperty`" Name=`"DiskEncryptionSetId`" Value=`"/subscriptions/0xxx4xxx-xxb-4bxx-xxxx-xxxxxxxx/resourceGroups/abc/providers/Microsoft.Compute/diskEncryptionSets/abc-des`"/> </CustomProperties> <!--NeedCopy--> -
Create an identity pool if not already created. For example:
New-AcctIdentityPool -IdentityPoolName idPool -NamingScheme ms## -Domain def.local -NamingSchemeType Numeric <!--NeedCopy--> -
Run the New-ProvScheme command: For example:
New-ProvScheme -CleanOnBoot -HostingUnitName "name" -IdentityPoolName "name" -InitialBatchSizeHint 1 -MasterImageVM "XDHyp:\HostingUnits\azure-res2\image.folder\def.resourcegroup\def.snapshot" -NetworkMapping @{"0"="XDHyp:\HostingUnits\azure-res2\\virtualprivatecloud.folder\def.resourcegroup\def-vnet.virtualprivatecloud\subnet1.network"} -ProvisioningSchemeName "name" -ServiceOffering "XDHyp:\HostingUnits\azure-res2\serviceoffering.folder\Standard_DS2_v2.serviceoffering" -MachineProfile "XDHyp:\HostingUnits\<adnet>\machineprofile.folder\<def.resourcegroup>\<machine profile vm.vm>" -CustomProperties $customProperties <!--NeedCopy--> - Finish creating the machine catalog.
Create a machine catalog with double encryption
You can create and update a machine catalog with double encryption using Web Studio and PowerShell commands.
The detailed steps on how to create a machine catalog with double encryption are:
- Create an Azure Key Vault and DES with Platform-managed and customer-managed keys. For information on how to create an Azure Key Vault and a DES, see Use the Azure portal to enable double encryption at rest for managed disks.
- To browse available DiskEncryptionSets in your hosting connection:
- Open a PowerShell window.
- Run the following PowerShell commands:
asnp citrix*cd xdhyp:cd HostingUnits-
cd YourHostingUnitName(ex. azure-east) cd diskencryptionset.folderdir
You can use an Id of the
DiskEncryptionSetto create or update a catalog using custom properties. - If you want to use machine profile workflow, create a VM or template spec as a machine profile input.
- If you want to use a VM as a machine profile input:
- Create a VM in Azure Portal.
- Navigate to Disks>Key management to encrypt the VM directly with any
DiskEncryptionSetID.
- If you want to use a template spec as a machine profile input:
- In the template, under
properties>storageProfile>osDisk>managedDisk, adddiskEncryptionSetparameter and add the id of the double encryption DES.
- In the template, under
- If you want to use a VM as a machine profile input:
- Create the machine catalog.
- If using Web Studio, do one of the following in addition to the steps in Create machine catalogs.
- If you do not use machine profile-based workflow, on the Disk Settings page, select Use the following key to encrypt data on each machine. Then, select your double encryption DES from the drop-down menu. Continue creating the catalog.
- If using machine profile workflow, on the Image page, select a master image and a machine profile. Make sure that the machine profile has a disk encryption set id in its properties.
All machines created in the catalog are double encrypted by the key associated with the DES you selected.
- If using PowerShell commands, do one of the following:
-
If not using machine profile-based workflow, add the custom property
DiskEncryptionSetIdin theNew-ProvSchemecommand. For example:New-ProvScheme -CleanOnBoot -CustomProperties '<CustomProperties xmlns="http://schemas.citrix.com/2014/xd/machinecreation" xmlns:xsi="http://www.w3.org/2001/XMLSchema-instance"> <Property xsi:type="StringProperty" Name="UseManagedDisks" Value="true" /> <Property xsi:type="StringProperty" Name="StorageAccountType" Value="Premium_LRS" /> <Property xsi:type="StringProperty" Name="DiskEncryptionSetId" Value="/subscriptions/12345678-xxxx-1234-1234-123456789012/resourceGroups/Sample-RG/providers/Microsoft.Compute/diskEncryptionSets/SampleEncryptionSet" /> </CustomProperties>' -HostingUnitName "Redacted" -IdentityPoolName "Redacted" -InitialBatchSizeHint 1 -MasterImageVM "Redacted" -NetworkMapping @{"0"="Redacted"} -ProvisioningSchemeName "Redacted" -ServiceOffering "Redacted" <!--NeedCopy--> -
If using machine profile-based workflow, use a machine profile input in the
New-ProvSchemecommand. For example:New-ProvScheme -CleanOnBoot -HostingUnitName azure-east -IdentityPoolName aio-ip -InitialBatchSizeHint 1 -MasterImageVM XDHyp:\HostingUnits\azure-east\image.folder\abc.resourcegroup\fgb-vda-snapshot.snapshot -NetworkMapping @{"0"="XDHyp:\HostingUnits\azure-east\virtualprivatecloud.folder\apa-resourceGroup.resourcegroup\apa-resourceGroup-vnet.virtualprivatecloud\default.network"} -ProvisioningSchemeName aio-test -MachineProfile XDHyp:\HostingUnits\azure-east\machineprofile.folder\abc.resourcegroup\abx-mp.templatespec\1.0.0.templatespecversion <!--NeedCopy-->
-
- If using Web Studio, do one of the following in addition to the steps in Create machine catalogs.
- Finish creating a catalog using remote PowerShell SDK. For information on how to create a catalog using the Remote PowerShell SDK, see https://developer-docs.citrix.com/projects/citrix-virtual-apps-desktops-sdk/en/latest/creating-a-catalog/. All machines created in the catalog are double encrypted by the key associated with the DES you selected.
Convert an unencrypted catalog to use double encryption
You can update a machine catalog’s encryption type (using custom properties or machine profile).
-
If not using machine profile-based workflow, add the custom property DiskEncryptionSetId in the
Set-ProvSchemecommand. For example:Set-ProvScheme -ProvisioningSchemeName "SampleProvSchemeName" -CustomProperties '<CustomProperties xmlns="http://schemas.citrix.com/2014/xd/machinecreation" xmlns:xsi="http://www.w3.org/2001/XMLSchema-instance"> <Property xsi:type="StringProperty" Name="DiskEncryptionSetId" Value="/subscriptions/12345678-xxxx-1234-1234-123456789012/resourceGroups/Sample-RG/providers/Microsoft.Compute/diskEncryptionSets/SampleEncryptionSet" /> </CustomProperties>' <!--NeedCopy--> -
If using machine profile-based workflow, use a machine profile input in the
Set-ProvSchemecommand. For example:Set-ProvScheme -ProvisioningSchemeName mxiao-test -MachineProfile XDHyp:\HostingUnits\azure-east\machineprofile.folder\aelx.resourcegroup\elx-mp.templatespec\1.0.0.templatespecversion <!--NeedCopy-->
Once successful, all new VMs that you add in your catalog are double encrypted by the key associated with the DES you selected.
Verify the catalog is double encrypted
-
In the Web Studio:
- Navigate to Machine Catalogs.
- Select the catalog you want to verify. Click the Template Properties tab located near the bottom of the screen.
- Under Azure Details, verify the Disk Encryption Set ID in Disk Encryption Set. If the catalog’s DES Id is blank, the catalog is not encrypted.
- In the Azure Portal, verify that the encryption type of the DES associated with the DES Id is platform-managed and customer-managed keys.
-
Using PowerShell command:
- Open the PowerShell window.
- Run
asnp citrix*to load the Citrix-specific PowerShell modules. -
Use
Get-ProvSchemeto get the information of your machine catalog. For example:Get-ProvScheme -ProvisioningSchemeName "SampleProvSchemeName" <!--NeedCopy--> -
Retrieve the DES Id custom property of the machine catalog. For example:
<Property xsi:type="StringProperty" Name="DiskEncryptionSetId" Value="/subscriptions/12345678-1234-1234-1234-123456789012/resourceGroups/Sample-RG/providers/Microsoft.Compute/diskEncryptionSets/SampleEncryptionSet" /> <!--NeedCopy--> - In the Azure Portal, verify that the encryption type of the DES associated with the DES Id is platform-managed and customer-managed keys.
Create a catalog with an Azure ephemeral disks
To use ephemeral disks, you must set the custom property UseEphemeralOsDisk to true when running New-ProvScheme.
Note:
If the custom property
UseEphemeralOsDiskis set to false or a value is not specified all provisioned VDAs continue to use a provisioned OS disk.
The following is an example set of custom properties to use in the provisioning scheme:
"CustomProperties": [
            {
                "Name": "UseManagedDisks",
                "Value": "true"
            },
            {
                "Name": "StorageType",
                "Value": "Standard_LRS"
            },
            {
                "Name": "UseSharedImageGallery",
                "Value": "true"
            },
            {
                "Name": "SharedImageGalleryReplicaRatio",
                "Value": "40"
            },
            {
                "Name": "SharedImageGalleryReplicaMaximum",
                "Value": "10"
            },
            {
                "Name": "LicenseType",
                "Value": "Windows_Server"
            },
            {
                "Name": "UseEphemeralOsDisk",
                "Value": "true"
            }
        ],
<!--NeedCopy-->
Configure an ephemeral disk for a catalog
To configure an Azure ephemeral OS disk for a catalog, use the UseEphemeralOsDisk parameter in Set-ProvScheme. Set the value of the UseEphemeralOsDisk parameter to true.
Note:
To use this feature, you must also enable the parameters
UseManagedDisksandUseSharedImageGallery.
For example:
Set-ProvScheme -ProvisioningSchemeName catalog-name -CustomProperties <CustomProperties xmlns="http://schemas.citrix.com/2014/xd/machinecreation" xmlns:xsi="http://www.w3.org/2001/XMLSchema-instance">
<Property xsi:type="StringProperty" Name="UseManagedDisks" Value="true" />
<Property xsi:type="StringProperty" Name="UseSharedImageGallery" Value="true" />
<Property xsi:type="StringProperty" Name="UseEphemeralOsDisk" Value="true" />
</CustomProperties>'
<!--NeedCopy-->
Configure storage type used by ephemeral disks
By default, Standard_LRS is the storage type used by the ephemeral OS disk feature. You can set the storage type to use SSDs instead for increased disk IOPS on read operations by specifying the StorageType custom property. Current supported values are Standard_LRS, StandardSSD_LRS, and Premium_LRS.
StorageType can also be updated on existing ephemeral machines with Set-ProvScheme and Set-ProvVMUpdateTimeWindow.
Important considerations for ephemeral disks
To provision ephemeral OS disks using New-ProvScheme, consider the following constraints:
- The VM size used for the catalog must support ephemeral OS disks.
- The size of the cache or temporary disk associated with the VM size must be greater than or equal to the size of the OS disk.
- The temporary disk size must be greater than the cache disk size.
Also consider these issues when:
- Creating the provisioning scheme.
- Modifying the provisioning scheme.
- Updating the image.
Azure dedicated hosts
You can use MCS to provision VMs on Azure dedicated hosts. Before provisioning VMs on Azure dedicated hosts:
- Create a host group.
- Create hosts in that host group.
- Ensure that there is sufficient host capacity reserved for creating catalogs and virtual machines.
You can create a catalog of machines with host tenancy defined through the following PowerShell script:
New-ProvScheme <otherParameters> -CustomProperties '<CustomProperties xmlns="http://schemas.citrix.com/2014/xd/machinecreation" xmlns:xsi="http://www.w3.org/2001/XMLSchema-instance">
 <Property xsi:type="StringProperty" Name="HostGroupId" Value="myResourceGroup/myHostGroup" />
 ...other Custom Properties...
 </CustomProperties>
<!--NeedCopy-->
When using MCS to provision virtual machines on Azure dedicated hosts, consider:
- A Dedicated host is a catalog property and cannot be changed once the catalog is created. Dedicated tenancy is currently not supported on Azure.
- A pre-configured Azure host group, in the region of the hosting unit, is required when using the
HostGroupIdparameter. - Azure auto-placement is required. This functionality makes a request to onboard the subscription associated with the host group. For more information, see VM Scale Set on Azure Dedicated Hosts - Public Preview. If auto-placement is not enabled, MCS throws an error during catalog creation.
Create or update a machine catalog using an Azure Compute Gallery image
When selecting an image to use for creating a machine catalog, you can select images you created in the Azure Compute Gallery.
For these images to appear, you must:
- Configure a Citrix Virtual Apps and Desktops site.
- Connect to the Azure Resource Manager.
- In the Azure portal, create a resource group. For details, see Create an Azure Compute Gallery using the portal.
- In the resource group, create an Azure Compute Gallery.
- In the Azure Compute Gallery, create an image definition.
- In the image definition, create an image version.
Use the following PowerShell commands to create or update a machine catalog using an image from Azure Compute Gallery:
- Open a PowerShell window.
- Run
asnp citrix*to load the Citrix-specific PowerShell modules. -
Select a resource group, and then list all galleries of that resource group.
Get-ChildItem -LiteralPath @("XDHyp:\HostingUnits\testresource\image.folder\sharedImageGalleryTest.resourcegroup") <!--NeedCopy--> -
Select a gallery, and then list all image definitions of that gallery.
Get-ChildItem -LiteralPath @("XDHyp:\HostingUnits\testresource\image.folder\sharedImageGalleryTest.resourcegroup\sharedImageGallery.sharedimagegallery") <!--NeedCopy--> -
Select one image definition, and then list all image versions of that image definition.
Get-ChildItem -LiteralPath @("XDHyp:\HostingUnits\testresource\image.folder\sharedImageGalleryTest.resourcegroup\sharedImageGallery.sharedimagegallery\sigtestimage.imagedefinition") <!--NeedCopy--> - Create and update an MCS catalog using the following elements:
- Resource group
- Gallery
- Gallery image definition
- Gallery image version
For information on how to create a catalog using the Remote PowerShell SDK, see https://developer-docs.citrix.com/projects/citrix-virtual-apps-desktops-sdk/en/latest/creating-a-catalog/.
Configure Shared Image Gallery
Use the New-ProvScheme command to create a provisioning scheme with Shared Image Gallery support. Use the Set-ProvScheme command to enable or disable this feature for a provisioning scheme and to change the replica ratio and replica maximum values.
Three custom properties were added to provisioning schemes to support the Shared Image Gallery feature:
UseSharedImageGallery
- Defines whether to use the Shared Image Gallery to store the published images. If set to True, the image is stored as a Shared Image Gallery image, otherwise the image is stored as a snapshot.
- Valid values are True and False.
- If the property is not defined, the default value is False.
SharedImageGalleryReplicaRatio
- Defines the ratio of machines to gallery image version replicas.
- Valid values are integer numbers greater than 0.
- If the property is not defined, default values are used. The default value for persistent OS disks is 1000 and the default value for non-persistent OS disks is 40.
SharedImageGalleryReplicaMaximum
- Defines the maximum number of replicas for each gallery image version.
- If the property is not defined, the default value is 100.
- If the property is not defined, the default value is 100.
Tip:
When using Shared Image Gallery to store a published image for MCS provisioned catalogs, MCS sets the gallery image version replica count based on the number of machines in the catalog, the replica ratio, and the replica maximum. The replica count is calculated by dividing the number of machines in the catalog by the replica ratio (rounding up to the nearest integer value) and then capping the value at the maximum replica count. For example, with a replica ratio of 20 and a maximum of 5, 0–20 machines have one replica created, 21–40 have 2 replicas, 41–60 have 3 replicas, 61–80 have 4 replicas, 81+ have 5 replicas.
Use case: Updating the Shared Image Gallery replica ratio and replica max
The existing machine catalog uses Shared Image Gallery. Use the Set-ProvScheme command to update the custom properties for all existing machines in the catalog and any future machines:
Set-ProvScheme -ProvisioningSchemeName catalog-name -CustomProperties '<CustomProperties xmlns="http://schemas.citrix.com/2014/xd/machinecreation" xmlns:xsi="http://www.w3.org/2001/XMLSchema-instance"> <Property xsi:type="StringProperty" Name="StorageType" Value="Standard_LRS"/> <Property xsi:type="StringProperty" Name="UseManagedDisks" Value="True"/> <Property xsi:type="StringProperty" Name="UseSharedImageGallery" Value="True"/> <Property xsi:type="IntProperty" Name="SharedImageGalleryReplicaRatio" Value="30"/> <Property xsi:type="IntProperty" Name="SharedImageGalleryReplicaMaximum" Value="20"/></CustomProperties>'
<!--NeedCopy-->
Use Case: Converting a snapshot catalog to a Shared Image Gallery catalog
For this use case:
- Run
Set-ProvSchemewith theUseSharedImageGalleryflag set to True. Optionally include theSharedImageGalleryReplicaRatioandSharedImageGalleryReplicaMaximumproperties. - Update the catalog.
- Power cycle the machines to force an update.
For example:
Set-ProvScheme -ProvisioningSchemeName catalog-name -CustomProperties '<CustomProperties xmlns="http://schemas.citrix.com/2014/xd/machinecreation" xmlns:xsi="http://www.w3.org/2001/XMLSchema-instance"> <Property xsi:type="StringProperty" Name="StorageType" Value="Standard_LRS"/> <Property xsi:type="StringProperty" Name="UseManagedDisks" Value="True"/> <Property xsi:type="StringProperty" Name="UseSharedImageGallery" Value="True"/> <Property xsi:type="IntProperty" Name="SharedImageGalleryReplicaRatio" Value="30"/> <Property xsi:type="IntProperty" Name="SharedImageGalleryReplicaMaximum" Value="20"/></CustomProperties>'
<!--NeedCopy-->
Tip:
The parameters
SharedImageGalleryReplicaRatioandSharedImageGalleryReplicaMaximumare not required. After theSet-ProvSchemecommand completes the Shared Image Gallery image has not yet been created. Once the catalog is configured to use the gallery, the next catalog update operation stores the published image in the gallery. The catalog update command creates the gallery, the gallery image, and the image version. Power cycling the machines updates them, at which point the replica count is updated, if appropriate. From that time, all existing non-persistent machines are reset using the Shared Image Gallery image and all newly provisioned machines are created using the image. The old snapshot is cleaned up automatically within a few hours.
Use Case: Converting a Shared Image Gallery Catalog to a snapshot catalog
For this use case:
- Run
Set-ProvSchemewith theUseSharedImageGalleryflag set to False or not defined. - Update the catalog.
- Power cycle the machines to force an update.
For example:
Set-ProvScheme -ProvisioningSchemeName catalog-name -CustomProperties '<CustomProperties xmlns="http://schemas.citrix.com/2014/xd/machinecreation" xmlns:xsi="http://www.w3.org/2001/XMLSchema-instance"> <Property xsi:type="StringProperty" Name="StorageType" Value="Standard_LRS"/> <Property xsi:type="StringProperty" Name="UseManagedDisks" Value="True"/> <Property xsi:type="StringProperty" Name="UseSharedImageGallery" Value="False"/></CustomProperties>'
<!--NeedCopy-->
Tip:
Unlike updating from a snapshot to a Shared Image Gallery catalog, the custom data for each machine is not yet updated to reflect the new custom properties. Run the following command to see the original Shared Image Gallery custom properties:
Get-ProvVm -ProvisioningSchemeName catalog-name. After theSet-ProvSchemecommand completes the image snapshot has not yet been created. Once the catalog is configured to not use the gallery, the next catalog update operation stores the published image as a snapshot. From that time, all existing non-persistent machines are reset using the snapshot and all newly provisioned machines are created from the snapshot. Power cycling the machines updates them, at which point the custom machine data is updated to reflect thatUseSharedImageGalleryis set to False. The old Shared Image Gallery assets (gallery, image, and version) are automatically cleaned up within a few hours.
Provision machines into specified Availability Zones
You can provision machines into specific Availability Zones in Azure environments. You can achieve that using the PowerShell.
Note:
- If no zones are specified, MCS lets Azure place the machines within the region. If more than one zone is specified, MCS randomly distributes the machines across them.
- If you select ZRS as Storage redundancy on the Storage and License Types page, then you get a warning suggesting to clear the zone selection and let Azure manage the VM availability zones. You get the warning only if you select a machine profile or host group that has availability zones.
Configure Availability Zones through PowerShell
Using PowerShell, you can view the offering inventory items by using Get-Item. For example, to view the Eastern US region Standard_B1ls service offering:
$serviceOffering = Get-Item -path "XDHyp:\Connections\my-connection-name\East US.region\serviceoffering.folder\Standard_B1ls.serviceoffering"
<!--NeedCopy-->
To view the zones, use the AdditionalData parameter for the item:
$serviceOffering.AdditionalData
If Availability Zones are not specified, there is no change in how machines are provisioned.
To configure Availability Zones through PowerShell, use the Zones custom property available with the New-ProvScheme operation. The Zones property defines a list of Availability Zones to provision machines into. Those zones can include one or more Availability Zones. For example, <Property xsi:type="StringProperty" Name="Zones" Value="1, 3"/> for Zones 1 and 3.
Use the Set-ProvScheme command to update the zones for a provisioning scheme.
If an invalid zone is provided, the provisioning scheme is not updated, and an error message appears providing instructions on how to fix the invalid command.
Tip:
If you specify an invalid custom property, the provisioning scheme is not updated and a relevant error message appears.
Storage types
Select different storage types for virtual machines in Azure environments that use MCS. For target VMs, MCS supports:
- OS disk: premium SSD, SSD, or HDD
- Write back cache disk: premium SSD, SSD, or HDD
When using these storage types, consider the following:
- Ensure that your VM supports the selected storage type.
- If your configuration uses an Azure ephemeral disk, you do not get the option for write-back cache disk setting.
Tip:
StorageTypeis configured for an OS type and storage account.WBCDiskStorageTypeis configured for write-back cache storage type. For a normal catalog,StorageTypeis required. IfWBCDiskStorageTypeis not configured, theStorageTypeis used as the default forWBCDiskStorageType.
If WBCDiskStorageType is not configured, then StorageType is used as the default for WBCDiskStorageType
Configure storage types
To configure storage types for VM, use the StorageType parameter in New-ProvScheme. Set the value of the StorageType parameter to one of the supported storage types.
The following is an example set of the CustomProperties parameter in a provisioning scheme:
Set-ProvScheme -ProvisioningSchemeName catalog-name -CustomProperties '<CustomProperties xmlns="http://schemas.citrix.com/2014/xd/machinecreation" xmlns:xsi="http://www.w3.org/2001/XMLSchema-instance">
<Property xsi:type="StringProperty" Name="UseManagedDisks" Value="true" />
<Property xsi:type="StringProperty" Name="StorageType" Value="Premium_LRS" />
<Property xsi:type="StringProperty" Name="LicenseType" Value="Windows_Client" />
</CustomProperties>'
<!--NeedCopy-->
Enable zone-redundant storage
You can select zone-redundant storage during catalog creation. It synchronously replicates your Azure managed disk across multiple availability zones, which allows you to recover from a failure in one zone by utilizing the redundancy in others.
You can specify Premium_ZRS and StandardSSD_ZRS in the storage type custom properties. ZRS storage can be set using existing custom properties or through the MachineProfile template. ZRS storage is also supported with Set-ProvVMUpdateTimeWindow command with -StartsNow and -DurationInMinutes -1 parameters, and you can change existing machine from LRS to ZRS storage.
Limitations:
- Supported only for managed disks
- Supported only with premium and standard solid-state drives (SSD)
- Not supported with
StorageTypeAtShutdown - Available only in certain regions.
- Performance of Azure drops when creating ZRS disks at scale. Therefore, for the first power on, turn on the machines in smaller batches (less than 300 machines at a time)
Set zone-redundant storage as the disk storage type
You can select zone-redundant storage during the initial catalog creation, or you can update your storage type in an existing catalog.
Select zone-redundant storage using PowerShell commands
When creating a new catalog in Azure using the New-ProvScheme PowerShell command, use Standard_ZRS as the value in the StorageAccountType.
For example:
<Property xsi:type="StringProperty" Name="StorageAccountType" Value="StandardSSD_ZRS" />
<!--NeedCopy-->
When setting this value, it is validated by a dynamic API that determines if it can be used properly. The following exceptions can occur if the use of ZRS is not valid for your catalog:
- StorageTypeAtShutdownNotSupportedForZrsDisks: The StorageTypeAtShutdown custom property cannot be used with ZRS storage.
- StorageAccountTypeNotSupportedInRegion: This exception occurs if you try to use ZRS Storage in an Azure Region that does not support ZRS
- ZrsRequiresManagedDisks: You can use zone-redundant storage only with managed disks.
You can set the disk storage type using the following custom properties:
StorageTypeWBCDiskStorageTypeIdentityDiskStorageType
Note:
During catalog creation, the machine profile’s OS disk
StorageTypeis used if the custom properties are not set.
Capture diagnostic settings on VMs and NICs from a machine profile
You can capture diagnostic settings on VMs and NICs from a machine profile while creating a machine catalog, updating an existing machine catalog, and updating existing VMs.
You can create a VM or template spec as a machine profile source.
Key steps
-
Set up required IDs in Azure. You must provide these IDs in the template spec.
- Storage account
- Log analytics workspace
- Event hub namespace with the standard tier pricing
- Create machine profile source.
- Create a new machine catalog, update an existing catalog, or update existing VMs.
Set up required IDs in Azure
Set up one of the following in Azure:
- Storage account
- Log analytics workspace
- Event hub namespace with the Standard tier pricing
Set up a storage account
Create a standard storage account in Azure. In the template spec, give the full resourceId for the storage account as the storageAccountId.
Once VMs are set up to log data to the storage account, the data can be found under the insights-metrics-pt1m container.
Set up a log analytics workspace
Create a log analytics workspace. In the template spec, give the full resourceId for the log analytics workspace as the workspaceId.
Once VMs are set up to log data to the workspace, data can be queried under Logs in Azure. You can run the following command in Azure under Logs to show a count of all the metrics logged by a resource:
AzureMetrics
| summarize Count=count() by  ResourceId
Set up an event hub
Do the following to set up an event hub in Azure portal:
- Create an event hub namespace with the standard tier pricing.
- Create an event hub underneath the namespace.
- Navigate to Capture under the event hub. Switch ON the toggle to capture with the Avro output type.
- Create a new container in an existing storage account to capture the logs.
- In the template spec, specify the
eventHubAuthorizationRuleIdin the following format:/subscriptions/093f4c12-704b-4b1d-8339-f339e7557f60/resourcegroups/matspo/providers/Microsoft.EventHub/namespaces/matspoeventhub/authorizationrules/RootManageSharedAccessKey - Specify the name of the event hub.
Once VMs are set up to log data to the event hub, the data is captured into the configured storage container.
Create a machine profile source
You can create a VM or template spec as a machine profile source.
Create a VM based machine profile with diagnostic settings
If you want to create a VM as your machine profile, then first set up diagnostic settings on the template VM itself. You can refer to the detailed instructions provided in the Microsoft documentation Diagnostic settings in Azure Monitor.
You can run the following commands to verify that there are now diagnostic settings associated with the VM or NIC:
az monitor diagnostic-settings list --resource-group matspo --resource matspo-tog-cc2659 --resource-type microsoft.network/networkInterfaces
<!--NeedCopy-->
az monitor diagnostic-settings list --resource-group matspo --resource matspo-tog-cc2 --resource-type microsoft.compute/virtualMachines
<!--NeedCopy-->
Create a template spec-based machine profile with diagnostic settings
If you want to use a VM that already has diagnostic settings enabled and export it into an ARM template spec, these settings won’t be automatically included within the template. You must manually add or modify diagnostic settings within the ARM template.
However, if you want a VM as your machine profile, MCS ensures that the critical diagnostic settings are accurately captured and applied to the resources within your MCS catalog.
- Create a standard template spec that defines a VM and NIC(s).
-
Add additional resources to deploy the diagnostic settings according to the spec: Microsoft.Insights diagnosticSettings. For scope, reference either a VM or NIC that’s in the template by name with a partial ID. For example, for creating diagnostic settings attached to a VM named test-VM in the template spec, specify the scope as:
"scope": "microsoft.compute/virtualMachines/test-VM", <!--NeedCopy--> - Use the template spec as a machine profile source.
Create or update a catalog with diagnostic settings
After you create a machine profile source, you can now create a machine catalog using New-ProvScheme command, update an existing machine catalog using Set-ProvScheme command, and update existing VMs using Request-ProvVMUpdate command.
Page file location determination
The page file location is determined according to the following scenario:
Note:
The default page file location is OS disk.
| Scenario | Location |
|---|---|
| Page file setting is specified in the custom properties | As specified in the custom properties |
| Ephemeral OS disk or hibernation is enabled | OS disk |
| VM has a temporary disk | Temporary disk |
| MCS I/O is enabled | WBC disk |
Page file setting scenarios
The following table describes some of the possible scenarios of page file setting during image preparation and provisioning scheme update:
| During | Scenario | Outcome |
|---|---|---|
| Image preparation | You set the source image page file on the temporary disk, while the VM size that you specify in the provisioning scheme has no temporary disk | The page file is placed on the OS |
| Image preparation | You set the source image page file on the OS disk, while the VM size that you specify in the provisioning scheme has a temporary disk | The page file is placed on the temporary disk |
| Image preparation | You set the source image page file on the temporary disk and enable the ephemeral OS disk in the provisioning scheme | The page file is placed on the OS disk |
| Provisioning scheme update | You attempt to update the provisioning scheme when the VDA version is earlier than 2311 | Modifies the page file setting with a warning |
| Provisioning scheme update | You attempt to update the provisioning scheme when the VDA version is 2311 or later | Determines the page file location as per Page file location determination |
Specify page file setting
Using PowerShell commands, you can specify page file settings, including the location and size. This overrides the page file settings determined by MCS as per Page file location determination. You can do this by running the following New-ProvScheme command during machine catalog creation.
Important considerations
Consider the following before proceeding with the catalog creation:
- You must provide all the custom properties (‘PageFileDiskDriveLetterOverride’, ‘InitialPageFileSizeInMB’, and ‘MaxPageFileSizeInMB’) in the
New-ProvSchemecommand or none of them. - This feature is not supported through Citrix Studio.
- The initial page file size must be between 16 MB and 16777216 MB.
- The maximum page file size must be greater than or equal to the initial page file size and less than 16777216 MB.
- You can set both the initial page file size and maximum page file size to zero at the same time.
Note:
You can modify the page file settings of the newly added VMs of an existing catalog, without updating the master image. To modify the page file settings, you need VDA version 2311 or later. You can modify the page file settings using the PowerShell commands. For more information, see Modify page file settings.
New-ProvScheme -CleanOnBoot `
-HostingUnitName "zijinnet" `
-IdentityPoolName "PageFileSettingExample" `
-ProvisioningSchemeName "PageFileSettingExample" `
-InitialBatchSizeHint 1 `
-MasterImageVM "XDHyp:\HostingUnits\zijinnet\image.folder\neal-zijincloud-resources.resourcegroup\CustomWin10VDA_OsDisk_1_9473d7c8a6174b2c8284c7d3efeea88f.manageddisk" `
-NetworkMapping @{"0"="XDHyp:\\HostingUnits\\zijinnet\\virtualprivatecloud.folder\\East US.region\\virtualprivatecloud.folder\\neal-zijincloud-resources.resourcegroup\\neal-zijincloud-resources-vnet.virtualprivatecloud\\default.network"} `
-ServiceOffering "XDHyp:\\HostingUnits\\zijinnet\\serviceoffering.folder\\Standard_B2ms.serviceoffering" `
-CustomProperties '<CustomProperties xmlns=" http://schemas.citrix.com/2014/xd/machinecreation" xmlns:xsi=" http://www.w3.org/2001/XMLSchema-instance"> `
<Property xsi:type="StringProperty" Name="PersistOsDisk" Value="false"/> `
<Property xsi:type="StringProperty" Name="PersistVm" Value="false"/> `
<Property xsi:type="StringProperty" Name="PageFileDiskDriveLetterOverride" Value="d"/> `
<Property xsi:type="StringProperty" Name="InitialPageFileSizeInMB" Value="2048"/> `
<Property xsi:type="StringProperty" Name="MaxPageFileSizeInMB" Value="8196"/> `
<Property xsi:type="StringProperty" Name="StorageAccountType" Value="Premium_LRS"/> `
<Property xsi:type="StringProperty" Name="LicenseType" Value="Windows_Client"/> `
</CustomProperties>'
<!--NeedCopy-->
Modify page file settings
You can modify the page file settings of the newly added VMs to an existing catalog without updating the master image. Currently, this feature is applicable to only Azure environments.
To modify the page file settings, you need VDA version 2311 or later. You can modify the page file settings using the PowerShell commands.
Following are the various page file settings that you can modify in the Azure environment:
PageFileDiskDriveLetterOverrideInitialPageFileSizeInMBMaxPageFileSizeInMB
Modify the page file settings of an existing catalog
To modify the page file settings of an existing machine catalog, run the Set-ProvScheme command. In this case, the updates are applied only to the new VMs added to the catalog. For example:
Set-ProvScheme -ProvisioningSchemeName $schemeName -CustomProperties '<CustomProperties xmlns="http://schemas.citrix.com/2014/xd/machinecreation" xmlns:xsi="http://www.w3.org/2001/XMLSchema-instance">
<Property xsi:type="StringProperty" Name="UseManagedDisks" Value="true" />
<Property xsi:type="StringProperty" Name="OsType" Value="Windows" />
<Property xsi:type="StringProperty" Name="StorageType" Value="StandardSSD_LRS" />
<Property xsi:type="StringProperty" Name="PageFileDiskDriveLetterOverride" Value="D" />
<Property xsi:type="StringProperty" Name="InitialPageFileSizeInMB" Value="2048" />
<Property xsi:type="StringProperty" Name="MaxPageFileSizeInMB" Value="8196" />
<Property xsi:type="StringProperty" Name="LicenseType" Value="Windows_Client" />
<Property  xsi:type="StringProperty" Name="Zones" Value="1" />
<Property xsi:type="StringProperty" Name="ResourceGroups" Value="neal-test-group1" />
<Property xsi:type="StringProperty" Name="SchemaVersion" Value="2" />
</CustomProperties>'
<!--NeedCopy-->
Note:
If you enable the write back cache and try to set the
PageFileDiskDriveLetterOverridetoC:using the PowerShell command, MCS IO driver automatically redirects the page file to a correct disk drive and notC:.
Create a catalog using Azure Spot VMs
Azure Spot VMs allow you to take advantage of Azure’s unused computing capacity at a significant cost savings. However, the ability to allocate an Azure Spot VM depends on the current capacity and pricing. Therefore, Azure might evict your running VM, fail to create the VM, or fail to power on the VM as per the Eviction policy. Therefore, Azure Spot VMs are good for some non-critical applications and desktops. For more information, see Use Azure Spot Virtual Machines.
Limitations
-
All VM sizes aren’t supported for Azure Spot VMs. For more information, see Limitations.
You can run the following PowerShell command to check whether a VM size supports Spot VMs or not. If a VM size supports Spot VM, then
SupportsSpotVMis True.(Get-Item "XDHyp:\HostingUnits\azure-res-conn2\serviceoffering.folder\Standard_D2ds_v4.serviceoffering"). AdditionalData <!--NeedCopy--> -
Currently, Azure Spot VMs do not support hibernation.
Requirement
While creating the machine profile source (VM or template spec) for Azure Spot VMs catalog, you must select Azure Spot Instance (if using VM) or set priority as Spot (if using template spec).
Steps to create a catalog using Azure Spot VMs
-
Create a machine profile source (VM or launch template).
- For creating a VM using Azure portal, see Deploy Azure Spot Virtual Machines using the Azure portal.
-
For creating a template spec, add the following properties under resources > type: Microsoft.Compute/virtualMachines > properties in the template spec. For example:
 "priority": "Spot",
 "evictionPolicy": "Deallocate",
 "billingProfile": {
 "maxPrice": 0.01
 }
 <!--NeedCopy-->
Note:
- Eviction policy can be Deallocate or Delete.
- For non-persistent VMs, MCS always sets the eviction policy as Delete. If the VM is evicted, it is deleted along with any non-persistent disks (For example, OS disk). Any persistent disks (for example, Identity disk) are not deleted. However, an OS disk is persistent if the catalog type is persistent or the
PersistOsDiskcustom property is set to True. Similarly, a WBC disk is persistent if thePersistWbccustom property is set to True. - For persistent VMs, MCS always sets the eviction policy as Deallocate. If the VM is evicted, it is deallocated. No changes are made to the disks.
- Maximum price is the price you are willing to pay per hour. If you are using Capacity Only, then this is -1. The maximum price can only be null, -1, or a decimal greater than zero. For more information, see Pricing.
-
You can run the following PowerShell command to check if a machine profile is Azure Spot VM enabled or not. If the
SpotEnabledparameter is True andSpotEvictionPolicyis set to Deallocate or Delete, then the machine profile is Azure Spot VM enabled. For example,-
If the machine profile source is a VM, run the following command:
(Get-Item "XDHyp:\HostingUnits\azure-res-conn2\machineprofile.folder\fifthcolumn.resourcegroup\kb-spot-delete.vm"). AdditionalData <!--NeedCopy--> -
If the machine profile source is a template spec, run the following command:
 (Get-Item "XDHyp:\HostingUnits\azure-res-conn2\machineprofile.folder\fifthcolumn.resourcegroup\fc-aeh-templatespec.templatespec\14.0.0-spot-delete.templatespecversion").AdditionalData
 <!--NeedCopy-->
-
-
Create a machine catalog using a machine profile with
New-ProvSchemePowerShell command.
You can update a catalog using the Set-ProvScheme command. You can also update existing VMs using the PowerShell command Set-ProvVmUpdateTimeWindow. The machine profile is updated on the next power on.
Evictions on a running Azure Spot VM
If the computing capacity is unavailable or the price per hour is higher than the maximum price as configured, Azure evicts a running Spot VM. By default, you are not notified of an eviction. The VM simply freezes and the VM is evicted. Microsoft recommends using Scheduled Events to monitor evictions. See Continuously monitor for eviction. You can also run scripts from within a VM to get a notification before the eviction. For example, Microsoft has a polling script in Python ScheduledEvents.cs.
Troubleshooting
- You can see Spot VM properties in the provisioned VM’s customMachineData using the
Get-ProvVMcommand. If the priority field is set to Spot, then Spot is in use. -
You can check if a VM is using Spot in Azure Portal:
- Find the VM in the Azure Portal.
- Go to the Overview page.
-
Scroll down to the bottom and locate the Azure Spot section.
- If Spot is not in use, then this field is empty.
- If Spot is in use, the Azure Spot and Azure Spot eviction policy fields are set.
- You can check the billing profile or maximum price per hour for the VM on the Configuration page.
Configure backup VM sizes
Public clouds can run out of capacity for a specific VM size. When Azure lacks capacity, MCS falls back to a preconfigured list of backup VM sizes. This curated list, tailored by the customer to their workload requirements, increases the likelihood that one of these sizes has sufficient capacity to boot on Power On or Resume if the VM was previously hibernated.
When a power action is initiated, MCS implements an automated fallback sequence to ensure high availability. The workflow is as follows:
- Initiation: A user or administrator issues a PowerOn or Resume command via Web Studio.
- Exception Monitoring: MCS attempts to start the VM using the primary configuration. It monitors for specific Azure capacity exceptions likeQuota Exceeded, Allocation Failed orZonal Allocation Failed and SKU Not Available(Can just go general on this and say we monitor Azure for any capacity or allocation failures)
- Sequential Fallback: If one of the above errors occurs, MCS automatically iterates through the BackupVmConfiguration list sequentially until the VM successfully starts. If all sizes in the BackupVmConfiguration fail, the power action is marked as failed.
-
Update vs. Re-creation Logic:
- Direct Update: In most cases, MCS performs a simple VM size update to the backup SKU and then powers the VM on.
- Delete and Re-create: To maintain environment integrity, certain transitions require the existing VM to be deleted and a new one created in its place. This occurs when:
- Switching between Spot and Regular VM types.
- Switching between VM sizes with Resource Disk (Temporary Storage) support and those without.
- Data Persistence & Recovery: During a “Delete and Re-create” operation, if all backup sizes also fail due to extreme Azure capacity shortages, the VM may temporarily disappear from the Azure Portal. However, no data loss occurs. Upon the next PowerOn attempt, MCS will recreate the VM using the original settings and reattach the existing OS, Identity, and Data disks.
-
Spot VM Billing & MaxPrice Behavior If your primary configuration utilizes a Machine Profile (VM Template) with Spot priority and a specific Billing Profile (MaxPrice), the following logic applies during fallback:
- Primary Size: Uses the MaxPrice defined in your Machine Profile. Eviction is based on Price or Capacity.
- Backup Spot Sizes: The BackupVmConfiguration property does not currently support a unique
MaxPriceinput for each SKU, MCS handles the transition as follows: - MaxPrice Reset: MCS sets the MaxPrice to -1.
- Eviction Policy Shift: This changes the Azure eviction behavior from Price-based to Capacity-based.
- Pricing: You will be charged the current Spot price, capped at the standard Pay-As-You-Go (PAYG) rate for that backup SKU. This ensures the VM is only evicted if Azure truly runs out of physical capacity, rather than because of a price fluctuation.
- Persistence of Backup State: Once started, the VM remains on the backup size for the duration of the session until a Shutdown or Hibernate request is processed.
- Restoration of Primary Size: Upon the next PowerOn or Resume, MCS always attempts to “home” the VM back to its Primary Service Offering (as defined in the Catalog or Machine Profile). If the primary size remains unavailable, the fallback sequence repeats.
Challenges with hibernation
Azure does not allow size changes on a hibernated VM, as explained General limitations. The VM must be in a Stopped state. Therefore, before changing the size, MCS issues a Deallocate request to clear the hibernated state, which causes the VM’s hibernation state to be lost. MCS then loops over the backup sizes, updates the VM size, and powers it on.
Backup VM size unsupported scenarios
The following configurations are unsupported:
- For persistent VMs, the following scenarios are unsupported:
- VM uses DiskControllerType SCSI, but Backup VM size supports only DiskControllerType NVMe.
- VM uses DiskControllerType NVMe, but Backup VM size supports only DiskControllerType SCSI.
- For non-persistent VMs with MCSIO enabled, switching to a size without temporary storage is unsupported if the write-back cache disk uses Resource Disk temporary storage.
Prerequisites to configure Backup VM sizes
If any of the following are unmet, an error is thrown.
- Supported only when the Machine Profile is in use on the Machine Catalog.
- Type is optional and can be either Spot or Regular. Defaults to Regular if unspecified.
- Each combination of ServiceOffering must be unique to avoid repeated configurations.
- Regional Quota must have enough cores for the ServiceOffering.
- Network interface count must not exceed the maximum allowed for a ServiceOffering.
- ServiceOfferings in this BackupVmConfiguration list must be compatible with current Custom Properties, capabilities of the Master Image and the MachineProfile. Some failure scenarios are:
- Azure Dedicated Hosts: Hosts in the Host Group must support the ServiceOffering if dedicated hosts are used.
- Ephemeral OS Disk: ServiceOffering must support Ephemeral OS Disks if enabled in custom properties.
- Premium Storage: ServiceOffering must support Premium storage if specified in custom properties.
- Accelerated Networking: ServiceOffering must support Accelerated Networking if it is enabled in MachineProfile.
- DiskEncryptionAtHost: ServiceOffering must support Encryption at Host if enabled in MachineProfile.
- Temporary Storage: If MCSIO is in use and Write Back Cache is on the Temporary disk, use of a VM size that does not have Temporary Storage is not allowed.
- HyperVGeneration: ServiceOffering must be compatible with the VM generation (1 or 2) specified in MasterImageVM.
- TrustedLaunch: ServiceOffering must support TrustedLaunch if enabled in MachineProfile.
- Confidential VMs: ServiceOffering must support Confidential VM if enabled in MachineProfile.
Create a catalog with backup VM sizes
Note:
To address the issue of the Studio UI freezing, replace all the single quotes with
"while running the PowerShell commands.
- Open a PowerShell window.
- Run
asnp citrix*to load the Citrix-specific PowerShell modules. - Create a Broker catalog. This catalog is populated with machines that are about to be created.
- Create an identity pool. This becomes a container for AD accounts created for the machines that are to be created.
- Create a provisioning scheme with the machine profile. See How to configure backup configuration.
- Update the
BrokerCatalogwith the unique Id of the provisioning scheme. - Create and add VMs to the catalog.
Update an existing catalog
You can update a provisioning scheme using the Set-ProvScheme command. See How to configure backup configuration.
Update existing VMs
You can update existing VMs in a catalog using Set-ProvVMUpdateTimeWindow PowerShell command. The command updates the VMs created from the provisioning scheme associated with the catalog on the next power on within the given time window. For example:
Set-ProvVMUpdateTimeWindow -ProvisioningSchemeName azure-catalog -StartTimeInUTC "3/12/2022 3am" -DurationInMinutes 60`
<!--NeedCopy-->
Set-ProvVMUpdateTimeWindow -ProvisioningSchemeName azure-catalog -StartsNow -DurationInMinutes 60
<!--NeedCopy-->
You can configure the backup VM size list for a selected number of existing MCS VMs using the Set-ProvVM command. However, to apply the updates, set an update time window for the VMs using Set-ProvVMUpdateTimeWindow and start the VMs within the window. For example,
-
Run the
Set-ProvVMcommand to configure the backup VM size list for a selected existing MCS VM. For example:Set-ProvVM -ProvisioningSchemeName "name" -VMName "Vm-001" -CustomProperties "<CustomProperties xmlns=`"http://schemas.citrix.com/2014/xd/machinecreation`"xmlns:xsi=`"http://www.w3.org/2001/XMLSchema-instance`"> <Property xsi:type=`"StringProperty`" Name=`"UseManagedDisks`" Value=`"true`" /> <Property xsi:type=`"StringProperty`" Name=`"StorageAccountType`" Value=`"Premium_LRS`" /> <Property xsi:type=`"StringProperty`" Name=`"LicenseType`" Value=`"Windows_Server`"/> <Property xsi:type=`"StringProperty`" Name=`"PersistWBC`" Value=`"true`"/> <Property xsi:type=`"StringProperty`" Name=`"BackupVmConfiguration`" Value=`"[{"ServiceOffering": "Standard_D2as_v4", "Type": "Spot"}, {"ServiceOffering": "Standard_D2s_v3", "Type": "Regular"}, {"ServiceOffering": "Standard_D2s_v3", "Type": "Spot"}]`"/> </CustomProperties>" <!--NeedCopy--> -
Run the
Set-ProvVMUpdateTimeWindowcommand to apply the updates. For example:Set-ProvVMUpdateTimeWindow -ProvisioningSchemeName azure-catalog -StartsNow -DurationInMinutes 60 <!--NeedCopy-->
Copy tags on all resources
You can copy tags specified in a machine profile to all the resources such as multiple NICs and disks (OS disk, Identity disk, and write-back cache disk) of a new VM or an existing VM in a machine catalog. The machine profile source can be a VM or an ARM template spec.
Note:
You must add the policy on the tags (See Assign policy definitions for tag compliance) or add the tags in a machine profile source to retain the tags on the resources.
Prerequisites
Create the machine profile source (VM or ARM template spec) to have tags on VM, disks, and NICs of that VM.
- If you want to have a VM as a machine profile input, then apply tags on the VM and all the resources in the Azure portal. See Apply tags with Azure portal.
-
If you want to have ARM template spec as a machine profile input, then add the following tag block under each resource.
  "tags": {
 "TagC": "Value3"
 },
 <!--NeedCopy-->
Note:
You can have a maximum of one disk and at least one NIC in the template spec.
Copy tags to the resources of a VM in a new machine catalog
- Create a non-persistent or persistent catalog with a VM or ARM template spec as a machine profile input.
-
Add a VM to the catalog and power it on. You must see the tags specified in the machine profile copied to the corresponding resources of that VM.
Note:
You get an error if there is a mismatch in the number of NICs provided in the machine profile and the number of NICs you want the VMs to use.
Modify tags on the resources of an existing VM
- Create a machine profile with the tags on all the resources.
-
Update the existing machine catalog with the updated machine profile. For example:
Set-ProvScheme -ProvisioningSchemeName <YourCatalogName> -MachineProfile <PathToYourMachineProfile> <!--NeedCopy--> - Turn off the VM on which you want to apply the updates.
-
Request scheduled update for the VM. For example:
Set-ProvVMUpdateTimeWindow -ProvisioningSchemeName <YourCatalogName> -VMName machine1 -StartsNow -DurationInMinutes -1 <!--NeedCopy--> - Turn on the VM.
- You must see the tags specified in the machine profile copied to the corresponding resources.
Note:
You get an error if there is a mismatch in the number of NICs provided in the machine profile and the number of NICs provided in the
Set-ProvScheme.
Create a preformatted WBC disk catalog
You can create a preformatted WBC disk catalog to improve startup performance of provisioned machines. To implement this functionality, create an Azure catalog with WBC enabled and include an additional custom property PreformatWriteBackCache as True.
You can update an existing catalog using the Set-ProvScheme command to update the WBC disk size.
This feature is compatible with the Image management workflow where MCS separates the mastering phase from the overall provisioning workflow. For information on Image management, see Image management.
Example of creating an Azure catalog with WBC enabled and PreformatWriteBackCache as True:
$customProperties = @'
<CustomProperties xmlns="http://schemas.citrix.com/2014/xd/machinecreation" xmlns:xsi="http://www.w3.org/2001/XMLSchema-instance">
<Property xsi:type="StringProperty" Name="PreformatWriteBackCache" Value="true" />
</CustomProperties>
'@

New-ProvScheme -CleanOnBoot `
-ProvisioningSchemeName "provisioningschemename" `
-HostingUnitName "hostingunitname" `
-IdentityPoolName "identitypoolnamename" `
-MasterImageVM "XDHyp:\HostingUnits\AzureHostingUnit\image.folder\rg.resourcegroup\masterImage.manageddisk" `
-CustomProperties $customProperties `
-NetworkMapping $networkMapping `
-UseWriteBackCache `
-WriteBackCacheDiskSize 30
<!--NeedCopy-->
Example of updating the WBC disk cache size of an existing catalog:
Set-ProvScheme -ProvisioningSchemeName provisioningschemename -WriteBackCacheDiskSize 127
<!--NeedCopy-->
Delete WBC disk at shutdown for MCS provisioned Citrix Provisioning™ catalogs
While creating an MCS provisioned Citrix Provisioning catalogs in Azure, you can provision the WBC disk to be non-persistent (PersistWBC as False). This configuration helps to delete the write-back cache (WBC) disk after you shut down the VM for MCS provisioned Citrix Provisioning catalogs in Azure.
Condition:
You must set the custom property PreformatWriteBackCache as True for this feature to work.
Example of creating an Azure catalog with PersistWBC as False and PreformatWriteBackCache as True:
$customProperties = @'
<CustomProperties xmlns="http://schemas.citrix.com/2014/xd/machinecreation" xmlns:xsi="http://www.w3.org/2001/XMLSchema-instance">
<Property xsi:type="StringProperty" Name="PersistWBC" Value="false" />
<Property xsi:type="StringProperty" Name="PreformatWriteBackCache" Value="true" />
</CustomProperties>
'@

New-ProvScheme -CleanOnBoot `
-ProvisioningSchemeName "provisioningschemename" `
-HostingUnitName "hostingunitname" `
-IdentityPoolName "identitypoolnamename" `
-MasterImageVM "XDHyp:\HostingUnits\AzureHostingUnit\image.folder\rg.resourcegroup\masterImage.manageddisk" `
-CustomProperties $customProperties `
-NetworkMapping $networkMapping `
-UseWriteBackCache `
-WriteBackCacheDiskSize 30
<!--NeedCopy-->
You can also update an existing catalog using the Set-ProvScheme command to update the PersistWBC custom property.
Provision data disk
You can create and assign a persistent data disk to an MCS created persistent or non-persistent VM of an MCS machine catalog in Azure.
The data disk must be provisioned from a managed disk as an image source.
Data disk properties
The data disk derives properties from custom properties or OS disk template if the properties are not specified in the custom properties.
-
Properties derived from custom properties
DiskEncryptionSetIdZonesStorageType
-
Properties derived from OS disk template if not specified in custom properties
DiskEncryptionSetIdZonesStorageType
Note:
- If Zone Redundant Storage (ZRS) is not specified in custom properties or OS disk template, then the data disk is placed in the same zone as the OS disk and Identity disk.
- Tags are derived only from the OS disk template.
Limitations
The following operations are currently not supported:
- Provisioning of more than one data disk.
- Provisioning of non-persistent data disks.
- Creating a data disk with a template.
- Modifying existing catalogs and VMs to use data disks.
- Resetting the data disk.
- Image update of the data disk.
- Using a source other than a managed disk.
- Storing data disk in Azure Compute Gallery (ACG).
- Using
StorageTypeAtShutdownfor the data disk
Create a catalog with data disk
Include the following parameters in the New-ProvScheme PowerShell command to provision an MCS machine catalog with data disk.
-
DataDisk: Path to a valid ManagedDisk type of inventory item. -
DataDiskPersistence: To indicate whether theDataDiskis persistent or non-persistent. However, currently, only persistent data disks are supported.
For example:
New-ProvScheme  -CleanOnBoot -HostingUnitName "<HostingUnitName >" -IdentityPoolName "<IdentityPoolName >" -InitialBatchSizeHint 1 -MasterImageVM disk.manageddisk -NetworkMapping <NetworkMapping > -ProvisioningSchemeName "<ProvisioningSchemeName >" -DataDisk "XDHyp:\HostingUnits\Azure-Resources-1\image.folder\<resourcegroupname>\xxxx-datadisk.manageddisk"  -DataDiskPersistence "Persistent"  -Scope @() -VMCpuCount 4  -VMMemoryMB 6144  -TenancyType Shared  -FunctionalLevel "L7_20"
<!--NeedCopy-->
Determine if a data disk is in use
Do the following to verify if the data disk is assigned to a VM:
- Run
Get-ProvVmand check the VM’sCustomVmData. If the VM is using the data disk, there is a disk record with roleDiskRole.DataDisk. - Check if a data disk is present under the VM in the Azure portal.
Delete a data disk
If you delete the catalog, the data disk is deleted unless you use forgetVM or purgeDBOnly option. If you delete the VM, the data disk is deleted unless you use the forgetVM or purgeDBOnly option.
Migrate from unmanaged to managed disks
On September 30, 2025, Azure will officially retire unmanaged disks (that is, VHDs). Any existing VMs using unmanaged disks will be stopped and deallocated after the deadline.
However, you can migrate your MCS provisioned VMs from unmanaged to managed disks, which helps to avoid service outages due to Azure’s unmanaged disk retirement plans.
All unmanaged disks attached to the VM are converted. This includes the Identity Disk, OS Disk, and WBC Disk (if used).
For more information on Azure’s unmanaged disk retirement plan, see Migrate your Azure unmanaged disks by September 30, 2025.
Use cases
This feature applies to persistent and non-persistent MCS-provisioned catalogs.
It also supports migration for both on-demand and non-on-demand (legacy) VMs:
- On-Demand VMs: Transition your existing disks from unmanaged to managed disks to align with Azure’s updated support.
- Non-On-Demand (Legacy) VMs: Legacy or non-on-demand VMs only support unmanaged disks. Use this feature to convert your legacy VMs to on-demand while also migrating to managed disks.
For more information on on-demand provisioning, see Azure on-demand provisioning.
Limitations
- Once a machine catalog or VM is converted to managed disks, it cannot be converted back to unmanaged disks
- For non-on-demand (legacy) VMs, the migration process includes converting them to on-demand provisioning. You cannot convert the disks only and continue to use non-on-demand VMs.
Important considerations
- Conversion does not occur automatically. It happens as part of a power-on operation.
- If multiple updates are requested for a VM, the disk conversion takes precedence. Additional updates are deferred until a subsequent power on.
- Once the VM is successfully converted and powered on, VHDs for the VM are cleaned up to save costs. The storage account itself are not cleaned up.
- A base disk might still exist in the storage account. You can run a catalog update, and a new snapshot (or ACG) base disk is created.
- Once all the VMs in the catalog are converted and the new base disk is created, the empty storage account can be deleted.
Required permissions
You need the following permission on your Azure Service Principal to allow conversion from unmanaged to managed disks:
Microsoft.Compute/virtualMachines/convertToManagedDisks/write
<!--NeedCopy-->
Configuration steps
For On-Demand Catalogs:
-
Run
Set-ProvScheme(orSet-ProvVMfor persistent VMs) to updateUseManagedDiskstoTrue. For example:Set-ProvScheme -ProvisioningSchemeName "<provscheme-name>" -CustomProperties "<CustomProperties xmlns=`"http://schemas.citrix.com/2014/xd/machinecreation`" xmlns:xsi=`"http://www.w3.org/2001/XMLSchema-instance`"><Property xsi:type=`"StringProperty`" Name=`"UseManagedDisks`" Value=`"true`" /></CustomProperties>" <!--NeedCopy-->Set-ProvVM -ProvisioningSchemeName "<provscheme-name>" -VMName "<vm-name>" -CustomProperties "<CustomProperties xmlns=`"http://schemas.citrix.com/2014/xd/machinecreation`" xmlns:xsi=`"http://www.w3.org/2001/XMLSchema-instance`"><Property xsi:type=`"StringProperty`" Name=`"UseManagedDisks`" Value=`"true`" /></CustomProperties>" <!--NeedCopy--> -
Run
Set-ProvVMUpdateTimeWindow` to apply the updates. In this example, the update is applied on the next power on for the VM.Set-ProvVmUpdateTimeWindow -ProvisioningSchemeName "<provscheme-name>" -VMName "<vm-name>" <!--NeedCopy--> -
Power on the VMs.
For Non-On-Demand (Legacy) Catalogs:
-
Run
Set-ProvScheme(orSet-ProvVMfor persistent VMs) to configureSet DeploymentSchemato1.1. For example:Set-ProvScheme -ProvisioningSchemeName "<provscheme-name>" -CustomProperties "<CustomProperties xmlns=`"http://schemas.citrix.com/2014/xd/machinecreation`" xmlns:xsi=`"http://www.w3.org/2001/XMLSchema-instance`"><Property xsi:type=`"StringProperty`" Name=`"DeploymentSchema`" Value=`"1.1`" /></CustomProperties>" <!--NeedCopy-->Set-ProvVM -ProvisioningSchemeName "<provscheme-name>" -VMName "<vm-name>" -CustomProperties "<CustomProperties xmlns=`"http://schemas.citrix.com/2014/xd/machinecreation`" xmlns:xsi=`"http://www.w3.org/2001/XMLSchema-instance`"><Property xsi:type=`"StringProperty`" Name=`"DeploymentSchema`" Value=`"1.1`" /></CustomProperties> <!--NeedCopy--> -
Run
Set-ProvVMUpdateTimeWindowto apply the updates. In this example, the update is applied on the next power on for the VM.Set-ProvVmUpdateTimeWindow -ProvisioningSchemeName "<provscheme-name>" -VMName "<vm-name>" <!--NeedCopy--> -
Power on the VMs.
Troubleshooting
If a VM fails to convert from unmanaged to managed disks:
-
Verify that the
UseManagedDisksorDeploymentSchemacustom properties are set correctly:- If using
Set-ProvScheme, verify the ProvScheme custom properties by runningGet-ProvScheme. For more information, see Get-ProvScheme. - If using
Set-ProvVM, verify that the VM has a new configuration with the updated custom property by runningGet-ProvVMConfiguration. For more information, see Set-ProvVM.
- If using
-
Verify that the following permission is present in your Azure Service Principal:
Microsoft.Compute/virtualMachines/convertToManagedDisks/write
-
Run
Get-ProvOperationEventto view any warnings for the Provisioning Scheme. For more information, see Get-ProvOperationEvent. For example:Get-ProvOperationEvent -LinkedObjectType ProvisioningScheme -LinkedObjectUid <your-provscheme-id> <!--NeedCopy-->
Where to go next
- If this is the first catalog created, Web Studio guides you to create a delivery group
- To review the entire configuration process, see Install and configure
- To manage catalogs, see Manage machine catalogs and Manage a Microsoft Azure catalog
More information
In this article
- Create a machine catalog
- Conditions for Azure temporary disk to be eligible for write-back cache disk
- Non-persistent write-back cache disk scenarios
- Create an Azure template spec
- Use template spec in creating or updating a catalog
- Azure server-side encryption
- Azure Customer-managed encryption key
- Azure disk encryption at host
- Double encryption on managed disk
- Azure resource groups
- Azure ephemeral disks
- Azure Compute Gallery
- Azure confidential VMs
- Boot Integrity Monitoring
- Azure Marketplace
- Create a catalog of on-demand capacity reservation VMs
- Nested virtualization
- NVMe-only SKUs
- Create a machine catalog using PowerShell
- Create a catalog with non-persistent write-back cache disk
- Create a catalog with persistent write-back cache disk
- Improve boot performance with MCSIO
- Use template spec in creating or updating a catalog using PowerShell
- Machine catalogs with Trusted Launch
- Use machine profile property values
- Create or update a catalog with multiple NICs per VM
- Provision catalog VMs with Azure Monitor Agent installed
- Create a machine catalog with customer-managed encryption key
- Create a machine catalog with double encryption
- Create a catalog with an Azure ephemeral disks
- Azure dedicated hosts
- Create or update a machine catalog using an Azure Compute Gallery image
- Configure Shared Image Gallery
- Provision machines into specified Availability Zones
- Storage types
- Capture diagnostic settings on VMs and NICs from a machine profile
- Page file location determination
- Page file setting scenarios
- Specify page file setting
- Modify page file settings
- Create a catalog using Azure Spot VMs
- Configure backup VM sizes
- Copy tags on all resources
- Create a preformatted WBC disk catalog
- Delete WBC disk at shutdown for MCS provisioned Citrix Provisioning™ catalogs
- Provision data disk
- Migrate from unmanaged to managed disks
- Where to go next
- More information