-
-
Create and manage connections and resources
-
Connection to Microsoft System Center Virtual Machine Manager
-
Connection to Nutanix
-
Cloud Connector Standalone Citrix Secure Ticketing Authority (STA) service
-
-
-
-
-
This content has been machine translated dynamically.
Dieser Inhalt ist eine maschinelle Übersetzung, die dynamisch erstellt wurde. (Haftungsausschluss)
Cet article a été traduit automatiquement de manière dynamique. (Clause de non responsabilité)
Este artículo lo ha traducido una máquina de forma dinámica. (Aviso legal)
此内容已经过机器动态翻译。 放弃
このコンテンツは動的に機械翻訳されています。免責事項
이 콘텐츠는 동적으로 기계 번역되었습니다. 책임 부인
Este texto foi traduzido automaticamente. (Aviso legal)
Questo contenuto è stato tradotto dinamicamente con traduzione automatica.(Esclusione di responsabilità))
This article has been machine translated.
Dieser Artikel wurde maschinell übersetzt. (Haftungsausschluss)
Ce article a été traduit automatiquement. (Clause de non responsabilité)
Este artículo ha sido traducido automáticamente. (Aviso legal)
この記事は機械翻訳されています.免責事項
이 기사는 기계 번역되었습니다.책임 부인
Este artigo foi traduzido automaticamente.(Aviso legal)
这篇文章已经过机器翻译.放弃
Questo articolo è stato tradotto automaticamente.(Esclusione di responsabilità))
Translation failed!
Connection to Nutanix
Create and manage connections and resources describes the wizards that create a connection. The following information covers details specific to Nutanix.
Note:
Before creating a connection to Nutanix, you need to first finish setting up your Nutanix account as a resource location. See Nutanix virtualization environments.
Nutanix AHV Prism Central host connection
See the Prerequisites before creating Nutanix AHV Prism Central host connection.
You can create a connection using one of the following:
Limitation
- The Nutanix AHV Prism Central host connection doesn’t support duplicate object names for items such as templates and networks. Selecting such items for catalog creation might lead to unexpected behavior.
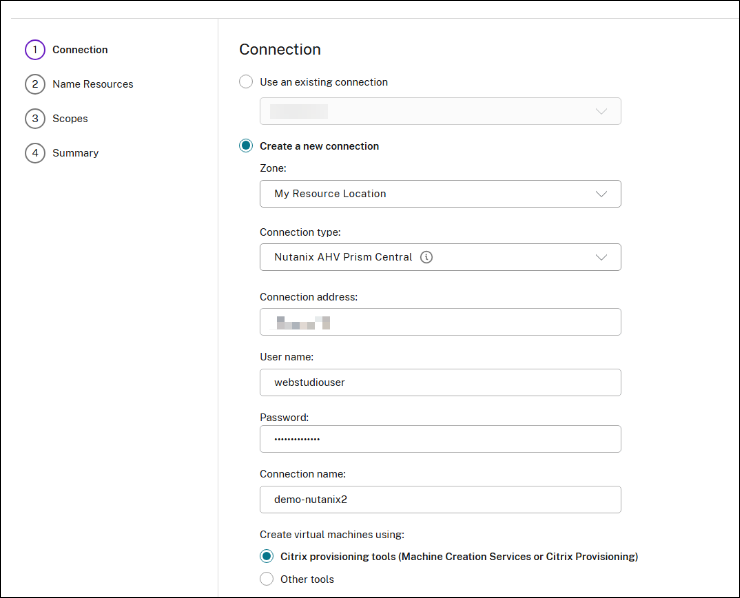
Create a connection using Web Studio
- Sign in to Citrix Cloud.
- Click Manage.
- Select Hosting in the left pane.
- Click Add Connections and Resources in the action bar.
- On the Connection page:
- Select Create a new connection.
- Select Nutanix AHV Prism Central as the connection type.
- Enter the IP address of your Nutanix AHV Prism Central as the connection address.
- Enter your administrative credentials and a friendly connection name.
- Select Citrix provisioning tools (Machine Creation Services™ or Citrix Provisioning).
-
Click Next.
Note:
While creating the host connection, network or cluster selection is not required. A hosting unit name is only needed. Select the network and cluster while creating the machine catalog.
-
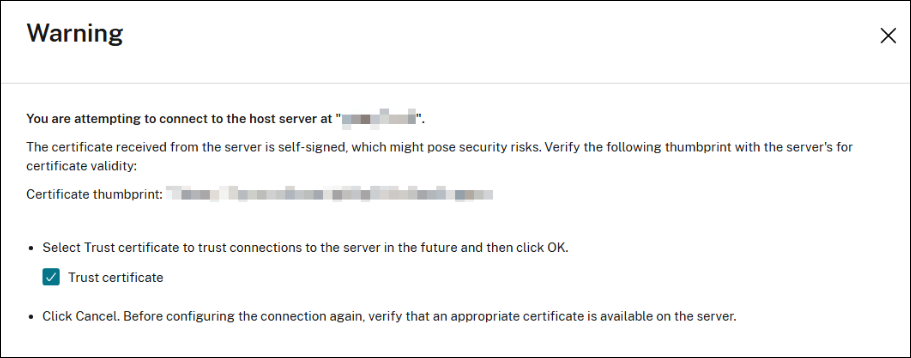
After you click Next, Citrix Virtual Apps and Desktops receives a private CA-signed certificate and you see a Warning page. For information, see Secure connections to the Nutanix Prism Central.
Compare the received thumbprint with the server’s for the certificate validity. If it’s valid, select Trust certificate and click OK to proceed with connection creation. Citrix Virtual Apps and Desktops then trusts the certificate and stores the thumbprint for future validation.
-
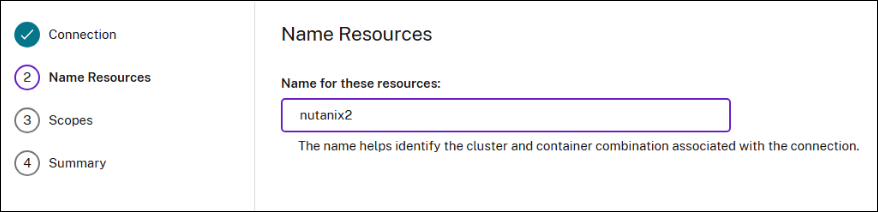
On the Name Resources page, add a unique name of the resources. Click Next.
- On the Scopes page, select one or more scopes for this host.
- On the Summary page, check the configuration and click Finish.
Note:
The Nutanix AHV Prism Central connection can co-exist with other types of Nutanix connections.
Secure connections to the Nutanix Prism Central
The Nutanix SSL thumbprint feature simplifies certificate trust when establishing a host connection to a Nutanix Prism Central hypervisor. This feature enables the storage of an untrusted certificate’s thumbprint in the site database, ensuring that Citrix Virtual Apps and Desktops consistently recognizes the hypervisor as trusted.
When creating a Nutanix host connection, a Warning page is displayed, presenting the certificate of the machine you are connecting to and allowing you to decide whether to trust it.
Create a connection using PowerShell
- Open the PowerShell window.
- Run
asnp citrix*. -
Set following parameters:
$ConnectionName = “Name of the connection” $UserName = “Username of the account on hypervisor” $ZoneUid = “UID of the zone where the hosting connection will be created” $HypervisorAddress = “The IP address of the hypervisor” $SSLThumbprint = “The Nutanix PC SSL thumbprint can be set using PowerShell SDK” $connectionPath = "XDHyp:\Connections\" + $ConnectionName $SecureUserInput = Read-Host "Enter the password for the user $($UserName)" -AsSecureString $EncryptedUserInput = $SecureUserInput | ConvertFrom-SecureString $SecurePass = ConvertTo-SecureString -String $EncryptedUserInput <!--NeedCopy--> -
Create an item for the new hosting connection. For example:
$connection = New-Item -Path @($connectionPath) -ConnectionType "Custom" -HypervisorAddress ` @($HypervisorAddress) -Persist -PluginId "AcropolisHypervisorPCFactory" -Scope @() ` -SecurePassword $SecurePass -SSLThumbprint @($SSLThumbprint) -UserName $UserName -ZoneUid ` $ZoneUid <!--NeedCopy--> -
Create a broker hypervisor connection. For example:
New-BrokerHypervisorConnection -HypHypervisorConnectionUid $connection.HypervisorConnectionUid
<!--NeedCopy-->
Create a hosting unit
When you create a hosting unit using the PowerShell command, provide the following required parameters:
-
$HostUnitName: Name of Hosting Unit to create -
ConnectionName: Name of the hypervisor connection previously created
- Open the PowerShell window.
- Run
add-pssnapin citrix*. -
Run PowerShell commands to create the hosting unit. For example:
$hostUnitPath = "XDHyp:\HostingUnits\" + $HostUnitName
New-Item -Path @($hostUnitPath) -RootPath $connectionPath -HypervisorConnectionName $ConnectionName -CustomProperties "" -NetworkPath @() -StoragePath @()
<!--NeedCopy-->
Note:
While creating the host connection, network or cluster selection is not required. A hosting unit name is only needed. Select the network and cluster while creating the machine catalog.
Manage host connections
You can manage an existing host connection using:
Manage the host connection using Web Studio
After creating a host connection, navigate to the Hosting node on Web Studio and right-click a connection to do the following:
- Delete Connection
- Rename Connection
- Edit Connection
- Turn on Maintenance Mode
- View Machines
- Test Connection
- Test TLS certificate trust
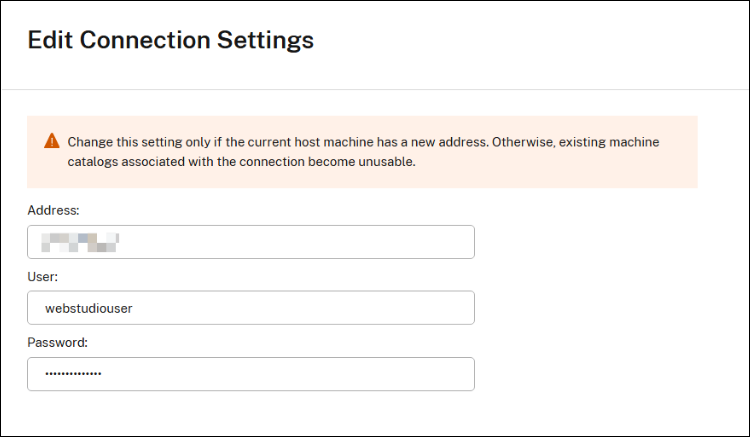
Edit a connection using Web Studio
- Right-click a connection and click Edit Connection.
- On the Connection Properties page, click Edit settings.
-
On the Edit Connection settings page, you can change the certificate information and click Save.
- Select Trust certificate on the Warning page to trust the new certificate thumbprint.
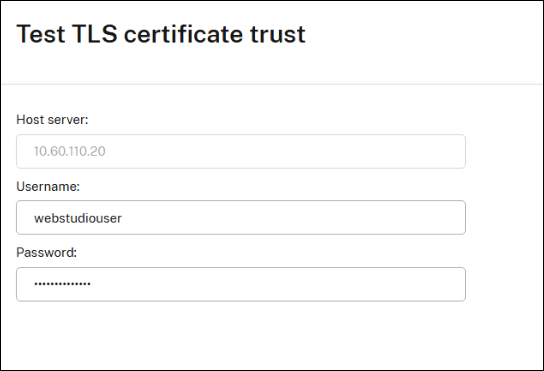
Test TLS certificate trust
- Right-click a connection and click Test TLS certificate trust.
-
On the Test TLS Certificate Trust page, you can change the certificate information, then click Test.
If the test result is not successful, then change the certificate information of the connection using Edit a connection using Web Studio.
Manage the host connection using PowerShell
You can use PowerShell commands to:
-
Change or update the user credential for a host connection. For example:
$UserName = "Username of the account on hypervisor" $SecureUserInput = Read-Host "Enter the password for the user $($UserName)" -AsSecureString $EncryptedUserInput = $SecureUserInput | ConvertFrom-SecureString $SecurePass = ConvertTo-SecureString -String $EncryptedUserInput Set-Item -LiteralPath @("XDHyp:\Connections\<Host connection name>") -SecurePassword $SecurePass -UserName $UserName <!--NeedCopy--> -
Reset SSLThumbprint. For example:
 $SSLThumbprint =  "The Nutanix PC SSL thumbprint value"
 Set-Item  -LiteralPath @("XDHyp:\Connections\<Host connection name>")  -SecurePassword $SecurePass -UserName $UserName -SSLThumbprint $SSLThumbprint
 <!--NeedCopy-->
Required permissions
The following permissions are required for the administrative account used for a Nutanix AHV Prism Central host connection.
Creating a host connection
Cluster:
- View Cluster
Power management of VMs
AHV VM:
- ACPI Shutdown Virtual Machine
- ACPI Reboot Virtual Machine
- Guest Reboot Virtual Machine
- Guest Shutdown Virtual Machine
- Power Off Virtual Machine
- Power On Virtual Machine
- Reset Virtual Machine
- View Existing Virtual Machine
Cluster:
- View Cluster
Provisioning of VMs
AHV VM:
- ACPI Reboot Virtual Machine
- ACPI Shutdown Virtual Machine
- Associate Virtual Machine Categories
- Create New Virtual Machine
- Create Virtual Machine
- Create Virtual Machine Disk
- Create Virtual Machine NIC
- Delete Existing Virtual Machine
- Delete Virtual Machine
- Delete Virtual Machine Disk
- Delete Virtual Machine GPU
- Delete Virtual Machine NIC
- Disassociate Virtual Machine Categories
- Eject Virtual Machine CD ROM
- Guest Reboot Virtual Machine
- Guest Shutdown Virtual Machine
- Power Off Virtual Machine
- Power On Virtual Machine
- Reset Virtual Machine
- Snapshot Virtual Machine
- Update Virtual Machine Basic Config
- Update Virtual Machine Disk
- Update Virtual Machine Disk List
- Update Virtual Machine NIC
- View Existing Virtual Machine
- View Virtual Machine
- View Virtual Machine CD ROM
- View Virtual Machine Disk
- View Virtual Machine GPU
- View Virtual Machine NIC
AHV VM Recovery Point:
- View AHV VM Recovery Point
Category:
- View Category
Cluster:
- View Cluster
Host:
- View Host
Image:
- Create Image
- Delete Image
- Update Image
- View Image
Recovery Point:
- Create Recovery Point
- Delete Recovery Point
- Replicate Recovery Point
- Restore Recovery Point
- View Recovery Point
- View Virtual Machine Recovery Point
Storage Container:
- View Storage Container
- View Storage Container Datastore
- View Storage Container Stats
Storage Policy:
- View Storage Policy
Subnet:
- View Subnet
- View Subnet Vnic
Task:
- Cancel Task
- View Task
VM Recovery Point:
- Delete VM Recovery Point
- Restore VM Recovery Point
- View VM Recovery Point
VM Templates:
- View VM Templates
- View VM Templates Versions
- Deploy VM Templates
Volume Group:
- Attach Volume Group To AHV VM
- Detach Volume Group From AHV VM
- View Volume Group
- View Volume Group Details
VPC:
- View VPC
Nutanix AHV, Nutanix AHV PC, or Nutanix AHV DRaaS host connection
- Sign in to Citrix Cloud.
- Click Manage.
- Select Hosting in the left pane.
- Click Add Connections and Resources in the action bar.
- On the Connection page, the following connection types are available for selection:
-
Nutanix AHV: specify the Prism Element (PE) cluster address, and credentials, and a name for the connection. On the Network page, select network(s) and give a name for the hosting unit.
Note:
If you deploy machines using Nutanix AHV (Prism Element) as the resource, select the container where the VM’s disk resides.
-
Nutanix AHV PC: specify the Prism Central (PC) address, credentials, and a name for the connection. On the Network page, select the network, cluster from the list, and give a name for the hosting unit.
Note:
The connection type Nutanix AHV PC is only used for creating connection to Nutanix Cloud Cluster (NC2) on Azure. Also, a machine catalog can only be hosted on a single cluster in an NC2 on Azure connection. This type of connection requires a Nutanix plug-in installed on Cloud Connectors
-
Nutanix AHV DRaaS: specify your address and user name, and then import the public and private keys contained in your Nutanix DRaaS credential files (
.pem). (Public and private keys are generated in Nutanix DRaaS cloud by Nutanix DRaaS administrators.)- To import the key, locate your credential file, open it with Notepad (or any text editor), and then copy the content. After that, return to the Connection page, select Import key, paste the content, and then select Save. Do not change the credential content or its format.
-
Where to go next
- If you’re in the initial deployment process, see Create machine catalogs
- For Nutanix specific information, see Create a Nutanix catalog
More information
Share
Share
This Preview product documentation is Citrix Confidential.
You agree to hold this documentation confidential pursuant to the terms of your Citrix Beta/Tech Preview Agreement.
The development, release and timing of any features or functionality described in the Preview documentation remains at our sole discretion and are subject to change without notice or consultation.
The documentation is for informational purposes only and is not a commitment, promise or legal obligation to deliver any material, code or functionality and should not be relied upon in making Citrix product purchase decisions.
If you do not agree, select I DO NOT AGREE to exit.