This content has been machine translated dynamically.
Dieser Inhalt ist eine maschinelle Übersetzung, die dynamisch erstellt wurde. (Haftungsausschluss)
Cet article a été traduit automatiquement de manière dynamique. (Clause de non responsabilité)
Este artículo lo ha traducido una máquina de forma dinámica. (Aviso legal)
此内容已经过机器动态翻译。 放弃
このコンテンツは動的に機械翻訳されています。免責事項
이 콘텐츠는 동적으로 기계 번역되었습니다. 책임 부인
Este texto foi traduzido automaticamente. (Aviso legal)
Questo contenuto è stato tradotto dinamicamente con traduzione automatica.(Esclusione di responsabilità))
This article has been machine translated.
Dieser Artikel wurde maschinell übersetzt. (Haftungsausschluss)
Ce article a été traduit automatiquement. (Clause de non responsabilité)
Este artículo ha sido traducido automáticamente. (Aviso legal)
この記事は機械翻訳されています.免責事項
이 기사는 기계 번역되었습니다.책임 부인
Este artigo foi traduzido automaticamente.(Aviso legal)
这篇文章已经过机器翻译.放弃
Questo articolo è stato tradotto automaticamente.(Esclusione di responsabilità))
Translation failed!
Log Collection for Citrix Cloud Connector™
CDF logs are used for troubleshooting purposes within Citrix products. Citrix Support uses CDF traces to identify issues with application and desktop brokering, user authentication, Virtual Delivery Agent (VDA) registration. This article discusses how to capture Cloud Connector data that can be used to troubleshoot and resolve issues you might experience in your environment.
Important notes:
- Enable logging on all Cloud Connector machines in your resource locations.
- To ensure that you’re capturing the full spectrum of data, Citrix recommends using the CDFControl capturing tool that resides on the VDA. For more information, see CTX111961 in the Citrix Support Knowledge Center. For more information about log collection for Citrix Workspace app, CTX141751.
- To submit CDF traces to Citrix, you must have an open Citrix Support case. Citrix Support technicians can’t review CDF traces that are not attached to an existing support case.
Step 1: Recreate the issue
In this step, recreate the issue you’re experiencing in your environment. If the issue is related to app launches or brokering, recreate the launch failure. If the issue is related to VDA registration, recreate the VDA registration attempt by manually restarting the Citrix Desktop Service on the VDA machine.
Step 2: Collect CDF traces
In this step, you collect CDF flush traces from each Cloud Connector in your resource location.
- Access the Cloud Connector machine by initiating an RDP connection using a Domain Admin or Local Administrator account.
- On the Cloud Connector machine, open the File Explorer and navigate to
C:\logs.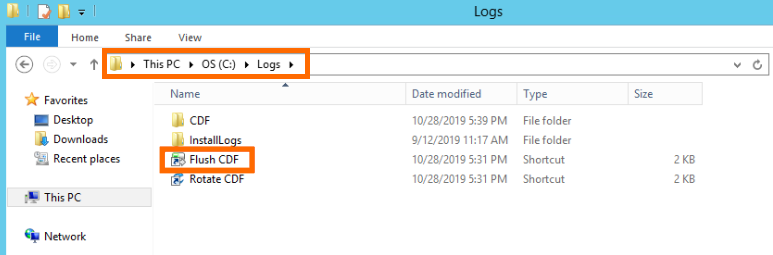
- Run Flush CDF. An icon appears briefly on the Taskbar of the Cloud Connector machine and then disappears.
- From the File Explorer, navigate to C:\logs\CDF and identify the most recent folder ending in !–FLUSH–!.
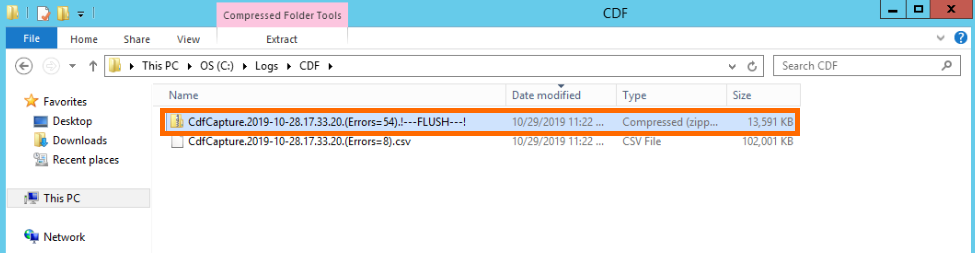
- Perform Steps 1-5 on every Cloud Connector machine in your resource location and combine all Cloud Connector flush traces into a single ZIP archive. If you don’t create a ZIP archive of the flush traces from all your Cloud Connector machines, you will need to submit them one at a time to Citrix.
Step 3: Submit data to Citrix
In this step, you attach your traces to your Citrix support case and submit them for review.
- Visit https://cis.citrix.com/ and sign in using your Citrix.com credentials.
- Select Diagnostics.
- Select Tools and then select Upload Data.

- In Case Number, enter the Citrix Support case number of the existing support case. Citrix Support technicians can’t review CDF traces appropriately without a case number attached to the data upload.
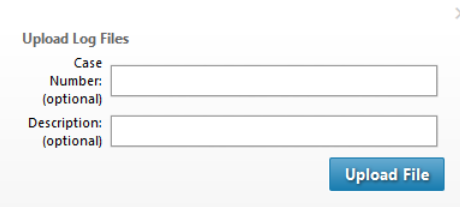
- In Description (optional), you can enter a brief description or leave this field blank.
- Select Upload File and select the ZIP archive you created earlier. If you didn’t create a ZIP archive of flush traces from all your Cloud Connector machines, repeat Steps 3-6 to attach each flush trace you want to submit.
After you submit your flush traces, Citrix Insight Services processes them and attaches them to the support case you specified. This process can take up to 24 hours, depending on the size of the files.
Share
Share
This Preview product documentation is Citrix Confidential.
You agree to hold this documentation confidential pursuant to the terms of your Citrix Beta/Tech Preview Agreement.
The development, release and timing of any features or functionality described in the Preview documentation remains at our sole discretion and are subject to change without notice or consultation.
The documentation is for informational purposes only and is not a commitment, promise or legal obligation to deliver any material, code or functionality and should not be relied upon in making Citrix product purchase decisions.
If you do not agree, select I DO NOT AGREE to exit.