Citrix Virtual Desktops Essentials™
Note:
Citrix Virtual Apps Essentials and Citrix Virtual Desktops Essentials have reached End of Sales and End of Life. For more information, see CTX583004.
Citrix Virtual Desktops™ Essentials allows management and delivery of Windows 10 virtual desktops from Microsoft Azure.
Virtual Desktops Essentials is designed specifically for the Azure Marketplace. Citrix® and Microsoft partner to deliver an integrated experience for Virtual Desktops Essentials and Azure IaaS. This partnership gives you a single interface to deliver a complete Windows 10 digital store from Azure.
Using Virtual Desktops Essentials, you can:
- Deploy and secure Windows 10 virtual desktops on Azure
- Deliver best-in-class user experience by using Citrix HDX™ capabilities
- Provide secure access on any device by using Citrix Workspace™ app
- Manage and administer the deployment from Microsoft Azure and Citrix Cloud™
Citrix Virtual Desktops Essentials simplifies Windows 10 deployment. You can deploy desktops quickly, manage at scale, and deliver a rich user access experience from a single management plane.
You manage the Windows 10 desktops using Studio and monitor sessions using Director. Users connect to their Windows 10 virtual desktops by logging on with Citrix Workspace app.
After you configure Citrix Virtual Desktops Essentials, you provide your users with a URL to Citrix® StoreFront Cloud. Users connect to their desktops through the Citrix Workspace app on their devices, with the URL you provide. When users log on to the Citrix Workspace app, the Windows 10 desktop icon appears in the store window.
Important:
Virtual Desktops Essentials includes a StoreFront Cloud URL, usually in the format
https://<yourcompanyname>.cloud.com. After you set up Virtual Desktops Essentials, test and share the store URL link with your end users to give them access to their desktops. Virtual Desktops Essentials does not support on-premises StoreFront.
For details about the store, see StoreFront Cloud.
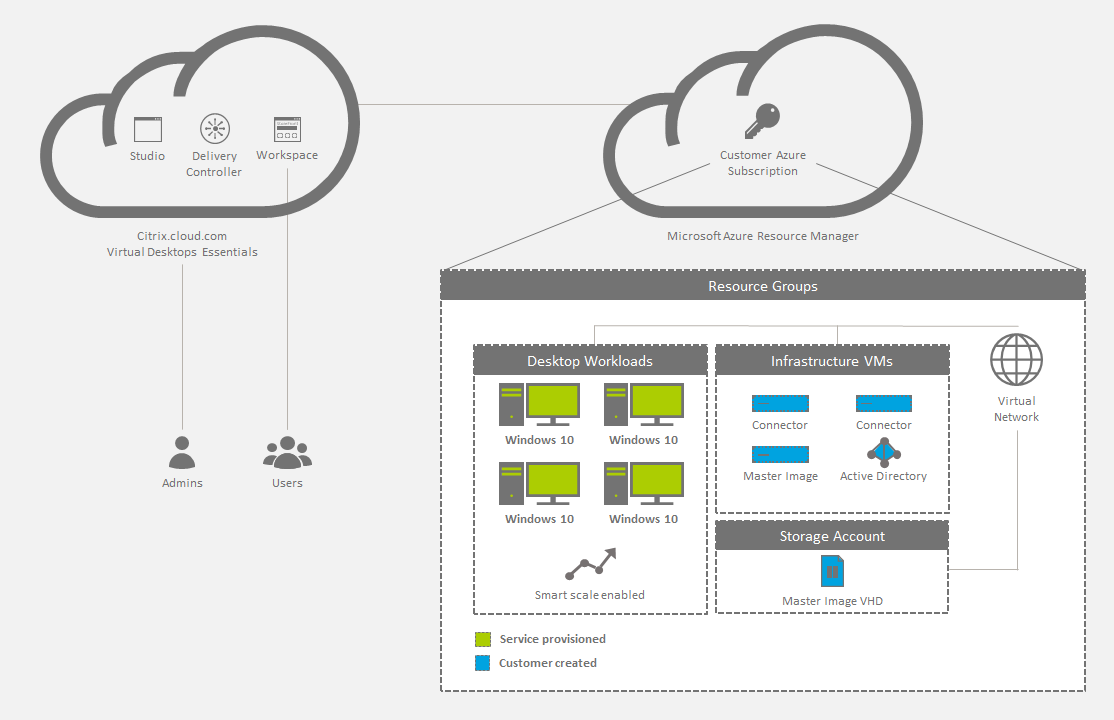
The diagram shows an architectural overview of a Virtual Desktops Essentials deployment.
What’s new
December 2018: Cloud-hosted StoreFront™ removed
Cloud-hosted StoreFront is no longer available for use with Virtual Desktops Essentials. Customers who purchased Virtual Desktops Essentials (formerly XenDesktop® Essentials) before December 2017 can use StoreFront Cloud as described in this article to provide end user access to desktops.
August 2018: New product names
If you’ve been a Citrix customer or partner for a while, you’ll notice new names in our products and product documentation. If you’re new to this Citrix product, you might see different names for a product or component.
The new product and component names stem from the expanding Citrix portfolio and cloud strategy. This article uses the following names.
-
Citrix Virtual Desktops Essentials: The technology that made XenDesktop the industry leader is now Citrix Virtual Desktops, and it brings VDI into a modern, contextual, secure app that allows the preferred way to securely access all your work applications. XenDesktop Essentials is now Citrix Virtual Desktops Essentials.
-
Citrix Workspace app: The Citrix Workspace app incorporates existing Citrix Receiver™ technology as well as the other Citrix Workspace client technologies. It has been enhanced to deliver additional capabilities to provide end users with a unified, contextual experience where they can interact with all the work apps, files, and devices they need to do their best work.
-
Citrix Gateway: The NetScaler® Gateway, which allows secure, contextual access to the apps and data you need to do your best work, is now Citrix Gateway.
In-product content might still contain former names. For example, instances of earlier names in console text, messages, and directory/file names. It is possible that some items (such as commands and MSIs) might continue to retain their former names to prevent breaking existing customer scripts.
Related product documentation and other resources (such as videos and blog posts) that are linked from this product’s documentation might still contain former names. Your patience during this transition is appreciated. For more detail about our new names, see https://www.citrix.com/about/citrix-product-guide.html.
How to buy Virtual Desktops Essentials
For detailed information about buying or canceling Virtual Desktops Essentials, download How to buy or cancel the Virtual Desktops Essentials Service.
System requirements, prerequisites, and compatibility
Virtual Desktops Essentials requires certain complementary products and components and specific account permissions for installation, configuration, and operation.
Microsoft Azure
Virtual Desktops Essentials is designed to support Microsoft Azure exclusively. Your Azure environment must meet certain minimum requirements to support Virtual Desktops Essentials:
- An Azure subscription with an enterprise agreement, or a Microsoft CSP Azure subscription.
- Windows Server Active Directory or Microsoft Entra ID Domain Service.
-
An Microsoft Entra ID tenant.
Important:
Microsoft requires the Microsoft Entra ID tenant in the Azure subscription to deploy Windows 10 desktops. You can use the Microsoft Entra ID tenant or another active directory to identify authorized users.
- An Active Directory domain controller.
-
An Azure Resource Manager (ARM) virtual network and subnet in your preferred region. Configure the virtual network with a custom domain name server (DNS) entry pointing to the domain controller. The virtual network must have one subnet that is large enough to hold the desktops.
Use the same virtual network for the DNS entry and desktop subnet.
- An Microsoft Entra ID user with contributor (or greater) permissions within the subscription.
- One virtual machine that has Microsoft Windows 10 installed, including your required customizations and apps.
Citrix Cloud Connector™
Citrix Cloud Connector authenticates and encrypts communications between Citrix Cloud and your resource locations. With Virtual Desktops Essentials, your resources are located in Microsoft Azure. Citrix Cloud requires that you install the Citrix Cloud Connector on two Windows server VMs to ensure continuous availability of your resource locations.
For more information about Cloud Connectors, see Citrix Cloud Connector
Citrix Cloud
- A Citrix Cloud account.
- Access to Citrix DaaS™ within Citrix Cloud, which is enabled as a part of your Virtual Desktops Essentials purchase.
- (Optional) One NetScaler Console VPX configured in ICA® Proxy mode, for access from outside the corporate network.
- ICA Proxy enables secure access to the applications and desktops offered to your users.
- For information about setting up the NetScaler Console VPX, see Deploying Citrix NetScaler VPX on Microsoft Azure.
Known issues
- The Citrix Help Desk Administrator custom access role does not work correctly. As a workaround, use the Cloud Administrator role, or enable Full access. [BRK-3589]
- If you use Microsoft Entra ID Domain Services: store logon UPNs must contain the domain name that was specified when enabling Microsoft Entra ID Domain Services. Logons cannot use UPNs for a custom domain you create, even if that custom domain is designated as primary.
Step 1: Connect your Azure subscription to Virtual Desktops Essentials
- Sign in to the Azure portal.
- In Azure, open a domain-joined Windows Server virtual machine and then open a web browser.
- In the web browser on the VM, sign in to Citrix Cloud. Citrix DaaS opens.
- From the upper left menu, select Resource Locations.
- On the Resource Locations page, click Download. The file
cwcconnector.exedownloads. - Double-click the downloaded program to start the installer.
- When prompted, enter your Citrix Cloud credentials. Follow the on-screen instructions to install and configure the Citrix Cloud Connector.
- Repeat steps 4 through 7 on at least one more server VM, to install another Cloud Connector.
During installation, the Cloud Connector accesses Citrix Cloud to authenticate, validate the installer permissions, and then download and configure the services that the Cloud Connector provides. The installation uses the privileges of the user who initiated the installation.
After installation, Citrix Cloud registers your domain in Identity and Access Management. For more information, see Identity and Access Management.
Step 2: Create a host connection
Before you start, ensure that you have your Microsoft Entra ID credentials and your subscription ID available. The Microsoft Entra ID user who creates the host connection must be a native cloud user in the Microsoft Entra ID or synchronized for the enterprise domain. The user account cannot be an invited or delegated Microsoft account.
- Sign in to Citrix Cloud.
- In the upper left menu, select My Services > Virtual Apps and Desktops.
- Click Manage. The Studio management console opens.
- Select Configuration > Hosting in the Studio navigation pane.
- Click Add Connection and Resources in the Actions pane.
- On the Add Connection and Resources page:
- In Connection type, select Microsoft Azure.
- In the Azure environment, select Azure Global and then click Next.
- In Connection Details:
- In Subscription ID, type the Azure subscription ID.
- In Connection name, type a name for the connection and then either:
- Click Create new and then follow the procedure Option 1: To create a connection.”
- Click Use existing and continue configuring the settings. Follow the procedure Option 2: Use an existing host connection.”
Option 1: Create a connection
- Sign in to Azure with the subscription contributor (or greater) account.
- Azure creates the host connection automatically. In Studio, a green check mark with the word Connected appears on the Add Connection and Resources page.
- Click Next.
- On the Region page, select the region where your virtual network resides, and then click Next.
- On the Network page:
- Type a name for the resources.
- Select the virtual network for the resource group.
- Select the subnet that applies to the resource group and then click Next.
- On the Summary page, click Finish. The host connection to the Microsoft Azure Resource Manager is complete.
Option 2: Use an existing host connection
After you click Use existing, the Existing Service Principal Details page appears:
- In Subscription ID, type the Microsoft Azure subscription ID.
- In Subscription name, type the name of the Azure subscription.
- Click OK.
- On the Connection page:
-
Click Create a new Connection, type your Microsoft Azure subscription ID and a connection name (optional), and then click Create new. The Microsoft authentication dialog box appears.
If you want to use a connection that you created at another time, choose Use an existing connection. Then, select the connection.
-
Type the user name and password for the Microsoft Microsoft Entra ID user. Citrix Cloud creates a service principal with the rights to create and manage machines for this subscription.
-
- On the Region page, select the Azure region where your Microsoft Azure resource group is located.
-
On the Network page:
- Type a name for the resources. If you typed a connection name, use it as the name for the Resources name.
- Choose the virtual network for your Microsoft Azure resource group.
- Select the subnets to use for this connection. If only one subnet exists, it is selected by default.
Step 3: Create a pool of Windows 10 desktops
In preparation for hosting the desktops, install the Citrix Virtual Delivery Agent (VDA) software on the Windows 10 virtual machine. The VDA:
- Enables the machine to register with Virtual Desktops Essentials.
- Establishes and manages the connection between the machine and the user device.
- Verifies that a Citrix license is available for the user or session.
- Applies any configured policies for the session.
- Communicates session information to Virtual Desktops Essentials.
To install the VDA on the base image
- Start the Windows 10 image.
- Go to https://www.citrix.com/downloads/citrix-cloud/product-software/xenapp-and-xendesktop-service.html and download a VDA for Desktop OS.
- Start the VDA installation.
- On the Environment page, click Create a master image using MCS.
- On the Additional Components page, select all of the components except Enable Citrix App-V.
- On the Delivery Controller™ page, enter the locations of your Cloud Connector virtual machines. Click Next and confirm any warning messages.
- On the Features page, keep the default settings and click Next.
- Click Next to accept the default settings on the remaining pages.
- On the Summary page, click Install.
- Restart the virtual machine and sign back in.
- Confirm that the settings have taken effect.
- Shut down the virtual machine. Shutting down the virtual machine is required for VDA registration.
Create a Storage Account
In Microsoft Azure, you need a storage account to host the base image virtual hard disk. You can host the drive in an existing storage account or create a storage account.
Important:
Upload the Windows 10 master image to the destination storage account in Azure before you create the machine catalog.
To create a storage account for images
- In the Microsoft Azure navigation pane, click Storage accounts.
- On the Storage accounts page, click Add.
- In Name, provide a name.
- In Deployment model, select Resource manager.
- In Performance, select Standard.
- For Replication, Storage service encryption, and Subscription, leave the default settings.
- In Resource group, click one of the following:
- Click Create new to create a resource group. Type the name of the group.
- Click Use existing to use an existing resource group. Select a group.
- To have the storage account appear on the dashboard, click Pin to dashboard.
- Click Create.
After you create a storage account, create a blob container and then name it to reflect the virtual hard disk, such as “VHDs.”
To create a blob container for image VHDs
- In the Microsoft Azure navigation pane, click Storage accounts and navigate to the storage account that you created previously.
- In the center navigation pane, under BLOB SERVICE, click Containers.
- In the details pane, click Container.
- In the New container pane, give the container a name.
- In Access type, select Blob and then click Create. The new blob container appears in the pane.
- Copy the blob URL and save it in a text file. The URL is used later to upload the converted VHD.
Create a machine catalog for Citrix Virtual Desktops Essentials
Machine catalogs are collections of virtual desktops that you manage as a single entity. These virtual desktops are the resources you provide to your users. All the machines in a catalog have the same operating system and the same VDA installed.
Typically, you create a master image and use it to create identical virtual machines in the catalog.
- Sign in to Citrix Cloud. In the upper left menu, select My Services > Virtual Apps and Desktops.
- Select the Manage tab.
- Click Machine Catalogs in the Studio navigation pane.
- Click Create Machine catalog in the Actions pane.
- On the Operating System page, Desktop OS is the only option available. Select it and then click Next.
- On the Desktop Experience page:
- Select I want users to connect to the same (static) desktop each time they log on.
- Select Yes, create a dedicated virtual machine and save changes on the local disk.
- On the Master Image page:
- Navigate to and select the VHD in the blob storage you created previously. The structure of the navigation tree aligns with the Azure hierarchy:
- Resource group
- Storage accounts
- Containers
- Virtual hard disks (VHDs)
- Image names
- Keep the default selection in Select the minimum functional level for this catalog.
- Navigate to and select the VHD in the blob storage you created previously. The structure of the navigation tree aligns with the Azure hierarchy:
- On the Storage and License Types page, select the destination storage type and your license preference.
- On the Virtual Machines page, select the number of virtual machines and the Azure virtual machine size.
- On the Network Interface Cards page, select a network adapter to associate with the Azure subnet name for your Citrix machines. You can also click Add Card to add another network adapter.
- On the Computer Accounts page:
- Click Create new Active Directory accounts.
- Choose the domain for the computer accounts.
- Navigate to the organizational unit (OU) for the new machines.
- Type an account naming scheme for the new machines. Include two number signs (##) to increment numbers automatically. Select number or letters. The pound signs translate to the naming scheme. For example, mymachcatalog## becomes mymachcatalog01 or mymachcatalogAB.
- On the Domain Credentials page, click Enter Credentials and then in the Windows Security dialog box, type your user name and password. This account is used to create the computer accounts.
- On the Summary page, type a name for the catalog and a description for administrators.
- Click Finish.
The virtual machines are created and a new storage account appears in the Microsoft Azure dashboard. While Machine Catalog Services deploys the virtual machines, a preparation virtual machine with a VHD is created temporarily in Azure.
To identify the image name in Microsoft Azure
- Sign in to the Azure portal.
- In the Dashboard navigation pane, click All resources. A list of subscriptions appears.
- Choose the subscription.
- Click All settings.
- Click Resource groups.
- Select the resource group.
- Select the Windows 10 virtual machine that contains the Citrix VDA.
- Click All settings.
- Click Disks.
- Select the OS disk. The first text box in the OS disk window contains the URL for the image, which is structured as shown in the following example. You can obtain the storage account name and image name from the URL. For example:
https://<storage account name>.blob.core.window.net/vhds/<image name>. - On the Machines page, the templates listed are retrieved directly from your Azure subscription.
Step 4: Assign Windows 10 desktops to your users
A Delivery Group is a collection of machines selected from one or more machine catalogs. The Delivery Group specifies which users can use those machines.
- Select Delivery Groups in the Studio navigation pane and then select Create Delivery Group in the Actions pane.
- Specify how many machines that you want to make available to the Delivery Group. The number you specify cannot exceed the number of available machines in your machine catalog.
- On the Delivery Type page, choose Desktops.
- On the Users page, choose the option to leave user management to Citrix Cloud. Selecting this option allows you to use Citrix Cloud to manage who can access machines in the Delivery Group. (You can also add users through Studio.)
- On the Summary page, provide a name and (optionally) a description for the Delivery Group.
After completing these steps, edit the delivery group to configure access for users. You can add or remove users and change user settings.
Add or remove users in a Delivery Group through Studio
- Select Delivery Groups in the Studio navigation pane.
- Select a group and then click Edit Delivery Group in the Actions pane.
- On the Users page, to add users, click Add, and then specify the users you want to add. To remove users, select one or more users and then click Remove. You can also select or clear the check box that enables or disables access by unauthenticated users.
- Click OK.
Change user settings in a Delivery Group through Studio
The name of this page can appear as either User Settings or Basic Settings.
- Select Delivery Groups in the Studio navigation pane.
- Select a group and then click Edit Delivery Group in the Actions pane.
- On the User Settings (or Basic Settings) page:
- In Description, type the text that the store displays to users.
- Set the time zone to match the Azure time zone.
- Select Enable Delivery Group.
- Set the maximum number of desktops per user.
- Click OK to save settings.
Add user access through the Citrix Cloud
- Sign in to Citrix Cloud and then click View Library.
- On the desktops tile, click ellipsis (…) in the right corner.
- Search for the users groups that are allowed access to the Delivery Group and add them to the list.
- When finished, click the X to close the window.
Your Windows 10 virtual desktops are assigned to the groups added to the end users list.
Step 5: Configure NetScaler Console VPX in Azure (optional)
The NetScaler Console VPX virtual appliance is available as an image in the Microsoft Azure Marketplace. When you deploy NetScaler Console VPX on Microsoft Azure Resource Manager, you can use the Azure cloud computing capabilities. You can use Citrix Gateway load balancing and traffic management features for your business needs.
You can deploy NetScaler Console VPX instances on Azure Resource Manager in one of two ways:
- A standalone instance.
- A high availability pair in active-active or active-standby modes.
If you have users who connect from a remote location, configure NetScaler Console VPX in Azure to create secure connections between Citrix Workspace app and Windows 10 desktops.
When the deployment is complete, use the Remote Desktop Protocol (RDP) to connect to one of the Cloud Connector machines. When you connect, you continue to the NetScaler Console VPX configuration from the Citrix Gateway administration console.
For complete configuration information, see Deploying NetScaler Console VPX instance on Microsoft Azure.
After you configure NetScaler Console VPX in Azure, enable Citrix Gateway in Citrix Cloud.
To configure the Citrix Gateway settings for secure access
- Log on to the management console using the Citrix Gateway administrator credentials. You do not need to configure more IP addresses. Click Skip.
- In Host Name, DNS IP Address, and Time Zone, use the IP address and the DNS settings of the virtual network. The settings are on your Active Directory domain controller.
- Click Done. You do not have to restart NetScaler Console VPX now.
- On the Configuration tab, click Licenses and upload the necessary licenses to configure Citrix Gateway.
- After the licenses upload, restart the appliance.
- When the virtual machine restarts, log on again by using Citrix Gateway credentials.
Configure Citrix Virtual Desktops Essentials settings in Citrix Gateway
After you configure the previous settings, run the Quick Configuration Wizard in Citrix Gateway. For more information, see Configuring Settings with the Quick Configuration Wizard.
Configure Citrix Gateway for high availability and load balancing
In a Microsoft Azure deployment, a high availability configuration of two Citrix Gateway virtual machines is achieved by using the Azure load balancer. The load balancer distributes client traffic across the virtual servers configured on both the Citrix Gateway instances.
If the client traffic originates from the internet, deploy an external load balancer between the internet and the Citrix Gateway instances to distribute client traffic. For more information about this configuration, see Configure a high-availability setup with a single IP address and a single NIC.
You can also add inbound port 80 to the Citrix Gateway network security group to configure Citrix Gateway by using its public IP address. After the configuration is complete, you can delete the inbound port 80 rule to secure access to the management console.
Step 6: Connect users
StoreFront Cloud delivers the service to user devices. In the Citrix Cloud console, select StoreFront Cloud from the upper left menu.
After you create the first catalog, Virtual Desktops Essentials configures the store URL automatically. This URL appears under the catalog details. You can customize the store URL and the appearance of stores. You can also enable the preview version of federated authentication using Microsoft Entra ID. For details, see StoreFront Cloud.
- In the Citrix Cloud console, select StoreFront Cloud in the upper left menu. Select the Service Integrations tab. The service is listed.
- Test your connection by logging on to the store URL with your domain credentials and starting a desktop.
- Provide the URL to your users, which they can copy. Users can type or paste that URL in the address bar of their browser or Citrix Workspace app to access desktops.
Remote access using NetScaler Console VPX
- In the Citrix Cloud console, click Manage and then click Service Delivery.
- Enable Citrix Gateway.
- Select Use your own Citrix Gateway in the resource location.
- Type the Citrix Gateway address in the text field. Do not include a protocol. You can include a port number.
- Enable session reliability, if you want that feature.
- Save.
- Test your connection by logging on to the store URL with your domain credentials and starting a desktop.
- Provide the URL to your users, which they can copy. Users can type or paste the URL in the address bar of their browser or Citrix Workspace app to access desktops.
Partner resources
This service is also available through the Microsoft Cloud Solution Provider channel. For details, see Microsoft CSP enablement for Citrix Essentials.
Upgrade to Citrix DaaS Standard for Azure
Learn how to upgrade from Citrix Virtual Desktops Essentials to Citrix DaaS Standard for Azure.
In this article
- What’s new
- How to buy Virtual Desktops Essentials
- System requirements, prerequisites, and compatibility
- Known issues
- Step 1: Connect your Azure subscription to Virtual Desktops Essentials
- Step 2: Create a host connection
- Step 3: Create a pool of Windows 10 desktops
- Step 4: Assign Windows 10 desktops to your users
- Step 5: Configure NetScaler Console VPX in Azure (optional)
- Step 6: Connect users
- Partner resources
- Upgrade to Citrix DaaS Standard for Azure