Create policies
A policy defines two parts:
- A group of settings that define how sessions, bandwidth, and security are managed for a group of users, devices, or connection types.
- Users and machines to assign the policy to. Before creating a policy, decide which group of users or devices it affects. You might want to create a policy based on job function, connection type, device platform, or geographic location.
When you create a policy, you can base it on settings from a policy template and customize them as needed. You can also start from scratch and manually add the necessary settings. This section covers the following topics:
Tip
If a policy exists for a group, consider editing it rather than creating one. Avoid creating policies solely to enable a specific setting or exclude specific users.
How policies work
When a user logs on, all policies that match the assignments for the connection are identified. Those policies are ranked by priority and multiple instances of any setting are compared. For each setting, the value from the highest-priority policy is applied. If a higher-priority policy disables a setting, that setting overrides any lower-priority policy where it’s enabled. Settings that aren’t configured are ignored.
Important:
If you’re configuring both Active Directory and Citrix policies using the Group Policy Management Console, assignments and settings might not apply as expected. For more information, see CTX127461.
The Unfiltered policy
We provide a default policy called Unfiltered.
- When you manage Citrix® policies in Web Studio, settings in the Unfiltered policy apply to all servers, desktops, and connections in the Site.
-
For the settings to apply, the Site and connections must fall within the scope of the GPO containing the policy.
Example: A GPO named Sales-US is linked to the Sales OU and includes all US sales team members. This GPO is configured with an Unfiltered policy with several user settings. When a sales manager logs on, the Unfiltered policy settings are applied because the user is in the Sales-US GPO.
Assignment modes
Assignment mode controls whether a policy applies based on how the connection criteria match.
-
Allow (default): Applies the policy only if the connection matches the assignment criteria.
-
Deny: Applies the policy if the connection doesn’t match the criteria.
Example 1: Same assignment type, different modes
Policy 1 includes:
-
Assignment A: Sales group, mode = Allow
-
Assignment B: Sales manager’s account, mode = Deny
Although the user is in the Sales group, the Deny assignment takes precedence. The policy doesn’t apply when the sales manager logs on.
Example 2: Different assignment types, same mode
Policy 2 includes:
-
Assignment C: Sales group (User), mode = Allow
-
Assignment D: Corporate IP range (Client IP), mode = Allow
The policy applies only when both assignments are satisfied. If the sales manager logs on from the office, both conditions are met, and the policy applies.
Policy 3 includes:
-
Assignment E: Sales group (User), mode = Allow
-
Assignment F: NetScaler Gateway connection (Access Control), mode = Allow
If the sales manager logs on from the office (not through NetScaler), Assignment F isn’t satisfied, so the policy doesn’t apply.
Policy settings: Parent-child relationships
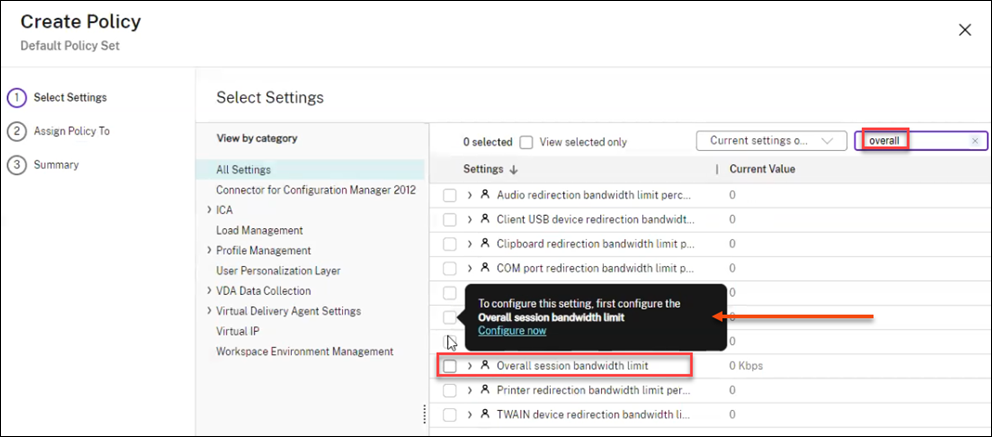
Some policy settings depend on parent settings. For example, you must configure Overall session bandwidth limit before its child settings become available.
When configuring policies in Web Studio, hover over a child setting to see which parent must be configured first. If a parent is disabled, related child settings are automatically disabled.
The following table lists parent settings and their corresponding child settings:
| Parent policy | Dependent Child policies |
|---|---|
| Overall session bandwidth limit
|
Audio redirection bandwidth limit percent |
| Clipboard redirection bandwidth limit percent | |
| COM port redirection bandwidth limit percent | |
| File redirection bandwidth limit percent | |
| HDX™ MediaStream Multimedia Acceleration bandwidth limit percent | |
| LPT port redirection bandwidth limit percent | |
| Printer redirection bandwidth limit percent | |
| Client USB device redirection bandwidth limit percent | |
| TWAIN device redirection bandwidth limit percent | |
| Allow bidirectional content redirection
|
Allowed URLs to be redirected to Client |
| Allowed URLs to be redirected to VDA | |
| CPU usage | CPU usage excluded process priority |
| Legacy graphics mode | Progressive compression level |
| Enable session watermark
|
Watermark custom text |
| Session watermark style | |
| Watermark transparency | |
| HDX adaptive transport | Loss tolerant mode for audio |
Policy setting states
Some policy settings can have one of the following states:
- Allowed or Prohibited: Allows or prevents the action controlled by the setting. Sometimes users are allowed or prevented from managing the setting’s action in a session. For example, if the menu animation is set to Allowed, users can control it within their session.
- Enabled or Disabled: turns the setting on or off. If a setting is disabled in a higher-priority policy, it’s not applied—even if enabled in a lower-priority policy.
Secure default settings
If the secure default setting is enabled during VDA installation, the priority of the policy settings is as follows:
- Customized setting
- Secure default setting
- Default setting
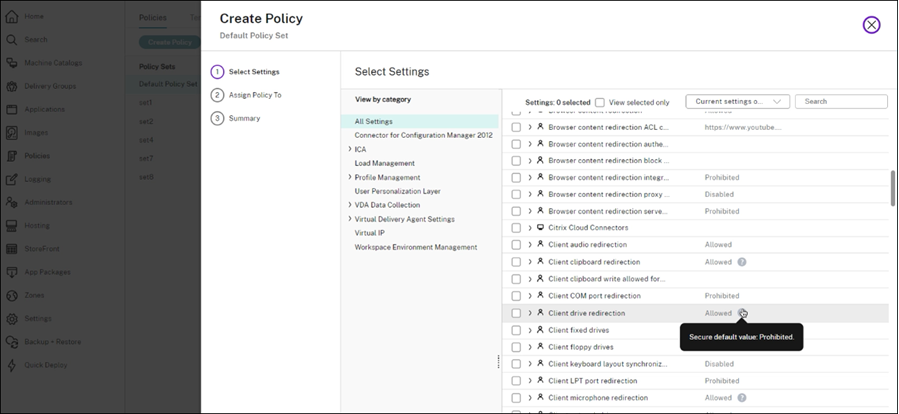
To view the secure default value:
- In Web Studio, click Policies in the left pane.
- On the Policies tab, click Create Policy.
-
In the Select Settings table, when you hover-over the settings that have Allowed as their current value, the Secure default value: Prohibited is shown.
Policy setting effectiveness
Some settings must be used and enabled together. For example, to allow users to access network drives on their local device:
-
Client drive redirection must be enabled
-
Client network drives must also be included
If Client drive redirection is disabled, users can’t access network drives even if Client network drives is enabled.
In general, changes to machine-related settings take effect when the VDA restarts or a user logs on. Changes to user-related settings apply at the next logon.
When adding a setting to a policy, you can select Use the default value to prevent changes. This option disables manual configuration and applies the default value only, regardless of previously entered values.
Best practices
- Assign policies to groups rather than individual users. If you assign policies to groups, assignments are updated automatically when you add or remove users from the group.
- Disable unused policies. Policies with no settings added incur unnecessary processing overhead.
Create policies from scratch
To create a policy:
- In Web Studio, click Policies in the left pane.
- On the Policies tab, click Create Policy.
- On the Select Settings page, select and configure settings and then click Next.
- On the Assign Policy to page, select the policy set where this policy resides, and then select the objects to assign the policy to. Click Next.
-
On the Summary page, complete the following settings:
- Enter a name and description for the policy.
- To enable the policy, select Enable policy.
- Click Finish.
Step 1: Select and configure policy settings
Policy settings are grouped by function. For example, settings related to Profile Management are under the Profile Management category.
There are two types of settings:
- Computer settings: Apply to machines and take effect when the virtual desktop starts (even if no user is logged on). They define virtual desktop behaviors.
- User settings: Apply when a user connects or reconnects. They define the user experience.
To select and configure a setting:
-
On the Select Settings page, to view settings by VDA versions, select one of the following options from the drop-down list option on the upper-right side:
- All settings: View all settings for all VDA versions
- Current settings only: View settings only for the current VDA versions
- Legacy settings only: View settings only for deprecated VDA versions
-
To search for a setting, enter the complete or partial name of the setting in the search box.
-
Select a setting. Click Enable to turn it on or Edit to specify a value.
-
Repeat step 3 to select and configure more settings for the policy.
Note:
Policy settings can be Enabled, Disabled, or Not configured. By default, policy settings aren’t configured, which means they aren’t added to a policy. Settings are applied only when they’re added to a policy.
Step 2: Specify policy assignments
Policy assignments define which users and machines a policy applies to. For information about how assignments affect policy behavior, see How policies work.
To specify policy assignments:
- On the Assign Policy To page, select Filtered users and computers.
- Select the users or computers by specifying assignments (also known as filters). Refer to the following table for available assignment types.
Note:
- If you do not specify any assignments or disable them, the policy applies to all connections.
- Policy assignments are also known as policy filters. For more information, see Create, modify, or delete a filter for a policy and How do filters get applied?
| Assignment type | Description |
|---|---|
| Access Control
|
Access control conditions through which a client is connecting:
|
| Citrix SD-WAN™ | Whether a user session is launched through Citrix SD-WAN. Note: You can add only one Citrix SD-WAN assignment to a policy. |
| Client IP Address | IP address of the user device used to connect to the session: IPv4 examples: 12.0.0.0, 12.0.0.*, 12.0.0.1-12.0.0.70, 12.0.0.1/24; IPv6 examples: 2001:0db8:3c4d:0015:0:0:abcd:ef12, 2001:0db8:3c4d:0015::/54 |
| Client Name | Name of the user device. Exact match: ClientABCName. Using wildcard: Client*Name. |
| Client Platform | OS type of the user device used to connect the session, such as Windows, Linux, iOS, Android, or HTML5. Required VDA version: 2503 or later. |
| Delivery Group | Delivery Group membership. |
| Delivery Group type | Type of desktop or application: private desktop, shared desktop, private application, or shared application. |
| Organizational Unit (OU) | Organizational unit. |
| Tag | Tags. Note: Apply this policy to all tagged machines. Application tags aren’t included. |
| User or Group | User or group name. The supported identity types for users and groups include Active Directory, Microsoft Entra ID, Okta, and Google Cloud. Required VDA version: 2507 or later. |
Create policies from templates
You can create a policy based on a Citrix-provided or custom template. The resulting policy is independent of the original template.
To create a policy from a template:
- In Web Studio, select Policies in the left pane.
- Select the Templates tab, and then select the template you want to use.
- Click Create Policy from Template in the action bar. The Create Policy page appears, showing all settings preconfigured in the selected template.
- Modify the settings and add more settings if needed, and then click Next.
- On the Assign Policy to page, select the policy set where this policy resides, and then select the objects to assign the policy to. Click Next.
- On the Summary page, enter a name and description for the policy.
- Click Finish. The new policy appears in the specified policy set on the Policies tab.