Quick Deploy reference
Catalog tabs on the Quick Deploy dashboard
From the Manage > Quick Deploy dashboard in Citrix DaaS (formerly Citrix Virtual Apps and Desktops service), click anywhere in the catalog’s entry. The following tabs contain information about the catalog:
-
Details: Lists the information specified when the catalog was created (or its most recent edit). It also contains information about the image that was used to create the catalog.
From this tab, you can:
- Change the image that is used in the catalog.
- Delete the catalog.
- Access the page containing details for the resource location used by the catalog.
-
Desktop: Available only for catalogs containing single-session (static or random) machines. From this tab, you can change the name and description of the catalog.
-
Desktop and Apps: The Desktops and Apps tab is available only for catalogs containing multi-session machines. From this tab, you can:
-
Subscribers: Lists all users, including their type (user or group), account name, display name, plus their Active Directory domain and user principal name.
From this tab, you can add or remove users for a catalog.
-
Machines: Shows the total number of machines in the catalog, plus the number of registered machines, unregistered machines, and machines that have maintenance mode turned on.
For each machine in the catalog, the display includes each machine’s name, power state (on/off), registration state (registered/unregistered), assigned users, session count (0/1), and maintenance mode status (an icon indicating on or off).
From this tab, you can:
- Add or delete a machine
- Start, restart, force restart, or shut down a machine
- Turn a machine’s maintenance mode on or off
For details, see Manage catalogs. Many of the machine actions are also available from the Monitor tab on the Quick Deploy dashboard. See Monitor and power control machines.
-
Power Management: Enables you to manage when machines in the catalog are powered on and off. A schedule also indicates when idle machines are disconnected.
You can configure a power schedule when you create a custom catalog or later. If no schedule is explicitly set, a machine powers off when a session ends.
When creating a catalog using quick create, you cannot select or configure a power schedule. By default, quick create catalogs use the Cost Saver preset schedule. However, you can edit that catalog later and change the schedule.
For details, see Manage power management schedules.
DNS servers
This section applies to all deployments that contain domain-joined machines. You can ignore this section if you use only non-domain-joined machines.
-
Before creating a domain-joined catalog (or a connection, if you’re using a Citrix Managed Azure subscription), check whether you have DNS server entries that can resolve public and private domain names.
When Citrix DaaS creates a catalog or a connection, it looks for at least one valid DNS server entry. If no valid entries are found, the creation operation fails.
Where to check:
- If you are using your own Azure subscription, check the DNS servers entry in your Azure.
- If you are using a Citrix Managed Azure subscription and creating an Azure VNet peering connection, check the DNS servers entry in the Azure VNet that you’re peering.
- If you are using a Citrix Managed Azure subscription and creating an SD-WAN connection, check the DNS entries in the SD-WAN Orchestrator.
-
In Azure, the Custom setting must have at least one valid entry. This service cannot be used with the Default (Azure-provided) setting.
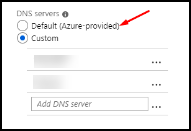
- If Default (Azure-provided) is enabled, change the setting to Custom, and add at least one DNS server entry.
- If you already have DNS server entries under Custom, verify that the entries you want to use with this service can resolve public and private domain IP names.
- If you do not have any DNS servers that can resolve domain names, Citrix recommends adding an Azure-provided DNS server that has those capabilities.
-
If you change any DNS server entries, restart all machines that are connected to the virtual network. The restart assigns the new DNS server settings. (The VMs continue using their current DNS settings until the restart.)
If you want to change DNS addresses later, after a connection is created:
-
When using your own Azure subscription, you can change them in Azure (as described in the preceding steps). Or, you can change them in this service.
-
When using a Citrix Managed Azure subscription, this service does not synchronize DNS address changes that you make in Azure. However, you can change DNS settings for the connection in this service.
Keep in mind that changing DNS server addresses can potentially cause connectivity issues for machines in catalogs that use that connection.
Adding DNS servers through this service
Before adding a DNS server address to a connection, make sure that the DNS server can resolve public and internal domain names. Citrix recommends that you test connectivity to a DNS server before adding it.
- To add, change, or remove a DNS server address when you’re creating a connection, select Edit DNS servers on the Add connection type page. Or, if a message indicates that no DNS server addresses were found, select Add DNS Servers. Continue with step 3.
- To add, change, or remove a DNS server address for an existing connection:
- From Manage > Quick Deploy, expand Network Connections on the right.
- Select the connection you want to edit.
- Select Edit DNS servers.
- Add, change, or remove addresses.
- To add an address, select Add DNS server and then enter the IP address.
- To change an address, click inside the address field and change the numbers.
- To remove an address, select the trash icon next to the address entry. You cannot remove all DNS server addresses. The connection must have at least one.
- When you’re done, select Confirm Changes at the bottom of the page.
- Restart all machines that use that connection. The restart assigns the new DNS server settings. (The VMs continue using their current DNS settings until the restart.)
Policies
Set group policies for non-domain-joined machines
- RDP to the machine that is being used for the image.
-
Install Citrix Group Policy Management:
- Browse to CTX220345. Download the attachment.
- Double-click the downloaded file. In the
Group Policy Templates 1912 > Group Policy Managementfolder, double-clickCitrixGroupPolicyManagement_x64.msi.
- Using the Run command, launch
gpedit.mscto open the Group Policy Editor. -
In
User Configuration Citrix Policies > Unfiltered, select Edit Policy.If the Group Policy Management Console fails (as described in CTX225742), install the Microsoft Visual C++ 2015 Runtime (or a later version of that runtime).
-
Enable policy settings as needed. For example:
- When working in Computer Configuration or User Configuration (depending on what you want to configure) on the Settings tab, in
Category > ICA / Printing, select Auto-create PDF Universal Printer and set toEnabled. - If you want logged-in users to be administrators of their desktop, add the Interactive User group to the built-in administrators group.
- When working in Computer Configuration or User Configuration (depending on what you want to configure) on the Settings tab, in
- When you’re done, save the image.
- Either update the existing catalog or create a new catalog using the new image.
Set group policies for domain-joined machines
-
Ensure that the Group Policy Management feature is installed.
- On a Windows multi-session machine, add the Group Policy Management feature, using the Windows tool for adding roles and features (such as Add Roles and Features).
- On a Windows single-session machine, install the Remote Server Administration Tools for the appropriate OS. (This installation requires a domain admin account.) After that installation, the Group Policy Management console is available from the Start menu.
-
Download and install the Citrix Group Policy management package from the Citrix download page, and then configure policy settings as needed. Follow the procedure in Set group policies for non-domain-joined machines, step 2 through the end.
See the Policy settings reference articles to learn about what’s available. All policy features are available from Citrix DaaS’s Full Configuration interface.
Resource location actions
Citrix automatically creates a resource location and two Cloud Connectors when you create the first catalog for publishing desktops and apps. You can specify some information related to the resource location when you create a catalog. See Resource location settings when creating a catalog.
For Remote PC Access, you create the resource location and Cloud Connectors.
This section describes available actions after a resource location is created.
- From Manage > Quick Deploy, expand Cloud Subscriptions on the right.
-
Select the subscription.
-
The Details tab shows the number and names of catalogs and images in the subscription. It also indicates the number of machines that can deliver desktops or apps. That count does not include machines used for other purposes, such as images, Cloud Connectors, or RDS license servers.
-
The Resource Locations tab lists each resource location. Each resource location entry includes the status and address of each Cloud Connector in the resource location.
-
The ellipsis menu in a resource location’s entry contains the following actions.
Run Health Check
Selecting Run Health Check starts the connectivity check immediately. If the check fails, the Cloud Connector’s state is unknown, because it is not communicating with Citrix Cloud. You might want to restart the Cloud Connector.
Restart Connectors
Citrix recommends restarting only one Cloud Connector at a time. Restarting takes the Cloud Connector offline, and disrupts user access and machine connectivity.
Select the check box for the Cloud Connector you want to restart. Select Restart.
Add Connectors
Adding a Cloud Connector typically takes 20 minutes to complete.
Provide the following information:
- How many Cloud Connectors to add.
- Domain service account credentials, which are used to join the Cloud Connector machines to the domain.
- Machine performance.
- Azure resource group. The default is the resource group last used by the resource location.
- Organizational Unit (OU). The default is the OU last used by the resource location.
- Whether your network requires a proxy server for internet connectivity. If you indicate Yes, provide the proxy server FQDN or IP address, and port number.
When you’re done, select Add Connectors.
Delete Connectors
If a Cloud Connector cannot communicate with Citrix Cloud, and a restart does not resolve the issue, Citrix Support might recommend deleting that Cloud Connector.
Select the check box for the Cloud Connector you want to delete. Then select Delete. When prompted, confirm the deletion.
You can also delete an available Cloud Connector. However, if deleting that Cloud Connector would result in fewer than two available Cloud Connectors in the resource location, you’re not allowed to delete the selected Cloud Connector.
Select Update Time
Citrix automatically provides software updates for the Cloud Connectors. During an update, one Cloud Connector is taken offline and updated, while other Cloud Connectors remain in service. When the first update completes, another Cloud Connector is taken offline and updated. This process continues until all Cloud Connectors in the resource location are updated. The best time to start updates is usually outside your typical business hours.
Choose the time to begin updates, or indicate that you want updates to start when an update is available. When you’re done, select Save.
Rename
Enter the new name for the resource location. Select Save.
Configure Connectivity
Indicate whether users can access desktops and apps through the Citrix Gateway service, or only from within your corporate network.
Profile Management
Profile Management ensures that personal settings apply to users’ virtual applications, regardless of the location of the user device.
Configuring Profile Management is optional.
You can enable Profile Management with the profile optimization service. This service provides a reliable way for managing these settings in Windows. Managing profiles ensures a consistent experience by maintaining a single profile that follows the user. It consolidates automatically and optimizes user profiles to minimize management and storage requirements. The profile optimization service requires minimal administration, support, and infrastructure. Also, profile optimization provides users with an improved logon and logoff experience.
The profile optimization service requires a file share where all the personal settings persist. You manage the file servers. We recommend setting up network connectivity to allow access to these file servers. You must specify the file share as a UNC path. The path can contain system environment variables, Active Directory user attributes, or Profile Management variables. To learn more about the format of the UNC text string, see Specify the path to the user store.
When enabling Profile Management, consider further optimizing the user’s profile by configuring folder redirection to minimize the effects of the user profile size. Applying folder redirection complements the Profile Management solution. For more information, see Microsoft Folder Redirection.
Configure the Microsoft RDS License Server for Windows Server workloads
This service accesses Windows Server remote session capabilities when delivering a Windows Server workload, such as Windows 2016. This typically requires a Remote Desktop Services client access license (RDS CAL). The Windows machine where the Citrix VDA is installed must be able to contact an RDS license server to request RDS CALs.
Install and activate the license server. For more information, see the Microsoft document Activate the Remote Desktop Services License Server. For proof of concept environments, you can use the grace period provided by Microsoft.
With this method, you can have Citrix DaaS apply the license server settings. You can configure the license server and per user mode in the RDS console on the image. You can also configure the license server using Microsoft Group Policy settings. For more information, see the Microsoft document License your RDS deployment with client access licenses (CALs).
To configure the RDS license server using Group Policy settings
- Install a Remote Desktop Services License Server on one of the available VMs. The VM must always be available. Citrix DaaS workloads must be able to reach this license server.
- Specify the license server address and per-user license mode using Microsoft Group Policy. For details, see the Microsoft document Specify the Remote Desktop Licensing Mode for an RD Session Host Server.
Windows 10 workloads require appropriate Windows 10 license activation. We recommend that you follow Microsoft documentation to activate Windows 10 workloads.
Consumption commitment usage
Note:
This feature is in preview.
From Manage > Quick Deploy, select the General card. The Consumption value indicates how much consumption has been used in the current calendar month. That value includes monthly and term commitments.
When you select General, the Notifications tab includes:
- Total consumption used for the month (monthly and term).
- Number of units of monthly consumption commitment.
- Percentage of term consumption commitment.
The values and progress bars can alert you to potential or actual usage overages.
Actual data can take 24 hours to appear. Usage and billing data are considered final 72 hours after the end of a calendar month.
For more usage information, see Monitor licenses and active usage.
You can optionally request notifications to appear in the Manage > Quick Deploy dashboard when consumption usage (for monthly, term, or both commitments) reaches a specified level. By default, notifications are disabled.
- On the Notifications tab, select Edit Notification Preferences.
- To enable notifications, click the slider so that the check mark appears.
- Enter a value. Repeat for the other consumption type, if needed.
- Select Save.
To disable notifications, click the slider so that the check mark no longer appears, and then select Save.
Monitor Citrix license usage
To view your Citrix license usage information, follow the guidance in Monitor licenses and active usage. You can view:
- Licensing summary
- Usage reports
- Usage trends and license activity
- Licensed users
You can also release licenses.
Load balancing
Load balancing applies to multi-session machines, not single-session machines.
Important:
Changing the load balancing method affects all catalogs in your deployment. That includes all catalogs created using any supported host type, cloud-based and on-premises, regardless of interface used to create them (such as Full Configuration or Quick Deploy).
Make sure you have maximum session limits configured for all catalogs before proceeding.
- In Quick Deploy, that setting is located on each catalog’s Details tab.
- In Full Configuration, see Load balance machines.
Load balancing measures the machine load, and determines which multi-session machine to select for an incoming user session under the current conditions. This selection is based on the configured load balancing method.
You can configure one of two load balancing methods: horizontal or vertical. The method applies to all multi-session catalogs (and therefore, all multi-session machines) in your Citrix DaaS deployment.
-
Horizontal load balancing: An incoming user session is assigned to the least-loaded powered-on machine available.
Simple example: You have two machines configured for 10 sessions each. The first machine handles five concurrent sessions. The second machine handles five.
Horizontal load balancing offers high user performance, but it can increase costs as more machines are kept powered-on and busy.
This method is enabled by default.
-
Vertical load balancing: An incoming user session is assigned to the powered-on machine with the highest load index. Citrix DaaS calculates and then assigns a load index for every multi-session machine. The calculation considers factors such as CPU, memory, and concurrency.
This method saturates existing machines before moving on to new machines. As users disconnect and free up capacity on existing machines, new load is assigned to those machines.
Simple example: You have two machines configured for 10 sessions each. The first machine handles the first 10 concurrent sessions. The second machine handles the eleventh session.
With vertical load balancing, sessions maximize powered-on machine capacity, which can save machine costs.
To configure the load balancing method:
- From Manage > Quick Deploy, expand General on the right.
- Under Global Settings, select View All.
- On the Global Settings page, under Multi-Session Catalog Load Balancing, choose the load balancing method.
- Select Confirm.
Create a catalog in a network that uses a proxy server
Follow this procedure if your network requires a proxy server for Internet connectivity, and you are using your own Azure subscription. (Using a Citrix Managed Azure subscription with a network requiring a proxy server is not supported.)
-
From Manage > Quick Deploy, start the catalog creation process by providing the required information and then selecting Create Catalog at the bottom of the page.
-
The catalog creation fails because of the proxy requirement. However, a resource location is created. That resource location’s name begins with “DAS”, unless you provided a resource location name when creating the catalog. On the manage > Quick Deploy dashboard, expand Cloud Subscriptions on the right. On the Resource Locations tab, check whether the newly created resource location has any Cloud Connectors in it. If it does, delete them.
-
In Azure, create two VMs (see Cloud Connector system requirements). Join those machines to the domain.
-
From the Citrix Cloud console, install a Cloud Connector on each VM. Make sure that the Cloud Connectors are in the same resource location that was created earlier. Follow the guidance in:
-
From Manage > Quick Deploy, repeat the catalog creation process. When the catalog is created, it uses the resource location and Cloud Connectors you created in the preceding steps.
Get help
-
Review Troubleshoot.
-
If you need further assistance with Citrix DaaS, open a ticket by following the guidance in How to Get Help and Support.
In this article
- Catalog tabs on the Quick Deploy dashboard
- DNS servers
- Policies
- Resource location actions
- Profile Management
- Configure the Microsoft RDS License Server for Windows Server workloads
- Consumption commitment usage
- Monitor Citrix license usage
- Load balancing
- Create a catalog in a network that uses a proxy server
- Get help