-
-
Cloud Connector Standalone Citrix Secure Ticketing Authority (STA) service
-
-
-
-
-
This content has been machine translated dynamically.
Dieser Inhalt ist eine maschinelle Übersetzung, die dynamisch erstellt wurde. (Haftungsausschluss)
Cet article a été traduit automatiquement de manière dynamique. (Clause de non responsabilité)
Este artículo lo ha traducido una máquina de forma dinámica. (Aviso legal)
此内容已经过机器动态翻译。 放弃
このコンテンツは動的に機械翻訳されています。免責事項
이 콘텐츠는 동적으로 기계 번역되었습니다. 책임 부인
Este texto foi traduzido automaticamente. (Aviso legal)
Questo contenuto è stato tradotto dinamicamente con traduzione automatica.(Esclusione di responsabilità))
This article has been machine translated.
Dieser Artikel wurde maschinell übersetzt. (Haftungsausschluss)
Ce article a été traduit automatiquement. (Clause de non responsabilité)
Este artículo ha sido traducido automáticamente. (Aviso legal)
この記事は機械翻訳されています.免責事項
이 기사는 기계 번역되었습니다.책임 부인
Este artigo foi traduzido automaticamente.(Aviso legal)
这篇文章已经过机器翻译.放弃
Questo articolo è stato tradotto automaticamente.(Esclusione di responsabilità))
Translation failed!
Manage security keys
Important:
- You must use this feature in combination with StoreFront™ 1912 LTSR CU2 or later.
- The Secure XML feature is only supported on Citrix ADC and Citrix Gateway release 12.1 and later.
Note:
Starting with version 2511, Citrix Web Studio (web-based) is the only management console for Citrix Virtual Apps and Desktops™. Citrix Studio (MMC-based) has been removed from the installer. This article applies only to Web Studio. For information about Citrix Studio, see the equivalent article in Citrix Virtual Apps and Desktops 7 2212 or earlier.
This feature lets you allow only approved StoreFront and Citrix Gateway machines to communicate with Delivery Controllers. After you enable this feature, any requests that do not contain the key are blocked. Use this feature to add an extra layer of security to protect against attacks originating from the internal network.
A general workflow to use this feature is as follows:
-
Enable Web Studio to show the feature settings.
-
Configure settings for your site.
-
Configure settings for StoreFront.
-
Configure settings for Citrix ADC.
Configure settings for the site
You can use Web Studio or PowerShell to configure security key settings for your site.
Use Web Studio
- Sign in to Web Studio, select Settings in the left pane.
-
Locate the Manage security key tile and click Edit. The Manage Security Key page appears.
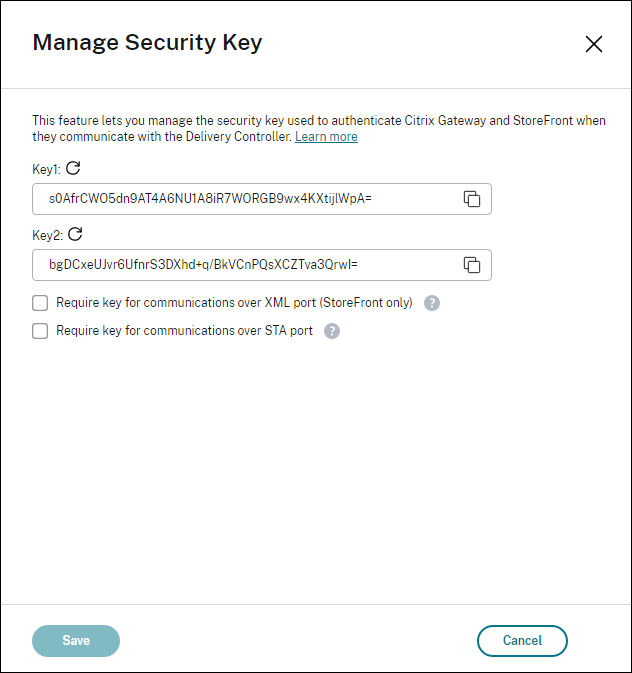
-
Click the refresh icon to generate the keys.
Important:
- There are two keys available for use. You can use the same key or different keys for communications over the XML and STA ports. We recommend that you use only one key at a time. The unused key is used only for key rotation.
- Do not click the refresh icon to update the key already in use. If you do, service interruption will occur.
-
Select where a key is required for communications:
-
Require key for communications over XML port (StoreFront only). If selected, require a key to authenticate communications over the XML port. StoreFront communicates with Citrix Cloud over this port. For information about changing the XML port, see Knowledge Center article CTX127945.
-
Require key for communications over STA port. If selected, require a key to authenticate communications over the STA port. Citrix Gateway and StoreFront communicate with Citrix Cloud over this port. For information about changing the STA port, see Knowledge Center article CTX101988.
-
- Click Save to apply your changes and close the window.
Use PowerShell
The following are PowerShell steps equivalent to Web Studio operations.
-
Run the Citrix Virtual Apps™ and Desktops Remote PowerShell SDK.
- In a command window, run the following command:
Add-PSSnapIn Citrix*
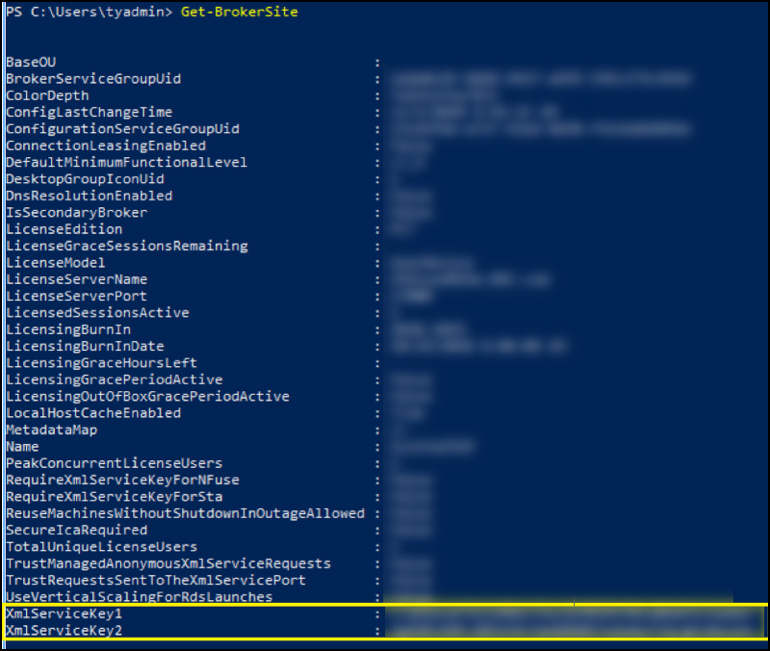
- Run the following commands to generate a key and set up Key1:
New-BrokerXmlServiceKeySet-BrokerSite -XmlServiceKey1 <the key you generated>
- Run the following commands to generate a key and set up Key2:
New-BrokerXmlServiceKeySet-BrokerSite -XmlServiceKey2 <the key you generated>
- Run one or both of the following commands to enable the use of a key in authenticating communications:
- To authenticate communications over the XML port:
Set-BrokerSite -RequireXmlServiceKeyForNFuse $true
- To authenticate communications over the STA port:
Set-BrokerSite -RequireXmlServiceKeyForSta $true
- To authenticate communications over the XML port:
See the PowerShell command help for guidance and syntax.
Configure settings for StoreFront
After completing the configuration for your site, you need to configure relevant settings for StoreFront by using PowerShell.
On the StoreFront server, run the following PowerShell commands:
| To configure the key for communications over the XML port, use command [Set-STFStoreFarm | https://developer-docs.citrix.com/en-us/storefront-powershell-sdk/current-release/Set-STFStoreFarm.html]. For example |
$store = Get-STFStoreService -VirtualPath [Path to store]
$farm = Get-STFStoreFarm -StoreService $store -FarmName [Resource feed name]
Set-STFStoreFarm -Farm $farm -XMLValidationEnabled $true -XMLValidationSecret [secret]
<!--NeedCopy-->
Enter the appropriate values for the following parameters:
Path to storeResource feed namesecret
To configure the key for communications over the STA port, use the New-STFSecureTicketAuthority and Set-STFRoamingGateway commands. For example:
$gateway = Get-STFRoamingGateway -Name [Gateway name]
$sta1 = New-STFSecureTicketAuthority -StaUrl [STA1 URL] -StaValidationEnabled $true -StaValidationSecret [secret]
$sta2 = New-STFSecureTicketAuthority -StaUrl [STA2 URL] -StaValidationEnabled $true -StaValidationSecret [secret]
Set-STFRoamingGateway -Gateway $gateway -SecureTicketAuthorityObjs $sta1,$sta2
<!--NeedCopy-->
Enter the appropriate values for the following parameters:
Gateway nameSTA URLSecret
See the PowerShell command help for guidance and syntax.
Configure settings for Citrix ADC
Note:
Configuring this feature for Citrix ADC is not required unless you use Citrix ADC as your gateway. If you use Citrix ADC, follow these steps:
-
Ensure that the following prerequisite configuration is already in place:
- The following Citrix ADC related IP addresses are configured.
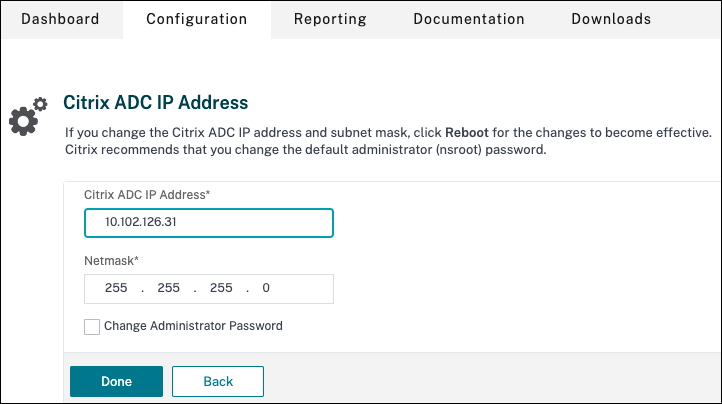
- Citrix ADC Management IP (NSIP) address for accessing the Citrix ADC console. For details, see Configuring the NSIP address.
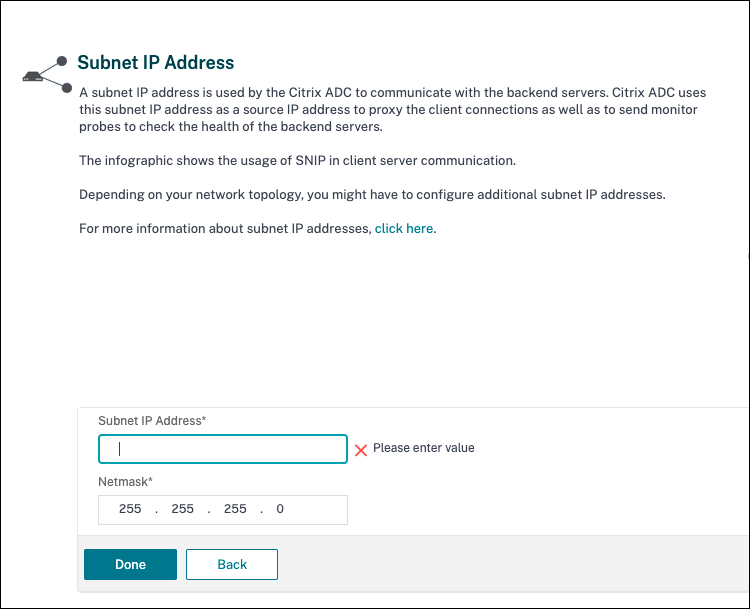
- Subnet IP (SNIP) address for enabling communication between the Citrix ADC appliance and the back-end servers. For details, see Configuring Subnet IP Addresses.
- Citrix Gateway virtual IP address and load balancer virtual IP address to log in to the ADC appliance for session launch. For details, see Create a virtual server.
- The required modes and features in the Citrix ADC appliance are enabled.
- To enable the modes, in the Citrix ADC GUI go to System > Settings > Configure Mode.
- To enable the features, in the Citrix ADC GUI go to System > Settings > Configure Basic Features.
- Certificates related configurations are complete.
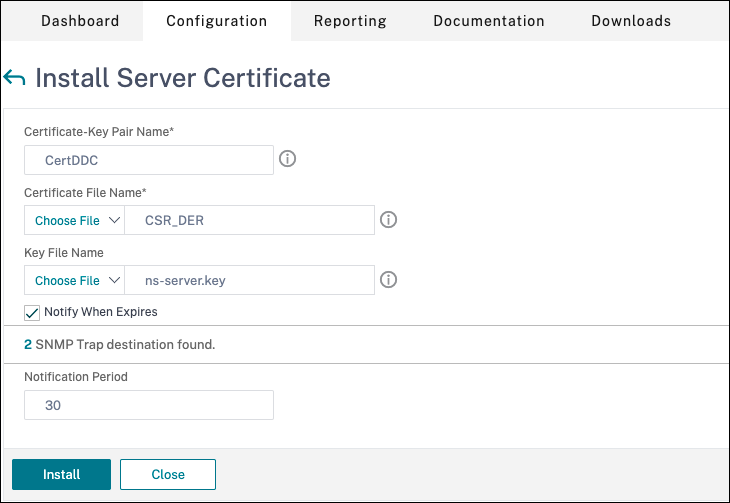
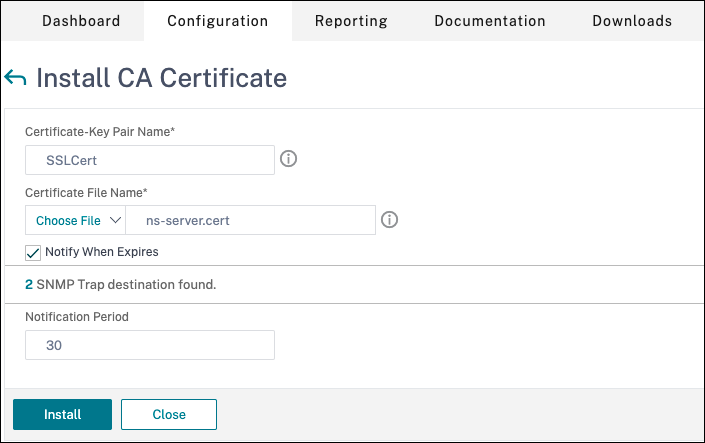
- The Certificate Signing Request (CSR) is created. For details, see Create a certificate.
- The server and CA certificates and root certificates are installed. For details, see Install, link, and updates.
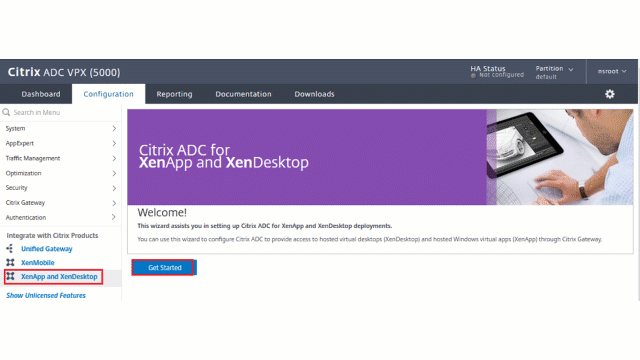
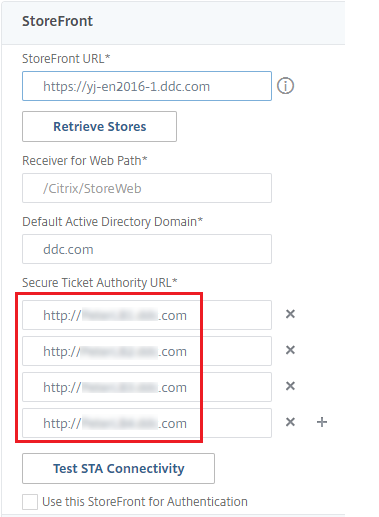
- A Citrix Gateway has been created for Citrix Virtual Desktops. Test the connectivity by clicking the Test STA Connectivity button to confirm that the virtual servers are online. For details, see Setting up Citrix ADC for Citrix Virtual Apps and Desktops.
- The following Citrix ADC related IP addresses are configured.
-
Add a rewrite action. For details, see Configuring a Rewrite Action.
- Go to AppExpert > Rewrite > Actions.
- Click Add to add a new rewrite action. You can name the action as “set Type to INSERT_HTTP_HEADER”.
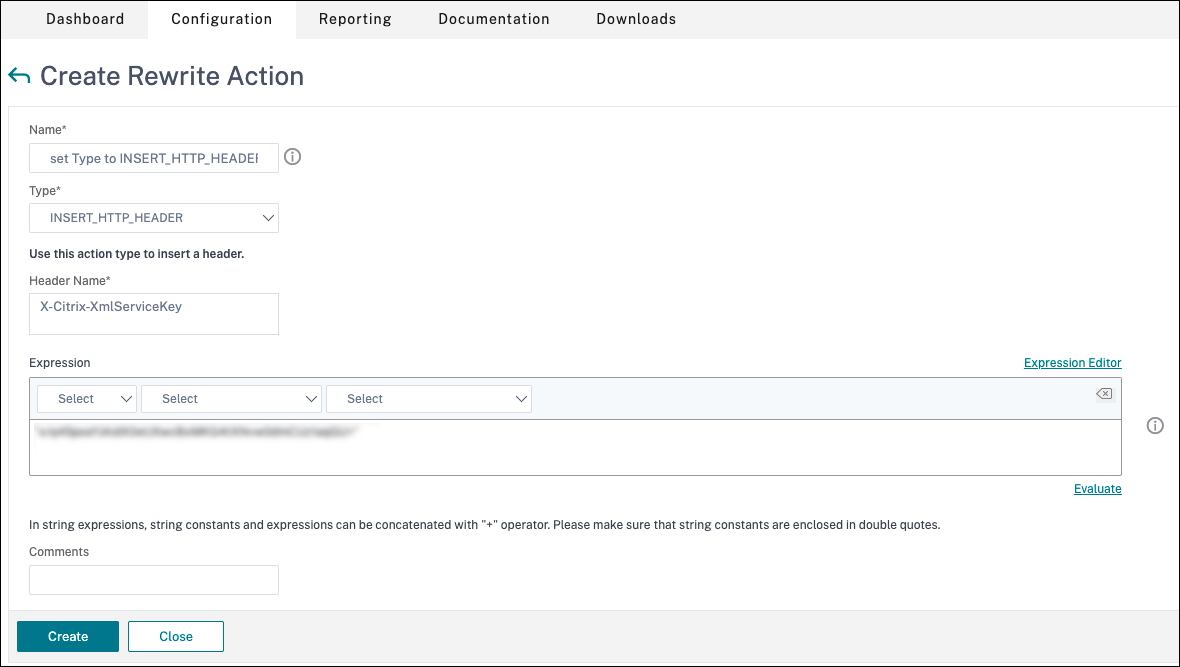
- In Type, select INSERT_HTTP_HEADER.
- In Header Name, enter X-Citrix-XmlServiceKey.
- In Expression, add
<XmlServiceKey1 value>with the quotes. You can copy the XmlServiceKey1 value from your Desktop Delivery Controller™ configuration.
- Add a rewrite policy. For details, see Configuring a Rewrite Policy.
-
Go to AppExpert > Rewrite > Policies.
-
Click Add to add a new policy.
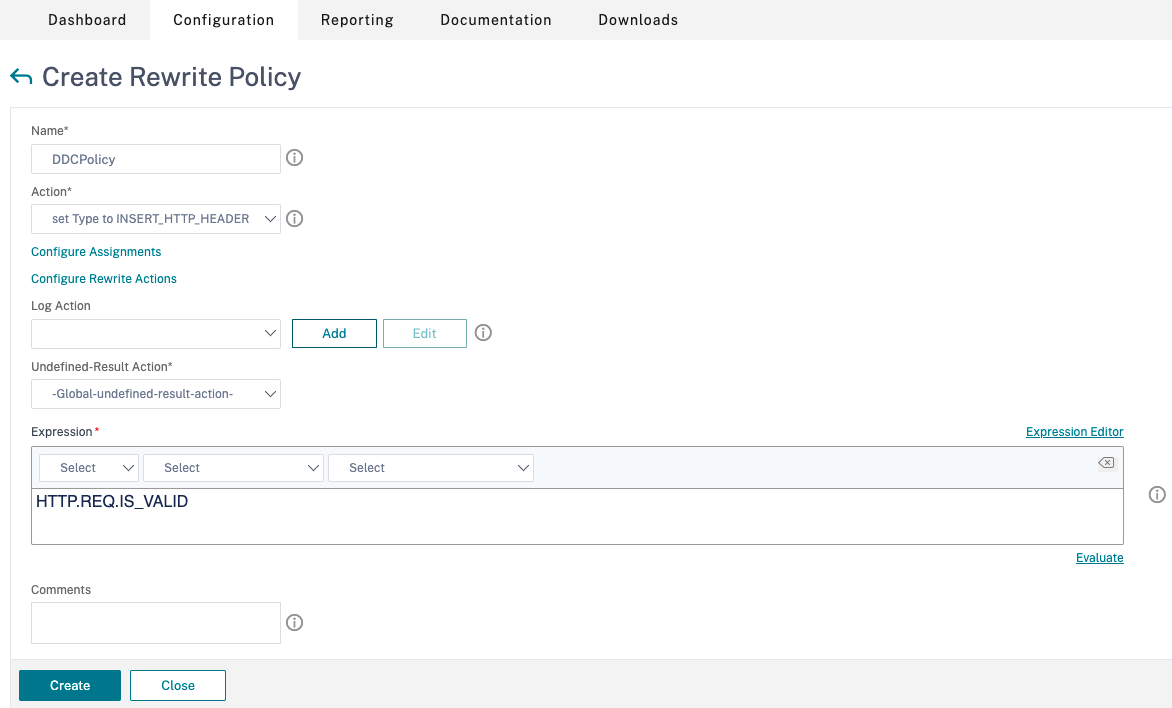
- In Action, select the action created in the earlier step.
- In Expression, add HTTP.REQ.IS_VALID.
- Click OK.
-
-
Set up load balancing. You must configure one load balancing virtual server per STA server. If not the sessions fail to launch.
For details, see Set up basic load balancing.
- Create a load balancing virtual server.
- Go to Traffic Management > Load Balancing > Servers.
- In Virtual Servers page, click Add.
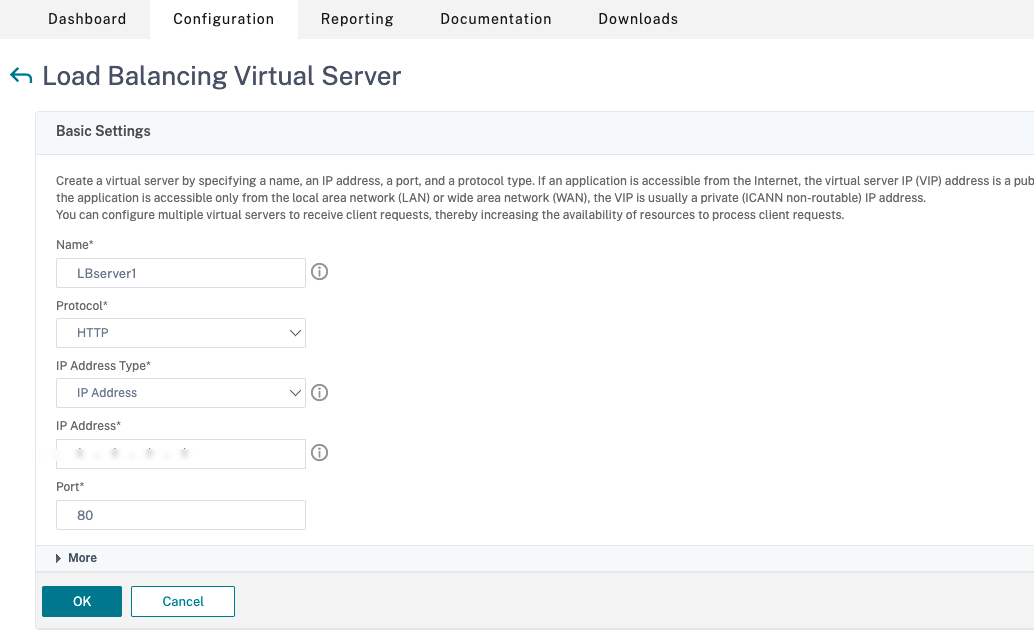
- In Protocol, select HTTP.
- Add the load balancing virtual IP address and in Port select 80.
- Click OK.
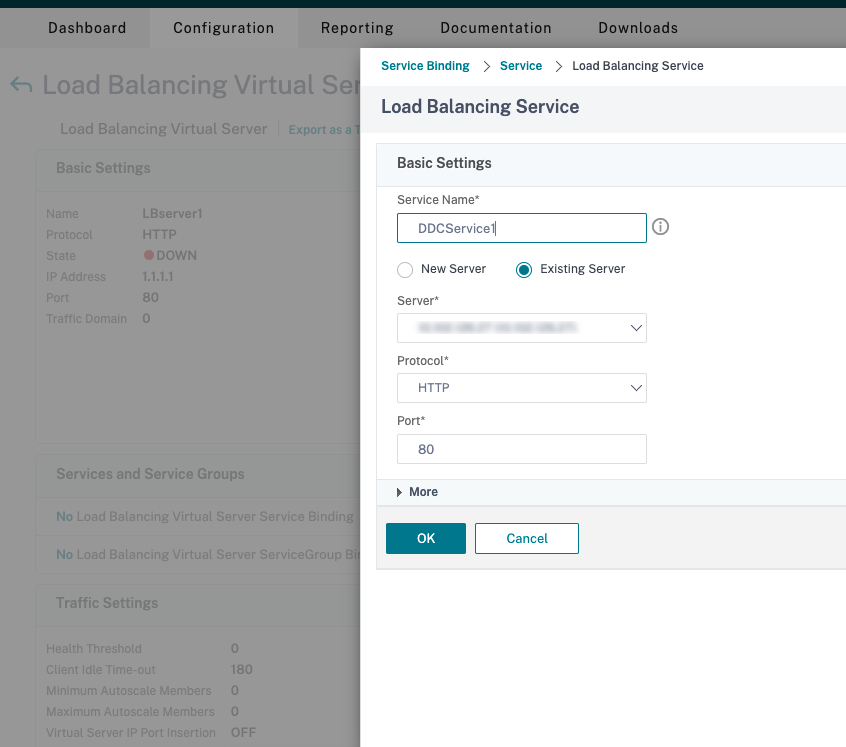
- Create a load balancing service.
- Go to Traffic Management > Load Balancing > Services.
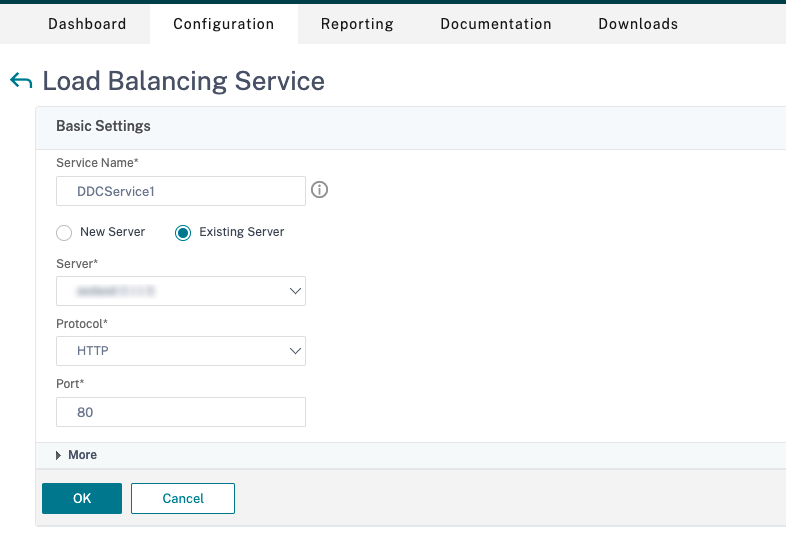
- In Existing Server, select the virtual server created in the previous step.
- In Protocol, select HTTP and in Port select 80.
- Click OK, and then click Done.
- Bind the service to the virtual server.
- Select the virtual server created earlier and click Edit.
- In Services and Service Groups, click No Load Balancing Virtual Server Service Binding.
- In Service Binding, select the service created earlier.
- Click Bind.
- Bind the rewrite policy created earlier to the virtual server.
- Select the virtual server created earlier and click Edit.
- In Advanced Settings, click Policies, and then in Policies section click +.
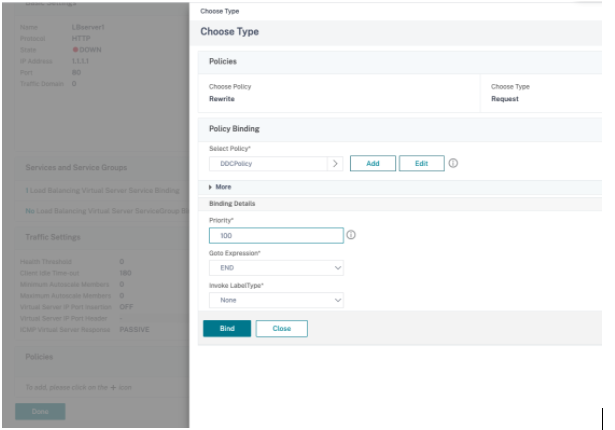
- In Choose Policy, select Rewrite and in Choose Type, select Request.
- Click Continue.
- In Select Policy, select the rewrite policy created earlier.
- Click Bind.
- Click Done.
- Set up persistence for the virtual server, if necessary.
- Select the virtual server created earlier and click Edit.
- In Advanced Settings, click Persistence.
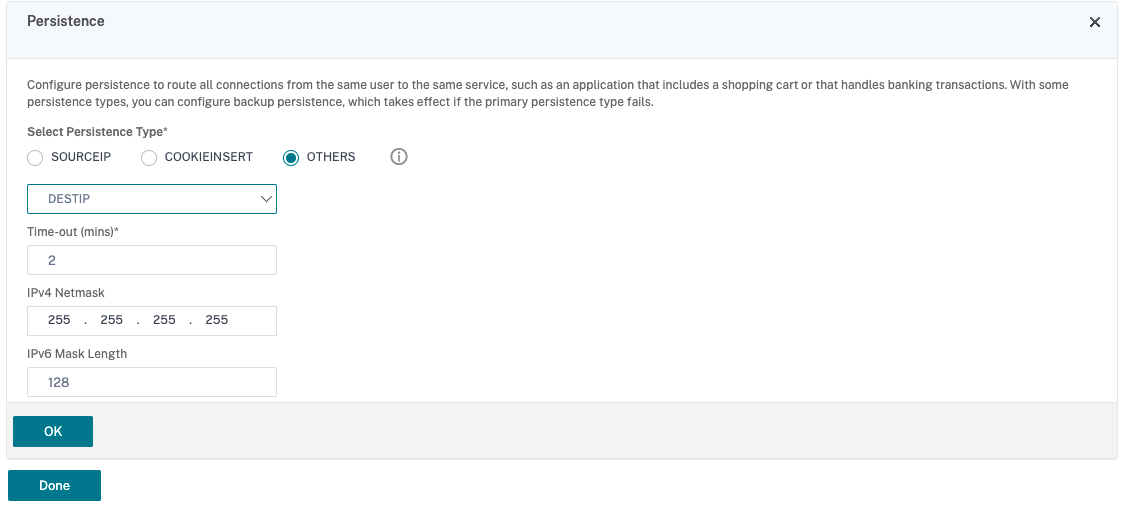
- Select persistence type as Others.
- Select DESTIP to create persistence sessions based on the IP address of the service selected by the virtual server (the destination IP address)
- In IPv4 Netmask, add network mask same as that of the DDC.
- Click OK.
- Repeat these steps for the other virtual server as well.
- Create a load balancing virtual server.
Configuration changes if the Citrix ADC appliance is already configured with Citrix Virtual Desktops™
If you have already configured the Citrix ADC appliance with Citrix Virtual Desktops, then to use the Secure XML feature, you must make the following configuration changes.
- Before the session launch, change the Security Ticket Authority URL of the gateway to use the FQDNs of the load balancing virtual servers.
- Ensure that the
TrustRequestsSentToTheXmlServicePortparameter is set to False. By default,TrustRequestsSentToTheXmlServicePortparameter is set to False. However, if the customer has already configured the Citrix ADC for Citrix Virtual Desktops, then theTrustRequestsSentToTheXmlServicePortis set to True.
- In the Citrix ADC GUI, go to Configuration > Integrate with Citrix Products and click XenApp and XenDesktop®.
-
Select the gateway instance and click the edit icon.

-
In the StoreFront pane, click the edit icon.
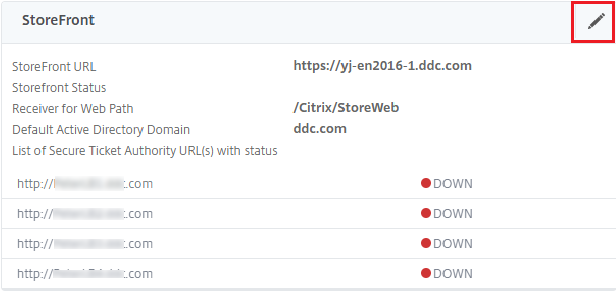
- Add the Secure Ticket Authority URL.
- If the Secure XML feature is enabled, then the STA URL must be the URL of the load balancing service.
- If the Secure XML feature is disabled, then the STA URL must be the URL of STA (DDC’s address) and the
TrustRequestsSentToTheXmlServicePortparameter on the DDC must be set to True.
Share
Share
This Preview product documentation is Citrix Confidential.
You agree to hold this documentation confidential pursuant to the terms of your Citrix Beta/Tech Preview Agreement.
The development, release and timing of any features or functionality described in the Preview documentation remains at our sole discretion and are subject to change without notice or consultation.
The documentation is for informational purposes only and is not a commitment, promise or legal obligation to deliver any material, code or functionality and should not be relied upon in making Citrix product purchase decisions.
If you do not agree, select I DO NOT AGREE to exit.