-
-
Cloud Connector Standalone Citrix Secure Ticketing Authority (STA) service
-
-
-
-
-
This content has been machine translated dynamically.
Dieser Inhalt ist eine maschinelle Übersetzung, die dynamisch erstellt wurde. (Haftungsausschluss)
Cet article a été traduit automatiquement de manière dynamique. (Clause de non responsabilité)
Este artículo lo ha traducido una máquina de forma dinámica. (Aviso legal)
此内容已经过机器动态翻译。 放弃
このコンテンツは動的に機械翻訳されています。免責事項
이 콘텐츠는 동적으로 기계 번역되었습니다. 책임 부인
Este texto foi traduzido automaticamente. (Aviso legal)
Questo contenuto è stato tradotto dinamicamente con traduzione automatica.(Esclusione di responsabilità))
This article has been machine translated.
Dieser Artikel wurde maschinell übersetzt. (Haftungsausschluss)
Ce article a été traduit automatiquement. (Clause de non responsabilité)
Este artículo ha sido traducido automáticamente. (Aviso legal)
この記事は機械翻訳されています.免責事項
이 기사는 기계 번역되었습니다.책임 부인
Este artigo foi traduzido automaticamente.(Aviso legal)
这篇文章已经过机器翻译.放弃
Questo articolo è stato tradotto automaticamente.(Esclusione di responsabilità))
Translation failed!
Enable TLS on Web Studio and Director
We recommend always using TLS to secure connections to Web Studio and Director by enabling HTTPS. This article explains how to configure Web Studio and Director to use a trusted certificate and ensure secure access over HTTPS.
Default behavior
When you install Web Studio, the installer creates a self-signed certificate and binds it to port 443 on the current server. You can access Web Studio and Director from a web browser over HTTPS on the local server.
However, if you try to access Web Studio or Director from another machine over HTTPS, the browser shows a security error because it doesn’t trust the certificate.
Note:
If you install Director without Web Studio, the installer doesn’t create a self-signed certificate.
Enable secure access over HTTPS
To allow access to Web Studio or Director over HTTPS from machines other than the Web Studio server, follow these steps:
-
If Web Studio isn’t configured as a proxy (client machines connect to both Web Studio and the Delivery Controllers), enable TLS on Delivery Controllers.
Note:
Using the self-signed certificate isn’t recommended because it requires manual configuration on each machine. For more information, see Use the self-signed certificate.
Create or import a trusted certificate
We recommend using a certificate from an enterprise or public certificate authority that is trusted by machines connecting to the server.
For more information, see Create a new certificate and Import existing certificate. The certificate’s common name or subject alternative name must match the FQDN that the users use to connect to Web Studio or Director. If a load balancer is deployed in front of the server, use the FQDN of the load balancer.
Bind the certificate to port 443
After creating or importing a trusted certificate, bind it to port 443 in IIS. You can do that either before or after installation. If certificate binding is already configured for port 443, the installer makes no changes.
Note:
By default, Web Studio and Director use port 443 for secure HTTPS access. You can change the port number if needed. See Change the default port number for details.
To bind the certificate to port 443, follow these steps:
-
Log on to the server as an administrator.
-
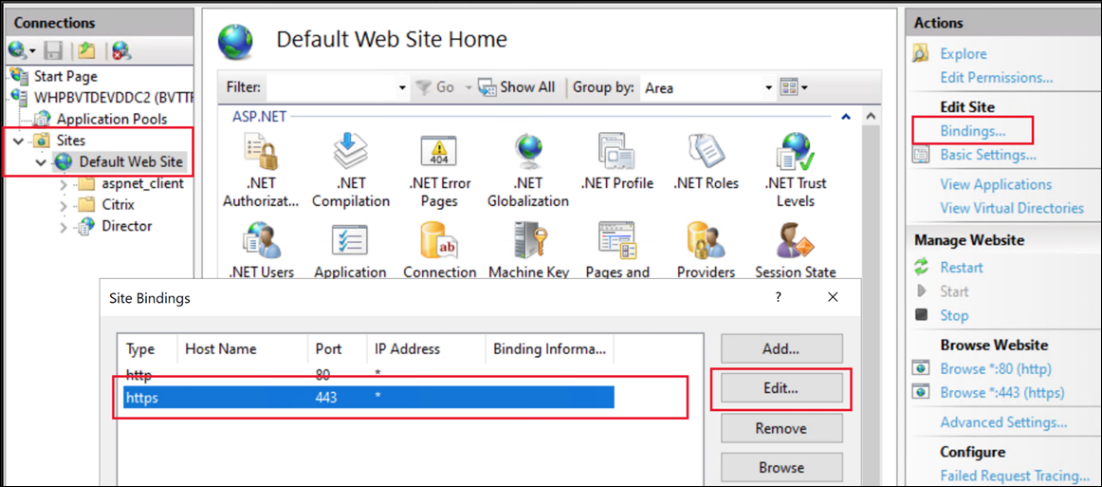
Open the IIS Manager, and browse to Sites > Default Web Site > Bindings.
-
If there is an existing binding of type https then select it and click Edit…. If there is no https binding then click Add.

-
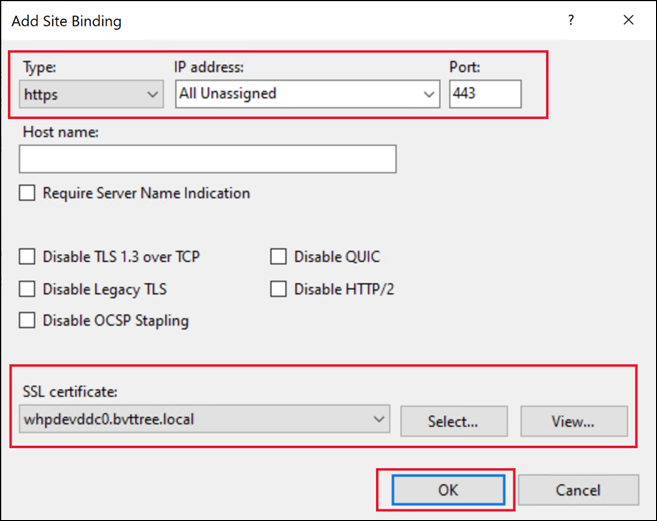
Create or edit the site binding:
-
For a new binding, set the type to https and the port to
443. -
Select the appropriate SSL certificate.
-
On Windows Server 2022 or higher, optionally select Disable Legacy TLS to ensure that users can only connect using modern TLS versions.
-
Click OK.

-
Alternatively, you can change the certificate using PowerShell. For example the following script looks for a certificate with a given common name and binds it to all IP addresses, port 443, and disables legacy TLS versions.
$certSName = 'CN=whpdevddc0.bvttree.local'  # The subject name of the certificate
$certificate = Get-ChildItem -Path Cert:\LocalMachine\My\ | ? {$_.Subject -eq $certSName}
netsh http add sslcert ipport=0.0.0.0:443 certhash=$($certificate.Thumbprint) certstorename=My appid="{91fe7386-e0c2-471b-a252-1e0a805febac}" disablelegacytls=enable
<!--NeedCopy-->
Note that appid is an arbitrary GUID that can be used to identify which application added the certificate.
Use the self-signed certificate
You can use the existing self-signed certificate, but it’s not recommended because it requires manually configuring each machine that accesses the server.
To install the self-signed certificate on machines that need to connect to Web Studio:
- Export the existing self-signed certificate from the Web Studio and Delivery Controller servers.
- Import the certificate into the Trusted Root Certificate store of machines that must access the server.
(Optional) Enable HTTP Strict Transport Security (HSTS)
HTTP Strict Transport Security (HSTS) tells web browsers to only use HTTPS when accessing the site. If a user tries to access the URL using HTTP, the browser automatically switches to HTTPS. This setting ensures secure connection validation on both the client and server sides. The browser maintains this validation for the configured period.
On Windows Server 2019 and later, you can configure HSTS in IIS:
- Open Internet Information Services (IIS) Manager.
- Select Default Web Site (or the appropriate website).
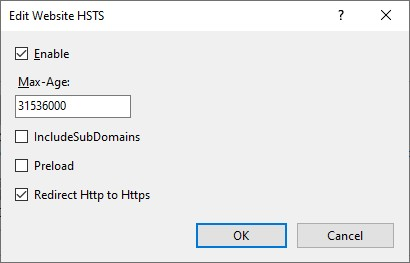
- In the Actions pane on the right side, select HSTS….
- Select Enable and enter a max age, for example 31536000 for one year.
- Select Redirect Http to Https.
Note:
Web Studio automatically configures a URL Rewrite rule to redirect HTTP to HTTPS when accessing the Studio website. However, this option also applies to Director and any other applications on the IIS site.
-
Click OK.

(Optional) Change the default port number
By default, Web Studio and Director use port 443 for secure HTTPS access. To change this port number, follow these steps to create a site binding for the desired port on Default Web Site.
Steps:
-
On the server hosting Web Studio, open Internet Information Services (IIS) Manager.
-
In the Connections pane, expand the server node and select Default Web Site under Sites.
-
In the Actions pane on the right, click Bindings.
-
In the Site Bindings window, click Add.
-
In the Add Site Binding window, set the following for the new binding:
- Type: Select https.
- IP address: Select the appropriate IP address, or leave as All Unassigned if applicable.
- Port: Enter the desired port number (for example, 444).
- SSL certificate: Select the appropriate SSL certificate for secure communication.
Note:
If the Delivery Controller™ and Web Studio are installed on separate machines, and the server doesn’t have other services or websites deployed, you can remove port 443. Otherwise, keep this port to avoid communication issues with the Orchestration service and other FMA services.
-
Click OK to save the binding, and then close the Site Bindings window.
-
In IIS Manager, click the server node, then in the Actions pane, click Restart to apply the new binding.
(Optional) Disable HTTPS redirection
When you install Web Studio, by default, any HTTP access is auto-redirected to HTTPS. It is possible to disable this redirection to allow HTTP access. This approach is recommended only if you have taken other measures to block HTTP access. In the case you have a TLS terminating load balance in front of Web Studio, it is still recommended to use HTTPS between your load balancer and Web Studio.
- Log on to the Web Studio server.
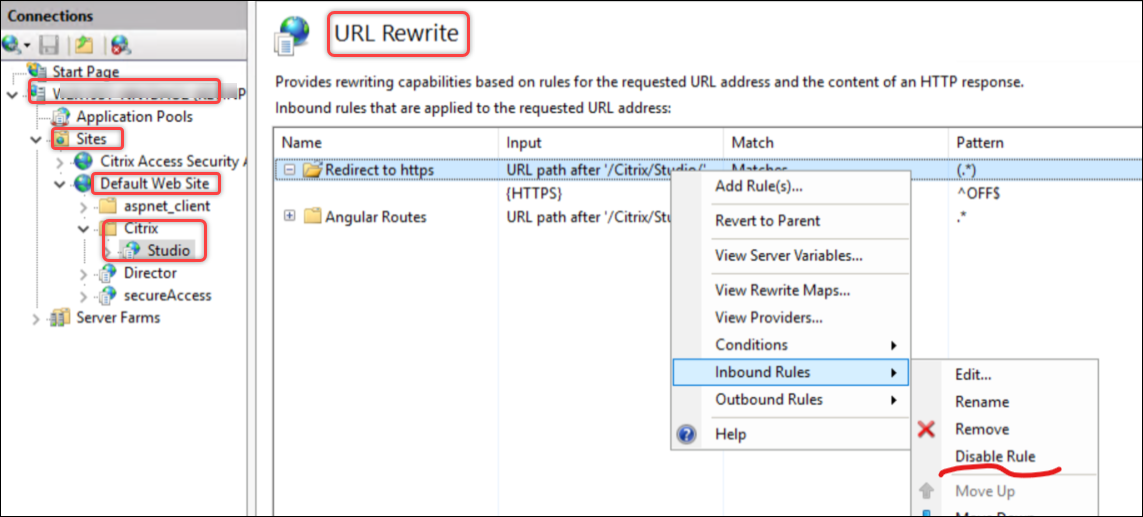
- Open Internet Information Services (IIS) Manager, and go to Server_name > Sites > Default Web Site > URL Rewrite.
-
Disable Inbound Rules for Redirection to https, as shown in the following screenshot.

If you have enabled HSTS in IIS then you must also clear Redirect Http to Https.
Share
Share
In this article
This Preview product documentation is Citrix Confidential.
You agree to hold this documentation confidential pursuant to the terms of your Citrix Beta/Tech Preview Agreement.
The development, release and timing of any features or functionality described in the Preview documentation remains at our sole discretion and are subject to change without notice or consultation.
The documentation is for informational purposes only and is not a commitment, promise or legal obligation to deliver any material, code or functionality and should not be relied upon in making Citrix product purchase decisions.
If you do not agree, select I DO NOT AGREE to exit.