Deployment Guide: Local Demo Deployment for Citrix Secure Developer Spaces™ on Citrix XenServer
The Citrix Secure Developer Spaces™ platform provides a secure and productive cloud development environment that can be deployed on public, private clouds, and self-hosted servers. It also works in full air-gapped modes, such as high-security settings.
The primary purpose of Citrix Secure Developer Spaces platform is to provide secure, cloud development environments (CDEs) that boost developer productivity while ensuring enterprise-level security. It allows organizations to streamline the provisioning and management of coding environments, improving efficiency and collaboration among internal and external teams. By centralizing development resources and integrating automated security features, the platform reduces the risk of data leaks and intellectual property theft, enabling safe remote work and supporting DevSecOps practices.
Specifically, typical usage scenarios encompass IT efficiency, developer productivity, and governance of the development process.
This guide covers deploying Citrix Secure Developer Spaces to an Ubuntu virtual machine (VM) hosted on Citrix XenServer. The target Ubuntu host runs as a XenServer guest VM. The SDS deployment steps are identical for bare metal Ubuntu hosts — only the VM provisioning steps in this guide are XenServer-specific. The CDEs can be accessed through cloud or local integrated development environments (IDEs), offering a secure and isolated environment for developers.
Use the 1-click local installer to deploy Citrix Secure Developer Spaces™ (SDS) on a local Ubuntu host for a proof of concept or demo. The installer runs in a Docker container on a separate host. It generates a custom deployment script that automatically configures a lightweight Kubernetes cluster (K3s) on the target host and deploys the SDS platform.
For a cloud proof of concept on AWS, Azure, or Google Cloud, see the 1-Click VM for deploying Citrix Secure Developer Spaces.
NOTE:
The local deployment is for proof-of-concept (POC) and demo environments only. It is optimized for implementation scalability, multi-node scaling, or long-term production workloads. Local demo deployments cannot be upgraded or migrated to a production environment. To move to production, use a standard cloud or on-premises Kubernetes deployment guide.
- Target Ubuntu host: A dedicated Ubuntu virtual machine on XenServer where K3s and the core SDS platform services are deployed.
Client devices access the SDS platform through the secure DNS name that the installer provides. This DNS name must resolve directly to the IP address of the target Ubuntu host.
Deployment Workflow
The deployment follows seven primary phases:
- Provision the target Ubuntu VM on XenServer.
- Prepare the target Ubuntu host.
- Run the installer container on the installer host.
- Generate the local custom deployment script using
sds-cli. - Run the script on the target Ubuntu host.
- Associate the target IP address with the assigned DNS name within the strict time-to-live (TTL) window.
- Sign in and validate the SDS deployment.
What You Deploy
After the deployment script completes, the target Ubuntu host contains:
- A single-node K3s cluster managed alongside integrated NetScaler Ingress controllers (
netscaler-cpx-ingress). - The SDS platform services.
- A secure HTTPS URL for the SDS console.
- An initial evaluation SDS platform license valid for 6 months.
- Default automated TLS certificates valid for 3 months.
Prerequisites
Target Ubuntu host
The target host is the Ubuntu virtual machine on XenServer where SDS is deployed.
| Requirement | Details |
|---|---|
| Operating system | Ubuntu 22.04 Desktop or Ubuntu 24.04 Desktop only. Ubuntu Server, other Ubuntu editions, and other Linux distributions are not supported. |
| CPU | x86_64 CPU supporting the AVX instruction set (e.g., Intel Celeron processors are incompatible). |
| Storage | Minimum 200 GB for Small deployments. 500 GB recommended for Medium. 1 TB or more for Large or Custom deployments. Workspace image storage is the primary disk consumer. |
| Software state | Clean Ubuntu installation with no Docker, Kubernetes, K3s, or related container platform software components installed. |
| Network | Reachable IP address (can be a public IP or a LAN IP) that client devices can access directly. |
| Access | User account with full sudo elevated permissions. |
[!CAUTION] This deployment has been validated on Ubuntu 22.04 Desktop and Ubuntu 24.04 Desktop only.
The following operating systems are not supported for the target host:
- Ubuntu Server (any version)
- Ubuntu minimal or cloud images
- Debian and other Debian-based distributions
- Red Hat Enterprise Linux, CentOS, Rocky Linux, or other RPM-based distributions
- Any other Linux distribution
Deploying on an unsupported operating system may result in installation failures or an unstable deployment. Citrix does not provide support for deployments on unsupported OS versions.
Installer host
The installer host must be separate from the target host because the target host must remain completely clean. The installer host runs the SDS installer container, which generates the deployment script. The installer host can be any machine that meets the following requirements:
| Requirement | Details |
|---|---|
| Docker | Installed, running, and able to pull image sources from Docker Hub. |
| Network | Outbound HTTPS access to Docker Hub and SDS image registries. |
| Disk space | Minimum 20 GB free for the installer container image and generated local workspace files. |
Deployment information
Have the following information ready before you start:
- An administrator email address for platform access.
- A secure administrator password, or leave empty to let the wizard autogenerate one.
- The IP address of the target Ubuntu host.
- Your choice of deployment region (US, EU, Asia) or specific datacenter location.
Sizing Guidance
The installer requires you to select the machine capacity. This capacity setting defines the maximum threshold of concurrently active user workspaces allowed on the deployment. The installer uses this setting to optimize the generated deployment script’s resource allocation and configuration parameters for the underlying Kubernetes cluster and platform services.
| Capacity | Minimum Target Host Size | Maximum Concurrent Workspaces |
|---|---|---|
| [1] Small | 4 CPU, 16 GB RAM | Up to 3 workspaces |
| [2] Medium (Default) | 8 CPU, 32 GB RAM | Up to 11 workspaces |
| [3] Large | 16 CPU, 64 GB RAM | Up to 25 workspaces |
| [4] Custom | User-defined VM instance | Resource-dependent |
NOTE:
You can adjust the machine capacity configuration later if resource needs or proof-of-concept requirements shift.
Provision the Target VM on XenServer
Before deploying SDS, create the Ubuntu VM on your XenServer host using XenCenter.
- In XenCenter, select New VM and choose an Ubuntu 22.04 or Ubuntu 24.04 Desktop ISO as the installation source.
- Allocate vCPUs, RAM, and disk storage based on your chosen deployment size from the Sizing Guidance table. Ensure the disk meets the minimum storage requirement for your selected capacity.
- Assign a network interface to a virtual network that:
- Provides outbound internet access (required for pulling Docker and SDS images during deployment).
- Is reachable from client devices that need to access the SDS console.
- Complete the Ubuntu Desktop installation and note the VM’s IP address.
-
Optionally, enable SSH on the VM for remote management:
sudo apt install -y openssh-server
<!--NeedCopy-->
Expected outcome: A clean Ubuntu Desktop VM is running on XenServer with a reachable IP address.
Prepare the Target Ubuntu Host
- Confirm that the target host runs a fresh desktop installation of Ubuntu 22.04 or Ubuntu 24.04.
- Confirm that Docker, Kubernetes, K3s, and related tools are completely uninstalled.
- Verify that the CPU supports AVX instructions:
   grep -o 'avx[^ ]*' /proc/cpuinfo | head -1
   <!--NeedCopy-->
If this command returns no output, the CPU is incompatible and you must use a different target host.
- Obtain the reachable IP address of the target machine:
   hostname -I
   <!--NeedCopy-->
Expected outcome: You have identified a clean target Ubuntu host with a direct network-accessible IP address.
Run the Installer Container
-
On the installer host, create and switch to a dedicated directory for configuration sharing:
mkdir -p ~/sds-local-deployment cd ~/sds-local-deployment <!--NeedCopy--> -
Pull and run the installer from Docker Hub:
docker run -it --rm -v ${PWD}:/strong-network/shared strongnetwork/strong_installer:2026.4.5
<!--NeedCopy-->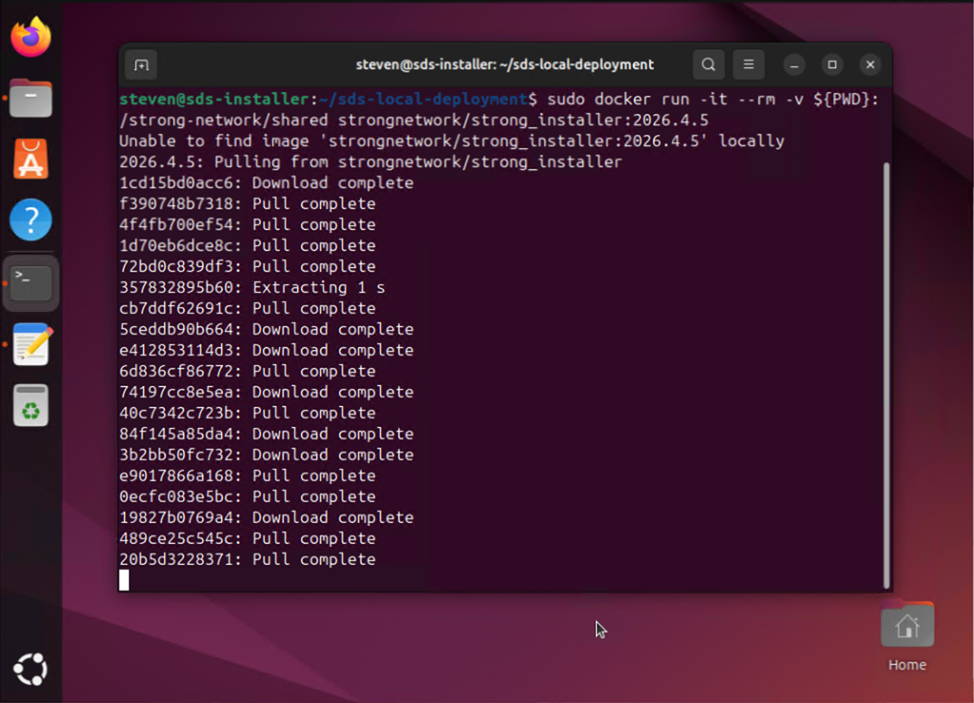
NOTE:
If the installer discovers a newer minor testing version, such as 2026.4.6, choose whether you wish to pivot to that package version.
- Upon launching, the container initializes the Secure Developer Spaces CLI interface, providing utilities to manage SDS environments:
- install: Performs first-time installations by pushing SDS images to your registry and generating configuration templates.
- upgrade: Upgrades an existing deployment using a configuration file from a previous deployment.
-
deploy-demo: Deploys a self-contained evaluation version of the entire platform to an isolated VM.
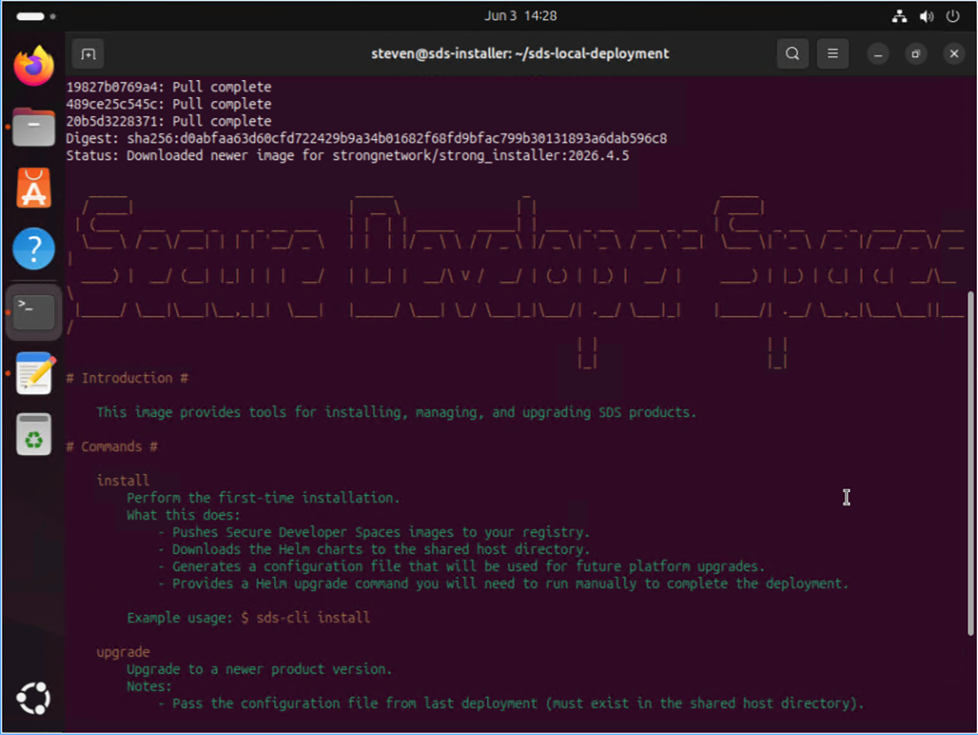
Expected outcome: The terminal displays the tool’s greeting banner and opens an interactive container shell interface.
Generate the Deployment Script
- From the interactive container shell, initiate the local deployment generation wizard:
deploy-demo --deployment-location=local
<!--NeedCopy-->
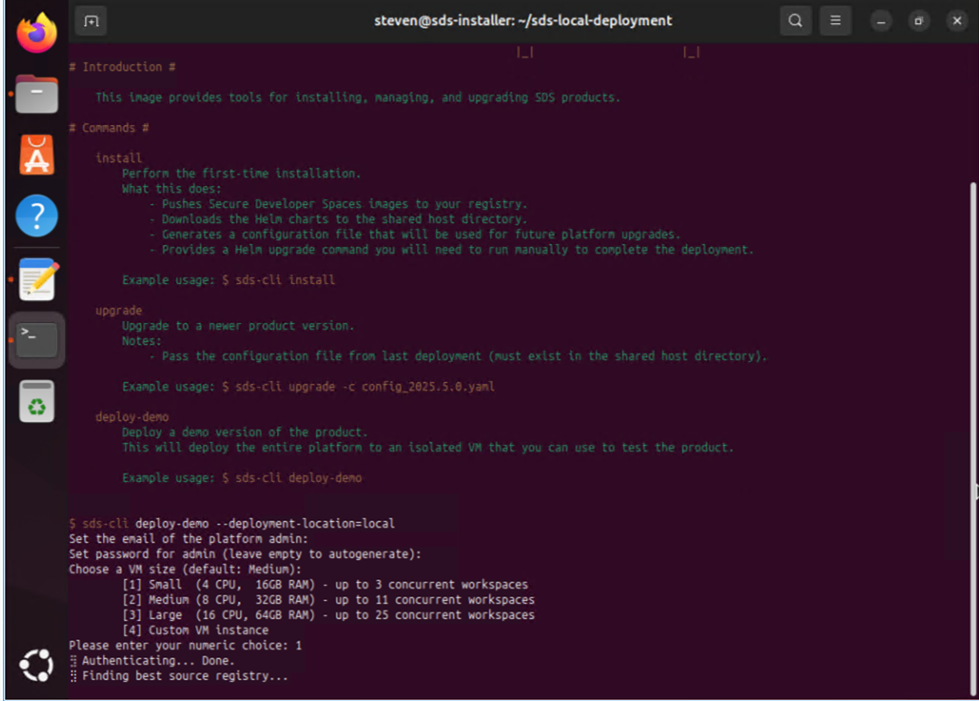
- Complete the configuration prompts as follows:
- Admin Credentials: Input your admin email address and provide a secure password.
- Set the email of the platform admin: e.g., admin@example.com
- Set password for admin (leave empty to autogenerate).
- Machine Capacity: Choose your numeric workspace sizing choice
- [1] Small (4 CPU, 16GB RAM) - Up to 3 workspaces
- [2] Medium (8 CPU, 32GB RAM) - Up to 11 workspaces
- [3] Large (16 CPU, 64GB RAM) - Up to 25 workspaces
- [4] Custom (User-defined VM instance) - Resource-dependent
-
Region Configuration: Choose your deployment region (1 for US, 2 for EU, or 3 for Asia) to map the source registry.
- The wizard displays a “Generated Local Deployment Script” notification payload containing the bash configuration script.
Expected outcome: You have copied the generated deployment script and noted the assigned secure URL and administrative credentials.
Run the Deployment Script on the Target Host
- Copy the generated bash script in its entirety from the installer container window output.
- Log in to your target clean Ubuntu host and save the contents to a file named deploy.sh.
-
Add execution permissions and execute the script utilizing elevated sudo privileges:
```Bash
chmod +x deploy.sh
sudo ./deploy.sh
<!--NeedCopy--> ```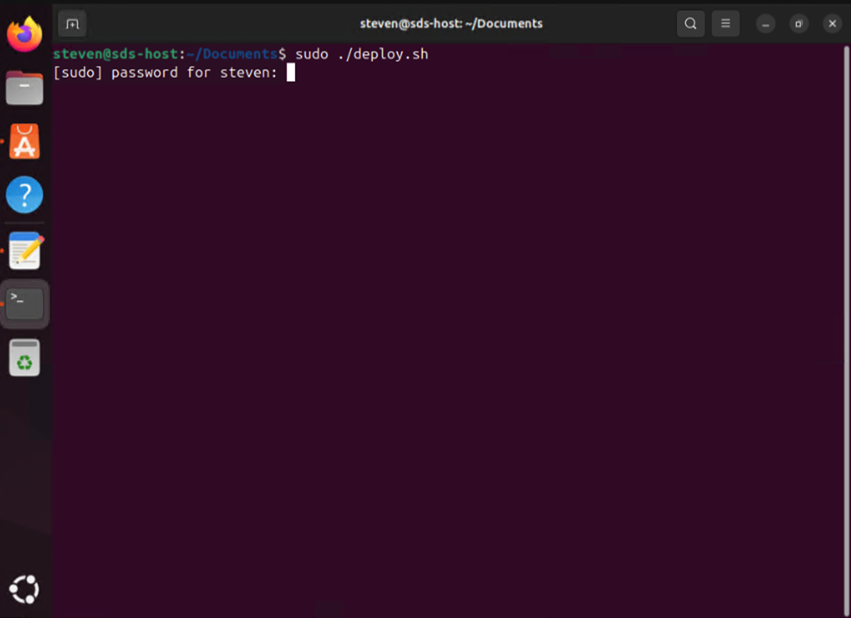
Expected outcome: The installation script runs and exits completely without throwing runtime errors.
Associate the IP Address with DNS
- You must associate the target Ubuntu machine’s accessible IP address to the custom testing URL domain name provided by the installer (e.g., mainsunfish.try.sds.citrix.com).
IMPORTANT:
You must execute this DNS mapping or host file association within 1 hour of script generation. You do not need to wait for the target Ubuntu machine deployment script to finish execution; this step can be handled in parallel.
-
When prompted by the installer container to proceed with DNS validation, verify the mapping:
- Do you want to proceed with the DNS and IP association? (y/n): y
- IP address: 192.168.5.198
- Domain mainsunfish.try.sds.citrix.com resolved to IP: 192.168.5.198
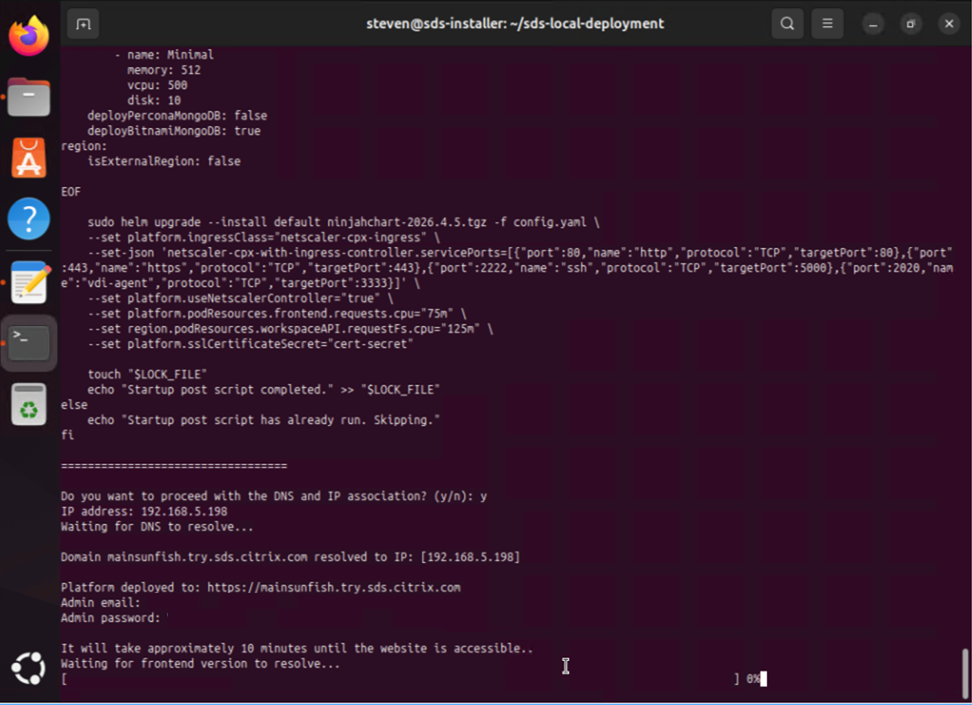
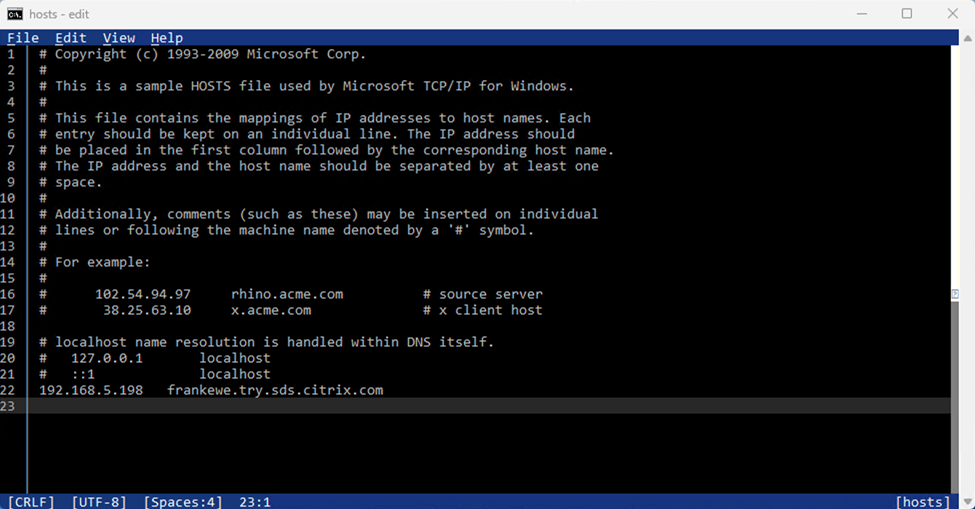
For shared network use: Configure a corresponding record mapping inside the active DNS server used by your endpoint environments. For standalone endpoint validation: Edit the local hosts file on each client workstation needing access:
- 192.168.5.198 mainsunfish.try.sds.citrix.com
Expected outcome: The provisioned URL resolves correctly to the target Ubuntu deployment IP address.
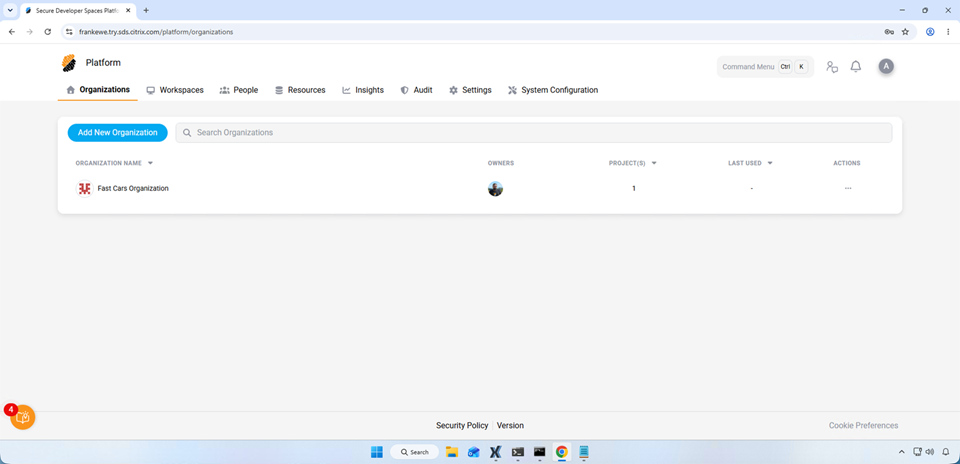
Sign in to the SDS Console
- Wait approximately 10 minutes after script completion for the backend application services to become healthy and accessible online.
- Open a web browser on a connected endpoint and navigate to your secure platform URL (e.g., https://mainsunfish.try.sds.citrix.com).
- Sign in using the administrator credentials you configured during setup (or the autogenerated credentials printed by the installer):
- Admin Email:
admin@example.com(the email you entered during setup) - Admin Password:
<your-admin-password>(or the autogenerated password printed by the installer)
- Admin Email:
CAUTION:
The login interface page might display in your browser before all underlying microservices have initialized. If you encounter an “invalid username or password” failure error on your first attempt, wait up to 5 minutes for data buffering to finish, then refresh and try again.
Expected outcome: The administration dashboard loads completely without errors, confirming successful platform entry.
Validate the Deployment
After your initial administrative login, verify basic platform functionality by executing the following validation workflow:
- Confirm that the web console loads securely over HTTPS with proper routing.
- Navigate to system configurations and verify active platform component settings.
- Create an evaluation organization structure and define a test project.
- Provision a new test user account inside your project profile.
- Launch a testing workspace environment utilizing an included baseline workspace template.
- Verify that the session starts smoothly and renders interactively directly within your web browser.
Troubleshooting
| Issue | Resolution |
|---|---|
| Installer container does not start | Ensure that the Docker service daemon is active on your separate installer workstation and verify that the machine has an active route to Docker Hub to pull images. |
| Deployment script fails early | The target Ubuntu host may not be completely clean. Re-image or clean your target machine to guarantee no conflicting Docker components, K3s fragments, or Kubernetes directories remain, then re-run the script. |
| AVX check returns no output | Your target machine processor lacks the mandatory instruction extensions. You must migrate the installation onto a compatible x86_64 CPU architecture that natively supports AVX. |
| Platform URL does not resolve | Confirm your entry within your local client hosts file or look up your network DNS server state. If the initial 1-hour generation lease time expired before you completed mapping, rerun the installer wizard to create a fresh script. |
| Sign-in fails immediately after deployment | The internal microservices are likely completing their initialization sequence. Wait 5 minutes for background database setup and service sync routines to complete, then try logging in again. |
Limitations
- Local demo deployments are strictly unsupported for production workloads, multi-node clustering, or scale validation testing.
- Local demo deployments cannot be upgraded or migrated to a production environment. To move to production, use a standard cloud or on-premises Kubernetes deployment guide.
- The SDS platform evaluation license expires 6 months after creation.
- Default TLS certificates expire 3 months after creation.
Decommission the Proof of Concept
When you conclude your product evaluation period:
- Export or archive any configuration notes, validation results, or screenshots you require.
- Remove any testing domain mappings or hosts file modifications from your client machines.
-
On the target host, completely remove the cluster components by running the native script:
sudo /usr/local/bin/k3s-uninstall.sh <!--NeedCopy--> - Purge any generated deployment script logs or payload files from your installer host workstation.
Related topics
In this article
- Deployment Workflow
- What You Deploy
- Prerequisites
- Sizing Guidance
- Provision the Target VM on XenServer
- Prepare the Target Ubuntu Host
- Run the Installer Container
- Generate the Deployment Script
- Run the Deployment Script on the Target Host
- Associate the IP Address with DNS
- Sign in to the SDS Console
- Validate the Deployment
- Troubleshooting
- Limitations
- Decommission the Proof of Concept
- Related topics