Manage a Nutanix catalog
Manage machine catalogs describes the wizards that manage a machine catalog. The following information covers details specific to Nutanix AHV Prism Central environments.
Note:
Before managing a machine catalog on Nutanix AHV Prism Central, you need to finish creating a machine catalog on Nutanix AHV Prism Central. See Create a Nutanix catalog.
You can manage a machine catalog on Nutanix AHV Prism Central using:
Use Studio
Following are the options to manage a machine catalog on Nutanix AHV Prism Central using Studio:
| Option | Description |
|---|---|
| Add Machines | Create and add VMs to the machine catalog. |
| Delete Machine Catalog | Delete a machine catalog. You can choose to delete VMs at the same time or leave persistent VMs intact. |
| Change Master Image | Change the master image used as a template for all VMs in the catalog. |
| Add or change Machine Profile | Change the template version of the machine profile or add a machine profile to an existing catalog. |
| Manage Configuration Set | Bind a catalog to a Workspace Environment Management™ configuration set or switch to a different configuration. |
| Edit Machine Catalog | Modify configurations for the catalog, such as NICs and Virtual Machines. |
| View Machines | Jump to the Search node to see all VMs that belong to the catalog. |
| Rename Machine Catalog | Change the catalog name. |
| Upgrade VDAs | Upgrade VDAs on a per-catalog basis. This feature only applies to static persistent machines. |
| Change Functional Level | Select the minimum functional level for the catalog. Setting a functional level makes all features available. |
| Test Machine Catalog | Test whether the catalog has errors or warnings. |
| Manage Tags | Create, edit, and delete tags. Select tags to apply to the catalog. |
| Move Machine Catalog | Move the catalog to another folder. |
Note:
Currently, the Clone option is not available.
Change master image
To change the master image for a catalog, follow these steps:
- On the Machine Catalogs page, right-click the machine catalog you want to update, and select Change Master Image.
-
On the Change Master Image page, click Select an image.
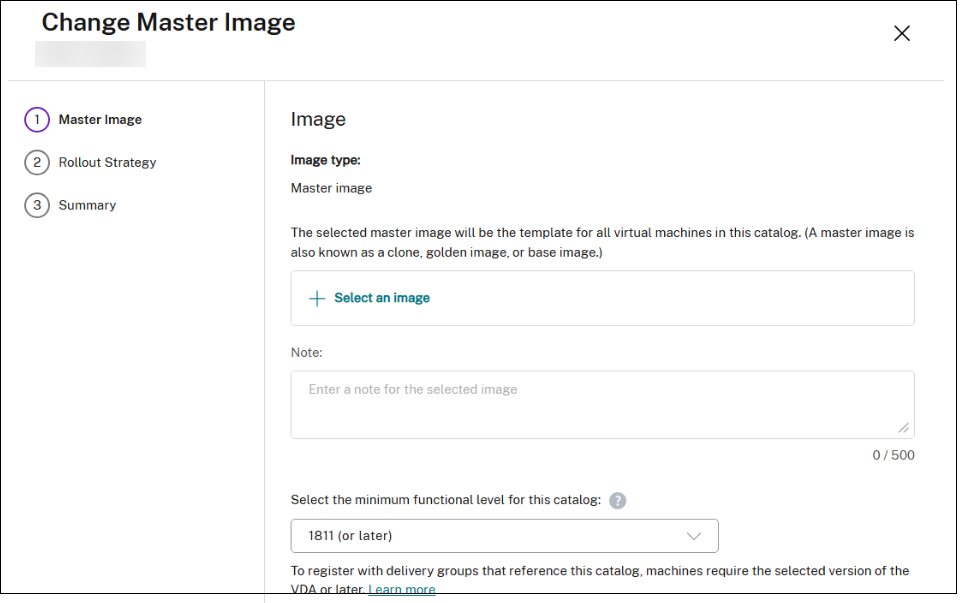
- On the Select an image page, expand a template and select a template version to use as the master image. You can filter machine templates by name.
- On the Rollout Strategy page, choose when you want the update to be applied.
Note:
- For an MCS provisioned non-persistent catalog with the Nutanix AHV Prism Central host connection plug-in, updating the master image to switch the boot configuration between Legacy and UEFI, prevents existing VMs from starting at their next boot.
- When you update the master image, only the OS disk is update. The hardware properties remain unchanged. To update the hardware properties, see Add or change the machine profile, Change NICs and Change VMs configuration.
Add or change the machine profile
To add or change a machine profile for a catalog, follow these steps:
- On the Machine Catalogs page, right-click the machine catalog you want to modify, and select Edit Machine Catalog.
-
On the Machine Profile page,
- If the machine catalog already has a machine profile, then click the pencil icon to select a different machine profile template version. You can filter by the template name. Confirm the machine profile settings.
- If the machine catalog doesn’t have a machine profile, then select Use a machine profile and select a machine profile. Confirm the machine profile settings.
- The Virtual Machines page must reflect the updated configuration as per the selected machine profile template version.
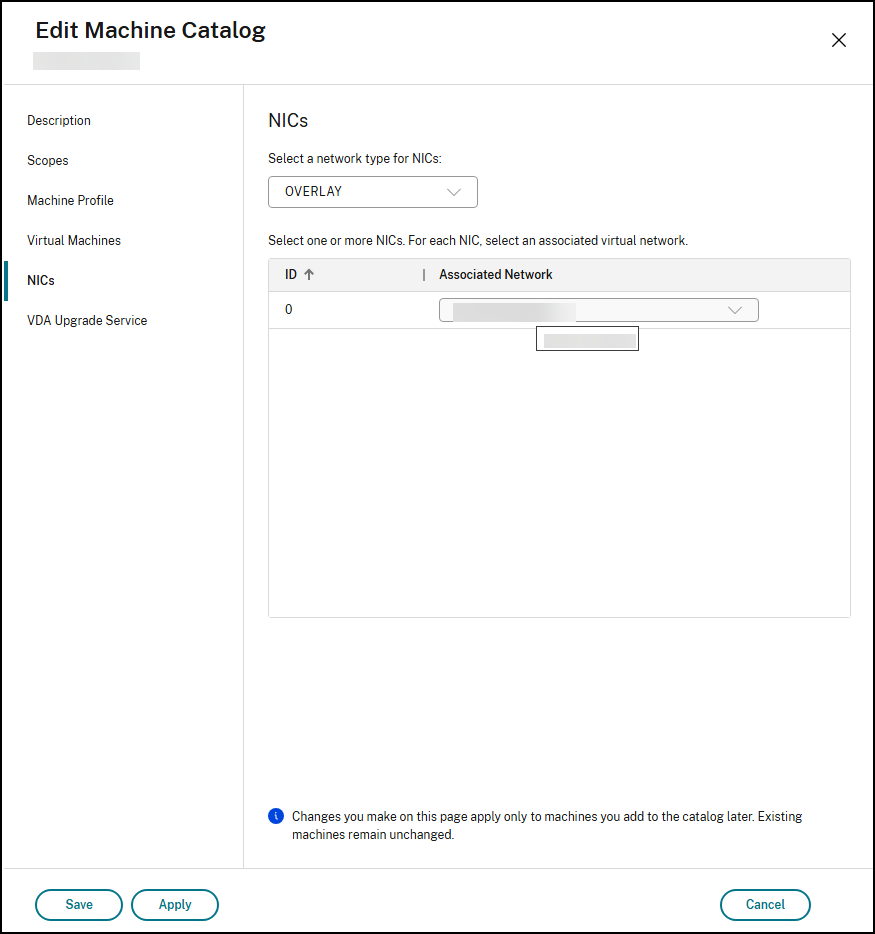
Change NICs
To change NICs for a catalog, follow these steps:
- On the Machine Catalogs page, right-click the machine catalog you want to modify, and select Edit Machine Catalog.
-
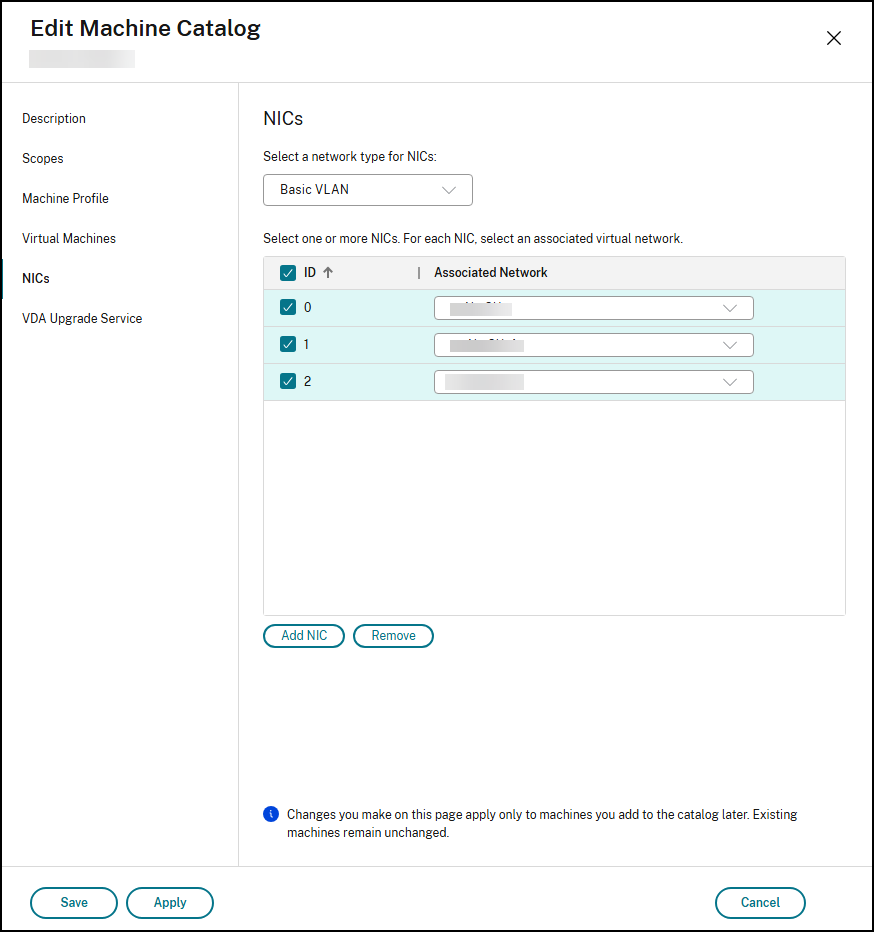
On the NICs page:
- Select a NIC type.
-
If the selected catalog was created with a machine profile, then the NIC number is consistent with the NIC number of machine profile and can’t be changed. Select an associated virtual network for each NIC.
-
If the selected catalog was created without machine profile, click Add NIC to increase NIC count or click Remove to delete selected NICs. Select or clear the boxes to select NICs, and choose an associated virtual network for each NIC.
Change VMs configuration
To change the configuration of VMs, including Memory, CPU count, and Cores per vCPU, follow these steps:
- On the Machine Catalogs page, right-click the machine catalog you want to modify, and select Edit Machine Catalog.
-
On the Virtual Machines page, use the up or down arrow, or enter values directly to adjust the Memory, CPU count, and Cores per vCPU for the VMs.

Use PowerShell
Change master image
The required parameters are:
-
ProvisioningSchemeName: Name of the provisioning scheme to edit. -
MasterImage: Literal path to the new master image.
Run the following command. For example:
Set-ProvSchemeMetadata  -Name "ImageManagementPrep_DoImagePreparation" -ProvisioningSchemeName "<ProvisioningSchemeName>" -Value "True"

Publish-ProvMasterVMImage  -MasterImageVM "<Literal path to the new master image- template version> -ProvisioningSchemeName "<ProvisioningSchemeName>" -RunAsynchronously
<!--NeedCopy-->
Note:
When you update the master image, only the OS disk is update. The hardware properties remain unchanged. To update the hardware properties, see Add or change the machine profile, Change NICs and Change NIC and VM’s configuration.
Add or change machine profile
Use the Set-ProvScheme command:
- To update a catalog with a new machine profile, or
- To update an existing catalog that does not have a machine profile to start using the machine profile as the source of hardware specification.
Note:
This does not update the hardware specification of the existing VMs in the catalog. Only the new VMs added to the catalog have the hardware specification from the given machine profile.
To change machine profile or convert an existing catalog to start using machine profile:
Set-ProvScheme -ProvisioningSchemeName <ProvScheme Name> `
               -MachineProfile "XDHyp:\HostingUnits\<Hosting Unit Name>\Templates.folder\<Template Name>.template\<Template Version Name>.templateversion"
               -NetworkMapping @{"0"="XDHyp:\HostingUnits\<Hosting unit name>\Clusters.folder\<Cluster Name>.cluster\<Network name>.network"}
<!--NeedCopy-->
The machine profile must have at least one NIC, and the number of NICs in the machine profile must match the subnet mappings in NetworkMapping
The total number of NICs for the template version can be obtained from the AdditionalData of its inventory item using the following:
$tv = Get-Item -Path "XDHyp:\HostingUnits\<Hosting Unit Name>\Templates.folder\<Template Name>.template\<Template Version Name>.templateversion"
$tv.AdditionalData.TotalNics
<!--NeedCopy-->
To change machine profile with overridden hardware specification:
Certain configurations can be configured using specific command-line parameters. These command line parameters, such as VMCpuCount and VMMemoryMB, and CPUCores in the CustomProperties, takes precedence over the values in the Machine Profile template version.
$customProperties = @"
    <CustomProperties xmlns="http://schemas.citrix.com/2014/xd/machinecreation" xmlns:xsi="http://www.w3.org/2001/XMLSchema-instance">
        <StringProperty Name="ClusterId" Value="00062c63-1fb0-58c9-4fc8-5c2573352378" />
        <StringProperty Name="CPUCores" Value="2" />
    </CustomProperties>
"@

Set-ProvScheme -ProvisioningSchemeName <ProvScheme Name> `
               -MachineProfile "XDHyp:\HostingUnits\<Hosting Unit Name>\Templates.folder\<Template Name>.template\<Template Version Name>.templateversion" `
               -CustomProperties $customProperties `
               -VMCpuCount 4 `
               -VMMemoryMB 4096
<!--NeedCopy-->
Change NIC and VM’s configuration
The required parameters are:
-
ProvisioningSchemeName: Name of the provisioning scheme to edit. -
NetworkMapping: Updated network mapping.
Run the following command. For example:
Set-ProvScheme  -CustomProperties "<CustomProperties xmlns=`"http://schemas.citrix.com/2014/xd/machinecreation`" xmlns:xsi=`"http://www.w3.org/2001/XMLSchema-instance`"><Property xsi:type=`"StringProperty`" Name=`"ClusterId`" Value=`"000xxxx-1fb0-xxxxx-4fc8-5c257335xxxx`" /><Property xsi:type=`"StringProperty`" Name=`"CPUCores`" Value=`"1`" /></CustomProperties>"  -NetworkMapping @{"6"="XDHyp:\HostingUnits\<Hosting Unit Name>\Clusters.folder\<Cluster Name>\<Network name>.network"} -ProvisioningSchemeName "<ProvisioningSchemeName>" -VMCpuCount 4
<!--NeedCopy-->
Reset OS disk for persistent VMs
Resetting the OS disk in persistent VMs, especially those with vTPM enabled, can break applications relying on vTPM keys and BitLocker, potentially preventing boot. Therfore, this feature allows:
- Resetting the OS disk for persistent VMs and preserving VM hardware configurations.
- Managing vTPM-enabled VMs to avoid breaking vTPM dependency during disk swaps.
You can reset OS disk for persistent VMs using the Reset-ProvVMDisk PowerShell command.
- For vTPM-enabled VMs: A new VM is created from a recovery point using the original hardware info, preserving vTPM keys.
- For non-vTPM VMs: The OS disk is replaced.
For examples, see Reset OS disk.
Migrate machine catalogs to Citrix-managed Nutanix AHV Prism Central host connection
Migrate your Citrix machine catalogs, and their associated VMs from existing Nutanix AHV (for Prism Element) and Nutanix AHV PC (for NC2 on Azure) host connections to the Citrix-managed Nutanix AHV Prism Central host connection. For migration, use PowerShell commands, which also include fast rollback options in case of issues, and commands to clean up source resources post-migration.
Benefits
- Minimized disruption: You smoothly transition to the Nutanix AHV Prism Central plug-in. This has minimal impact on your existing deployments.
- Seamless upgrade path: It provides a clear, and supported path for you to upgrade your infrastructure, and leverage the new management interface.
- Data integrity and safety: Rollback options ensure you revert the environment to its original state in case of unforeseen issues. This reduces risk.
- Resource efficiency: You clean up source resources after successful migration. This optimizes storage, and management overhead.
- Flexibility: It supports migration for catalogs provisioned by both MCS, and third-party technologies. This offers broader applicability.
Applicability
This feature is applicable to machine catalogs under Nutanix AHV (for Prism Element) and Nutanix AHV PC (for NC2 on Azure) host connections:
- Machine catalogs managed by MCS, including both persistent and non-persistent types.
- Power-managed-only machine catalogs that contain VMs provisioned by third-party technologies.
System Requirements
- Nutanix AHV Prism Element (PE) AOS Version: You require a minimum of 6.8.
- Nutanix Prism Central (PC) Version: You require a minimum of 2024.3.
Note:
Nutanix Prism Central 7.3 requires AOS 7.3 due to a Nutanix known issue.
Limitations
- PVS catalogs arent supported: This feature doesn’t support machine catalogs created using Citrix Provisioning Services (PVS) Xendesktop Setup Wizard.
-
Rollback restrictions:
- Only allow rollback of a migrated catalog if you haven’t modified the catalog after the initial migration.
- When you execute the “Cleanup Source Resources” operation, it clears the migration state. This prevents any subsequent rollback.
- No re-migration: A machine catalog that you already migrated isn’t supported for re-migration.
- Multi-host connection VMs: Migration of power-managed-only machine catalog that contains VMs imported from multiple host connections is not supported.
Important Considerations
- Nutanix cluster management: Hosting Nutanix AHV clusters must be registered to a Nutanix Prism Central. .
- Master image template creation: For MCS machine catalogs, the migration command provides an option to generate a vm template version on Prism Central from the original snapshot of the machine catalog master image. This vm template version can later be used as the MCS master image of machine catalogs under Prism Central host connection. By default, this option is not enabled.
-
Rollback pre-conditions:
For a successful rollback to be possible, the original source environment—including the host connection, base disks—must remain unchanged. You must also avoid making any configuration changes to the migrated machine catalog and adding/removing VMs until the migration is confirmed to be successful. After that confirmation, you may perform the final Cleanup Source Resources operation, but be aware that this is an irreversible step that will make a rollback impossible.
Required permissions for migration and rollback
To migrate catalogs or rollback, you need the following permissions:
Prism Element administrator:
- Create Virtual Machine
Prism Central administrator:
- Create VM Templates
- Delete VM Templates
- Delete VM Recovery Point
- Delete Virtual machine
For the complete list of specific permissions needed for Citrix-managed Nutanix AHV Prism Central host connection, see Required permissions.
How to migrate
You manage this feature through dedicated PowerShell cmdlets. The general workflow involves three main operations: Migration, Rollback, and Cleanup source resources.
Migrate a machine catalog
- This operation moves a machine catalog, and its associated VMs from a source Nutanix AHV or Nutanix AHV PC host connection to a target Citrix-managed Nutanix AHV Prism Central host connection.
- For MCS provisioned catalogs, this process creates new base disks in the target connection .
- You optionally choose to create a master VM equivalent (VM template version) in the target connection from the original master image snapshot.
- Create a new Nutanix AHV Prism Central host connection: Before migrating, register the hosting Nutanix AHV cluster to a Nutanix Prism Central, and establish a new Nutanix AHV Prism Central host connection that points to the target Nutanix Prism Central instance. This connection serves as the destination for your migrated catalogs. For details, see Nutanix AHV Prism Central host connection.
-
Migrate an existing machine catalog: For an existing machine catalogs, use the
Switch-ProvCatalogPowerShell cmdlet to initiate the migration to Citrix-managed Nutanix AHV Prism Central host connection.c:\PS>Switch-ProvCatalog -BrokerCatalogUid <Catalog_UID> -DestinationHypervisorConnectionName "DestinationConnection" -DestinationHostingUnitName "DestinationUnit" -CreateMasterImageAtDestination <!--NeedCopy-->- Replace
<Catalog_UID>with the unique identifier of the machine catalog you wish to migrate. Use following PowerShell cmdlet to locate theBrokerCatalogUidby catalog nameGet-BrokerCatalog -Name <Catalog Name>. -
DestinationConnectionis the name of the new Nutanix AHV Prism Central host connection created in Step 1. -
DestinationUnitis the name you give to the hosting unit within theDestinationConnectionwhere the machine catalog will reside. - The
-CreateMasterImageAtDestinationparameter is optional. It creates a master image VM template version on the target Prism Central.
- Replace
-
Verify migration completion: After executing the migration cmdlet, monitor the task status in the PowerShell window to ensure it completes successfully. When the migration completes, the catalog is moved to the target host connection created in step 1. You must see a status finished with the task type SwitchProvCatalog. Followings are recommended steps to verify the migration completion:
- Check the status of the catalog in Studio.
- Verify that the VMs within the catalog are now associated with the new destination hypervisor connection.
- Verify that the VMs within the catalog are showing the correct power state.
- Test the functionality of the migrated machine catalog by adding or removing machines or issuing power operations ensuring that the catalog is functioning correctly.
Rollback a migrated catalog
This operation reverts a machine catalog, and its VMs to their original source host connection. It removes any resources you created during the migration process.
Important:
You only perform rollback if you have not modified the catalog after migration, and you have not run the Cleanup Source Resources operation. The original source connection remains unchanged, and still contains its base disks.
c:\PS>Switch-ProvCatalog -BrokerCatalogUid <Catalog_UID> -Rollback
<!--NeedCopy-->
Clean up source resources
After a successful migration, this operation removes source resources, for example, base disks, from the original hypervisor connection.
Important:
When you execute this command, it clears the migration state. This makes subsequent rollbacks impossible.
c:\PS>Switch-ProvCatalog -BrokerCatalogUid <Catalog_UID> -CleanupSourceResources
<!--NeedCopy-->
You receive a confirmation prompt before proceeding, as this action is irreversible. Acknowledge the prompt to complete the cleanup.