Get started with Autoscale™
Autoscale is a feature that provides a consistent, high-performance power management solution to proactively scale delivery groups based on a configured schedule or load demands.
Autoscale applies to all types of delivery groups:
- Single-session static OS
- Single-session random OS
- Multi-session random OS
This article describes basic Autoscale-related concepts and provides guidance on how to enable and configure Autoscale for a delivery group.
Basic concepts
Before you start, learn about the following basic concepts in Autoscale:
- Capacity and machine registration
- Scale across multiple machine catalogs
- Machine provisioning and session demand
- Instance size considerations
- Schedules
- Peak and Off-Peak times
- Power-Off delay
- Pool size
- Capacity buffer
- Load index
- Autoscale and maintenance mode
- Machine cost
- Scale up a delivery group
- Scale down a Delivery Group
- Drain state
Capacity and machine registration
Autoscale includes only machines that are registered with the site when determining the capacity. Powered-on machines that are unregistered can’t accept session requests. As a result, they aren’t included in the overall capacity of the delivery group.
Scale across multiple machine catalogs
In some sites, multiple machine catalogs might be associated with a single delivery group. Autoscale randomly powers on machines from each catalog to meet schedule or session demand requirements.
For example, a delivery group has two machine catalogs: Catalog A has three machines powered on and Catalog B has one machine powered on. If Autoscale needs to power on an extra machine, it might power on a machine from either Catalog A or Catalog B.
Machine provisioning and session demand
The machine catalog associated with the delivery group must have enough machines to power on and off as demand increases and decreases. If session demand exceeds the total number of registered machines in the delivery group, Autoscale ensures that all registered machines are powered on. However, Autoscale does not provision additional machines.
Note:
If a Delivery Group has 63 machines and a buffer capacity of 10% is set for off-business hours, then as per the Autoscale calculation, 6.3 machines must be turned on during off-business hours. To handle the decimal value, following are the rules:
- Round to nearest: For example, if the value is 6.4, then 6 machines are turned on. If the value is 6.7, then 7 machines are turned on.
- Round to 1 for any non-zero value less than 1. For example, if the value is 0.2 or 0.9, then 1 machine is turned on.
Instance size considerations
You can optimize your costs if you appropriately size your instances in public clouds. We recommend that you provision smaller instances as long as they match your workload performance and capacity requirements.
Smaller instances host fewer user sessions than larger instances. Therefore, Autoscale puts machines into drain state faster because it takes less time for the last user session to be logged off. As a result, Autoscale powers off smaller instances sooner that reducing costs.
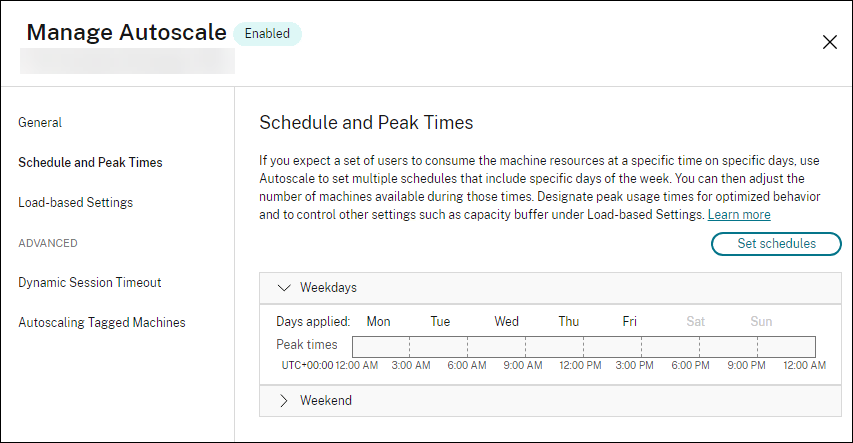
Schedules
Autoscale powers on and off machines in a delivery group based on a schedule that you set.
A schedule includes the number of active machines for each time slot, with peak and off-peak times defined.
Schedule settings vary with the type of delivery group. For more information, see:
- Multi-session OS delivery groups
- Single-session OS random delivery groups
- Single-session OS static delivery groups
Peak and off-peak times
Peak and off-peak times are used to indicate which of the capacity buffer values to use for specific periods of the day. You can define the peak times, leaving the remaining undefined times as off-peak times.
Power-Off delay
Power-off delay is the minimum number of minutes that must elapse after a machine is powered on before Autoscale can power off that machine. This keeps machines from flip-flopping on and off during volatile session demands. By default, the power-off delay is 30 minutes. You can set it in a range of 0-60 minutes.
Pool size
Pool size is the number of machines that must be kept powered-on for a particular period of a day.
Capacity buffer
Capacity buffer is used to add spare capacity to the current demand to account for dynamic load increases. There are two scenarios to be aware of:
- For multi-session OS delivery groups, the capacity buffer is defined as a percentage of the total capacity of the delivery group in terms of load index.
- For single-session OS delivery groups, the capacity buffer is defined as a percentage of the total number of machines in the delivery group.
The capacity buffer is a rolling buffer, given that it is calculated and applied based on the current usage rather than calculated and applied on top of the configured pool size.
For example, given a delivery group with 10 machines, a pool size of 1 machine for the current period and a capacity buffer of 10%. An additional machine is powered on when the 1 powered-on machine, as defined by the schedule, is loaded to the point where the 10% capacity buffer is no longer satisfied. If the load is reduced after powering on the second machine and there is more than enough free load capacity to satisfy the 10% capacity buffer, Autoscale prepares 1 machine for power off.
Load index
IMPORTANT:
The load index applies only to multi-session delivery groups.
The load index metric determines how likely a machine is to receive user logon requests. It’s calculated using the Citrix Load Management policy settings configured for concurrent logon, session, CPU, disk, and memory use.
The load index ranges from 0 to 10,000. By default, a machine is considered at full load when it’s hosting 250 sessions:
-
The digit “0” indicates an unloaded machine. A machine with a load index value of 0 is at a baseline load.
-
The digit “10,000” indicates a fully loaded machine that can’t run any more sessions.
Autoscale and maintenance mode
Machines in maintenance mode, regardless of their availability status, are considered as part of the calculation of the overall pool size. Therefore, it’s possible for all machines within the pool to be in maintenance mode. However, these machines are excluded from the capacity buffer calculations, ensuring their immediate availability. To guarantee a specific percentage of machines are accessible for user connections, adjust the pool size and buffer values accordingly.
Machine cost
Machine instance cost per hour is the cost per hour, in US$, of the computing capacity being used. This setting is used to calculate the cost savings of the Autoscale settings. To view the savings, go to Monitor > Trends > Machine usage.
Scale up a delivery group
Autoscale powers on additional machines in an Autoscale-enabled delivery group when:
- The Autoscale schedule for the delivery group indicates that more machines must be powered on for the current time period.
- The current load on the delivery group has exceeded the capacity buffer.
Conditions for powering on machines:
- Not in maintenance mode.
- Hypervisor is not in maintenance mode.
- Powered off and unregistered.
- Belongs to the delivery group that requires scaling up
- No pending power actions.
Scale down a delivery group
Autoscale powers off machines in an Autoscale-enabled delivery group when:
- The Autoscale schedule specifies that machines must be powered off to meet the configured number of machines for the current time period.
- The current load of the delivery group has decreased, resulting in more powered-on machines than required to meet the pool size and capacity buffer.
Autoscale scales down a delivery group by powering off the excess machines exceeding the number needed to meet the pool size and capacity buffer.
The scale-down process involves two steps:
- Place the required number of machines into the drain state.
- Select all drained machines for power off.
Machines eligible for power off must meet the following criteria:
- Not in maintenance mode
- Hypervisor not in maintenance mode
- Currently powered-on
- Registered as available or is waiting to register after starting up
- Drained and has no active sessions
- No pending power actions
- Satisfies the power-off delay
Drain state
Autoscale attempts to scale down the number of powered-on machines in the delivery group to the configured pool size and capacity buffer.
To achieve this goal, Autoscale puts the excess machines with the fewest sessions into “drain state” and powers them off when all sessions are logged off. This behavior occurs when session demand lessens and the schedule requires fewer machines than are powered on.
Conditions for the machines to drain:
- Powered-on
- Not be in maintenance mode
- Hypervisor not in maintenance mode
- Belongs to the delivery group that requires scaling down
- Least number of current active sessions
Note:
- Machines that have been on for at least the time specified by the Power-Off delay are preferred for drain.
- Machines in drain state no longer host new session launches and waits for the existing sessions to be logged off. A machine is shut down only when all sessions are logged off. However, if there are no machines immediately available for session launches, Autoscale prefers directing the session launches to a machine in drain state over powering on a machine.
Autoscale puts excess machines into “drain state” one by one:
-
If two or more machines have the same number of active sessions, Autoscale drains the machine that has been powered on for the specified power-off delay.
Doing so avoids putting recently powered-on machines into drain state because those machines are more likely to have the fewest sessions.
-
If two or more machines have been powered on for the specified power-off delay, Autoscale drains those machines one by one at random.
Machines in drain state no longer host new session launches and are waiting for the existing sessions to be logged off. A machine becomes a candidate for shutdown only when all sessions are logged off. However, if there are no machines immediately available for session launches, Autoscale prefers directing the session launches to a machine in drain state over powering on a machine.
A machine is taken out of drain state when one of the following conditions is met:
- The machine is powered off.
- Autoscale is disabled for the delivery group to which the machine belongs.
- Autoscale uses the machine to meet schedule or load demand requirements. This case occurs when the schedule (schedule-based scaling) or the current demand (load-based scaling) requires more machines than the number of machines that are currently powered on.
Important:
If no machines are immediately available for session launches, Autoscale prefers directing session launches to a machine in a drain state over powering on a machine. A machine in a drain state that hosts a session launch remains in drain state.
Display drain state
You can determine which machines are in a drain state using PowerShell or Web Studio.
Use PowerShell
Run the Get-BrokerMachineV2 PowerShell cmdlet to view the IsDraining and DrainingReason properties for your machines.
For example: Get-BrokerMachineV2 -Property IsDraining,DrainingReason,MachineName | Format-Table MachineName,IsDraining,DrainingReason
-
IsDraining: This Boolean property is
Truewhen a machine is in a drain state andFalsewhen it is not. -
DrainingReason: This property provides a specific reason for the machine being in a drain state. Its default value is
NotDraining. When a machine is draining, DrainingReason displays one of the following values:- AutoscaleScaleDown: Autoscale initiated the drain state to scale down the number of powered-on machines in a delivery group to meet configured pool size and capacity buffer requirements. This occurs when session demand lessens or the schedule requires fewer machines.
- NaturalRebootCycle: The machine is draining as part of a scheduled reboot cycle with the “Wait for session to end” restart mode. The machine waits for active sessions to end before rebooting.
- RebootCycle: The machine is draining as part of a scheduled reboot cycle with the “Force logoff” restart mode. Active sessions are forcibly logged off before the machine reboots.
- MaintenanceMode: An administrator placed the machine in maintenance mode.
- HypervisorInMaintenanceMode: The hypervisor connection hosting the machine is in maintenance mode.
- MaintenanceCycle: The machine is draining as part of VUS maintenance cycle operation, such as an OS disk reset.
- GuestOSDraining: The guest operating system explicitly sets itself into a drain mode (for example, through a registry setting). This reason applies only to multi-session machines.
- GuestOSDrainingUntilRestart: The guest operating system sets itself into a drain mode that will persist until the next restart. This reason applies only to multi-session machines.
Use Web Studio
Note:
While the
IsDrainingandDrainingReasonproperties apply to both single-session and multi-session machines (withGuestOSDrainingreasons being multi-session specific), the Drain State column in Web Studio historically applies only to multi-session machines for displaying these states.
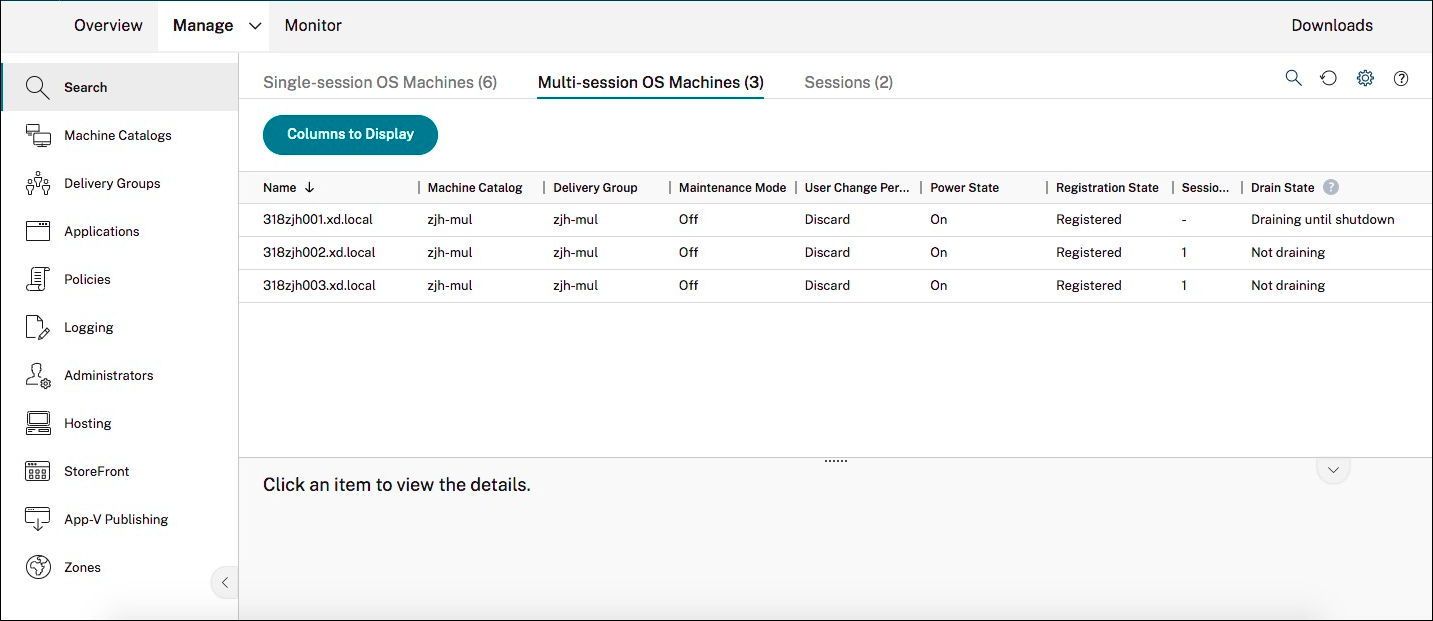
To display machines that are in a drain state in Web Studio:
- Navigate to the Search node and then click Columns to Display.
- In the Columns to Display window, select the checkbox next to Drain State.
- Click Save to exit the Columns to Display window.
The Drain State column can display the following information:
- Draining until shutdown. Appears when machines are in drain state until they’re shut down.
- Not draining. Appears when machines aren’t yet in a drain state.
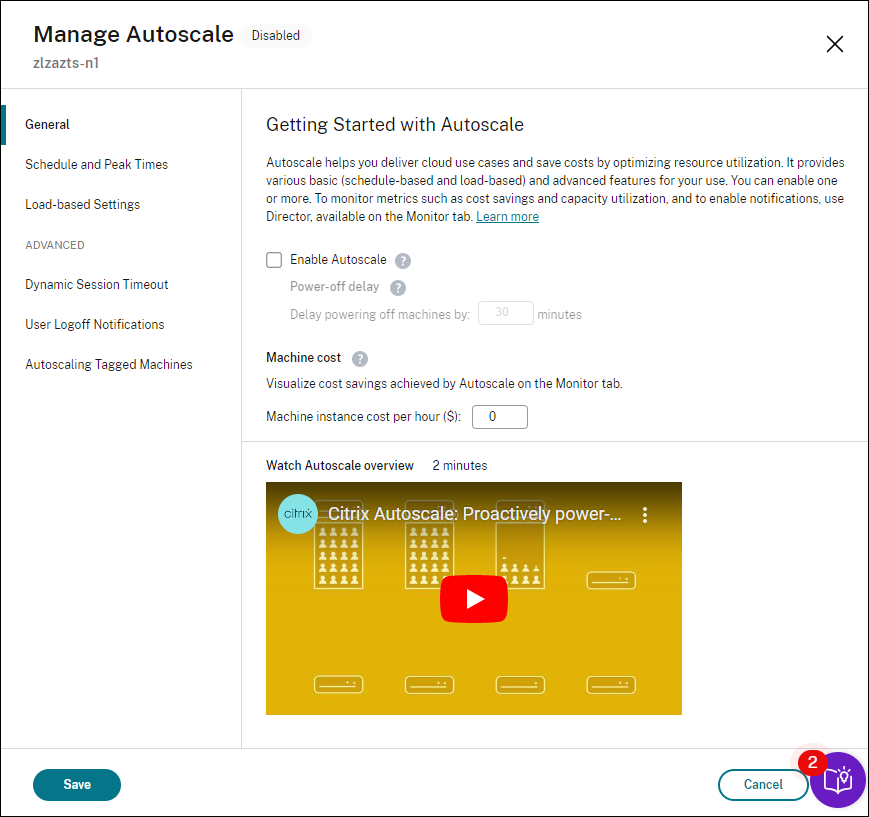
Enable Autoscale for a delivery group
Autoscale is disabled by default when you create a delivery group. To enable and configure Autoscale for a delivery group using Web Studio, follow these steps:
You can also use PowerShell commands to enable and configure Autoscale for a delivery group. For more information, see Broker PowerShell SDK commands.
-
Select Delivery Groups in the left pane.
-
Select the delivery group that you want to manage and then click Manage Autoscale.

-
On the Manage Autoscale page, select the Enable Autoscale check box to enable Autoscale. After you enable Autoscale, the options on the page are enabled.
-
To change the default settings based on your organization’s needs, complete the following settings:
-
To power off inactive machines more efficiently, use Dynamic session timeouts and User logoff notifications
-
To power manage a subset of machines in the delivery group, use Autoscaling tagged machines
To disable Autoscale, clear the Autoscale check box. The options on the page turn gray to indicate that Autoscale is disabled for the selected delivery group.
Important:
- If you disable Autoscale, all machines managed by Autoscale remain in their states at the time of disabling.
- After you disable Autoscale, the machines in drain state are taken out of drain state. For more information about drain state, see Drain state.
- The Power policies actions for single-session OS static delivery groups and single-session OS random delivery groups on the Load-based Settings page is independent of the Autoscale setting (enabled or disabled).
Exclude draining machines from autoscale calculations
This feature allows you to prevent machines, which are draining due to reboot schedules, from counting towards Autoscale capacity targets. By excluding these machines, you optimize resource provisioning and avoid over-provisioning.
For example: You have a delivery group of multi-session OS machines configured with Autoscale and regular reboot schedules. When machines enter a draining state for reboot, Autoscale typically still counts them as available capacity. This might trigger the provisioning of additional machines unnecessarily. By enabling this feature, you instruct Autoscale to ignore these draining machines when calculating capacity. This ensures that only actively available machines contribute to the target, which leads to more efficient resource utilization and reduced operational costs.
Applicability
This feature applies to delivery groups containing multi-session OS machines (RDS).
Limitations
- This feature does not apply to single-session OS machines.
- When you configure Autoscale based on the “Number of machines” (rather than “Percentage”), the system does not exclude machines in a draining state from Autoscale calculations.
Important considerations
- The property
ExcludeNaturalRebootDrainingFromAutoscaleis configured at the delivery group. - The default value for the
ExcludeNaturalRebootDrainingFromAutoscaleproperty isFalse. This means draining machines are included in Autoscale calculations by default.
Prerequisites
- Configure a multi-session OS delivery group.
- Enable and configure Autoscale for the target delivery group. Preferably, you use “Percentage of machines” for scaling.
- Configure Restart Schedules for the delivery group to induce machines into a draining state.
How to configure
You configure this feature at the delivery group level using a PowerShell command.
-
Ensure the feature toggle
ExcludeNaturalRebootDrainingFromAutoscaleis enabled. You can verify this by runningGet-ConfigEnabledFeaturein PowerShell and checking for the toggle in the output list.Note:
If the toggle is disabled, you cannot modify the delivery group property.
-
Set the delivery group property to exclude draining machines.
- Open PowerShell with administrative privileges.
- Identify your multi-session OS delivery group.
-
Set the
ExcludeNaturalRebootDrainingFromAutoscaleproperty to$Truefor your delivery group using theSet-BrokerDesktopGroupcmdlet:Set-BrokerDesktopGroup -Name "<YourDeliveryGroupName>" -ExcludeNaturalRebootDrainingFromAutoscale $True <!--NeedCopy-->Replace
<YourDeliveryGroupName>with the actual name of your delivery group. -
Verify the property is set to
Trueby running:Get-BrokerDesktopGroup -Name "<YourDeliveryGroupName>" | Select Name, ExcludeNaturalRebootDrainingFromAutoscale <!--NeedCopy-->The output should show
ExcludeNaturalRebootDrainingFromAutoscale : True.
-
Configure Autoscale and restart schedules (if not already configured).
Ensure your delivery group has Autoscale enabled and a Restart Schedule configured to cause machines to enter a draining state.
- In Web Studio, edit your delivery group.
- Go to Manage Autoscale and configure peak/off-peak schedules, ensuring Autoscale is enabled. If you intend for draining machines to be excluded, set your schedule based on “Percentage of machines”.
- Go to Restart Schedule and create or edit a schedule that causes machines to enter a draining state (e.g., use Graceful restart for Cloud or Re-start all machines after draining session for on-premises deployments).
Monitoring and Troubleshooting
Problem: Sessions occasionally launch onto draining machines even when you enable the feature.
Cause: This is expected behavior. Machines in a draining state are still available for session launches as a “last resort” if no other suitable non-draining machines are available. The feature primarily affects Autoscale calculations for provisioning/deprovisioning. It does not affect the broker’s session launch logic itself.
Solution: This is not an issue but an intended design. To minimize sessions going to draining machines, ensure your Autoscale buffer and capacity are sufficient to keep enough non-draining machines available to meet demand.
Autoscale options for VMs with user sessions
Autoscale can manage both assigned and pooled machines, optimizing their power and availability. The following content provides PowerShell commands and UI settings for controlling machine power states based on peak and off-peak times and user sessions for assigned and pooled machines.
Assigned machines are dedicated to a single user, while pooled machines are shared among multiple users.
Note:
- Session limit policies in Citrix Studio, particularly the Disconnected session timer and Session idle timer, are crucial for managing user sessions even when Citrix Autoscale is NOT enabled. These policies define how long a session can remain disconnected or idle before being terminated, ensuring resource utilization and preventing locked-out sessions. The policy setting can be used for both assigned and pooled machines, particularly those running multi-session VDAs. For detailed information, see Session limits policy settings.
- The
Get-BrokerMachinePowerShell command is deprecated. UseGet-BrokerMachineV2as an alternative.
For assigned machines
-
To automatically power on assigned single‑session machines in a static delivery group at the beginning of peak time use the PowerShell command:
Set-BrokerDesktopGroup "Desktop Group Name" -AutomaticPowerOnForAssigned $True <!--NeedCopy--> -
To ensure any assigned machine that is found to be off during peak time is restarted, also enable
AutomaticPowerOnForAssignedDuringPeak.Set-BrokerDesktopGroup "Desktop Group Name" -AutomaticPowerOnForAssigned $True -AutomaticPowerOnForAssignedDuringPeak $True <!--NeedCopy--> -
If you want the VMs to turn on only when a user launches a session, then do either of the following:
- Set
AutomaticPowerOnForAssignedandAutomaticPowerOnForAssignedDuringPeaktoFalse. -
Define all hours as off-peak with no peak hours at all using the UI interface. See Schedule-based settings. During off peak times an Autoscale managed assigned machine is shut down if it has no user session on it.
- Set
-
In cases where all the machines are turned on by Autoscale at peak times, use the UI interface to set the wait time in minutes and actions like, no action, suspend, or shut down if no user logs on after the machine is powered on by Autoscale. See Power policies.
For pooled machines
To automatically shut down pooled machines after session logoff, set the PowerShell command ShutdownAfterUse to True for a delivery group. For example:
Set-BrokerDesktopGroup -Name “DesktopGroupName” -ShutdownDesktopsAfterUse $true
<!--NeedCopy-->
Monitor metrics
After you enable Autoscale for a delivery group, you can monitor the following metrics of Autoscale-managed machines from Director.
-
Machine usage
-
Estimated savings
-
Alert notifications for machines and sessions
-
Machine status
-
Load evaluation trends
Note:
When you initially enable Autoscale for a delivery group, it might take a few minutes to display monitoring data for that delivery group. Monitoring data remains available if Autoscale is enabled and then disabled for the delivery group. Autoscale collects monitoring data at 5-minute intervals.
For more information about the metrics, see Monitor Autoscale-managed machines.
Autoscale on hibernated VMs
You can hibernate VMs through Autoscale configurable settings. Use the PowerShell commands Get-BrokerDesktopGroups, New-BrokerDesktopGroups, or Set-BrokerDesktopGroups to set the following positive value to the parameter AutoscaleScaleDownActionDuringPeak (during peak) or AutoscaleScaleDownActionDuringOffPeak (during off peak) to define the power actions:
- 0: Shut down the VMs when scaling down
- 1: Suspend (hibernate the VMs) when scaling down
VMs not capable of hibernation are shut down.
You can configure reboot schedules for hibernated VMs if the Delivery Group is hibernation enabled. In the reboot cycle, the VMs are resumed and, then shut down. The reboot schedule can be set as weekly, daily, monthly, and once. You can configure multiple schedules. However, the VMs resuming from hibernation can take few mins.
Autoscale can also power on hibernated multi-session Remote Desktop Services (RDS) and shared single session VMs with no sessions on it during peak time. The VMs can be of MCS and non-MCS machine catalogs.
More information
For more information on Autoscale, see Citrix Autoscale in Tech Zone.