Enable TLS / DTLS on VDAs
Enable TLS connections between Citrix Workspace™ app and Virtual Delivery Agents (VDAs) by completing the following tasks:
- Install certificates on the VDAs. For details, see requesting and installing a certificate
- Configure TLS on the machines where the VDAs are installed. (For convenience, further references to machines where VDAs are installed are simply called “VDAs.”). It is highly recommended that you use the Citrix supplied PowerShell script to configure TLS/DTLS. For details, see Configure TLS on a VDA using the PowerShell script. However, if you want to configure TLS/DTLS manually, see Manually configure TLS on a VDA.
- Configure TLS in the Delivery Groups containing the VDAs by running a set of PowerShell cmdlets in Studio. For details, see Configure TLS on Delivery Groups.
Requirements and considerations:
- Configure TLS in the Delivery Groups and on the VDAs after you install components, create a Site, create machine catalogs, and create Delivery Groups.
- To configure TLS in the Delivery Groups, you must have permission to change Controller access rules. A Full Administrator has this permission.
- To configure TLS on the VDAs, you must be a Windows administrator on the machine where the VDA is installed.
- On pooled VDAs that are provisioned by Machine Creation Services™ or Provisioning Services, the VDA machine image is reset on restart, causing previous TLS settings to be lost. Run the PowerShell script each time the VDA is restarted to reconfigure the TLS settings.
A Delivery Group cannot have a mixture of some VDAs with TLS configured and some VDAs without TLS configured. Before you configure TLS for a Delivery Group, ensure that you have already configured TLS for all the VDAs in that Delivery Group
When you configure TLS on VDAs, permissions on the installed TLS certificate are changed, giving the ICA® Service read access to the certificate’s private key, and informing the ICA Service of the following:
-
Which certificate in the certificate store to use for TLS.
-
Which TCP port number to use for TLS connections.
The Windows Firewall (if enabled) must be configured to allow incoming connection on this TCP port. This configuration is done for you when you use the PowerShell script.
-
Which versions of the TLS protocol to allow.
Important:
Citrix recommends using TLS 1.2 or higher. SSL and older versions of TLS are deprecated.
The supported TLS protocol versions follow a hierarchy (lowest to highest): SSL 3.0, TLS 1.0, TLS 1.1, TLS 1.2, and TLS 1.3. Specify the minimum allowed version; all protocol connections using that version or a higher version are allowed.
For example, if you specify TLS 1.1 as the minimum version, then TLS 1.1, TLS 1.2 and TLS 1.3 protocol connections are allowed. If you specify SSL 3.0 as the minimum version, then connections for all the supported versions are allowed. If you specify TLS 1.3 as the minimum version, only TLS 1.3 connections are allowed.
-
Which TLS cipher suites to allow.
A cipher suite selects the encryption that is used for a connection. Clients and VDAs can support different sets of cipher suites. When a client (Citrix Workspace app) connects and sends a list of supported TLS cipher suites, the VDA matches one of the client’s cipher suites with one of the cipher suites in its own list of configured cipher suites, and accepts the connection. If there is no matching cipher suite, the VDA rejects the connection.
The VDA supports three sets of cipher suites (also known as compliance modes): GOV(ernment), COM(mercial), and ALL. The acceptable cipher suites also depend on the Windows FIPS mode; see http://support.microsoft.com/kb/811833 for information about Windows FIPS mode. The following table lists the cipher suites in each set:
Cipher Suite ALL COM GOV ALL COM GOV FIPS Mode Off Off Off On On On TLS_AES_256_GCM_SHA384 X X X X TLS_AES_128_GCM_SHA256 X X X TLS_ECDHE_RSA_WITH_AES_256_GCM_SHA384 X X X X TLS_ECDHE_RSA_WITH_AES_256_CBC_SHA384 X X X X TLS_ECDHE_RSA_WITH_AES_128_CBC_SHA X X X X Note:
The VDA does not support DHE ciphersuites (for example, TLS_DHE_RSA_WITH_AES_256_GCM_SHA384, TLS_DHE_RSA_WITH_AES_256_CBC_SHA, TLS_DHE_RSA_WITH_AES_128_GCM_SHA256, and TLS_DHE_RSA_WITH_AES_128_CBC_SHA.) If selected by Windows, the connection will fail.
If you are using a NetScaler Gateway, refer to the NetScaler documentation for information on cipher suite support for back-end communication. For information on TLS cipher suite support, see Ciphers available on the Citrix ADC appliances. For information on DTLS cipher suite support, see DTLS cipher support.
Requesting and installing a certificate
To use TLS, you must install a certificate whose Alternative Name includes the VDA’s FQDN. The certificate must be trusted by any clients connecting directly to the VDA (not via a Citrix Gateway). To allow un-managed devices where you cannot easily deploy certificates to connect to the VDA, consider deploying a NetScaler® Gateway.
Create certificate using Microsoft Certificate Authority
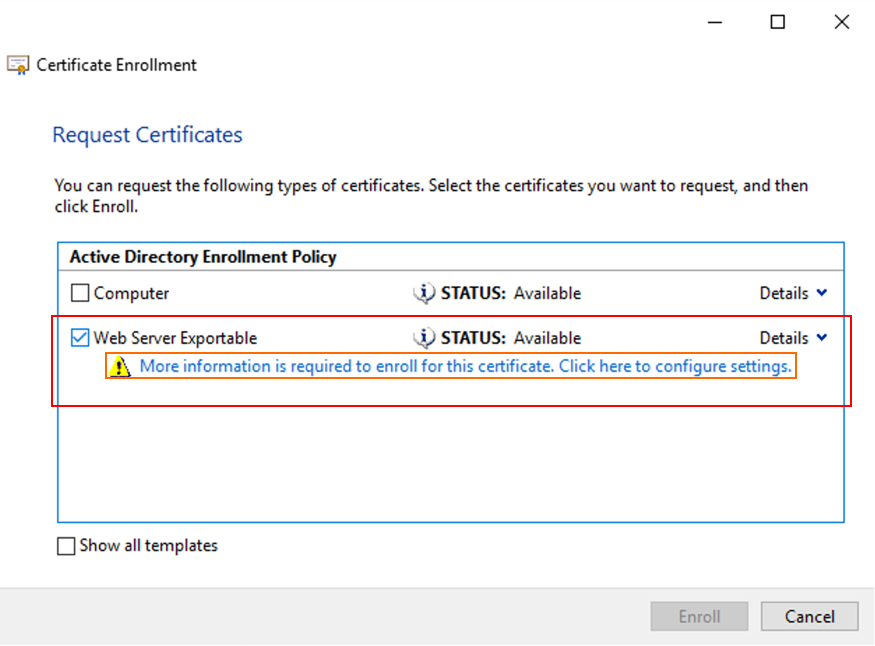
If your clients and VDAs are on a trusted forest and it has a Microsoft Certificate Authority, you can acquire a certificate from the Certificates MMC snap-in Certificate Enrollment wizard.
- On the VDA, open the MMC console and add the Certificates snap-in. When prompted select Computer account.
- Expand Personal > Certificates, then use the context menu command All Tasks > Request New Certificate.
- Click Next to begin, and Next to confirm that you are acquiring the certificate from Active Directory enrollment.
-
Select the template for Server Authentication certificate. Both the default Windows Computer or Web Server Exportable are acceptable. If the template has been set up to automatically provide the values for Subject, you can click Enroll without providing more details.
-
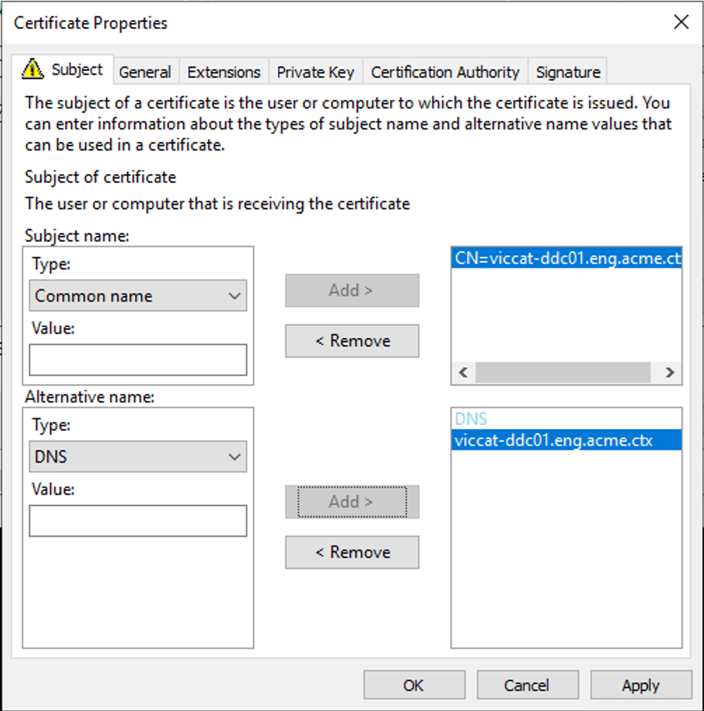
To provide more details for the certificate template, click Details and configure the following:
Subject name — select type Common name and add the FQDN of the VDA
Alternative name — select type DNS and add the FQDN of the VDA
Note:
Use Active Directory Certificate Services Certificate Auto-Enrollment to automate issuing and deploying certificates to the VDAs. This is described in Enable certificate auto-enrollment).
You can use wildcard certificates to allow a single certificate to secure multiple VDAs:
Subject name — select type Common name and enter the *.primary.domain of the VDAs
Alternative name — select type DNS and add the *.primary.domain of the VDAs

You can use SAN certificates to allow a single certificate to secure multiple specific VDAs:
Subject name — select type Common name and enter a string to help identify the certificate usage
Alternative name — select type DNS and add an entry for the FQDN of each VDA. Keep the number of Alternative names to a minimum to ensure optimal TLS negotiation.

Note:
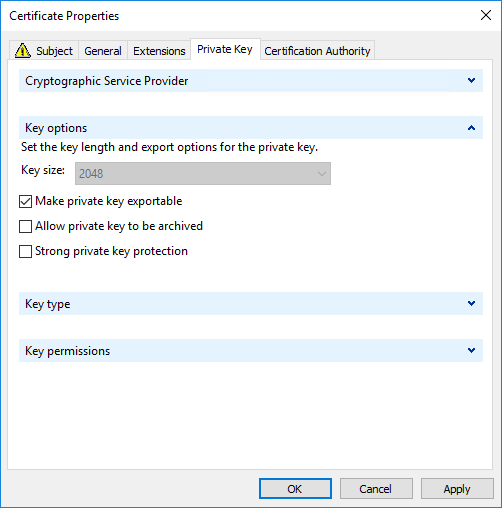
Both wildcard and SAN certificates require Make private key exportable on the Private Key tab to be selected:
Configure TLS on a VDA using the PowerShell script
Install the TLS Certificate in the Local Computer > Personal > Certificates area of the certificate store. If more than one certificate resides in that location, supply the thumbprint of the certificate to the PowerShell script.
Note:
Starting with XenApp and XenDesktop 7.15 LTSR, the PowerShell script finds the correct certificate based on the FQDN of the VDA. You do not need to supply the thumbprint when only a single certificate is present for the VDA FQDN.
The Enable-VdaSSL.ps1 script enables or disables the TLS listener on a VDA. This script is available in the Support > Tools > SslSupport folder on the installation media.
When you enable TLS, DHE cipher suites are disabled. ECDHE cipher suites are not affected.
When you enable TLS, the script disables all existing Windows Firewall rules for the specified TCP port. It then adds a new rule that allows the ICA Service to accept incoming connections only on the TLS TCP and UDP ports. It also disables the Windows Firewall rules for:
- Citrix ICA (default: 1494)
- Citrix CGP (default: 2598)
- Citrix WebSocket (default: 8008)
The effect is that users can only connect using TLS or DTLS. They cannot use ICA/HDX, ICA/HDX with Session Reliability, or HDX over WebSocket, without TLS or DTLS.
Note:
DTLS is not supported with ICA/HDX Audio over UDP Real-time Transport, or with ICA/HDX Framehawk.
See Network ports.
The script contains the following syntax descriptions, plus extra examples; you can use a tool such as Notepad++ to review this information.
Important:
Specify either the Enable or Disable parameter, and the CertificateThumbPrint parameter. The other parameters are optional.
Syntax
Enable-VdaSSL {-Enable | -Disable} -CertificateThumbPrint "<thumbprint>" [-SSLPort <port>] [-SSLMinVersion "<min-ssl-version>"] [-SSLCipherSuite"\<suite>"]
| Parameter | Description |
|---|---|
| Enable | Installs and enables the TLS listener on the VDA. Either this parameter or the Disable parameter is required. |
| Disable | Disables the TLS listener on the VDA. Either this parameter or the Enable parameter is required. If you specify this parameter, no other parameters are valid. |
| CertificateThumbPrint “ |
Thumbprint of the TLS certificate in the certificate store, enclosed in quotation marks. The script uses the specified thumbprint to select the certificate you want to use. If this parameter is omitted, an incorrect certificate is selected. |
| SSLPort |
TLS port. Default: 443 |
| SSLMinVersion “ |
Minimum TLS protocol version, enclosed in quotation marks. Valid values: SSL_3.0, TLS_1.0 (default), TLS_1.1, TLS_1.2 and TLS_1.3. TLS_1.3 requires Windows 11 or Windows Server 2022 or higher. |
| SSLCipherSuite “ |
TLS cipher suite, enclosed in quotation marks. Valid values: “GOV”, “COM”, and “ALL” (default). |
Examples
The following script installs and enables the TLS protocol version value. The thumbprint (represented as “12345678987654321” in this example) is used to select the certificate to use.
Enable-VdaSSL -Enable -CertificateThumbPrint "12345678987654321"
The following script installs and enables the TLS listener, and specifies TLS port 400, the GOV cipher suite, and a minimum TLS 1.2 protocol value. The thumbprint (represented as “12345678987654321” in this example) is used to select the certificate to use.
Enable-VdaSSL -Enable
-CertificateThumbPrint "12345678987654321"
-SSLPort 400 -SSLMinVersion "TLS_1.2"
-SSLCipherSuite "All"
The following script disables the TLS listener on the VDA.
Enable-VdaSSL -Disable
Manually configure TLS on a VDA
When configuring TLS on a VDA manually, you grant generic read access to the private key of the TLS certificate for the appropriate service on each VDA: NT SERVICE\PorticaService for a VDA for Windows Single-session OS, or NT SERVICE\TermService for a VDA for Windows Multi-session OS. On the machine where the VDA is installed:
STEP 1. Launch the Microsoft management console (MMC): Start > Run > mmc.exe.
STEP 2. Add the Certificates snap-in to the MMC:
- Select File > Add/Remove Snap-in.
- Select Certificates and then click Add.
- When prompted with “This snap-in will always manage certificates for:” choose “Computer account” and then click Next.
- When prompted with “Select the computer you want this snap-in to manage” choose “Local computer” and then click Finish.
STEP 3. Under Certificates (Local Computer) > Personal > Certificates, right–click the certificate and then select All Tasks > Manage Private Keys.
STEP 4. The Access Control List Editor displays “Permissions for (FriendlyName) private keys” where (FriendlyName) is the name of your TLS certificate. Add one of the following services and give it Read access:
- For a VDA for Windows Single-session OS, “PORTICASERVICE”
- For a VDA for Windows Multi-session OS, “TERMSERVICE”
STEP 5. Double-click the installed TLS certificate. In the certificate dialog, select the Details tab and then scroll to the bottom. Click Thumbprint.
STEP 6. Run regedit and go to HKLM\SYSTEM\CurrentControlSet\Control\Terminal Server\Wds\icawd.
- Edit the SSL Thumbprint key and copy the value of the TLS certificate’s thumbprint into this binary value. You can safely ignore unknown items in the Edit Binary Value dialog box (such as ‘0000’ and special characters).
- Edit the SSLEnabled key and change the DWORD value to 1. (To disable SSL later, change the DWORD value to 0.)
-
If you want to change the default settings (optional), use the following in the same registry path:
SSLPort DWORD – SSL port number. Default: 443.
SSLMinVersion DWORD – 1 = SSL 3.0, 2 = TLS 1.0, 3 = TLS 1.1, 4 = TLS 1.2, 5 = TLS 1.3. Default: 2 (TLS 1.0).
SSLCipherSuite DWORD – 1 = GOV, 2 = COM, 3 = ALL. Default: 3 (ALL).
STEP 7. Ensure that the TLS TCP and UDP ports are that open in the Windows Firewall if they are not the default 443. (When you create the inbound rule in Windows Firewall, ensure its properties have the “Allow the connection” and “Enabled” entries selected.)
STEP 8. Ensure that no other applications or services (such as IIS) are using the TLS TCP port.
STEP 9. For multi-session VDAs, restart the machine for the changes to take effect. (You do not need to restart single-session VDA machines.)
STEP 10. Modify the Windows cipher suite preference so that the VDA-supported cipher suites have the highest priority in order to avoid connection issues.
Important:
The Group Policy changes outlined below only take effect after the system is restarted.
If you are using non-persistent session hosts provisioned with MCS or PVS, you must apply these settings in the master image.
Option 1:
Using the Group Policy Editor, go to Computer Configuration > Policies > Administrative Templates > Network > SSL Configuration Settings > SSL Cipher Suite Order. Ensure the following cipher suites are at the top of the list:
TLS_AES_256_GCM_SHA384_P384
TLS_AES_256_GCM_SHA384_P256
TLS_AES_128_GCM_SHA256_P384
TLS_AES_128_GCM_SHA256_P256
TLS_ECDHE_RSA_WITH_AES_256_GCM_SHA384_P384
TLS_ECDHE_RSA_WITH_AES_256_GCM_SHA384_P256
TLS_ECDHE_RSA_WITH_AES_256_CBC_SHA384_P384
TLS_ECDHE_RSA_WITH_AES_256_CBC_SHA384_P256
TLS_ECDHE_RSA_WITH_AES_128_CBC_SHA_P384
TLS_ECDHE_RSA_WITH_AES_128_CBC_SHA_P256
<!--NeedCopy-->
Note:
TLS_AES_256_GCM_SHA384 and TLS_AES_128_GCM_SHA256 only apply to Windows 11 and Windows Server 2022 or newer. If you are using older operating systems, please do not include these cipher suites in your list.
Note that the listed cipher suites also specify the elliptic curve, P384 or P256, to ensure that “curve25519” is not selected. FIPS Mode does not prevent the use of “curve25519”.
It is not necessary to remove any cipher suites from the list. Note that these settings apply to the entire system, so if you decide to remove any cipher suites, you must ensure they are not required by any applications or services running on your session hosts.
Option 2:
Using the Group Policy Editor, go to Computer Configuration > Policies > Administrative Templates > Network > SSL Configuration Settings > SSL Cipher Suite Order. Ensure the following cipher suites are at the top of the list:
TLS_AES_256_GCM_SHA384
TLS_AES_128_GCM_SHA256
TLS_ECDHE_RSA_WITH_AES_256_GCM_SHA384
TLS_ECDHE_RSA_WITH_AES_256_CBC_SHA384
TLS_ECDHE_RSA_WITH_AES_128_CBC_SHA
<!--NeedCopy-->
Note:
TLS_AES_256_GCM_SHA384 and TLS_AES_128_GCM_SHA256 only apply to Windows 11 and Windows Server 2022, or newer. If you are using older operating systems, please do not include these cipher suites in your list.
It is not necessary to remove any cipher suites from the list. Note that these settings apply to the entire system, so if you decide to remove any cipher suites, you must ensure they are not required by any applications or services running on your session hosts.
Using the Group Policy Editor, go to Computer Configuration > Policies > Administrative Templates > Network > SSL Configuration Settings > ECC Curve Order. Enable the setting and include the following curves in the list:
NistP384
NistP256
<!--NeedCopy-->
Note:
This ensure that “curve25519” is not selected. FIPS Mode does not prevent the use of “curve25519”.
The VDA selects a cipher suite only if appears in both lists: the Group Policy list and the list for the selected compliance mode (COM, GOV, or ALL). The cipher suite must also appear in the list sent by the client (Citrix Workspace app).
Configure TLS on Delivery Groups
Complete this procedure for each Delivery Group that contains VDAs you have configured for TLS connections.
- From Studio, open the PowerShell console.
- Run Get-BrokerAccessPolicyRule -DesktopGroupName ‘<delivery-group-name>’ | Set-BrokerAccessPolicyRule -HdxSslEnabled $true.
- Run Set-BrokerSite -DnsResolutionEnabled $true.
Enabling SSL for Pooled VDAs using Auto-Enrolment
When using pooled VDAs, if you add a certificate to the master image then all VDAs share the same image. You can use a wildcard certificate but a disadvantage is that if any one of the VDAs becomes compromised, this all powerful certificate would mean HDX™ connections belonging to all VDAs would be at risk.
Instead a secure alternative is to leverage Microsoft Active Directory Certificate Services to provisioning certificates automatically using group policy. You can use a startup script on the VDA to dynamically provision a fresh certificate and enables SSL to the VDA.
Note that this approach will only work for single-session Desktop VDAs. For multi-session VDAs, the ICA listener is brought up too early during the boot process, before certificates can be automatically provisioned.
Since Active Directory Certificate Services uses an internal Enterprise Certificate Authority, it won’t be automatically trusted by all Windows installations. If the clients are managed by the corporation and part of a domain forest, the trusted CA certificates can be distributed automatically using group policy. For BYOD and other non-domain joined devices you need to distribute the trusted CA certificates to your users by some other mechanism (such as offering a download link), or use a NetScaler gateway.
Enable Certificate Auto-Enrollment
First ensure you have Active Directory Certificate Services role installed on a server in your VDA domain forest providing an Enterprise CA, otherwise auto-enrollment will not be possible.
Note that this may put considerable higher load than usual on your Enterprise CA, since VDAs will be submitting a certificate request on every boot. Make sure to allocate sufficient CPU and memory on the CA server to cope with the load, and as ever test the scalability of the deployment in a lab environment before moving into production.
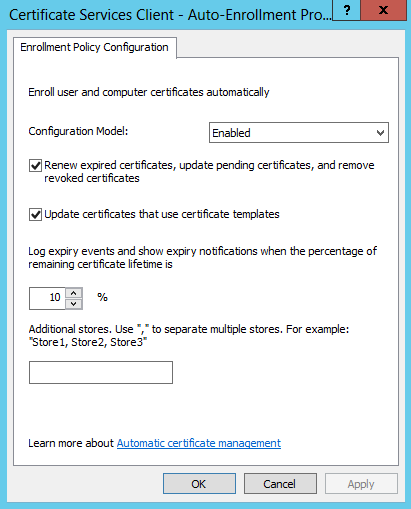
In the Group Policy Management Editor, create a new policy which applies to the Organizational Unit that will contain your pooled VDAs with SSL enabled as follows:
- Expand Computer Configuration -> Policies -> Windows Settings -> Security Settings -> Public Key Policies
- Edit the ‘Certificate Services Client – Auto Enrollment Policy’ object properties
- Configure as shown in the screenshot below.
- Right-click the Automatic Certificate Request container and select New -> Automatic Certificate Request…
- In the Automatic Certificate Request Setup Wizard, click Next
- Ensure the Computer certificate template is selected, click Next
- Click Finish
Preparing the Windows Master Image
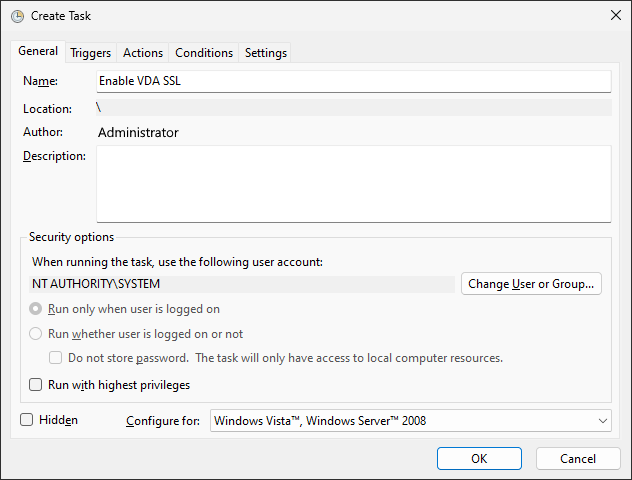
Copy the Enable-VdaSsl.ps1 script from the product installation media in the Support\Tools\SslSupport folder to the VDA master image. Note the master image should not contain any certificates to be used for HDX SSL connections. The certificates will be provisioned when the MCS or PVS machine catalog is created. Now create a new scheduled task as follows (do not run the scheduled task now):
-
Open Task Scheduler.
-
In the Actions pane, press Create Task…
-
On the general tab:
-
Enter a Name such as
Enable VDA SSL -
Click Change User or Group… and in the Select User or Group dialog box enter
SYSTEMand click OK
-
-
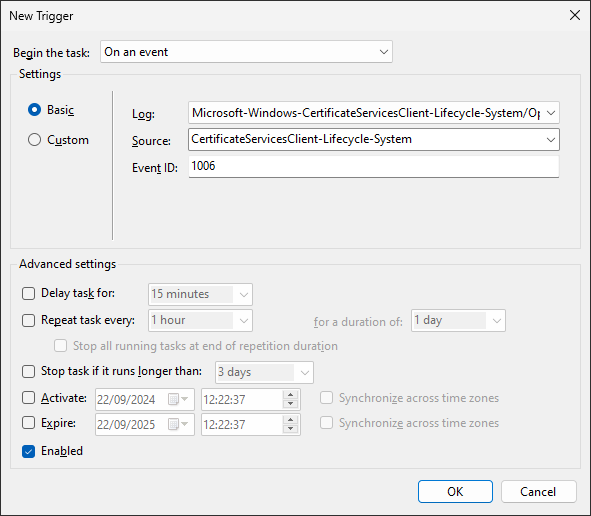
Select the Triggers tab
-
Click New…. In the New Trigger dialog:
-
Set Begin the task to On an event
-
Set Log to Microsoft-Windows-CertificateServicesClient-Lifecycle-System/Operational
-
Set Source to Microsoft-Windows-CertificateServicesClient-Lifecycle-System
-
Set Event ID to
1006 -
Click OK to save the trigger
-
-
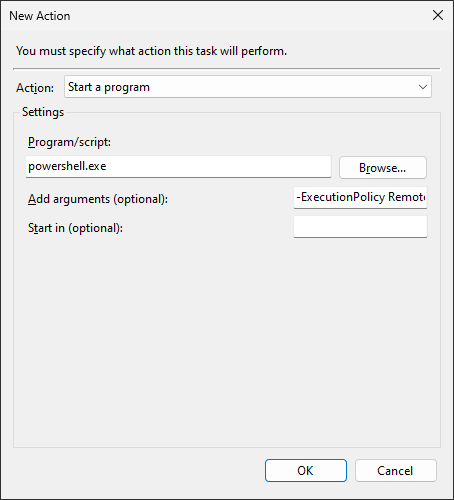
Select the Actions tab
-
Click New…
-
In the New Action dialog:
-
Set Action to Start a program
-
In the Program/script field, enter
powershell.exe -
In the Add arguments field, enter
-ExecutionPolicy RemoteSigned Enable-VdaSsl.ps1 -Enable -Confirm:$False, including the path to the powershell script. -
Press OK to save the action
-
-
Press OK to save the task
Troubleshooting
If a connection error occurs, check the system event log on the VDA.
When using Citrix Workspace app for Windows, if you receive a connection error that indicates a TLS error, disable Desktop Viewer and then try connecting again. Although the connection still fails an explanation of the underlying TLS issue might be provided. For example, you specified an incorrect template when requesting a certificate from the certificate authority.)
Most configurations that use HDX Adaptive Transport work successfully with DTLS, including those using the latest versions of Citrix Workspace app, Citrix Gateway, and the VDA. Some configurations which use DTLS between Citrix Workspace app and Citrix Gateway, and which use DTLS between Citrix Gateway and the VDA, require additional action.
Additional action is needed if:
- the Citrix Receiver version supports HDX Adaptive Transport and DTLS: Receiver for Windows (4.7, 4.8, 4.9), Receiver for Mac (12.5, 12.6, 12.7), Receiver for iOS (7.2, 7.3.x) or Receiver for Linux (13.7)
and either of the following also applies:
-
the Citrix Gateway version supports DTLS to the VDA, but the VDA version does not support DTLS (version 7.15 or earlier),
-
the VDA version supports DTLS (version 7.16 or later), but the Citrix Gateway version does not support DTLS to the VDA.
To avoid connections from Citrix Receiver™ failing, do one of the following:
- update Citrix Receiver, to Receiver for Windows version 4.10 or later, Receiver for Mac 12.8 or later, or Receiver for iOS version 7.5 or later; or,
- update the Citrix Gateway to a version that supports DTLS to the VDA; or,
- update the VDA, to version 7.16 or later; or,
- disable DTLS at the VDA; or,
- disable HDX Adaptive Transport.
Note:
A suitable update for Receiver for Linux is not yet available. Receiver for Android (version 3.12.3) does not support HDX Adaptive Transport and DTLS via Citrix Gateway, and is therefore not affected.
To disable DTLS at the VDA, modify the VDA firewall configuration to disable UDP port 443. See Network ports.
TLS and HTML5 video redirection, and browser content redirection
You can use HTML5 video redirection and browser content redirection to redirect HTTPS websites. The JavaScript injected into those websites must establish a TLS connection to the Citrix HDX HTML5 Video Redirection Service running on the VDA. To achieve this, the HTML5 Video Redirection Service generates two custom certificates in the certificate store on the VDA. Stopping the service removes the certificates.
The HTML5 video redirection policy is disabled by default.
The browser content redirection is enabled by default.
For more information on HTML5 video redirection, see Multimedia policy settings.