Tags
Introduction
Tags are strings that identify items such as machines, applications, desktops, delivery groups, application groups, and policies. After creating a tag and adding it to an item, you can tailor certain operations to apply only to items that have a specified tag.
-
Tailor search displays in Studio.
For example, to display only applications that have been optimized for testers, create a tag named “test” and then add (apply) it to those applications. You can now filter the search with the tag “test”.
-
Publish applications from an application group or specific desktops from a delivery group, considering only a subset of the machines in selected delivery groups. This is called a tag restriction.
With tag restrictions, you can use your existing machines for more than one publishing task, saving the costs associated with deploying and managing more machines. A tag restriction can be thought of as subdividing (or partitioning) the machines in a delivery group. Its functionality is similar, but not identical, to worker groups in XenApp releases earlier than 7.x.
Using an application group or desktops with a tag restriction can be helpful when isolating and troubleshooting a subset of machines in a delivery group.
Details and examples of using a tag restriction are described later in this article.
-
Schedule periodic restarts for a subset of machines in a delivery group.
Using a tag restriction for machines enables you to use new PowerShell cmdlets to configure multiple restart schedules for subsets of machines in a delivery group. For examples and details, see Manage delivery groups.
-
Tailor the application (assignment) of Citrix® policies to machines in delivery groups, delivery group types, or OUs that have (or don’t have) a specified tag.
For example, if you want to apply a Citrix policy only to the more powerful workstations, add a tag named “high power” to those machines. Then, on the Assign Policy page of the Create Policy wizard, select that tag and the Enable check box. You can also add a tag to a delivery group and then apply a Citrix policy to that group. For details, see Create policies.
You can apply tags to:
- Machines
- Applications
- Machine catalogs
- Delivery groups
- Application groups
You can configure a tag restriction when creating or editing the following in Studio:
- A desktop in a shared delivery group
- An application group
Important:
A tag can be explicitly applied to a machine or can be explicitly applied at the machine catalog or delivery group level. When a tag is applied at the machine catalog or delivery group level, all machines within that catalog or delivery group implicitly inherit the tag. These inherited tags cannot be removed at the machine level. To remove the tag effect, the tag must be removed from the machine catalog or delivery group level.
Tag restrictions for a desktop or an application group
A tag restriction involves several steps:
- Create the tag and then add (apply) it to machines.
- Create or edit a group with the tag restriction (in other words, restrict launches to machines with tag x).
A tag restriction extends the Controller’s machine selection process. The Controller selects a machine from an associated delivery group, subject to access policy, configured user lists, zone preference, and launch readiness, plus the tag restriction (if present). For applications, the Controller falls back to other delivery groups in priority order, applying the same machine selection rules for each considered delivery group.
Example 1: Simple layout
This example introduces a simple layout that uses tag restrictions to limit which machines are considered for certain desktop and application launches. There is one shared delivery group, one published desktop, and one application group configured with two applications.
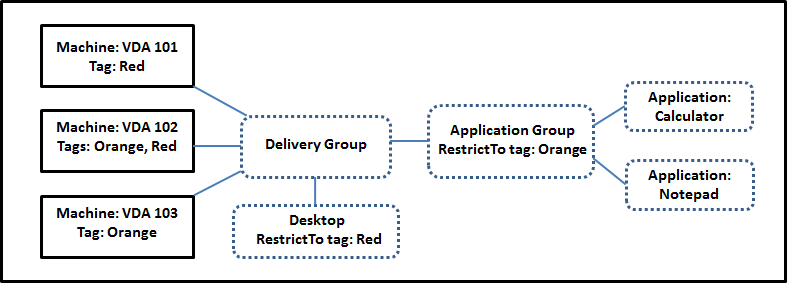
- Tags have been added to each of the three machines (VDA 101-103).
- The desktop in the delivery group was created with a tag restriction named
Red. So, that desktop can be launched only on machines in that delivery group that have the tagRed: VDA 101 and 102. - The application group was created with the
Orangetag restriction. So, each of its applications (CalculatorandNotepad) can be launched only on machines in that delivery group that have the tagOrange: VDA 102 and 103.
Machine VDA 102 has both tags (Red and Orange), so it can be considered for launching the applications and the desktop.
Example 2: More complex layout
This example contains several application groups that were created with tag restrictions. This results in the ability to deliver more applications with fewer machines than would otherwise be needed if you used only delivery groups.
How to configure example 2 shows the steps used to create and apply the tags, and then configure the tag restrictions in this example.
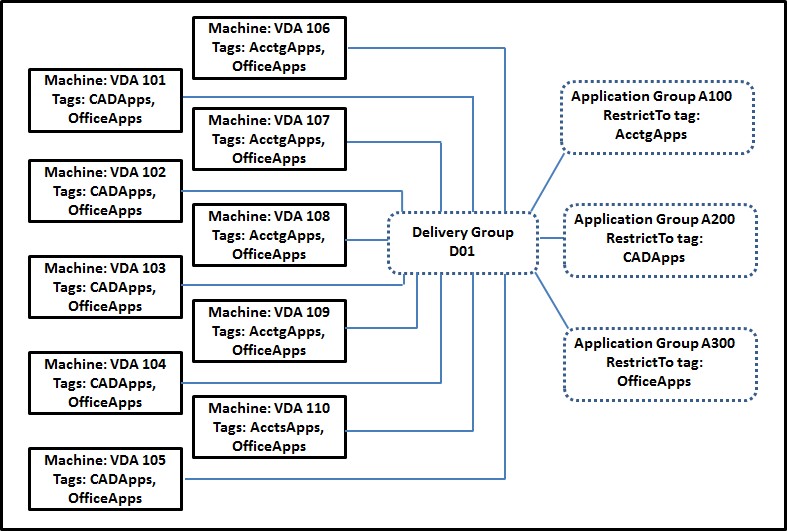
This example uses 10 machines (VDA 101-110), one delivery group (D01), and three application groups (A100, A200, A300). By applying tags to each machine and then specifying tag restrictions when creating each application group:
- Accounting users in the group can access the apps they need on five machines (VDA 101–105)
- CAD designers in the group can access the apps they need on five machines (VDA 106-110)
- Users in the group who need Office applications can access the Office apps on 10 machines (VDA 101-110)
Only 10 machines are used, with only one delivery group. Using delivery groups alone (without application groups) would require twice as many machines, because a machine can belong to only one delivery group.
Manage tags and tag restrictions
Tags are created, added (applied), edited, and deleted from selected items through the Manage Tags action in Studio.
(Exception: Tags used for policy assignments are created, edited, and deleted through the Manage Tags action. However, you apply (assign) tags when you create the policy. See Create policies for details.)
Tag restrictions are configured when you create or edit desktops in delivery groups, and when you create and edit application groups.
Use the Manage Tags feature
From Studio, select the items to which you want to apply a tag. The items include:
- One or more machines
- One or more applications
- A desktop, a delivery group, or an application group
- A machine catalog
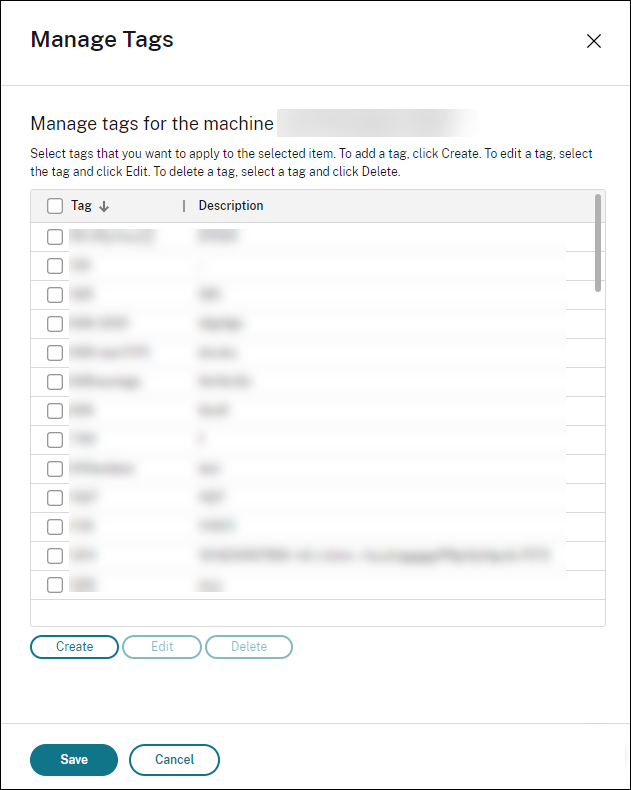
Then select Manage Tags in the action bar. The Manage Tags dialog box lists all existing tags, not just those for the items you selected.
-
An enabled check box indicates that the tag has already been added to the selected items. (In the screen capture below, the selected machine has a tag named “Tag1” applied.)
-
If you select more than one item, a check box containing a hyphen indicates that some but not all selected items have that tag added.
The following actions are available from the Manage Tags dialog box. Review Cautions when working with tags.
-
To create a tag:
Select Create. Enter a name and description. Tag names must be unique and are not case-sensitive. Then select Save.
Creating a tag does not automatically apply it to any items you have selected. Use the check boxes to apply the tag.
-
To add (apply) one or more tags:
Enable the check box next to the tag name. A check box containing a hyphen indicates that some, but not all selected items already have the tag applied. When you select multiple items and a tag’s check box has a hyphen, changing it to a check mark affects all selected machines.
If you attempt to add a tag to machines, and that tag is used as a restriction in an application group, you are warned that the action can make those machines available for launch. If that’s what you intend, proceed.
-
To remove one or more tags:
Clear the check box next to the tag name. A check box containing a hyphen indicates that some, but not all selected items already have the tag applied. When you select multiple items and a tag’s check box has a hyphen, clearing the check box removes the tag from all selected machines.
If you try to remove a tag restriction from a machine, you’re warned that the action can affect the machines considered for launch. If that’s what you intend, proceed.
-
To edit a tag:
Select a tag and then select Edit. Enter a new name, description, or both. You can edit only one tag at a time.
-
To delete one or more tags:
Select the tags and then select Delete. The Delete Tag dialog box indicates how many items currently use the selected tags (for example “2 machines”). Select an item to display more information (for example, the names of the two machines that have the tag applied). Confirm whether you want to delete the tags.
You cannot delete a tag that is used as a restriction. First, edit the application group and remove the tag restriction or select a different tag.
When you’re done in the Manage Tags dialog box, select Save.
To see if a machine has any tags applied: Select Delivery Groups in the left pane. Select a delivery group then select View Machines in the action bar. Select a machine and then select the Tags tab on the Details pane.
Manage tag restrictions
Configuring a tag restriction is a multi-step process: You first create the tag and add/apply it to machines. Then, you add the restriction to the application group or the desktop.
-
Create and apply the tag:
Create the tag and then add (apply) it to the machines that the tag restriction will affect, using Manage Tags actions.
-
To add a tag restriction to an application group:
Create or edit the application group. On the Delivery Groups page, select Restrict launches to machines with the tag and then select the tag from the list.
-
To change or remove the tag restriction on an application group:
Edit the group. On the Delivery Groups page, either select a different tag from the list or remove the tag restriction entirely by clearing Restrict launches to machines with the tag.
-
To add a tag restriction to a desktop:
Create or edit a delivery group. Select Add or Edit on the Desktops page. In the Add Desktop dialog box, select Restrict launches to machines with the tag and then select the tag from the menu.
-
To change or remove the tag restriction on a delivery group:
Edit the group. On the Desktops page, select Edit. In the dialog box, either select a different tag from the list or remove the tag restriction entirely by clearing Restrict launches to machines with the tag.
Cautions when working with tags
A tag applied to an item can be used for different purposes. Keep in mind that adding, removing, and deleting a tag can have unintended effects. You can use a tag to sort machine displays when using search in Studio. You can use the same tag as a restriction when configuring an application group or a desktop. That action limits launch consideration to only machines in specified delivery groups that have that tag.
If you add a tag to machines after that tag is configured as a desktop or application group tag restriction, you are warned that might make the machines available for launching more applications or desktops. If that’s what you intend, proceed. If not, cancel the operation.
For example, let’s say you create an application group with the Red tag restriction. Later, you add several other machines in the same delivery groups used by that application group. If you then try to add the Red tag to those machines, you see a message similar to: “The tag Red is used as a restriction on the following application groups. Adding this tag might make the selected machines available to launch applications in this application group.” You can then confirm or cancel adding that tag to those additional machines.
Similarly, when a tag is used in an application group to restrict launches, you cannot delete the tag until you edit the group and remove it as a restriction. (If you were allowed to delete that tag, it might result in allowing applications to launch on all machines in the delivery groups associated with the application group.) The same prohibition against deleting a tag applies if the tag is being used as a restriction for desktop launches. After you edit the application group or desktops in the delivery group to remove that tag restriction, you can delete the tag.
All machines might not have the same sets of applications. A user can belong to more than one application group, each with a different tag restriction and different or overlapping sets of machines from delivery groups. The following table lists how machine considerations are decided.
| When an application has been added to | These machines in the selected delivery groups are considered for launch |
|---|---|
| One application group with no tag restriction | Any machine. |
| One application group with tag restriction A | Machines that have tag A applied. |
| Two application groups, one with tag restriction A and the other with tag restriction B | Machines that have tag A and tag B. If none is available, then machines that have tag A or tag B. |
| Two application groups, one with tag restriction A and the other with no tag restriction | Machines that have tag A. If none is available, then any machine. |
If you used a tag restriction in a machine restart schedule, any changes you make that affect tag applications or restrictions affect the next machine restart cycle. It does not affect any restart cycles that are in progress while the changes are being made.
How to configure example 2
The following sequence shows the steps to create and apply tags, and then configure tag restrictions for the application groups illustrated in the earlier second example.
VDAs and applications have already been installed on the machines and the delivery group has been created.
Create and apply tags to the machines:
- From Studio, select Delivery Groups in the left pane. Select delivery group
D01and then select View Machines in the action bar. - Select machines VDA 101-105 and then select Manage Tags in the action bar.
- In the Manage Tags dialog box, select Create. Create a tag named
CADApps. Select OK. - Select Create again and create a tag named
OfficeApps. Select OK. - Add (apply) the newly created tags to the selected machines by enabling the check boxes next to each tag’s name (
CADAppsandOfficeApps). Then close the dialog box. - Select delivery group
D01. Select View Machines in the action bar. - Select machines VDA 106-110 and then select Manage Tags in the action bar.
- In the Manage Tags dialog box, select Create. Create a tag named
AcctgApps. Select OK. - Apply the newly created
AcctgAppstag and theOfficeAppstag to the selected machines by selecting the check boxes next to each tag’s name. Then close the dialog box.
Create the application groups with tag restrictions.
- From Studio, select Applications in the left pane.
- Select Create Application Group in the action bar. The wizard launches.
- On the Delivery Groups page, select delivery group
D01. Select Restrict launches to machines with tag and then select theAcctgAppstag from the list. - Complete the wizard, specifying the accounting users and the accounting applications. (When adding the application, choose the From Start menu source, which searches for the application on the machines that have the
AcctgAppstag.) On the Summary page, name the groupA100. - Repeat the preceding steps to create application group
A200, specifying machines that have theCADAppstag, plus the appropriate users and applications. - Repeat steps to create application group
A300, specifying machines that have theOfficeAppstag, plus the appropriate users and applications.
Apply tags to machine catalogs
You can use Studio or PowerShell to apply tags to machine catalogs.
-
Using the management interface is described in Manage tags. Catalog displays do not indicate whether tags are applied.
-
To use PowerShell, see Use PowerShell to apply tags to catalogs.
Here is an example of using tags with catalogs:
- A delivery group contains machines from several catalogs, but you want an operation (such as a restart schedule) to affect only the machines in a specific catalog. Applying a tag to that catalog accomplishes that goal.
Use PowerShell to apply tags to catalogs
The following PowerShell cmdlets are available:
- You can pass catalog objects to cmdlets such as
Add-BrokerTagandRemove-BrokerTag. -
Get-BrokerTagUsageshows how many catalogs contain tags. -
Get-BrokerCataloghas a property namedTags.
For example, the following cmdlets add a previously created tag named fy2018 to the catalog named acctg: Get-BrokerCatalog -Name acctg | Add-BrokerTag fy2018.
See the PowerShell cmdlet help for guidance and syntax.
Auto tags
Using auto tags, you can define rules for automatic addition and removal of tags on machines, application groups, applications, desktop groups, or desktops. The tags are also automatically removed if they do not meet the defined rules. This enhancement eliminates the need to maintain different scripts that run periodically for environment optimization.
Use cases
With auto-tagging, you can implement rules relevant to your business drivers, such as reducing costs, optimizing the infrastructure, and driving consumption. The following are some of the use cases:
- Reclaim unused VDIs - To release the dedicated workloads that have not been used for more than a pre-configured number of days to the available pool.
- Remove App clutter - To reduce application clutter by identifying the applications that have not been used for more than a pre-configured number of days.
- DGs with less than X functional level - To find delivery groups with less than a specific functional level.
- Inactive users - To reclaim resources of users who have not logged on for more than a pre-configured number of days.
Note:
The tag attached to a machine that has not been used for more than 30 days is removed from that machine the next time it runs if a user logs in that machine after 30 days.
PowerShell commands
You can create autotags using PowerShell commands. After an autotag rule is created, it is evaluated at a frequency of 3600 seconds. For more information, see New-BrokerAutoTagRule.
The parameters of New-BrokerAutoTagRule are:
- Name: Generic name for the rule
- Object type: Machine
- Rule text : The filter to define the rule.
- Tag Uid: The tag id that you want to associate with.
Examples
-
To tag dedicated VDIs that have not been used for more than 30 days:
New-BrokerAutoTagRule -Name ‘UnusedVdi’ -ObjectType ‘Machine’ -RuleText “-AllocationType Static -IsAssigned $true -Filter { SummaryState -ne `”InUse`” -and ( LastConnectionTime -lt ‘-30’ -or LastConnectionTime -eq `$null ) }” -TagUid 123
<!--NeedCopy-->
After the rule is configured, the machines with the tag unused-VDI are released.
-
To tag delivery groups with less than X functional level (using L7_20 as the threshold functional level):
New-BrokerAutoTagRule -Name 'LowFL' -ObjectType 'DesktopGroup' -RuleText " -Filter { MinimumFunctionalLevel -lt 'L7_20' } " -TagUid 143 <!--NeedCopy--> -
To tag user visible apps published without a folder:
New-BrokerAutoTagRule -Name 'NoFolder' -ObjectType 'Application' -RuleText "-Enabled $true -Filter { ClientFolder -eq $null } " -TagUid 153`
<!--NeedCopy-->
More information
Blog post: How to assign desktops to specific servers.