-
-
-
Google Cloud environments
-
Microsoft System Center Virtual Machine Manager virtualization environments
-
Cloud Connector Standalone Citrix Secure Ticketing Authority (STA) service
-
-
-
-
-
This content has been machine translated dynamically.
Dieser Inhalt ist eine maschinelle Übersetzung, die dynamisch erstellt wurde. (Haftungsausschluss)
Cet article a été traduit automatiquement de manière dynamique. (Clause de non responsabilité)
Este artículo lo ha traducido una máquina de forma dinámica. (Aviso legal)
此内容已经过机器动态翻译。 放弃
このコンテンツは動的に機械翻訳されています。免責事項
이 콘텐츠는 동적으로 기계 번역되었습니다. 책임 부인
Este texto foi traduzido automaticamente. (Aviso legal)
Questo contenuto è stato tradotto dinamicamente con traduzione automatica.(Esclusione di responsabilità))
This article has been machine translated.
Dieser Artikel wurde maschinell übersetzt. (Haftungsausschluss)
Ce article a été traduit automatiquement. (Clause de non responsabilité)
Este artículo ha sido traducido automáticamente. (Aviso legal)
この記事は機械翻訳されています.免責事項
이 기사는 기계 번역되었습니다.책임 부인
Este artigo foi traduzido automaticamente.(Aviso legal)
这篇文章已经过机器翻译.放弃
Questo articolo è stato tradotto automaticamente.(Esclusione di responsabilità))
Translation failed!
Google Cloud environments
Citrix Virtual Apps and Desktops™ lets you provision and manage machines on Google Cloud.
Requirements
- Citrix Cloud™ account. The feature described in this article is available only in Citrix Cloud.
- A Google Cloud project. The project stores all compute resources associated with the machine catalog. It can be an existing project or a new one.
- Enable four APIs in your Google Cloud project. For details, see Enable Google Cloud APIs.
- Google Cloud service account. The service account authenticates to Google Cloud to enable access to the project. For details, see Configure and update service accounts.
- Enable Google private access. For details, see Enable-private-google-access.
Enable Google Cloud APIs
To use the Google Cloud functionality through Web Studio, enable these APIs in your Google Cloud project:
- Compute Engine API
- Cloud Resource Manager API
- Identity and Access Management (IAM) API
- Cloud Build API
- Cloud Key Management Service (KMS)
From the Google Cloud console, complete these steps:
-
In the upper left menu, select APIs and Services > Dashboard.
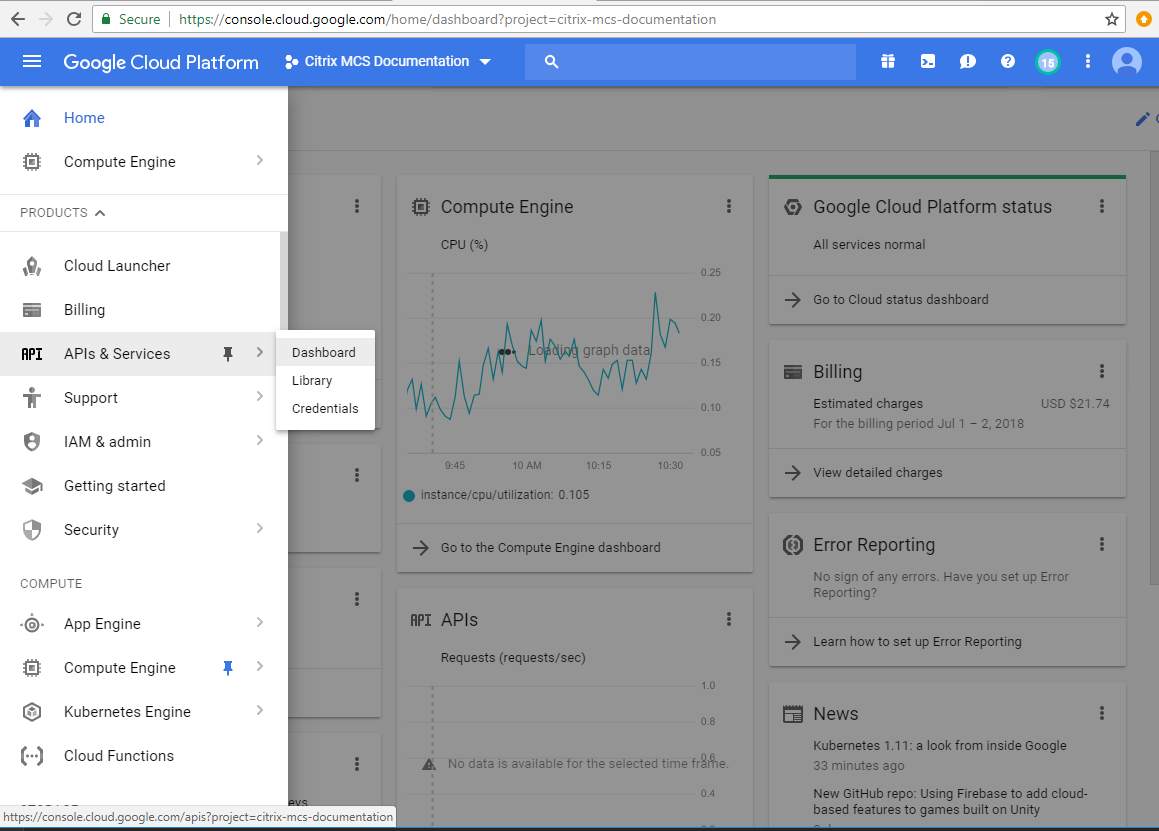
-
On the Dashboard screen, ensure that Compute Engine API is enabled. If not, follow these steps:
-
Navigate to APIs and Services > Library.
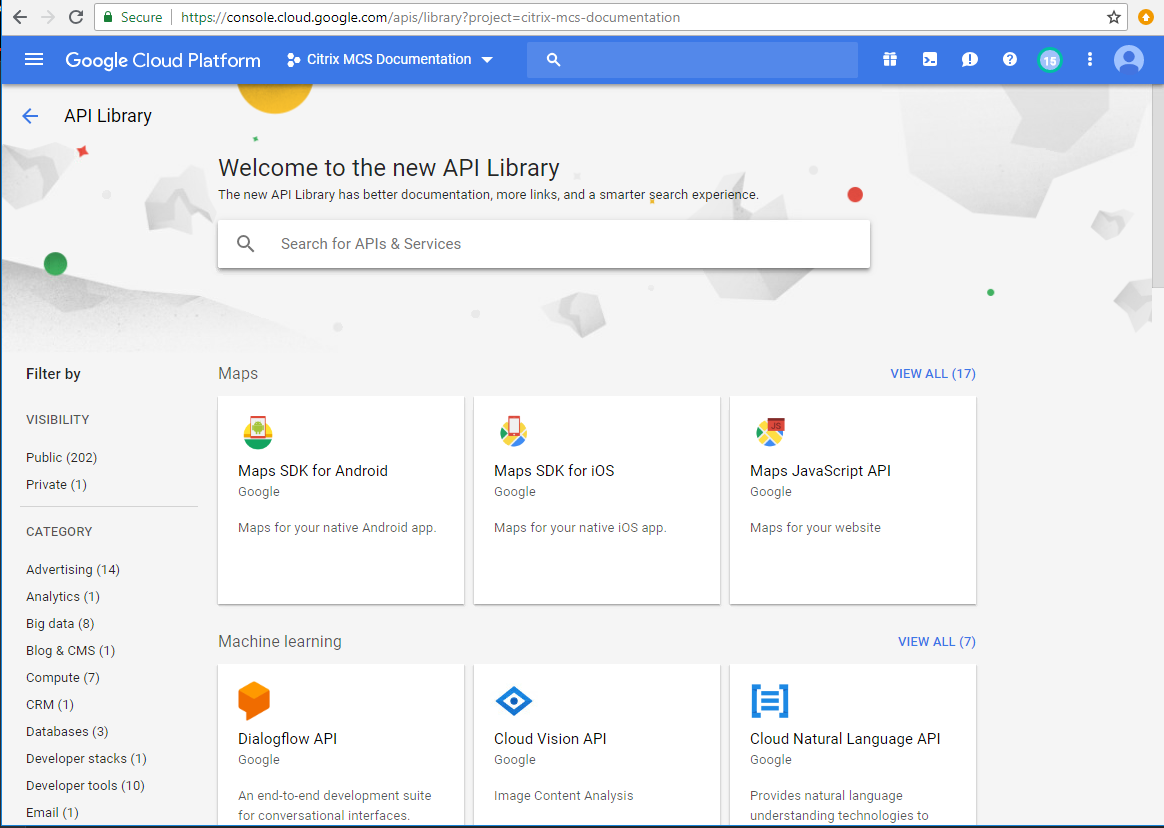
-
In the search box, type Compute Engine.
-
From the search results, select Compute Engine API.
-
On the Compute Engine API page, select Enable.
-
-
Enable Cloud Resource Manager API.
-
Navigate to APIs and Services > Library.
-
In the search box, type Cloud Resource Manager.
-
From the search results, select Cloud Resource Manager API.
-
On the Cloud Resource Manager API page, select Enable. The status of the API appears.
-
-
Similarly, enable Identity and Access Management (IAM) API and Cloud Build API.
You can also use Google Cloud Shell to enable the APIs. To do this:
- Open the Google Console and load the Cloud Shell.
-
Run the following four commands in the Cloud Shell:
- gcloud services enable compute.googleapis.com
- gcloud services enable cloudresourcemanager.googleapis.com
- gcloud services enable iam.googleapis.com
- gcloud services enable cloudbuild.googleapis.com
- Click Authorize if the Cloud Shell prompts.
Configure and update service accounts
Note:
GCP is introducing changes to Cloud Build Service’s default behavior and use of service accounts after April 29, 2024. For more information, see Cloud Build Service Account Change. Your existing Google projects with Cloud Build API enabled before April 29, 2024 are not affected by this change. However, if you want to have existing Cloud Build Service behavior after April 29, you can create or apply the organization policy to disable the constraint enforcement before you enable the Cloud Build API. As a result, the following content is divided into two: Before April 29, 2024 and After April 29, 2024. If you set the new organization policy, follow the section Before April 29, 2024.
Before April 29, 2024
Citrix Cloud uses three separate service accounts within the Google Cloud project:
-
Citrix Cloud Service Account: This service account enables Citrix Cloud to access the Google project, provision, and manage machines. This service account authenticates to Google Cloud using a key generated by Google Cloud.
You must create this service account manually as outlined here. For more information, see Create a Citrix Cloud Service Account.
You can identify this service account with an email address. For example,
<my-service-account>@<project-id>.iam.gserviceaccount.com. -
Cloud Build Service Account: This service account is provisioned automatically after you enable all the APIs mentioned in Enable Google Cloud APIs. To view all automatically created service accounts, navigate to IAM & Admin > IAM in the Google Cloud console and select the Include Google-provided role grants checkbox.
You can identify this service account by an email address that begins with the Project ID and the word cloudbuild. For example,
<project-id>@cloudbuild.gserviceaccount.comVerify if the service account has been granted the following roles. If you must add roles, follow the steps outlined in Add roles to the Cloud Build Service Account.
- Cloud Build Service Account
- Compute Instance Admin
- Service Account User
-
Cloud Compute Service Account: This service account is added by Google Cloud to instances created in Google Cloud once the Compute API is activated. This account has the IAM basic editor role to do the operations. However, if you delete the default permission to have more granular control, you must add a Storage Admin role that requires the following permissions:
- resourcemanager.projects.get
- storage.objects.create
- storage.objects.get
- storage.objects.list
You can identify this service account by an email address that begins with the Project ID and the word compute. For example, <project-id>-compute@developer.gserviceaccount.com.
Create a Citrix Cloud Service Account
To create a Citrix Cloud Service Account, follow these steps:
- In the Google Cloud console, navigate to IAM & Admin > Service accounts.
- On the Service accounts page, select CREATE SERVICE ACCOUNT.
- On the Create service account page, enter the required information, and then select CREATE AND CONTINUE.
-
On the Grant this service account access to project page, click the Select a role drop-down menu and select the required roles. Click +ADD ANOTHER ROLE if you want to add more roles.
Each account (personal or service) has various roles defining the management of the project. Grant the following roles to this service account:
- Compute Admin
- Storage Admin
- Cloud Build Editor
- Service Account User
- Cloud Datastore User
- Cloud KMS Crypto Operator
The Cloud KMS Crypto Operator requires the following permissions:
- cloudkms.cryptoKeys.get
- cloudkms.cryptoKeys.list
- cloudkms.keyRings.get
- cloudkms.keyRings.list
- cloudkms.cryptoKeyVersions.useToDecrypt
- cloudkms.cryptoKeyVersions.useToEncrypt
Note:
Enable all the APIs to get the complete list of roles available while creating a new service account.
- Click CONTINUE
- On the Grant users access to this service account page, add users or groups to grant them access to perform actions in this service account.
- Click DONE.
- Navigate to the IAM main console.
- Identify the service account created.
- Validate the roles are assigned successfully.
Considerations:
When creating the service account, consider the following:
- The steps Grant this service account access to project and Grant users access to this service account are optional. If you choose to skip these optional configuration steps, the newly created service account does not display in the IAM & Admin > IAM page.
- To display roles associated with a service account, add the roles without skipping the optional steps. This process ensures that roles appear for the configured service account.
Citrix Cloud Service Account key
The Citrix Cloud Service Account key is required for creating a connection in Citrix DaaS. The key is contained in a credential file (.json). The file is automatically downloaded and saved to the Downloads folder after you create the key. When you create the key, be sure to set the key type to JSON. Otherwise, Web Stduio cannot parse it.
To create a Service Account Key, navigate to IAM & Admin > Service accounts and click the email address of the Citrix Cloud Service Account. Switch to the Keys tab and select Add Key > Create new key. Make sure to select JSON as the key type.
Tip:
Create keys using the Service accounts page in the Google Cloud console. We recommend that you change keys regularly for security purposes. You can provide new keys to the Citrix Virtual Apps™ and Desktops application by editing an existing Google Cloud connection.
Add roles to the Citrix Cloud Service Account
To add roles to the Citrix Cloud Service Account:
- In the Google Cloud console, navigate to IAM & Admin > IAM.
-
On the IAM > PERMISSIONS page, locate the service account you created, identifiable with an email address.
For example,
<my-service-account>@<project-id>.iam.gserviceaccount.com - Select the pencil icon to edit the access to the principal of the service account.
- On the Edit access to “project-id” page for the selected principal option, select ADD ANOTHER ROLE to add the required roles to your service account one by one and then select SAVE.
Add roles to the Cloud Build Service Account
To add roles to the Cloud Build Service Account:
- In the Google Cloud console, navigate to IAM & Admin > IAM.
-
On the IAM page, locate the Cloud Build service account, identifiable with an email address that begins with the Project ID and the word cloudbuild.
For example,
<project-id>@cloudbuild.gserviceaccount.com - Select the pencil icon to edit the Cloud Build account roles.
-
On the Edit access to “project-id” page for the selected principal option, select ADD ANOTHER ROLE to add the required roles to your Cloud Build service account one by one and then select SAVE.
Note:
Enable all the APIs to get the complete list of roles.
After April 29, 2024
Citrix Cloud uses two separate service accounts within the Google Cloud project:
-
Citrix Cloud Service Account: This service account enables Citrix Cloud to access the Google project, provision, and manage machines. This service account authenticates to Google Cloud using a key generated by Google Cloud.
You must create this service account manually.
You can identify this service account with an email address. For example,
<my-service-account>@<project-id>.iam.gserviceaccount.com. -
Cloud Compute Service Account: This service account is provisioned automatically after you enable all the APIs mentioned in Enable Google Cloud APIs. To view all automatically created service accounts, navigate to IAM & Admin > IAM in the Google Cloud console and select the Include Google-provided role grants checkbox. This account has the IAM basic editor role to do the operations. However, if you delete the default permission to have more granular control, you must add Storage Admin role that requires the following permissions:
- resourcemanager.projects.get
- storage.objects.create
- storage.objects.get
- storage.objects.list
You can identify this service account by an email address that begins with the Project ID and the word compute. For example,
<project-id>-compute@developer.gserviceaccount.com.Verify if the service account has been granted the following roles.
- Cloud Build Service Account
- Compute Instance Admin
- Service Account User
Create a Citrix Cloud Service Account
To create a Citrix Cloud Service Account, follow these steps:
- In the Google Cloud console, navigate to IAM & Admin > Service accounts.
- On the Service accounts page, select CREATE SERVICE ACCOUNT.
- On the Create service account page, enter the required information, and then select CREATE AND CONTINUE.
-
On the Grant this service account access to project page, click the Select a role drop-down menu and select the required roles. Click +ADD ANOTHER ROLE if you want to add more roles.
Each account (personal or service) has various roles defining the management of the project. Grant the following roles to this service account:
- Compute Admin
- Storage Admin
- Cloud Build Editor
- Service Account User
- Cloud Datastore User
- Cloud KMS Crypto Operator
The Cloud KMS Crypto Operator requires the following permissions:
- cloudkms.cryptoKeys.get
- cloudkms.cryptoKeys.list
- cloudkms.keyRings.get
- cloudkms.keyRings.list
Note:
Enable all the APIs to get the complete list of roles available while creating a new service account.
- Click CONTINUE
- On the Grant users access to this service account page, add users or groups to grant them access to perform actions in this service account.
- Click DONE.
- Navigate to the IAM main console.
- Identify the service account created.
- Validate the roles are assigned successfully.
Considerations:
When creating the service account, consider the following:
- The steps Grant this service account access to project and Grant users access to this service account are optional. If you choose to skip these optional configuration steps, the newly created service account does not display in the IAM & Admin > IAM page.
- To display roles associated with a service account, add the roles without skipping the optional steps. This process ensures that roles appear for the configured service account.
Citrix Cloud Service Account key
The Citrix Cloud Service Account key is required for creating a connection in Citrix DaaS. The key is contained in a credential file (.json). The file is automatically downloaded and saved to the Downloads folder after you create the key. When you create the key, be sure to set the key type to JSON. Otherwise, Web Studio cannot parse it.
To create a Service Account Key, navigate to IAM & Admin > Service accounts and click the email address of the Citrix Cloud Service Account. Switch to the Keys tab and select Add Key > Create new key. Make sure to select JSON as the key type.
Tip:
Create keys using the Service accounts page in the Google Cloud console. We recommend that you change keys regularly for security purposes. You can provide new keys to the Citrix Virtual Apps and Desktops application by editing an existing Google Cloud connection.
Add roles to the Citrix Cloud Service Account
To add roles to the Citrix Cloud Service Account:
- In the Google Cloud console, navigate to IAM & Admin > IAM.
-
On the IAM > PERMISSIONS page, locate the service account you created, identifiable with an email address.
For example,
<my-service-account>@<project-id>.iam.gserviceaccount.com - Select the pencil icon to edit the access to the principal of the service account.
- On the Edit access to “project-id” page for the selected principal option, select ADD ANOTHER ROLE to add the required roles to your service account one by one and then select SAVE.
Add roles to the Cloud Compute Service Account
To add roles to the Cloud Compute Service Account:
- In the Google Cloud console, navigate to IAM & Admin > IAM.
-
On the IAM page, locate the Cloud Compute Service Account, identifiable with an email address that begins with the Project ID and the word compute.
For example,
<project-id>-compute@developer.gserviceaccount.com - Select the pencil icon to edit the Cloud Build account roles.
-
On the Edit access to “project-id” page for the selected principal option, select ADD ANOTHER ROLE to add the required roles to your Cloud Build service account one by one and then select SAVE.
Note:
Enable all the APIs to get the complete list of roles.
Storage permissions and bucket management
Citrix Virtual Apps and Desktops improves the process of reporting cloud build failures for the Google Cloud service. This service runs builds on the Google Cloud. Citrix Virtual Apps and Desktops creates a storage bucket named citrix-mcs-cloud-build-logs-{region}-{5 random characters} where the Google Cloud services captures build log information. An option is set on this bucket that deletes the contents after a period of 30 days. This process requires that the service account used for the connection has Google Cloud permissions set to storage.buckets.update. If the service account does not have this permission, Citrix Virtual Apps and Desktops ignores errors and proceeds with the catalog creation process. Without this permission, the size of the build logs increases and requires manual cleanup.
Enable private Google access
When a VM lacks an external IP address assigned to its network interface, packets are only sent to other internal IP addresses destinations. When you enable private access, the VM connects to the set of external IP addresses used by the Google API and associated services.
Note:
Whether private Google access is enabled, all VMs that are with and without public IP addresses, must be able to access Google Public APIs, especially if third-party networking appliances have been installed in the environment.
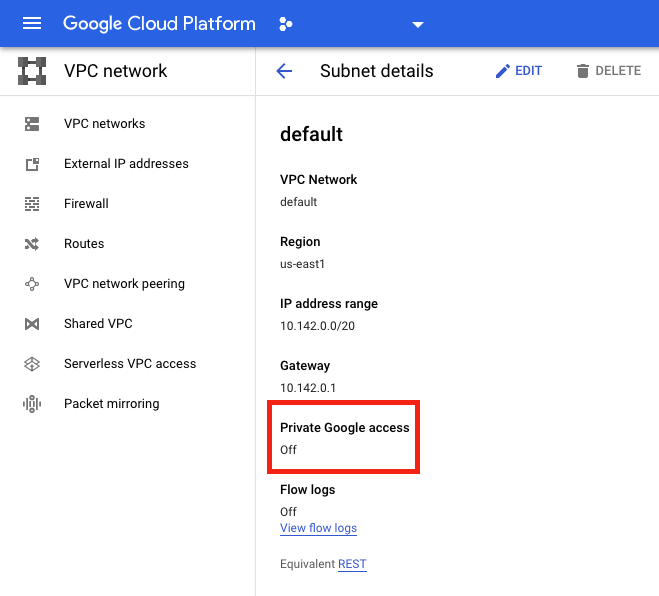
To ensure that a VM in your subnet can access the Google APIs without a public IP address for MCS provisioning:
- In Google Cloud, access the VPC network configuration.
- In the Subnet details screen, turn on Private Google access.
For more information, see Configuring Private Google Access.
Important:
If your network is configured to prevent VM access to the Internet, ensure that your organization assumes the risks associated with enabling Private Google access for the subnet to which the VM is connected.
Where to go next
- Install core components
- Install VDAs
- Create a site
- For creating and managing a connection in Google Cloud environments, see Connection to Google cloud environments
More information
Share
Share
This Preview product documentation is Citrix Confidential.
You agree to hold this documentation confidential pursuant to the terms of your Citrix Beta/Tech Preview Agreement.
The development, release and timing of any features or functionality described in the Preview documentation remains at our sole discretion and are subject to change without notice or consultation.
The documentation is for informational purposes only and is not a commitment, promise or legal obligation to deliver any material, code or functionality and should not be relied upon in making Citrix product purchase decisions.
If you do not agree, select I DO NOT AGREE to exit.