-
-
Cloud Connector Standalone Citrix Secure Ticketing Authority (STA) service
-
-
-
-
-
This content has been machine translated dynamically.
Dieser Inhalt ist eine maschinelle Übersetzung, die dynamisch erstellt wurde. (Haftungsausschluss)
Cet article a été traduit automatiquement de manière dynamique. (Clause de non responsabilité)
Este artículo lo ha traducido una máquina de forma dinámica. (Aviso legal)
此内容已经过机器动态翻译。 放弃
このコンテンツは動的に機械翻訳されています。免責事項
이 콘텐츠는 동적으로 기계 번역되었습니다. 책임 부인
Este texto foi traduzido automaticamente. (Aviso legal)
Questo contenuto è stato tradotto dinamicamente con traduzione automatica.(Esclusione di responsabilità))
This article has been machine translated.
Dieser Artikel wurde maschinell übersetzt. (Haftungsausschluss)
Ce article a été traduit automatiquement. (Clause de non responsabilité)
Este artículo ha sido traducido automáticamente. (Aviso legal)
この記事は機械翻訳されています.免責事項
이 기사는 기계 번역되었습니다.책임 부인
Este artigo foi traduzido automaticamente.(Aviso legal)
这篇文章已经过机器翻译.放弃
Questo articolo è stato tradotto automaticamente.(Esclusione di responsabilità))
Translation failed!
Precheck for VDA install and upgrade
Introducing a decoupled pre-flight check for VDA installation and upgrades, enabling customers to proactively identify potential issues before proceeding. This check validates all dependencies and prerequisites, providing a clear pass/fail status for each condition. If any failures occur, detailed remediation guidance with specific recommendations is provided. The actual installation or upgrade process remains separate and must be initiated manually after the pre-check is completed.
This article outlines the steps to perform the precheck for VDA installation and upgrade.
Step 1. Run Command Line
Note:
- The pre-check is supported only in command-line mode.
- The installation or upgrade is not initiated when running this command.
To perform a precheck, add the /precheckonly option to your frequently used command for installation or upgrade. All the precheck conditions for your VDA installation or upgrade will be checked.
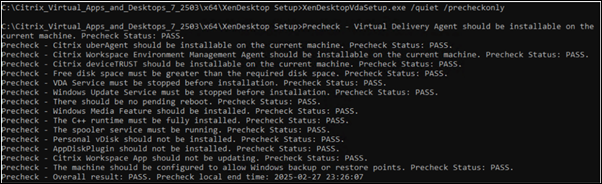
Perform precheck for default install and upgrade
Run the following command to perform a precheck and ensure that the machine status is in acceptable state:
\x64\XenDesktop Setup\XenDesktopVdaSetup.exe /quiet /precheckonly
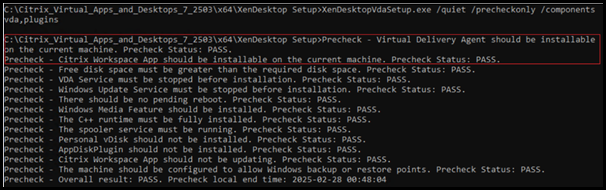
Perform precheck for install and upgrade of specified components
To check prerequisites for specific components before installation or upgrade, add /precheckonly to your command.
\x64\XenDesktop Setup\XenDesktopVdaSetup.exe /quiet /precheckonly /components vda,plugins
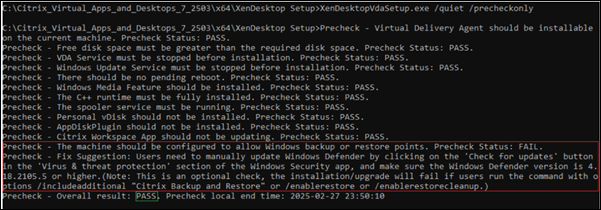
Perform precheck for install and upgrade of additional component - Citrix Backup and Restore
The command \x64\XenDesktop Setup\XenDesktopVdaSetup.exe /quiet /precheckonly checks the prerequisites for Citrix Backup and Restore component as an optional check. If all prechecks pass except the optional check, the overall result is PASS.
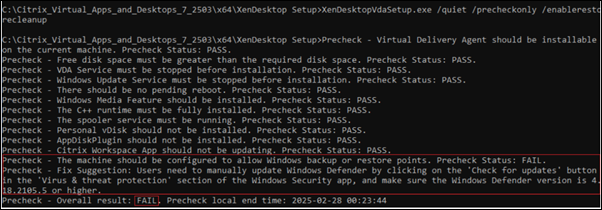
The following commands check the prerequisites for Citrix Backup and Restore component as part of mandatory check:
\x64\XenDesktop Setup\XenDesktopVdaSetup.exe /quiet /precheckonly /includeadditional "Citrix Backup and Restore"\x64\XenDesktop Setup\XenDesktopVdaSetup.exe /quiet /precheckonly /enablerestore\x64\XenDesktop Setup\XenDesktopVdaSetup.exe /quiet /precheckonly /enablerestorecleanup
Step 2. View precheck results
The precheck results are displayed in the command line, logged in %temp%/Citrix/XenDesktop Installer/XenDesktop Installation.log and saved in %temp%/Citrix/XenDesktop Installer/PrecheckResult_{yyyyMMddHHmmss}.json. If the precheck fails, the overall result is FAIL, with suggested fixes for each issue.
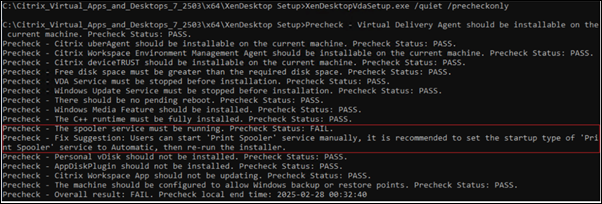
Command line output
The precheck results in the command line include:
- Precheck criteria
- Precheck status
- Fix suggestions for failure
- Overall result
- End time.
If the result is a FAIL, the suggestions to fix are available in the lines starting with Precheck - Fix Suggestion:
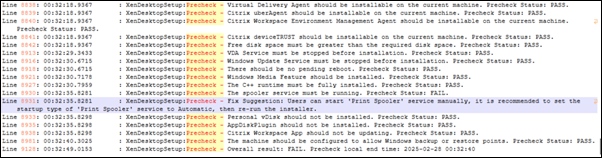
Log output
The pre-check results in XenDesktop Installation.log mirror those shown in the command line. To locate them, search for Precheck - in the log file.
If the overall result is a FAIL, the suggestions to fix are available in lines containing Precheck - Fix Suggestion:.
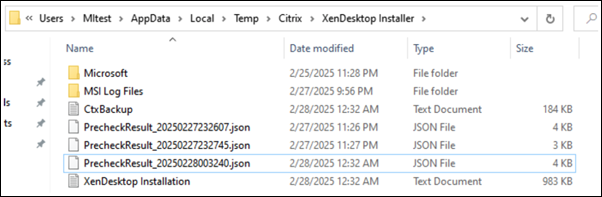
JSON output
A .json file is generated every time a command with /quiet /precheckonly is run. The file is named PrecheckResult_{yyyyMMddHHmmss}.json, with a timestamp suffix.
The .json file includes:
- Pre-check local end time
- Overall result
- Pre-check details
- Criteria
- Actual value
- Status
- Fix suggestion
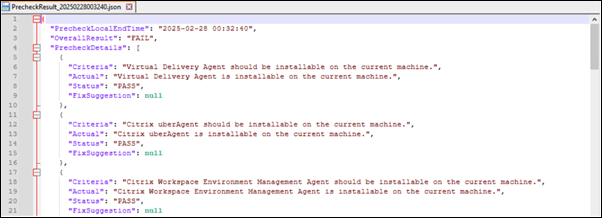
Fix suggestions for each pre-check item with a status of FAIL can be found under the pre-check details section in the .json file.

Share
Share
In this article
This Preview product documentation is Citrix Confidential.
You agree to hold this documentation confidential pursuant to the terms of your Citrix Beta/Tech Preview Agreement.
The development, release and timing of any features or functionality described in the Preview documentation remains at our sole discretion and are subject to change without notice or consultation.
The documentation is for informational purposes only and is not a commitment, promise or legal obligation to deliver any material, code or functionality and should not be relied upon in making Citrix product purchase decisions.
If you do not agree, select I DO NOT AGREE to exit.