-
-
Cloud Connector Standalone Citrix Secure Ticketing Authority (STA) service
-
-
HDX screen sharing
-
-
-
-
This content has been machine translated dynamically.
Dieser Inhalt ist eine maschinelle Übersetzung, die dynamisch erstellt wurde. (Haftungsausschluss)
Cet article a été traduit automatiquement de manière dynamique. (Clause de non responsabilité)
Este artículo lo ha traducido una máquina de forma dinámica. (Aviso legal)
此内容已经过机器动态翻译。 放弃
このコンテンツは動的に機械翻訳されています。免責事項
이 콘텐츠는 동적으로 기계 번역되었습니다. 책임 부인
Este texto foi traduzido automaticamente. (Aviso legal)
Questo contenuto è stato tradotto dinamicamente con traduzione automatica.(Esclusione di responsabilità))
This article has been machine translated.
Dieser Artikel wurde maschinell übersetzt. (Haftungsausschluss)
Ce article a été traduit automatiquement. (Clause de non responsabilité)
Este artículo ha sido traducido automáticamente. (Aviso legal)
この記事は機械翻訳されています.免責事項
이 기사는 기계 번역되었습니다.책임 부인
Este artigo foi traduzido automaticamente.(Aviso legal)
这篇文章已经过机器翻译.放弃
Questo articolo è stato tradotto automaticamente.(Esclusione di responsabilità))
Translation failed!
Overview
HDX Screen Sharing is a built-in, native, high-performance feature within Citrix Virtual Apps and Desktops that enables users to share their virtual session screens with others in real-time. It is designed to deliver low latency and high quality, providing a seamless experience for collaboration, support, and training scenarios without the need to implement thirdparty software solutions.

HDX Screen sharing functionality is integrated directly into the HDX protocol, which ensures that the sharing session is both secure and efficient, with minimal impact on session performance.
With HDX Screen Sharing, users can share their entire Citrix sessions content, including keyboard and mouse control, with one or more participants.
The feature supports high-resolution displays and can accommodate up to eight monitors.
HDX Screen Sharing is available on all VDA platforms, including Windows, Linux, and macOS, and offers cross-compatibility. This means that users on Windows VDAs can share their screens with users on Linux and macOS VDAs, and vice versa.
Furthermore, HDX Screen Sharing does not rely on any client components, making it accessible on all client platforms, including mobile devices.
Key Concepts
- Sharer: The user who initiates the screen sharing from their virtual desktop session and will be showing their virtual sessions desktop with others
- Viewer: The user (or users) who connects to the sharer’s session to view their screen, also referred to as the screen sharing participants
- Connection Code: A unique, system-generated security code that the sharer provides to viewers for access to the shared session.
- Graphics Status Indicator: A user interface element located in the notification area that provides controls for starting, stopping, and managing screen sharing sessions.
- Screen Sharing Player: The in-session tool that viewers use to view the sharer’s session.
Use Cases and example usage scenarios
Properly configuring and utilizing HDX Screen Sharing can address various organizational needs, from IT support to collaborative development and training
Scenario 1: IT Help Desk and Remote Support
An IT administrator needs to troubleshoot an issue a user is experiencing within their virtual desktop. Instead of trying to replicate the issue, the IT admin can start Remote Assist through HDX Screen sharing from Citrix Director. The administrator sees the user’s exact screen in real-time, leading to faster problem identification and resolution. The ability to request keyboard and mouse control allows the admin to take direct action. HDX Screen sharing is also integrated into Citrix Director from CVAD 2511 and later versions. For more information about using HDX Screen sharing via Citrix Director see the Citrix Director documentation
Scenario 2: End user collaboration
A team of engineers is working on a complex 3D model within a graphics-intensive application in their virtual desktops. They need to review the design together and make real-time adjustments.
One engineer can share their session, and the entire team can view the model, suggest changes, and even take turns controlling the application to make edits. This avoids the need for exporting files or using third-party screen-sharing tools.
Scenario 3: Employee Onboarding and Training
A new employee is learning how to use a proprietary line-of-business application. A trainer can demonstrate the application’s features directly within the new hire’s virtual session.
The trainer can guide the new employee step-by-step. The colored border indicator (red or yellow) clearly shows when the session is being shared, providing a visual cue for the learning environment.
System requirements
HDX Screen sharing is supported on all VDA platforms, however there might be additional requirements on certain platforms. See below for more information.
HDX Screen sharing uses TCP ports within the range of 52525 to 52625 by default.
When installing VDA version 2112 and onward, the VDA installer can be configured to automatically open the default firewall ports for HDX Screen sharing.

If this was not done during VDA installation or if a custom port range is configured, open these ports manually on the VDAs.
Note:
There must be network connectivity between the VDA hosting the session and the machines connecting to the shared sessions.
A maximum of 64 viewers can connect to a single screen sharing session. The Port range controls the maximum number of users in a multi-session environment that can start screen sharing. One port is required per user.
Note:
All monitors connected to the session are shared. You cannot select individual monitors.
AV1 and H.265 video codecs and 10-bit color mode are not supported. The session will automatically fall back to H.264 video encoding during active screen sharing. Once the screen sharing session has ended, AV1 and H.265 will be available again.
Windows VDA
- Windows: Single-session or multi-session OS VDA
- The graphics status indicator must be enabled.
Note:
Only desktop sessions can be shared.
Linux VDA
- If session sharing occurs between multiple Linux VDAs, it is recommended to upgrade to the same VDA version to avoid keyboard input issues.
- It is recommended for the Citrix Workspace™ app to be configured to use Scancode mode
- The system tray Icon must be enabled
More information on HDX Screen sharing for Linux VDAs can be found in the Linux VDA documentation for HDX Screen sharing
MacOS VDA
- Qt 5, revision 5.15.13 or later.
To align the unified user experience crossing all VDA regarding HDX Screen Sharing, you need install the Qt framework, the minimal compatible version is Qt 5 (rev. 5.15.13 or later).
Install of Qt 5 on the VDA can be performed using, for example, homebrew by run following command:
brew install qt@5
More information on HDX Screen sharing for MacOS VDAs can be found in the MacOS VDA documentation for HDX Screen sharing
Configuration
HDX Screen sharing is disabled by default, and the functionality can be enabled and configured through Citrix® policies.
The policies will give granular control to HDX Screen sharing configuration.
Enabling HDX Screen sharing for end users
HDX Screen sharing is disabled by default. To enable end users to share their screen via HDX Screen sharing the features needs to be enabled and configured as follows:
- Enable HDX Screen sharing policy
- Enable Graphics Status indicator
- Optional: configure and open custom ports in the VDA firewall
Step 1: Enable HDX Screen sharing
To Enable HDX Screen sharing, browse to the Screen sharing policy and set the policy to enabled

Step 2: Enable the Graphics Status Indicator
Browse to Graphics Status Indicator and set the policy to Enabled

Additional HDX Screen sharing configuration
By default, HDX Screen sharing uses the following TCP ports for communication:
- TCP start port: 52525
- TCP end port: 52625
The default TCP port range can be adjusted by the ‘HDX Screen sharing port’ policy:
To adjust the TCP port range, browse to the ‘HDX Screen sharing port’ policy and set the port range to the desired port range.
The port configuration can be used to restrict the number of simultaneous users sharing their screen in a multi-session VDA.
Note:
The port configuration should not overlap with HDX Screen sharing for Director.
The HDX Screen sharing connection code will never expire by default and can be used indefinitely during a screen sharing session to join that session.
For enhanced security, a timeout setting can be configured, after which the connection code will expire. Once the specified timeout period has elapsed, the previously generated connection code becomes invalid, and new users will be unable to join the screen sharing session using this code. The sharer will need to regenerate a new session connection code.
Furthermore, when a screen sharing session has been started and no viewers have connected within the configured timeout period, screen sharing will automatically stop. To resume screen sharing, the sharer will need to restart HDX Screen sharing and share the connection code.
To configure a timeout for HDX Screen sharing sessions, browse to the ‘HDX Screen sharing timeout’ policy and set the desired timeout value in minutes.
Connection code configuration (Preview)
By default, HDX Screen sharing uses a 40-character connection code. Starting CVAD 2411, Admins can configure the usage of the new, shorter connection code for HDX Screen sharing. The new connection code is shorter at 13 characters and does not include ambiguous characters for easier verbal communication of the connection code to prospective viewers by the sharer.

Currently, the configuration is provided as a registry setting for the VDAs. Please note that the new, shorter connection code does not provide backwards compatibility to older VDAS.
Note:
The new, shorter connection code does not provide backwards compatibility to older VDAS.
Prerequisites
VDA - CVAD 2411 and later
Connection configuration
To enable the new shorter connection code:
- Open the Windows Registry Editor using regedit.exe.
- Navigate to
HKEY_LOCAL_MACHINE\SOFTWARE\Citrix\Graphics\ScreenShare - Create a DWORD value named CodeType and set the value to 1.
This key controls the connection code to use, 0 for older longer connection code, 1 for new short code.

Starting a Screen sharing session
As a sharer, to share a session, look for the HDX graphics status indicator icon on the Windows notification area. Right-click on it to display the menu and select ‘Screen share’ > ‘Share my screen’.
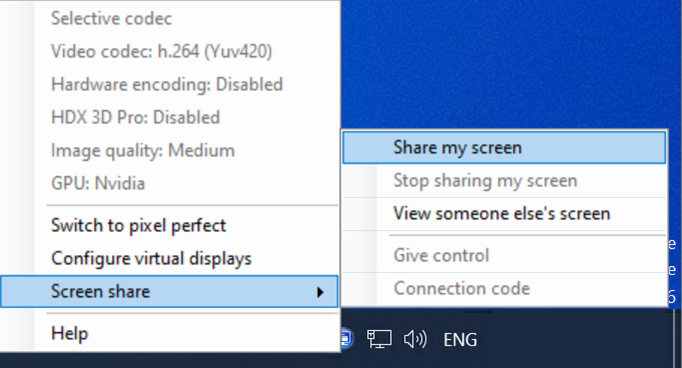
After Screen sharing has been initiated, a dialogue box will appear with the connection code that can be used to join the Screen sharing session. This code can be used by one or more viewers to connect to your Screen sharing session.
Click ‘Copy to clipboard’ or manually select and copy the connection code shown in the dialog box.
The connection code can then be pasted into the application of choice, such as an email application or Microsoft Teams for example, to be distributed to other users.
Once the connection code has been copied, the dialogue box can be closed by clicking ‘Ok’ or the x in the top right.
The current active connection code can be retrieved from the Screen share > Connection code menu option at any time while the session is shared.

Note:
Be careful about who you share the connection code with; all users with whom you have shared the connection code can potentially connect to your active Screen sharing session.
Once a Screen sharing session has been initiated, a yellow border will appear around the Citrix session to indicate that HDX Screen sharing is active, but no viewers have joined yet.

When a viewer has connected to the screen sharing session, the border will change color into red, indicating that the screen sharing session is active and has viewers connected.

Please note that if you have multiple screens active in your Citrix session, all screens will be shared via screen sharing, and viewers will be able to see all connected screens in your session.
There is currently no support to share only a single monitor or a subset of connected monitors in your session.
By default, up to 100 viewers can connect to a single screen sharing session, although this limit may be restricted by your Citrix administrator.
Regenerate new connection codes
As long as the connection code is active, new users can use the connection code to join your screen sharing session. If the code has expired, existing viewers will stay connected but no new users will be able to connect to your screen sharing session. To allow new users to connect to your session, you will need to regenerate a new connection code.
The new connection code can be retrieved from the ‘Screen share’ > ‘Connection code’ menu option at any time while the session is shared.

Stopping screen sharing
To stop Screen sharing, look for the HDX graphics status indicator icon in the Windows notification area. Right-click on it to display the menu and select ‘Screen share’ > ‘Stop sharing my screen’. Screen sharing will stop immediately, and all current viewers will be disconnected from your session. The red border will disappear to indicate that Screen sharing has stopped.

Give mouse and keyboard control
At any point in the screen sharing session, as a sharer you can hand over mouse and keyboard control to a specific viewer.
Once handed over, that viewer will share full control over your mouse and keyboard with you in your Citrix session.
To share mouse and keyboard control, open the graphics status indicator icon on the Windows notification area. Right-click on it to display the menu and select ‘Screen share’ > ‘Give control’ and select one of the active viewers to hand the control over to.

The selected viewer will get a notification indicating that he has mouse and keyboard control.

To stop mouse and keyboard sharing and to take back control, open the graphics status indicator icon on the Windows notification area. Right-click on it to display the menu and select ‘Screen share’ > ‘Give control’ and deselect the active viewers.

The viewer will be notified that he has lost mouse and keyboard control.

Note:
You can only share mouse and keyboard control with one viewer at a time. A viewer can also request control of the mouse and keyboard. When this occurs, you will be notified of the request, and you can choose to allow or deny their request.

Event logging
For security and auditing purposes, the screen sharing events on the sharer VDA are now collected and logged, which will allow the administrator to track and the screen sharing activity on the sharer VDAs. The following information and events are logged during a screen sharing session:
- Sharing Start/Stop – Event denoting start and stop of the screen sharing session
- Connection requests –IP and username of the viewer that requested to connect along with the connection code that was used and the connection decision (granted/denied connection either because of an authentication failure or sharer decision)
- Screen Control Requests – Viewer IP and username that requested screen control along with the decision (granted/denied)
- Viewer Actions - Viewer IP and username that either disconnected from the screen sharing session or released control of the sharer’s screen.

Viewing a Screen sharing session
To connect to someone else’s sessions, look for the HDX graphics status indicator icon in the Windows notification area. Right-click on it to display the menu and select ‘Screen share’ > ‘View someone else’s screen’.
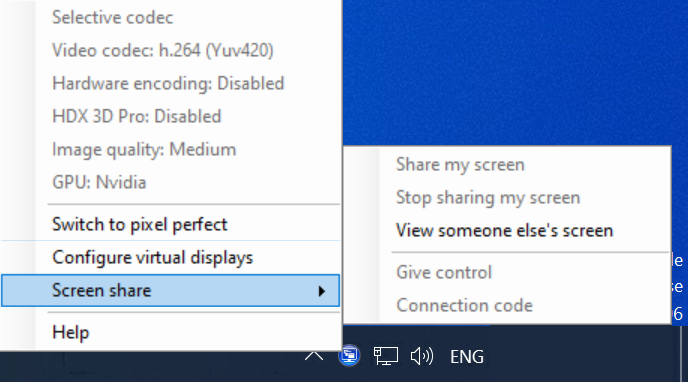
You will be prompted to enter a connection code. The HDX Screen sharer will have provided this code to you. Enter or paste the session’s connection string, as supplied by the user sharing the session, into the text box.
When you click ‘Connect’, the connection code will be validated, and if validation succeeds, the Screen sharing connection to the sharer’s session will be established and the Screen sharing viewer will open automatically and show the sharer’s screen (or screens).
When you connect to the session, the sharer will be notified of your participation to his screen sharing session.

Adjusting the display scaling
If the sharer uses a monitor resolution that is higher than yours or if they use multiple monitors during their session, the Screen sharing player will automatically adjust the resolution. To disable scaling and view the native resolution of the sharer’s monitors, select the diagonal arrows in the top left corner of the Screen sharing player.
Disconnect from a screen sharing session
To disconnect from the Screen sharing session, close the Screen sharing player at any time. To reconnect, if the connection code has not expired, you can use the same code to rejoin the Screen sharing session with the sharer. If the connection code has expired, the sharer will need to regenerate a new code for you. The connection code expiration is controlled by the connection time-out Screen sharing Policy, which can be set by an Admin.
Request mouse and keyboard control
By default, the sharer has full control of the mouse and keyboard in the screen sharing session. As a viewer, you can request mouse and keyboard control from the sharer.
To request mouse and keyboard control, click on the ‘mouse icon’ in the top left of the screen sharing viewer. The sharer will be notified of your request and can allow or deny it. Once the sharer approves the request for mouse and keyboard control, both you as the viewer and the screen sharing sharer will share mouse and keyboard control within the session.
Note:
The sharer can take back exclusive control of the mouse and keyboard at any time.

Share
Share
In this article
- Key Concepts
- Use Cases and example usage scenarios
- System requirements
- Configuration
- Connection code configuration (Preview)
- Prerequisites
- Connection configuration
- Starting a Screen sharing session
- Regenerate new connection codes
- Stopping screen sharing
- Viewing a Screen sharing session
- Adjusting the display scaling
- Disconnect from a screen sharing session
- Request mouse and keyboard control
This Preview product documentation is Citrix Confidential.
You agree to hold this documentation confidential pursuant to the terms of your Citrix Beta/Tech Preview Agreement.
The development, release and timing of any features or functionality described in the Preview documentation remains at our sole discretion and are subject to change without notice or consultation.
The documentation is for informational purposes only and is not a commitment, promise or legal obligation to deliver any material, code or functionality and should not be relied upon in making Citrix product purchase decisions.
If you do not agree, select I DO NOT AGREE to exit.