Provision printers
Citrix Universal™ Print Server
When determining the best print solution for your environment, consider the following:
- The Universal Print Server provides features not available for the Windows Print Provider: Image and font caching, advanced compression, optimization, and QoS support.
- The Universal print driver supports the public device-independent settings defined by Microsoft. If users need access to device settings that are specific to a print driver manufacturer, the Universal Print Server paired with a Windows-native driver might be the best solution. With that configuration, you retain the benefits of the Universal Print Server while providing users access to specialized printer functionality. A trade-off to consider is that Windows-native drivers require maintenance.
- The Citrix Universal Print Server provides universal printing support for network printers. The Universal Print Server uses the Universal print driver, a single driver on the Multi-session OS machine that allows local or network printing from any device, including thin clients and tablets.
To use the Universal Print Server with a Windows-native driver, enable the Universal Print Server. By default, if the Windows-native driver is available, it is used. Otherwise, the Universal print driver is used. To specify changes to that behavior, such as to use only the Windows-native driver or only the Universal print driver, update the Universal print driver usage policy setting.
Install the Universal Print Server
To use the Universal Print Server, install the UpsServer component on your print servers, as described in the installation documents, and configure it. For more information, see Install core components and Install using the command line.
For environments where you want to deploy the UPClient component separately, for example with XenApp 6.5:
- Download the Citrix Virtual Apps and Desktops™ Virtual Delivery Agent (VDA) standalone package for Windows Single-session OS or Windows Multi-session OS.
- Extract the VDA using the command line instructions described in Install using the command line.
- Install the pre-requisites from the \Image-Full\Support\VcRedist_2013_RTM
- Vcredist_x64 / vcredist_x86
- Run x86 for 32-bit only, and both for 64-bit deployments
- Vcredist_x64 / vcredist_x86
- Install the cdf prerequisite from the \Image-Full\x64\Virtual Desktop Components or \Image-Full\x86\Virtual Desktop Components.
- Cdf_x64 / Cdf_x86
- x86 for 32-bit, x64 for 64-bit
- Cdf_x64 / Cdf_x86
- Find the UPClient component in \Image-Full\x64\Virtual Desktop Components or \Image-Full\x86\Virtual Desktop Components.
- Install the UPClient component by extracting and then launching the component’s MSI.
- A restart is required after installing the UPClient component.
Opt out of CEIP for the Universal Print Server
You are automatically enrolled in the Citrix Customer Experience Improvement Program (CEIP) when you install the Universal Print Server. The first upload of data occurs after seven days from the date and time of installation.
To opt out of CEIP, edit the registry key HKLM\Software\Citrix\Universal Print Server\CEIPEnabled and set the DWORD value to 0.
To opt back in, set the DWORD value to 1.
Caution: Editing the registry incorrectly can cause serious problems that may require you to reinstall your operating system. Citrix cannot guarantee that problems resulting from the incorrect use of Registry Editor can be solved. Use Registry Editor at your own risk. Be sure to back up the registry before you edit it.
For more information, see Citrix Insight Services.
Configure the Universal Print Server
Use the following Citrix policy settings to configure the Universal Print Server. For more information, refer to the on-screen policy settings help.
- Universal Print Server enable. Universal Print Server is disabled by default. When you enable Universal Print Server, you choose whether to use the Windows Print Provider if the Universal Print Server is unavailable. After you enable the Universal Print Server, a user can add and enumerate network printers through the Windows Print Provider and Citrix Provider interfaces.
- Universal Print Server print data stream (CGP) port. Specifies the TCP port number used by the Universal Print Server print data stream CGP (Common Gateway Protocol) listener. Defaults to 7229.
- Universal Print Server web service (HTTP/SOAP) port. Specifies the TCP port number used by the Universal Print Server listener for incoming HTTP/SOAP requests. Defaults to 8080.
To change the default port of HTTP 8080 for Universal Print Server communication to Citrix Virtual Apps and Desktops VDAs, the following registry must also be created and the port number value modified on the Universal Print Server computer(s):
HKEY_LOCAL_MACHINE\SOFTWARE\Policies\Citrix\PrintingPolicies “UpsHttpPort”=DWORD:<portnumber>
This port number must match the HDX Policy, Universal Print Server web service (HTTP/SOAP) port, in Studio.
- Universal Print Server print stream input bandwidth limit (kbps). Specifies the upper bound (in kilobits-per-second) for the transfer rate of print data delivered from each print job to the Universal Print Server using CGP. Defaults to 0 (unlimited).
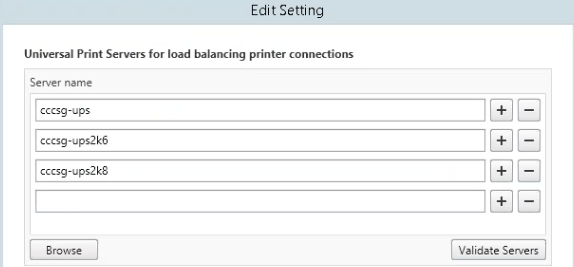
- Universal Print Servers for load balancing. This setting lists the Universal Print Servers to be used to load balance printer connections established at session launch, after evaluating other Citrix printing policy settings. To optimize printer creation time, Citrix recommends that all print servers have the same set of shared printers.
- Universal Print Servers out-of-service threshold. Specifies how long the load balancer should wait for an unavailable print server to recover before it determines that the server is permanently offline and redistributes its load to other available print servers. Default is 180 (seconds).
Once the printing policies are modified on the Delivery Controller™, it can take a few minutes for the policy changes to be applied to the VDAs.
Interactions with other policy settings - The Universal Print Server honors other Citrix printing policy settings and interacts with them as noted in the following table. The information provided assumes that the Universal Print Server policy setting is enabled, the Universal Print Server components are installed, and the policy settings are applied.
| Policy setting | Interaction |
| Client printer redirection, Auto-create client printers | After the Universal Print Server is enabled, client network printers are created using the Universal print driver instead of the native drivers. Users see the same printer name as before. |
| Session printers | When you use the Citrix Universal Print Server solution, Universal print driver policy settings are honored. |
| Direct connections to print server | When the Universal Print Server is enabled and the Universal print driver usage policy setting is configured to use universal printing only, a direct network printer connection can be created to the print server, using the Universal print driver. |
| UPD preference | Supports EMF and XPS drivers. |
Effects on user interfaces - The Citrix Universal print driver used by the Universal Print Server disables the following user interface controls:
- In the Printer Properties dialog box, the Local Printer Settings button
- In the Document Properties dialog box, the Local Printer Settings and Preview on client buttons
The Citrix Universal print driver (EMF and XPS drivers) supports advanced printing features such as stapling and paper source. The user can select Stapling or Paper Source options from the custom UPD print dialog if the client or network printers which are mapped to the UPD in the session support these features.

To set non-standard printer settings such as stapling and secure PIN, select Local Settings in the customer UPD print dialog for any client mapped printers that use either the Citrix UPD EMF or XPS drivers. The Printing Preferences dialog of the mapped printer is displayed outside the session on the client, allowing the user to change any printer option, and the modified printer settings are used in the active session when printing that document.
These features are available if the native driver makes them available using the Microsoft Print Capability technology. The native driver should use the standardized Print Schema Keywords in the Print Capabilities XML. If non-standard keywords are used, the advanced printing features will not be available using Citrix Universal print driver.
When using the Universal Print Server, the Add Printer Wizard for the Citrix Print Provider is the same as the Add Printer Wizard for the Windows Print Provider, with the following exceptions:
- When adding a printer by name or address, you can provide an HTTP/SOAP port number for the print server. That port number becomes a part of the printer name and appears in displays.
- If the Citrix Universal print driver usage policy setting specifies that universal printing must be used, the Universal print driver name appears when selecting a printer. The Windows Print Provider cannot use the Universal print driver.
The Citrix Print Provider does not support client-side rendering.
For more information about the Universal Print Server, see CTX200328.
Auto-created client printers
These universal printing solutions are provided for client printers:
-
Citrix Universal Printer - A generic printer created at the beginning of sessions that is not tied to a printing device. When you auto-create and use only the Citrix Universal Printer, you might experience reduced resource usage and user sign in times. The Universal Printer can print to any client-side printing device.
The Citrix Universal Printer might not work for all user devices or Citrix Workspace™ apps in your environment. The Citrix Universal Printer requires a Windows environment and does not support the Citrix Offline Plug-in or applications that are streamed to the client. Consider using auto-created client printers and the Universal print driver for such environments.
To use a universal printing solution for non-Windows Citrix Workspace apps, use one of the other Universal print drivers that are based on Postscript or PCL.
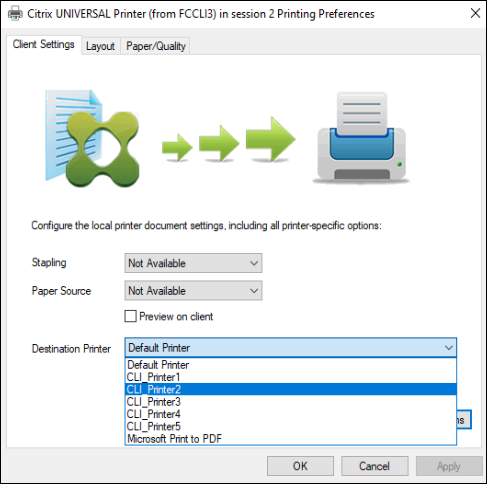
The Citrix Universal Printer lets you select the client’s default printer or a specific client printer as the printing destination. To choose a specific printer for a print job, open the Printing Preferences dialog box. Select the Destination Printer dropdown. The Default Printer option sends print jobs to the client’s default printer. Any client-redirected printers attached to the endpoint running the session are also listed. The printer that you select is saved as the destination printer for any future print jobs.
-
Citrix Universal print drivers - A device-independent printer driver. If you configure a Citrix Universal print driver, the system uses the EMF-based Universal print driver by default.
The Citrix Universal print driver might create smaller print jobs than older or less advanced printer drivers. However, a device-specific driver might be needed to optimize print jobs for a specialized printer.
Configure universal printing - Use the following Citrix policy settings to configure universal printing. For more information, refer to the on-screen policy settings help.
- Universal print driver usage. Specifies when to use universal printing.
- Auto-create generic universal printer. Enables or disables auto-creation of the generic Citrix Universal Printer object for sessions when a user device compatible with Universal Printing is in use. By default, the generic Universal Printer object is not auto-created.
- Universal driver preference. Specifies the order in which the system attempts to use Universal print drivers, beginning with the first entry in the list. You can add, edit, or remove drivers and change the order of the drivers in the list.
- Universal printing preview preference. Specifies whether to use the print preview function for auto-created or generic universal printers.
- Universal printing EMF processing mode. Controls the method of processing the EMF spool file on the Windows user device. By default, EMF records are spooled directly to the printer. Spooling directly to the printer allows the spooler to process the records faster and uses fewer CPU resources.
For more policies, see Optimize printing performance. To change the defaults for settings such as paper size, print quality, color, duplex, and the number of copies, see CTX113148.
Auto-create printers from the user device - At the start of a session, the system auto-creates all printers on the user device by default. You can control what, if any, types of printers are provisioned to users and prevent autocreation.
Use the Citrix policy setting Auto-create client printers to control autocreation. You can specify that:
- All printers visible to the user device, including network and locally attached printers, are created automatically at the start of each session (default)
- All local printers physically attached to the user device is created automatically
- Only the default printer for the user device is created automatically
- Autocreation is disabled for all client printers
The Auto-create client printers setting requires that the Client printer redirection setting is Allowed (the default).
Assign network printers to users
By default, network printers on the user device are created automatically at the beginning of sessions. The system enables you to reduce the number of network printers that are enumerated and mapped by specifying the network printers to be created within each session. Such printers are referred to as session printers.
You can filter session printer policies by IP address to provide proximity printing. Proximity printing enables users within a specified IP address range to automatically access the network printing devices that exist within that same range. Proximity printing is provided by the Citrix Universal Print Server and does not require the configuration described in this section.
Proximity printing might involve the following scenario:
- The internal company network operates with a DHCP server which automatically designates IP addresses to users.
- All departments within the company have unique designated IP address ranges.
- Network printers exist within each department’s IP address range.
When proximity printing is configured and an employee travels from one department to another, no additional printing device configuration is required. Once the user device is recognized within the new department’s IP address range, it will have access to all network printers within that range.
Configure specific printers to be redirected in sessions - To create administrator-assigned printers, configure the Citrix policy setting Session printers. Add a network printer to that policy using one of the following methods:
- Enter the printer UNC path using the format \\servername\printername.
- Browse to a printer location on the network.
- Browse for printers on a specific server. Enter the server name using the format \\servername and click Browse.
Important: The server merges all enabled session printer settings for all applied policies, starting from the highest to lowest priorities. When a printer is configured in multiple policy objects, custom default settings are taken from only the highest priority policy object in which that printer is configured.
Network printers created with the Session printers setting can vary according to where the session was initiated by filtering on objects such as subnets.
Specify a default network printer for a session - By default, the user’s main printer is used as the default printer for the session. Use the Citrix policy setting Default printer to change how the default printer on the user device is established in a session.
- On the Default printer settings page, select a setting for Choose client’s default printer:
- Network printer name. Printers added with the Session printers policy setting appear in this menu. Select the network printer to use as the default for this policy.
- Do not adjust the user’s default printer. Uses the current Terminal Services or Windows user profile setting for the default printer. For more information, refer to the on-screen policy settings help.
- Apply the policy to the group of users (or other filtered objects) you want to affect.
Configure proximity printing - Proximity printing is also provided by the Citrix Universal Print Server, which does not require the configuration described here.
- Create a separate policy for each subnet (or to correspond with printer location).
- In each policy, add the printers in that subnet’s geographic location to the Session printers setting.
- Set the Default printer setting to Do not adjust the user’s default printer.
- Filter the policies by client IP address. Be sure to update these policies to reflect changes to the DHCP IP address ranges.