This content has been machine translated dynamically.
Dieser Inhalt ist eine maschinelle Übersetzung, die dynamisch erstellt wurde. (Haftungsausschluss)
Cet article a été traduit automatiquement de manière dynamique. (Clause de non responsabilité)
Este artículo lo ha traducido una máquina de forma dinámica. (Aviso legal)
此内容已经过机器动态翻译。 放弃
このコンテンツは動的に機械翻訳されています。免責事項
이 콘텐츠는 동적으로 기계 번역되었습니다. 책임 부인
Este texto foi traduzido automaticamente. (Aviso legal)
Questo contenuto è stato tradotto dinamicamente con traduzione automatica.(Esclusione di responsabilità))
This article has been machine translated.
Dieser Artikel wurde maschinell übersetzt. (Haftungsausschluss)
Ce article a été traduit automatiquement. (Clause de non responsabilité)
Este artículo ha sido traducido automáticamente. (Aviso legal)
この記事は機械翻訳されています.免責事項
이 기사는 기계 번역되었습니다.책임 부인
Este artigo foi traduzido automaticamente.(Aviso legal)
这篇文章已经过机器翻译.放弃
Questo articolo è stato tradotto automaticamente.(Esclusione di responsabilità))
Translation failed!
连接到 Nutanix
(/zh-cn/citrix-virtual-apps-desktops/install-configure/connections)介绍了创建连接的向导。以下信息涵盖了 Nutanix 特有的详细信息。
注意:
在创建到 Nutanix 的连接之前,您需要首先将 Nutanix 帐户设置为资源位置。请参阅 (/zh-cn/citrix-virtual-apps-desktops/install-configure/install-prepare/nutanix)。
Nutanix AHV Prism Central 主机连接
在创建 Nutanix AHV Prism Central 主机连接之前,请参阅 (/zh-cn/citrix-virtual-apps-desktops/install-configure/install-prepare/nutanix#prerequisites)。
您可以使用以下方法之一创建连接:
- (#create-a-connection-using-web-studio)
- (#create-a-connection-using-powershell)
限制
- Nutanix AHV Prism Central 主机连接不支持模板和网络等项目的重复对象名称。为目录创建选择此类项目可能会导致意外行为。
使用 Web Studio 创建连接
- 登录到 Citrix Cloud。
- 单击管理。
- 在左侧窗格中选择托管。
- 在操作栏中单击添加连接和资源。
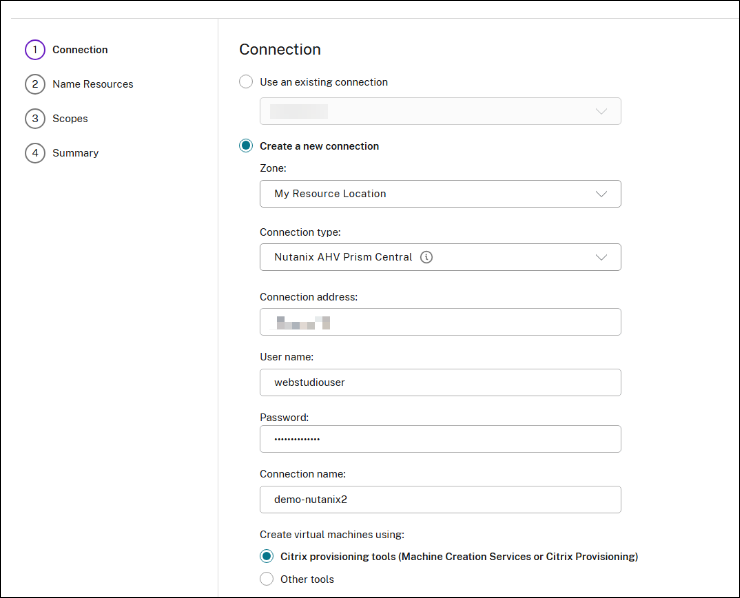
- 在连接页面上:
- 选择创建新连接。
- 选择 Nutanix AHV Prism Central 作为连接类型。
- 输入您的 Nutanix AHV Prism Central 的 IP 地址作为连接地址。
- 输入您的管理凭据和易记的连接名称。
- 选择 Citrix 预配工具 (机器创建服务™ 或 Citrix 预配)。
-
单击下一步。
注意:
创建主机连接时,不需要选择网络或群集。只需要一个托管单元名称。在创建计算机目录时选择网络和群集。
-
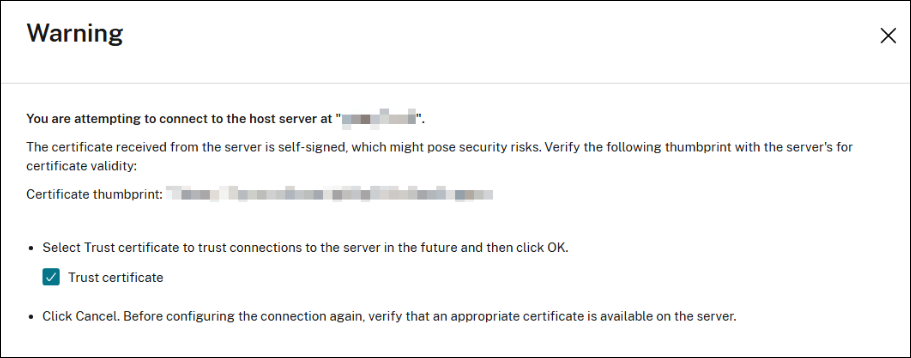
单击下一步后,Citrix Virtual Apps and Desktops 会收到一个私有 CA 签名的证书,您会看到一个警告页面。有关信息,请参阅安全连接到 Nutanix Prism Central。
将收到的指纹与服务器的指纹进行比较,以验证证书的有效性。如果有效,请选择信任证书并单击确定以继续创建连接。Citrix Virtual Apps and Desktops 随后会信任该证书并存储指纹以供将来验证。
-
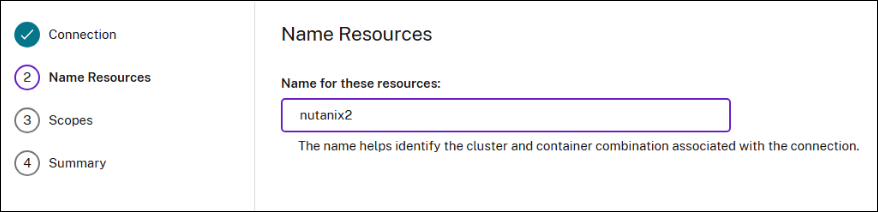
在命名资源页面上,添加资源的唯一名称。单击下一步。
- 在范围页面上,为此主机选择一个或多个范围。
- 在摘要页面上,检查配置并单击完成。
注意:
Nutanix AHV Prism Central 连接可以与其他类型的 Nutanix 连接共存。
与 Nutanix Prism Central 的安全连接
Nutanix SSL 指纹功能在建立与 Nutanix Prism Central 虚拟机管理程序的宿主连接时,简化了证书信任。此功能允许将不受信任证书的指纹存储在站点数据库中,从而确保 Citrix Virtual Apps and Desktops 始终将虚拟机管理程序识别为受信任的。
创建 Nutanix 主机连接时,将显示一个警告页面,其中显示您正在连接的计算机的证书,并允许您决定是否信任它。
使用 PowerShell 创建连接
- 打开 PowerShell 窗口。
- 运行
asnp citrix*。 -
设置以下参数:
$ConnectionName = “Name of the connection” $UserName = “Username of the account on hypervisor” $ZoneUid = “UID of the zone where the hosting connection will be created” $HypervisorAddress = “The IP address of the hypervisor” $SSLThumbprint = “The Nutanix PC SSL thumbprint can be set using PowerShell SDK” $connectionPath = "XDHyp:\Connections\" + $ConnectionName $SecureUserInput = Read-Host "Enter the password for the user $($UserName)" -AsSecureString $EncryptedUserInput = $SecureUserInput | ConvertFrom-SecureString $SecurePass = ConvertTo-SecureString -String $EncryptedUserInput <!--NeedCopy--> -
为新的托管连接创建项目。例如:
$connection = New-Item -Path @($connectionPath) -ConnectionType "Custom" -HypervisorAddress ` @($HypervisorAddress) -Persist -PluginId "AcropolisHypervisorPCFactory" -Scope @() ` -SecurePassword $SecurePass -SSLThumbprint @($SSLThumbprint) -UserName $UserName -ZoneUid ` $ZoneUid <!--NeedCopy--> -
创建代理虚拟机管理程序连接。例如:
New-BrokerHypervisorConnection -HypHypervisorConnectionUid $connection.HypervisorConnectionUid
<!--NeedCopy-->
创建托管单元
当您使用 PowerShell 命令创建托管单元时,请提供以下必需参数:
-
$HostUnitName: 要创建的托管单元的名称 -
ConnectionName: 之前创建的管理程序连接的名称
- 打开 PowerShell 窗口。
- 运行
add-pssnapin citrix*。 -
运行 PowerShell 命令以创建托管单元。例如:
$hostUnitPath = "XDHyp:\HostingUnits\" + $HostUnitName
New-Item -Path @($hostUnitPath) -RootPath $connectionPath -HypervisorConnectionName $ConnectionName -CustomProperties "" -NetworkPath @() -StoragePath @()
<!--NeedCopy-->
注意:
创建主机连接时,不需要选择网络或群集。只需要托管单元名称。在创建计算机目录时选择网络和群集。
管理主机连接
您可以使用以下方式管理现有主机连接:
使用 Web Studio 管理主机连接
创建主机连接后,导航到 Web Studio 上的托管节点,然后右键单击连接以执行以下操作:
- 删除连接
- 重命名连接
- 编辑连接
- 启用维护模式
- 查看计算机
- 测试连接
- 测试 TLS 证书信任
使用 Web Studio 编辑连接
- 右键单击连接,然后单击编辑连接。
- 在连接属性页面上,单击编辑设置。
-
在编辑连接设置页面上,您可以更改证书信息,然后单击保存。
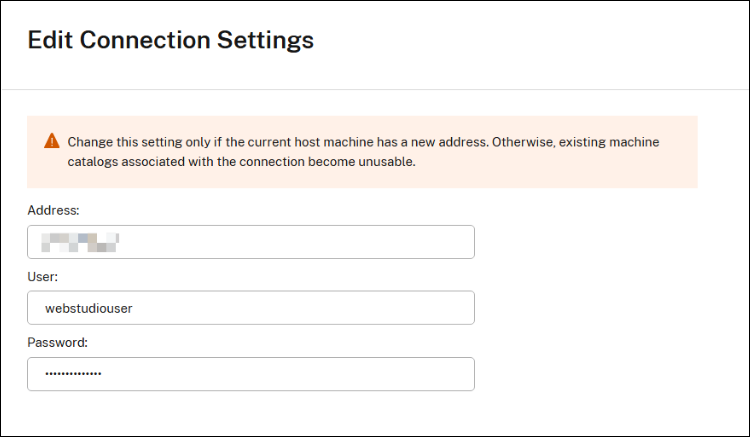
- 在警告页面上选择信任证书以信任新的证书指纹。
测试 TLS 证书信任
- 右键单击连接,然后单击测试 TLS 证书信任。
-
在测试 TLS 证书信任页面上,您可以更改证书信息,然后单击测试。
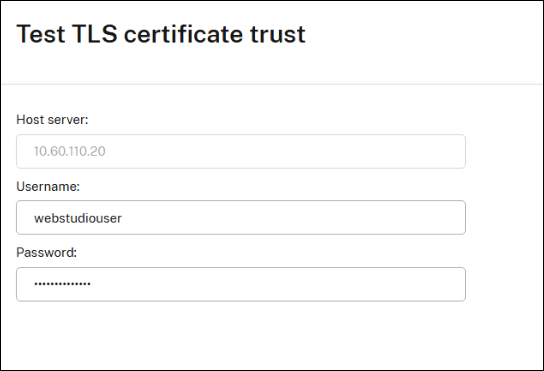
如果测试结果不成功,则使用使用 Web Studio 编辑连接更改连接的证书信息。
使用 PowerShell 管理主机连接
您可以使用 PowerShell 命令执行以下操作:
-
更改或更新主机连接的用户凭据。例如:
$UserName = "Username of the account on hypervisor" $SecureUserInput = Read-Host "Enter the password for the user $($UserName)" -AsSecureString $EncryptedUserInput = $SecureUserInput | ConvertFrom-SecureString $SecurePass = ConvertTo-SecureString -String $EncryptedUserInput Set-Item -LiteralPath @("XDHyp:\Connections\<Host connection name>") -SecurePassword $SecurePass -UserName $UserName <!--NeedCopy--> -
重置 SSLThumbprint。例如:
 $SSLThumbprint =  "The Nutanix PC SSL thumbprint value"
 Set-Item  -LiteralPath @("XDHyp:\Connections\<Host connection name>")  -SecurePassword $SecurePass -UserName $UserName -SSLThumbprint $SSLThumbprint
 <!--NeedCopy-->
所需权限
Nutanix AHV Prism Central 主机连接所用的管理帐户需要以下权限。
创建主机连接
群集:
- 查看群集
VM 的电源管理
AHV VM:
- ACPI 关闭虚拟机
- ACPI 重启虚拟机
- 客户机重启虚拟机
- 客户机关机虚拟机
- 关闭虚拟机电源
- 开启虚拟机电源
- 重置虚拟机
- 查看现有虚拟机
集群:
- 查看集群
子网:
- 查看子网
虚拟机预配
AHV 虚拟机:
- ACPI 重启虚拟机
- ACPI 关机虚拟机
- 关联虚拟机类别
- 创建新虚拟机
- 创建虚拟机
- 创建虚拟机磁盘
- 创建虚拟机网卡
- 删除现有虚拟机
- 删除虚拟机
- 删除虚拟机磁盘
- 删除虚拟机 GPU
- 删除虚拟机网卡
- 取消关联虚拟机类别
- 弹出虚拟机 CD ROM
- 客户机重启虚拟机
- 客户机关机虚拟机
- 关闭虚拟机电源
- 开启虚拟机电源
- 重置虚拟机
- 虚拟机快照
- 更新虚拟机基本配置
- 更新虚拟机磁盘
- 更新虚拟机磁盘列表
- 更新虚拟机网卡
- 查看现有虚拟机
- 查看虚拟机
- 查看虚拟机光驱
- 查看虚拟机磁盘
- 查看虚拟机 GPU
- 查看虚拟机网卡
AHV 虚拟机恢复点:
- 查看 AHV 虚拟机恢复点
类别:
- 查看类别
群集:
- 查看群集
主机:
- 查看主机
映像:
- 创建映像
- 删除映像
- 更新映像
- 查看映像
恢复点:
- 创建恢复点
- 删除恢复点
- 复制恢复点
- 还原恢复点
- 查看恢复点
- 查看虚拟机恢复点
存储容器:
- 查看存储容器
- 查看存储容器数据存储
- 查看存储容器统计信息
存储策略:
- 查看存储策略
子网:
- 查看子网
- 查看子网虚拟网卡
任务:
- 取消任务
- 查看任务
虚拟机恢复点:
- 删除 VM 恢复点
- 还原 VM 恢复点
- 查看 VM 恢复点
VM 模板:
- 查看 VM 模板
- 查看 VM 模板版本
- 部署 VM 模板
卷组:
- 将卷组附加到 AHV VM
- 将卷组从 AHV VM 分离
- 查看卷组
- 查看卷组详细信息
VPC:
- 查看 VPC
Nutanix AHV、Nutanix AHV PC 或 Nutanix AHV DRaaS 主机连接
- 登录 Citrix Cloud。
- 单击“管理”。
- 在左侧窗格中选择“托管”。
- 在操作栏中单击“添加连接和资源”。
- 在“连接”页面上,可以选择以下连接类型:
-
Nutanix AHV:指定 Prism Element (PE) 群集地址、凭据以及连接名称。在“网络”页面上,选择网络并为托管单元指定名称。
注意:
如果您使用 Nutanix AHV (Prism Element) 作为资源部署计算机,请选择 VM 磁盘所在的容器。
-
Nutanix AHV PC:指定 Prism Central (PC) 地址、凭据以及连接名称。在“网络”页面上,从列表中选择网络和群集,并为托管单元指定名称。
注意:
连接类型 Nutanix AHV PC 仅用于创建与 Azure 上的 Nutanix Cloud Cluster (NC2) 的连接。此外,计算机目录只能托管在 Azure 连接上的 NC2 中的单个群集上。此类型的连接需要在 Cloud Connectors 上安装 Nutanix 插件。
-
Nutanix AHV DRaaS:指定您的地址和用户名,然后导入 Nutanix DRaaS 凭据文件 (
.pem)) 中包含的公钥和私钥。(公钥和私钥由 Nutanix DRaaS 管理员在 Nutanix DRaaS 云中生成。)- 要导入密钥,请找到您的凭据文件,使用记事本(或任何文本编辑器)打开它,然后复制内容。之后,返回“连接”页面,选择“导入密钥”,粘贴内容,然后选择“保存”。请勿更改凭据内容或其格式。
-
后续步骤
- 如果您处于初始部署过程中,请参阅创建计算机目录
- 有关 Nutanix 的具体信息,请参阅 创建 Nutanix 目录
更多信息
共享
共享
This Preview product documentation is Citrix Confidential.
You agree to hold this documentation confidential pursuant to the terms of your Citrix Beta/Tech Preview Agreement.
The development, release and timing of any features or functionality described in the Preview documentation remains at our sole discretion and are subject to change without notice or consultation.
The documentation is for informational purposes only and is not a commitment, promise or legal obligation to deliver any material, code or functionality and should not be relied upon in making Citrix product purchase decisions.
If you do not agree, select I DO NOT AGREE to exit.