-
-
Cloud Connector Standalone Citrix Secure Ticketing Authority (STA) service
-
-
-
-
-
-
Uploading the AOT logs from CVAD Core Components
-
-
This content has been machine translated dynamically.
Dieser Inhalt ist eine maschinelle Übersetzung, die dynamisch erstellt wurde. (Haftungsausschluss)
Cet article a été traduit automatiquement de manière dynamique. (Clause de non responsabilité)
Este artículo lo ha traducido una máquina de forma dinámica. (Aviso legal)
此内容已经过机器动态翻译。 放弃
このコンテンツは動的に機械翻訳されています。免責事項
이 콘텐츠는 동적으로 기계 번역되었습니다. 책임 부인
Este texto foi traduzido automaticamente. (Aviso legal)
Questo contenuto è stato tradotto dinamicamente con traduzione automatica.(Esclusione di responsabilità))
This article has been machine translated.
Dieser Artikel wurde maschinell übersetzt. (Haftungsausschluss)
Ce article a été traduit automatiquement. (Clause de non responsabilité)
Este artículo ha sido traducido automáticamente. (Aviso legal)
この記事は機械翻訳されています.免責事項
이 기사는 기계 번역되었습니다.책임 부인
Este artigo foi traduzido automaticamente.(Aviso legal)
这篇文章已经过机器翻译.放弃
Questo articolo è stato tradotto automaticamente.(Esclusione di responsabilità))
Translation failed!
Uploading the AOT logs from CVAD Core Components
Beginning with CVAD 2507 CU1 and CVAD 2511, AOT logs are gathered from all applicable components. The supported components include DDC, StoreFront, Citrix Director, Windows VDA, Linux VDA, Mac VDA, License Server, FAS, Cloud Connector, PVS, WEM, Session Recording, Citrix Workspace UI, and Citrix Gateway.
Centralized log forwarding configuration via Citrix Web Studio for CVAD on-prem
Citrix Web Studio provides a centralized location for configuring Always-on Tracing (AOT) log forwarding across the site. This setting defines where AOT logs are sent and automatically propagates the configuration to relevant components in the environment.
When you configure the log server in Web Studio:
- The configuration is written in the Site database.
- Delivery Controllers retrieve the updated settings and distribute them to the VDAs in the selected delivery groups.
- VDAs use the received configuration to forward their AOT logs to the specified log server.
- StoreFront that participates in AOT logging receives the necessary details through the same centralized mechanism.
- Director uses the provided AuthKey and log server details to query and display AOT logs for monitoring and troubleshooting.
This centralized approach removes the need to configure each component individually. You set up the log server details once in Web Studio, and Citrix automatically propagates the configuration across the site.
Below is the list of components that will get log server details once it is set on Web Studio:
- Citrix Director/Monitor
- Citrix Delivery Controller
- Windows VDA
- Linux VDA
- Mac VDA
- StoreFront
- Session Recording Agent
- CWAs
To configure the log server settings for on-prem environment
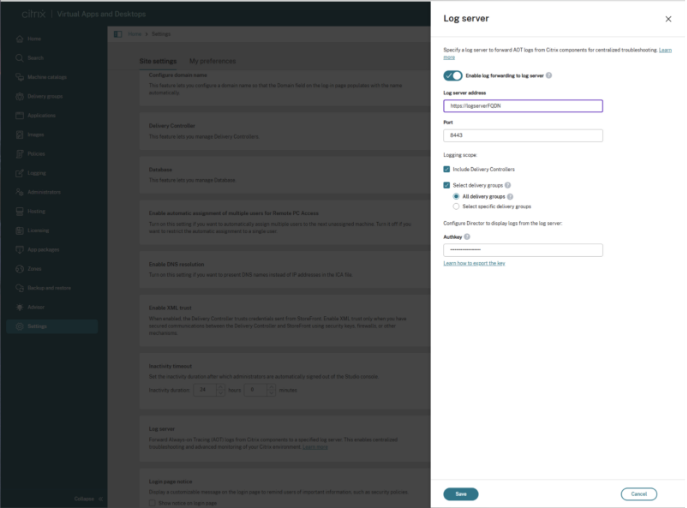
- Sign in to Web Studio and select Settings in the left pane.
- In the Log server tile, select Add if no log server is configured.
- On the Log server page, turn on Enable log forwarding to log server.
-
Enter the Log server address and Port. VDAs and Delivery Controllers use this information to forward AOT logs.
Note:
-
If you are using the Citrix Connector Appliance to deploy the Log Server, ensure that only port 443 is configured.
-
Updating the Log Server address and port in Citrix Studio works initially, but if you revisit the settings and modify the Log Server details without re-entering the authentication key, the authentication key placeholder becomes empty after saving, even though the operation appears successful. This results in missing or invalid configuration in Director and Monitor. As a workaround, always re-enter and validate the authentication key whenever modifying Log Server settings until this issue is resolved.
-
-
Choose which components forward logs:
-
Include Delivery Controllers: Sends AOT logs from all Delivery Controllers.
-
Select delivery groups: Sends logs from VDAs in selected delivery groups.
- All delivery groups: Sends logs from all VDAs.
- Select specific delivery groups: Choose individual delivery groups to include.
-
- Enter the AuthKey generated on the log server. The dDirector uses this key to authenticate and retrieve logs.
- Select Save to apply the configuration.
To edit an existing configuration
To update the log server or modify the logging scope, go to Settings > Log server and select Edit.
Configure the log server settings for Citrix DaaS/Cloud environment via DaaS settings
Always On Tracing (AOT) is supported for both on-premises (CVAD) and Citrix DaaS (cloud) deployments. However, log collection behaviour differs based on where the components are hosted.
After installing and configuring the AOT Log Server (on Linux, Windows, or Connector Appliance), complete the following to enable log forwarding to the Log Server in Citrix DaaS settings for Cloud deployments:
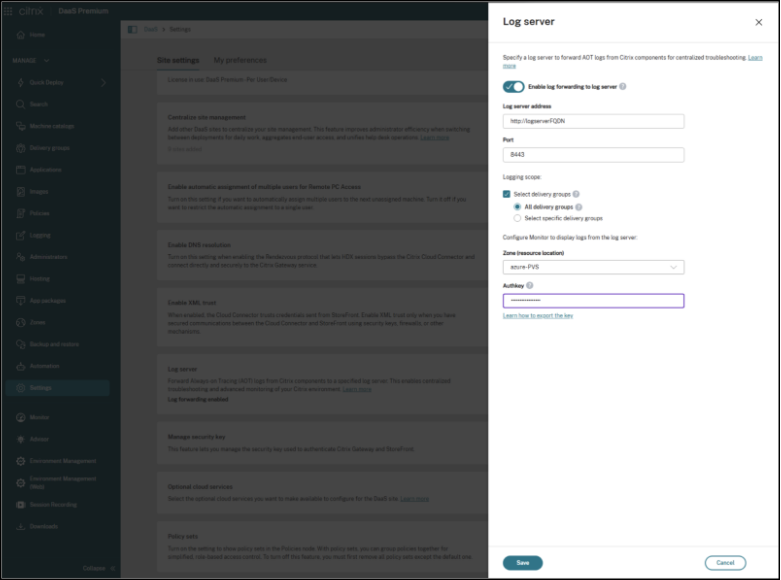
Citrix Web Studio for DaaS (DaaS settings) provides a centralized location to configure Always-on Tracing (AOT) log forwarding for cloud-managed sites. This configuration determines where AOT logs are sent and controls which VDAs participate in log forwarding. Monitor uses these settings to retrieve and display logs for troubleshooting.
- Sign in to Web Studio for DaaS (DaaS Settings) and select Settings in the left pane.
- In the Log server tile, select Add if no log server is currently configured.
- On the Log server page, enter the Log server address and Port. VDAs use this information to forward AOT logs to the server.
-
Define which VDAs forward logs:
- Select Select delivery groups to control the scope.
- All delivery groups (default) forwards logs from all VDAs in the site.
- To target specific VDAs, select Select specific delivery groups, and choose the delivery groups you want to include.
Note:
If you are using the Citrix Connector Appliance to deploy the Log Server, ensure that only port 443 is configured.
- Select the Zone (resource location) where the log server is deployed.
- Enter the Authkey generated by the log server. Monitor uses this key to authenticate and retrieve logs for display.
- Select Save to apply the configuration.
Log forwarding configuration for other components
Configure AOT log upload for StoreFront in Citrix Cloud deployments
For Citrix Cloud (hybrid) deployments, when on-prem storefront is used (instead of Citrix Workspace) with Cloud DDC, StoreFront does not automatically receive the AOT Log Server configuration from the Cloud Connector. Run the following PowerShell command on the StoreFront server to manually configure the AOT Log Server endpoint.
# Enable - Run the following command in StoreFront PowerShell

Enable-CitrixAOTUpload -AoTDataStoreEndpoint https://<FQDNofLogServer>:<server_port> -Role StoreFront

# Disable - Run the following command in StoreFront PowerShell
Disable-CitrixAOTUpload
<!--NeedCopy-->
Note:
Execute this command only for Citrix Cloud (hybrid) deployments that use Cloud DDCs. Do not run this command for on-premises CVAD deployments where StoreFront is paired with on-premises Delivery Controllers, as the Log Server configuration is automatically synchronized and no manual configuration is required.
Configure AOT logs upload for Session Recording Server
You can configure the Session Recording Server to upload AOT logs to a central log server by running the following PowerShell command on the Session Recording Server machine:
#Enable - run following command in Session Recording Server PowerShell
Enable-CitrixAOTUpload -AotDataStoreEndpoint <https://FQDNofServer>:<server port> -Role SessionRecording

#Disable - run following command in Session Recording Server PowerShell
Disable-CitrixAOTUpload
<!--NeedCopy-->
Configure AOT logs upload for FAS
You can configure FAS to upload AOT logs to a central log server by running the following PowerShell command on the FAS Server:
#Enable - run following command in FAS PowerShell
Enable-CitrixAOTUpload -AotDataStoreEndpoint <https://FQDNofServer>:<server port> -Role FAS

#Disable - run following command in FAS PowerShell
Disable-CitrixAOTUpload
<!--NeedCopy-->
Note:
Always-on tracing is not available if you install or upgrade using the FAS installer MSI file - FederatedAuthenticationService_x64.msi.
Always install FAS from the CVAD MetaInstaller or XenDesktopFasSetup.exe or FasSetup_xxxx.exe
Configure AOT logs upload for PVS
You can configure PVS to upload AOT logs to a central log server by running the following PowerShell command on the PVS Server:
#Enable - run following command in PVS PowerShell
Enable-CitrixAOTUpload -AotDataStoreEndpoint <https://FQDNofServer>:<server port> -Role PVS

#Disable - run following command in PVS PowerShell
Disable-CitrixAOTUpload
<!--NeedCopy-->
Note:
If you have multiple PVS servers, run the command to enable or disable AOT log uploads on each one.
Uploading AOT logs for License Server
- The Logserver URL needs to be updated inside SLS config file, which can be find at the location “C:\Program Files (x86)\Citrix\Licensing\WebServicesForLicensing\SimpleLicenseServiceConfig.xml” with XML tag “AotServerURL”
Example:
<AotServerURL>https://<FQDNofLogServer:443>//ctxlogserver/UploadCitrixLogStream</AotServerURL>
<!--NeedCopy-->
Note:
When are logs generated in License Server?
License Server AOT logs are generated only during specific events such as: License Server installation or upgrade, WSL (Citrix Web Services for Licensing) service restart, License activation failure, Dark site activation failures and Clock-related licensing issues
If none of these events occurred recently, the absence of logs does not necessarily indicate a problem.
Quick Checks
- Confirm whether a qualifying event (restart, upgrade, activation issue, etc.) occurred recently.
- Restart the Citrix Web Services for Licensing service and allow up to one hour for upload processing.
- Verify the AOT Log Server URL is configured correctly.
- Confirm the Citrix Web Services for Licensing service is running.
- Check:
C:\Program Files (x86)\Citrix\Licensing\LS\resource\aotIf the file contains data, logs may be waiting for upload.
Note:
License Server AOT logging is event-driven, not continuous. It is normal to see no logs when no qualifying events have occurred.
- The License Server periodically uploads the logs to AOT server automatically.
Configure AOT logs upload for Citrix Connector
To collect Cloud Connector logs in the AOT Log Server, the following requirements apply:
-
Cloud Connector must be on version 6.169.0.22492 or later.
-
In Cloud DDC deployments, Log Server configuration details are automatically synchronized to the registry with May release, and no manual configuration is required
-
In hybrid deployments (on-prem DDC), manual registry configuration is required to enable log collection. Create the following registry entries on the Cloud Connector machine:
Path:
HKLM\Software\Citrix\ConfigSyncService
Entries:
-
LogServerEnabled (REG_DWORD) = 1 -
LogServerEndpoint (REG_SZ) = <https://<logserver-fqdn>:<port>>
Configure AOT logs upload for Citrix Workspace apps
Citrix empowers Citrix Workspace app clients to automatically upload diagnostic logs to the centralized log server. This capability enhances troubleshooting efficiency by providing administrators with immediate access to client-side diagnostic information without requiring manual log collection. The client side AOTs will be automatically uploaded, and it triggers when AOT feature is enabled in the whole CVAD environment, and when user launches a resource.
System requirements
- Citrix Virtual Apps and Desktops 2511 or CVAD 2507 CU1 and later versions
- Citrix Workspace app 2511 or CWA 2507.1 CU1 and later versions
- Ensure the required version of the selected Citrix Workspace app (CWA) is installed. For more information, see Supported versions
Prerequisite
Citrix Workspace app web launches
For Citrix Workspace app web launches (including WebHelper, direct ICA file download, and web browser extension launch methods), StoreFront must be configured to use the modern User Interface (UI Experience). For instructions on enabling the modern UI experience, see the StoreFront documentation.
Note:
This prerequisite applies only to web-based launches and is not required for native Citrix Workspace app launches.
Configure AOT logs upload for NetScaler
- SSH into NetScaler CLI and then go into the NetScaler shell by running “shell” command.
-
Go into /var/analytics_conf directory
cd /var/analytics_conf <!--NeedCopy--> - Generate the schema file by executing an interactive python script “python {auditlog_schema_generator_for_hec_export.py}”. The schema file defines the HTTP headers (Auth-token, User-Agent etc) and Payload attributes (Role, Machine IP etc).
Snippet of the output generated by this script
root@Raju-adc2# python auditlog_schema_generator_for_hec_export.py
Schema Builder: Follow the prompts to define your schema.
Include 'Auth-Token'? (Y/n):
Enter the display name (alias) for 'Auth-Token' (press Enter to keep as is): Authkey
'Auth-Token' can only go in 'header'. Automatically selected.
Include 'HostName'? (Y/n): n
Include 'Content-type'? (Y/n): y
Enter the display name (alias) for 'Content-type' (press Enter to keep as is):
'Content-type' can only go in 'header'. Automatically selected.
Default value for 'Content-type' is 'application/json'.
Do you want to change it? (y/N):
Include 'User-agent'? (Y/n):
Enter the display name (alias) for 'User-agent' (press Enter to keep as is):
'User-agent' can only go in 'header'. Automatically selected.
Default value for 'User-agent' is 'AUDITLOGS/1.0'.
Do you want to change it? (y/N):
Include 'Role'? (Y/n): y
Enter the display name (alias) for 'Role' (press Enter to keep as is):
Where should 'Role' be included? (HEADER/payload): HEADER
Default value for 'Role' is 'GW'.
Do you want to change it? (y/N): y
Enter new default value for 'Role': Gateway
<!--NeedCopy-->
Sample schema file generated
{
     "Header": {
         "Auth-Token": {
             "name": "AuthKey"
         },
         "Content-type": {
             "name": "Content-type",
             "value": "application/json"
         },
         "User-agent": {
             "name": "User-agent",
             "value": "AUDITLOGS/1.0"
         },
         "Role": {
             "name": "Role",
             "value": "Gateway"
         },
         "MachineIP": {
             "name": "MachineIP"
         },
         "MachineName": {
             "name": "MachineName"
         }
     },
     "Payload": {
         "LogLevel": "Level",
         "MessageContent": "Message",
         "ModuleName": "Module",
         "Time": "TimeStamp"
     },
     "Format": {
         "delimiter": ""
     }
 }
<!--NeedCopy-->
- Exit the shell and come back to the NetScaler CLI
- Create a syslog Action which defines the Syslog Server, Ports and the schema file (created in the previous step) etc
add audit syslogAction {Action Name} {AOT Server IP/FQDN} -serverPort {Destination Port} -logLevel {Log Level} -transport HTTP -httpAuthToken {Authentication Token generated on the AOT sever} -httpEndpointUrl {AOT Server URL where logs will be sent} -httpSchemaFile {Schema File created in Previous Step}
<!--NeedCopy-->
Example:
add audit syslogAction act1 10.102.154.196 -serverPort 8088 -logLevel ALL -transport HTTP -httpAuthToken fbb94d5b234d86a6cb155e3f808dd33c9698a0d1a866e814573b1909e4c9e56896f433da1071e3276bd133269fd69203d8f29166816f4d427e709773ceb9d41d531043331f7f76 -httpEndpointUrl "/services/collector/event" -httpSchemaFile sample.json
<!--NeedCopy-->
- Bind the syslogAction to the Audit Syslog Policy
add audit syslogPolicy {PolicyName} True {Name of the Syslog Action}
<!--NeedCopy-->
Example:
add audit syslogPolicy pol1 true act1
<!--NeedCopy-->
Share
Share
This Preview product documentation is Citrix Confidential.
You agree to hold this documentation confidential pursuant to the terms of your Citrix Beta/Tech Preview Agreement.
The development, release and timing of any features or functionality described in the Preview documentation remains at our sole discretion and are subject to change without notice or consultation.
The documentation is for informational purposes only and is not a commitment, promise or legal obligation to deliver any material, code or functionality and should not be relied upon in making Citrix product purchase decisions.
If you do not agree, select I DO NOT AGREE to exit.