Installing and Configuring Log Server
The Log Server can be set up on individual Linux or Windows servers or hosted on the Citrix connector appliance and leverage evergreen updates. Refer to the relevant section for installation and configuration steps for each option.
Note for Installation
For enhanced security, HTTPS is recommended in the deployment.
Ensure that the selected port is not already in use.
Avoid using privileged ports (0–1023) as they require administrator or system-level permissions.
Verify that firewall rules allow traffic on the chosen port.
Use a port number within the valid range (0–65535), but avoid ports commonly used by system services to prevent conflicts.
If you are using the Citrix Connector Appliance to deploy the Log Server, ensure that only port 443 is configured.
The port numbers used in the examples (8080 for HTTP and 8443 for HTTPS) are for reference only. You are not required to use these exact ports. Select appropriate port numbers based on your environment and follow the installation guidelines outlined above when configuring the AOT Log Server.
Installing Log Server via Citrix Connector Appliance
The Log Server can be deployed within the Citrix Connector Appliance. This approach eliminates the need to deploy and manage a host VM and manually download images or run container commands. The Log Server is automatically onboarded during Connector Appliance upgrade and remains up to date through ongoing connector updates, ensuring you always have the latest version. For more information, see Connector appliance updates
Steps to Deploy Log Server via Citrix Connector Appliance
-
If your environment does not already have a Connector Appliance, deploy the appliance to your hypervisor or from your public cloud marketplace. The minimum required Citrix Connector Appliance is 11.4.1.444. After importing, register the appliance with Citrix Cloud. For more information, see Obtain the connector appliance
-
By default, Connector Appliance has 2 vCPUs and 4GB memory; increase resources to at least 4 vCPUs and 16GB memory to handle log server requests.
-
Create a DNS “A” record for the Connector Appliance FQDN so that supported components can resolve the Log Server hostname. Joining the Connector Appliance to an Active Directory domain is optional.
-
Cloud Monitor retrieves AOT logs through the Monitor Connector service running on a supported Windows Cloud Connector in the Resource Location. If the Log Server is deployed on the Citrix Connector Appliance, a supported Windows Cloud Connector must also be present in the same Resource Location. The Connector Appliance alone is not sufficient for Cloud Monitor to retrieve AOT traces. The Cloud Connector must be running version 6.141.0.13739 (or 4.420.0.13739) or later. Earlier versions will cause the
GetAotTracesAPI call to fail, resulting in an HTTP 500 error in Monitor. -
The Connector Appliance provides a self-signed certificate that is served to a browser that connects to the Connector Appliance administration page. To be able to connect to logserver via HTTPs, you must replace this self-signed certificate with one of your own that is signed by your organization or generated by using your organization’s chain of trust, for more details refer to Managing Certificates or Replace Server Certificate.
-
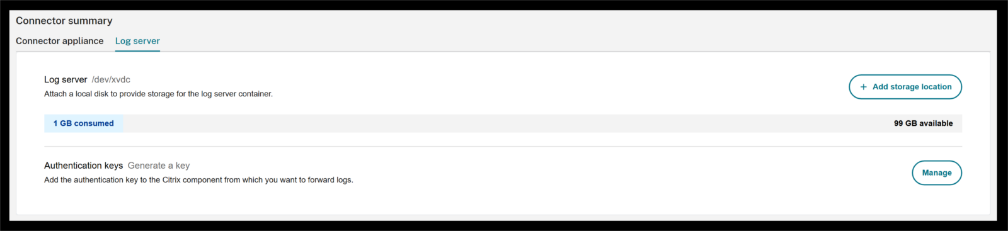
Once the upgrade is complete, log in to the Connector Appliance UI at
https://<connector-appliance-FQDN>/?enable=logserver, ensure to have the “?enable=logserver” to be able to see the logserver UI. The new Log Server tab now shows storage and authentication key management options.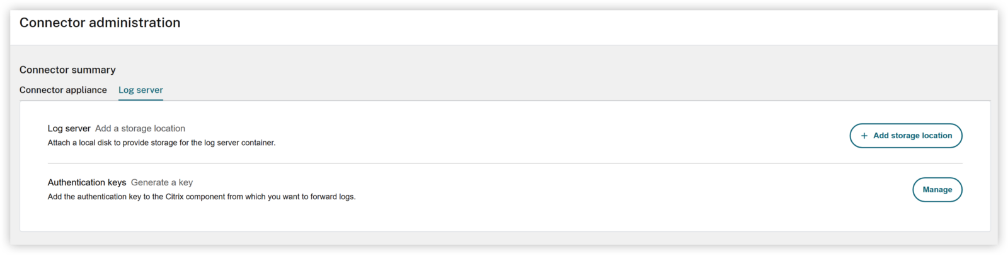
-
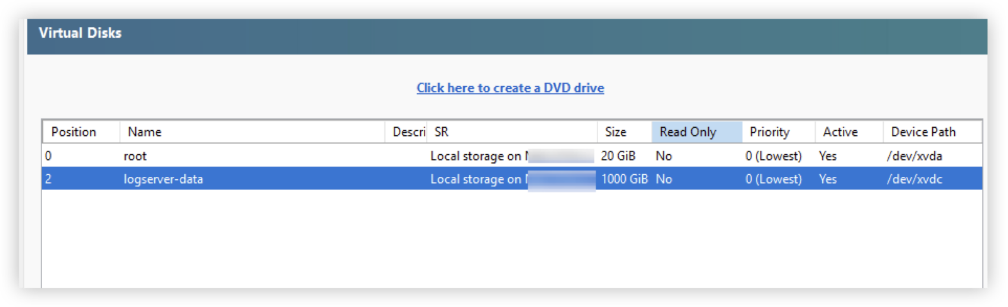
The connector appliance boot disk has a capacity of 20GB. To support efficient log storage on the logserver, you should add another virtual disk to the connector appliance using your hypervisor or cloud management platform. This additional disk should have enough space to meet your log storage needs (as explained in the previous section).The XenServer screenshot below shows an example of a connector appliance with an extra disk configured.
Note:
A known requirement for VMware ESXi: Users must attach the additional data disk to a different SCSI controller than the one used by the root disk.
-
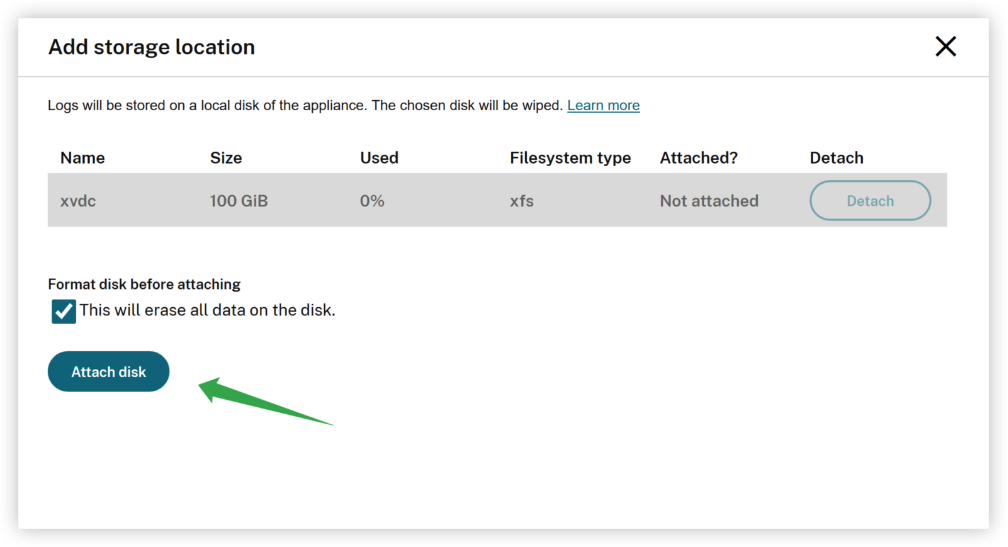
After adding the key disk, the logserver UI will automatically detect it, allowing you to format and mount it to the logserver container on the connector appliance.
-
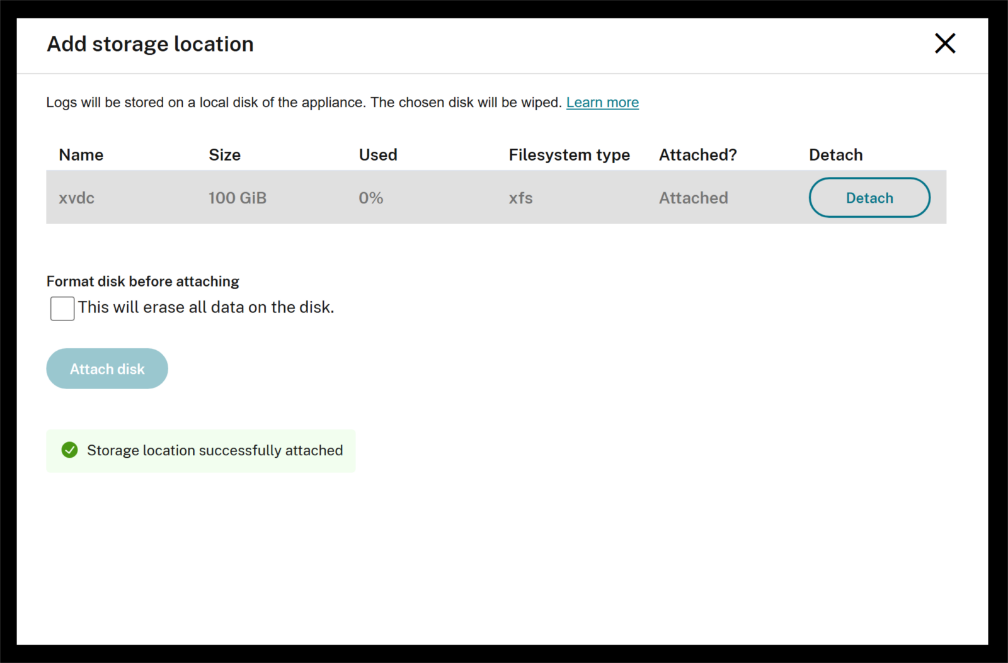
Once you click the “Attach disk” button, the disk will be mounted to the logserver container.
-
The main page will display the disk size along with information about how much space is used and how much remains.
-
After the disk is attached, verify that the Log Server is running by calling the ping endpoint:
https://<connector-appliance-FQDN>/ctxlogserver/Ping. A pong response confirms that the Log Server has successfully started. -
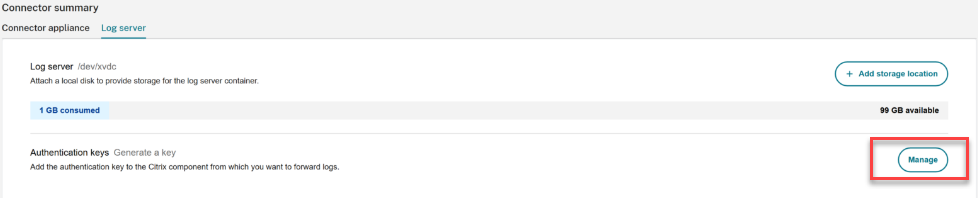
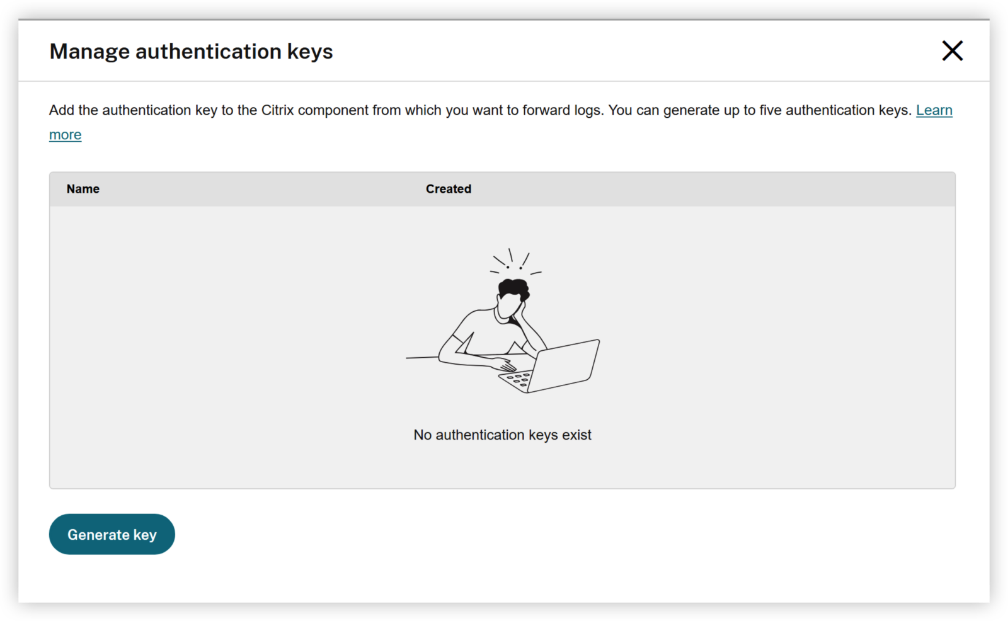
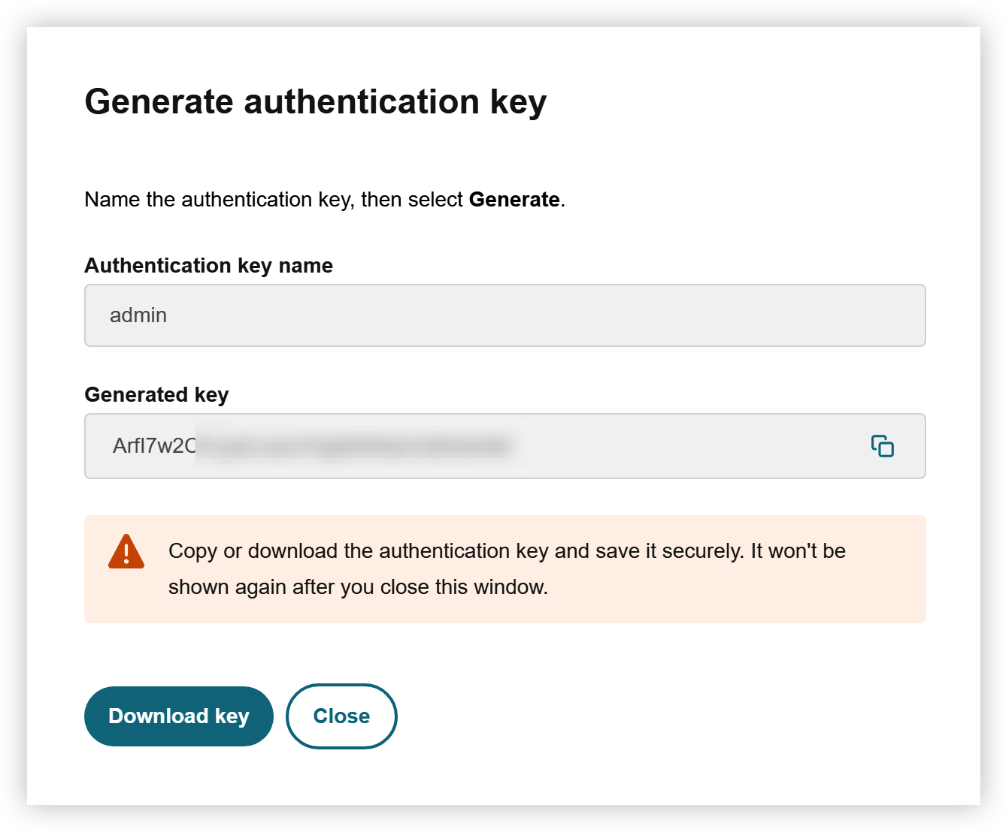
Click on Manage button, and click “Generate Key”. Now, enter the role name, then copy or download the auth key. The key won’t be shown again after you close the window.
Linux installation
- Download the log server docker container image from Citrix downloads.
- Place the downloaded files in the same directory.
- Run the installer in the directory with terminal (Linux) or command prompt (Windows) and follow the instructions:
chmod +x ./InstallLogServer

#Install with https mode with port 8443 with default path
./InstallLogServer --https --cert </path/your_private_cert_key.pfx> --port 8443

#Install with http mode, with port 8080 with default path
./InstallLogServer --port 8080

#Command to change the config path and data path of your choice with https mode
./InstallLogServer --https --cert </path/your_private_cert_key.pfx> --port 8443 --config /Path/LogServer/Config --database /Path/LogServer/Data

#Command to change the config path and data path of your choice with http mode
./InstallLogServer --port 8080 --config /Path/LogServer/Config --database /Path/LogServer/Data

#To support CWA client uploading AOT logs, some additional parameters need to be added after the install log server command.
--sta-server http://STA_SERVER_FQDN:port --log-server LOG_SERVER_FQDN:PORT
<!--NeedCopy-->
Where,
-
STA_SERVER_FQDN is the hostname or ip address of the STA server (In on-prem installation, the STA server usually installs along with DDC.)
-
LOG_SERVER_FQDN and PORT are the hostname of the log server itself, and the port specified (8080, 8443 or the –port value in the install parameter).
-
The log server certificate your_private_cert_key.pfx must be trusted by other Citrix components, where the AOT client will use TLS connection to upload logs.
The STA_SERVER address allows the Log Server to issue reconnection STA tickets to Citrix Workspace app (CWA) clients when StoreFront cannot provide them—such as after a session timeout. This enables CWA clients to re-establish the connection directly with the Log Server if a connection break occurs.
The LOG_SERVER address is used when the Log Server requests an STA ticket from the configured STA server. The STA server returns a ticket that authorizes connections specifically to the Log Server endpoint.
These parameters are optional if CWA clients don’t need reconnection STA tickets or connect to LogServer directly without a gateway.
Post Installation on Linux
After the installation, some useful script files are generated:
# In Linux, sh scripts will be generated
DownloadLogsByTime.sh
DownloadLogsByWords.sh
GetAuthKey.sh
ListMachines.sh
StartLogServer.sh
<!--NeedCopy-->
Use ./StartLogServer.sh to start the server. Check your configpath/weblogs.txt to confirm LogServer has started successfully.
If the LogServer starts successfully, we can see the below message in the weblogs file. Port 5000 is used by LogServer internally in docker containers with selected http or https protocol.
Now listening on https://[::]:5000
<!--NeedCopy-->
If the log server was installed in HTTP mode, successful logs should show the below:
Now listening on http://[::]:5000
<!--NeedCopy-->
If LogServer uses HTTPS, ensure its certificate is trusted on all machines uploading AOT logs
Note:
The port configured in the installation step (8080 or 8443 or any port specified) should be used when configuring LogServer url in DDC, Storefront, VDA, etc.
Usually, it takes 30s to 60s to start on Linux.
Windows Installation
- Download the log server docker container image from Citrix downloads.
- Place the downloaded files in the same directory.
- Run the installer in the directory with terminal (Linux) or command prompt (Windows) and follow the instructions:
Step 1
Install Docker Desktop (subscription may be required) for Windows on the log server VM. Follow the steps below to ensure Docker Desktop installs and starts correctly on Windows systems that rely on WSL 2.
-
Set the memory limit >= 12 GB in docker desktop settings
-
Docker Desktop requires the following Windows features, ensure to verify these features are enabled.
- Hyper-V
- Virtual Machine Platform
- Windows Subsystem for Linux (WSL)
-
If any features are missing, install them and restart the VM to take effect.
-
After the system restarts, open PowerShell (Run as Administrator) and update WSL by executing the command
wsl --update -
Docker Desktop requires WSL 2. Configure it as the default by executing the command
wsl --set-default-version 2 -
Once WSL is updated and the required Windows features are enabled, the Docker Desktop Engine should start successfully.
Step 2
Run the commands below to continue the installation.
Note:
The default location of Config and Database (Data) folders are created under C:\Users<username>\LogServer.You can change them with the commands below
#Install with https mode with port 8443 with default path
InstallLogServer.exe --https --cert <c:\path\cert.pfx> --port 8443

#Install with http mode, with port 8080 with default path
InstallLogServer.exe --port 8080

#Command to change the config path and data path of your choice with https mode
InstallLogServer.exe --https --cert <c:\path\cert.pfx> --port 8443 --config C:\LogServer\Config --database C:\LogServer\Datacmd

#Install with specific config path and data path
InstallLogServer.exe --port 8080 --config C:\LogServer\Config --database C:\LogServer\Datacmd

#To support CWA client uploading AOT logs, some additional parameters need to be added after the install log server command.
--sta-server http://STA_SERVER_FQDN:port --log-server LOG_SERVER_FQDN:PORT
<!--NeedCopy-->
Where,
-
STA_SERVER_FQDN is the hostname or ip address of the STA server (In on-prem installation, the STA server usually installs along with DDC.)
-
LOG_SERVER_FQDN and PORT are the hostname of the log server itself, and the port specified (8080, 8443 or the –port value in the install parameter).
-
The log server certificate your_private_cert_key.pfx must be trust by other Citrix components, where the AOT client will use TLS connection to upload logs.
The STA_SERVER address enables LogServer to supply reconnection STA tickets to CWA clients when StoreFront cannot provide them due to session timeout. As a result, CWA clients can obtain reconnection tickets directly from LogServer in the event of connection failures.
The LOG_SERVER address is utilised when the logserver requests a STA ticket from the STA_SERVER. The STA_SERVER issues a STA ticket that exclusively authorises connections to the LOG_SERVER address.
These parameters are optional if CWA clients don’t need reconnection STA tickets or connect to LogServer directly without a gateway.
Post Installation on Windows
After the installation, a few useful script files are generated in the same directory where you saved the installer files.
Note:
You can move these files to a different location. However, remember the new location, as they will be required again when configuring the Log Server.
#In Windows, bat scripts will be generated in the same directory where you saved the installer files.
DownloadLogsByTime.bat
DownloadLogsByWords.bat
GetAuthKey.bat
ListMachines.bat
StartLogServer.bat
<!--NeedCopy-->
Use StartLogServer.bat to start the log server.
Check your configpath\weblogs.txt to confirm LogServer started successfully
When the logs show the below, it means to say the Log Server has started successfully. If the LogServer starts successfully you will see the below message in the weblogs file. Port 5000 is used by LogServer internally in docker containers with selected http or https protocol.
Now listening on: https://[::]:5000
<!--NeedCopy-->
If the log server was installed in HTTP mode, successful logs should show the below:
Now listening on: http://[::]:5000
<!--NeedCopy-->
If LogServer uses HTTPS, ensure its certificate is trusted on all machines uploading AOT logs.
Note:
The port configured in the installation step (8080 or 8443 or any port specified) should be used when configuring logserver URL in DDC, Storefront, VDA, etc.
Usually, it takes 1~10 minutes depending on the hardware in Windows.
Mutual TLS authentication (optional)
Mutual TLS (mTLS) provides an additional layer of security between the Log Server and clients (VDA, DDC, StoreFront, CWA). When mTLS is enabled, both the client and the server authenticate each other using certificates issued by your enterprise PKI.
mTLS is useful in environments where:
- Network segments are untrusted or shared
- There is a requirement to authenticate not only the Log Server but also each AOT log client
- Customers want to prevent unauthorized systems from sending log data
- Regulatory or compliance policies require certificate-based authentication.
Although mTLS is optional, it enhances security by ensuring that only trusted Citrix components can communicate with the Log Server, and that the log server can verify every incoming connection before accepting telemetry data.
Certificate requirements
To configure mTLS, the following certificates must be generated:
- aotclient.pfx – Certificate used by AOT log clients (VDA, DDC, StoreFront, CWA)
- logserver.pfx – Certificate used by the Log Server
- enterprise-ca.cer – The root or intermediate certificate used to sign both .pfx files
Note
Skip this Mutual TLS section if you use Citrix Connector Appliance, as it isn’t supported.
The enterprise-ca.cer file must be imported into the Trusted Root Certification Authorities store on both the Log Server and telemetry clients.
The aotclient.pfx and logserver.pfx certificates should not be protected by password.
The subject of aotclient.pfx must be CitrixAOTClient, allowing the telemetry client to automatically locate the certificate during runtime.
To enable mTLS, include the –ca parameter in the Log Server installation command. This parameter specifies the path to the enterprise-ca.cer certificate.
# with default path
./InstallLogServer --https --cert logserver.pfx --ca enterprise-ca.cer --port 8443

# with customized path
./InstallLogServer --config /YourPath/LogServer/Config --database /YourPath/LogServer/Data --cert /YourPath/logserver.pfx --ca /YourPath/enterprise-ca.cer --port 8443

# delete temp certificate logserver.pfx in current install directory
sudo rm -rf /YourPath/logserver.pfx

# keep logserver.pfx accessed only by the container process user 'ubuntu'.
sudo chmod 400 LogServer/Config/logserver.pfx
sudo chown ubuntu:ubuntu LogServer/Config/logserver.pfx
<!--NeedCopy-->
If mutual TLS authentication is required, run the following PowerShell command in DDC, Storefront, VDA and other CVAD components with administrator privileges.
# import client cert at the machine aot client
Import-PfxCertificate -CertStoreLocation Cert:\LocalMachine\My\ -FilePath c:\aotclient.pfx

# Verify successful import
Get-ChildItem Cert:\LocalMachine\My | Where-Object { $_.Subject -like "*AOTclient*" }

# delete temp certificate aotclient.pfx
Remove-Item -Path "C:\aotclient.pfx" -Force
# Ensure LogServer’s certificate is trusted on all machines uploading AOT logs.
<!--NeedCopy-->
Note:
The telemetry service is running in “network service” account, so it is required to manually grant NETWORK SERVICE full control over the private key of the CitrixAOTClient certificate, using the certlm.msc graphical interface.
Press Win + R, type certlm.msc and press Enter to open the Certificates (Local Computer) console.
Expand Certificates (Local Computer) > Personal > Certificates.
In the right pane, locate the certificate issued to CitrixAOTClient.
Open “Manage Private Keys”
Right-click the certificate and select All Tasks > Manage Private Keys
In the permissions dialog, select Add, type NETWORK SERVICE, and click Check Names (it should resolve to NT AUTHORITY\NETWORK SERVICE).
Click OK to apply the permissions.
If customer supplies self-signed certificates, do as follows:
- On the logserver side, logserver.pfx and aotclient.cer are installed as previously described. The aotclient.cer serves the role of enterprise-ca.cer.
- On the client side, aotclient.pfx and logserver.cer are imported as previously described. The logserver.cer serves the role of enterprise-ca.cer.
- For more information, seeCreate a new certificate
Verify the Log Server
Open your browser on Log Server or VDA or DDC, visit http://YourLogServerFQDN:8080/Ping
A response string “Pong UTC:08/19/2025 01:03:29 Version: 2511.1.6 will show in the browser. The UTC time should be the LogServer UTC time. The version string contains the release name and builder number.
Note:
Change port 8080 to your configured port if not using the default port, and change http to https if installed with HTTPS mode.
If the log server verification fails, please check the following logs:
- Run docker logs logserver to check docker logs.
- For Linux -
$HOME/LogServer/Config/weblogs.txt(change $HOME/LogServer to your real installed path if not using default one) - For Windows -
C:\Users\YourUserName\LogServer\Config\weblogs.txt(Change YourUserName to real username. Change C:\Users\YourUserName\LogServer to your real installed path if not using default one)
Advanced Configuration of Log Server
On Linux or Windows
Run docker stop logserver to stop the logserver
By default, the log server is configured with the below values. To make the changes, edit the StartLogServer.sh or StartLogServer.bat if installed in windows.
-e MAX_RESERVE_DAYS=7
-e MAX_DISK_USAGE_PERCENTAGE=85
-e LOCAL_DOWN_ONLY=true
-e OPENSEARCH_JAVA_OPTS="-Xms2G -Xmx2G"
<!--NeedCopy-->
| LogServer Configuration Options | Default Value | Value Range | Desc |
|---|---|---|---|
| LOG_LEVEL | 2 | 0-4 | 0=Trace, 1=Debug, 2=Info, 3=Warning, 4=Error |
| CORS_ORIGINS | “Url” or “url1;url2;url3” | Modify this value to allow CWA H5/Chrome client uploading AOT logs. Support multiple urls separated by “;” | |
| MAX_RESERVE_DAYS | 7 | 1~30 | Log Server stores log entries max days based on the TimeStamp field. Logs that were inserted 7 days ago will be deleted. Check every 10 minutes. |
| MAX_DISK_USAGE_PERCENTAGE | 85 | 10~90 | Log Server monitors the data storage percentage. If the usage percentage is more than 90%, Log Server will delete old logs day by day until the usage percentage is less than 90%. Check every 10 minutes. |
| LOCAL_DOWN_ONLY | true | true/false | If true, only the machine installed Log Server can visit the /Download/APIs. If false, then other machines with AuthKey could visit the /Download/ APIs. |
| OPENSEARCH_JAVA_OPTS | “-Xms2G -Xmx2G” | 2G ~ MaxMem/2 | Opensearch memory configurations. Provide more memories if there are a lot of machines that send logs to Log Server. Eg., 0~999 machines: 2GB 1000~1999 machines: 4GB 2000~9999 machines: 6GB |
Run./StartLogServer.sh on Linux to verify if the changes are updated.
Run StartLogServer.bat on Windows to verify if the changes are updated.
On Citrix Connector Appliance
Below are the steps for to configure the advanced settings of log server on Citrix connector appliance via local API.
You can execute this on either Postman or Curl or PowerShell. Below is an example of instructions executed on Postman:
- Authentication: Generating a JWT
All API calls must be authenticated using a JSON Web Token (JWT). You must first generate a token which is then included in the header of subsequent requests.
Step 1.1: Generate the Token
To generate the token, run a POST request to the $login endpoint.
-
Endpoint: POST https://[ip]/$login
-
Body: You’ll need to include the necessary JSON payload for authentication (e.g., username and password). If the credentials are correct, the API will return a token.
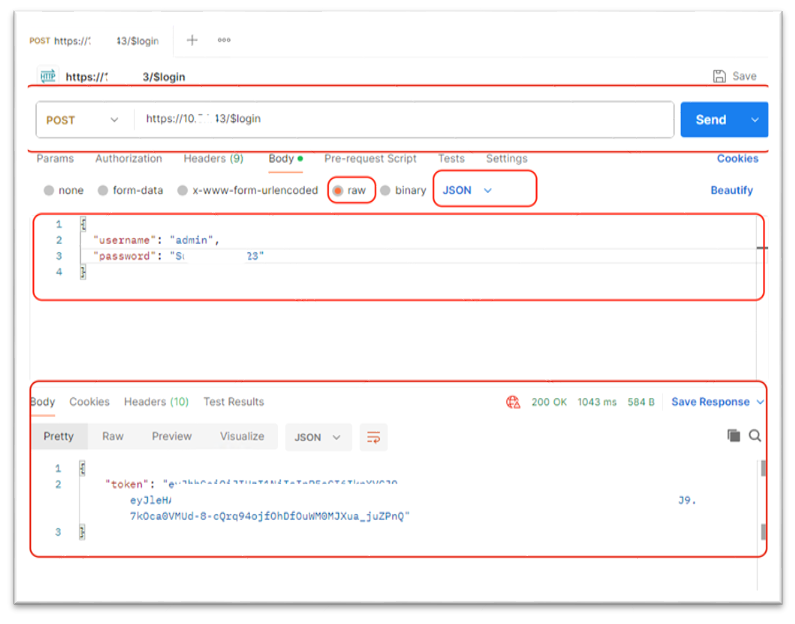
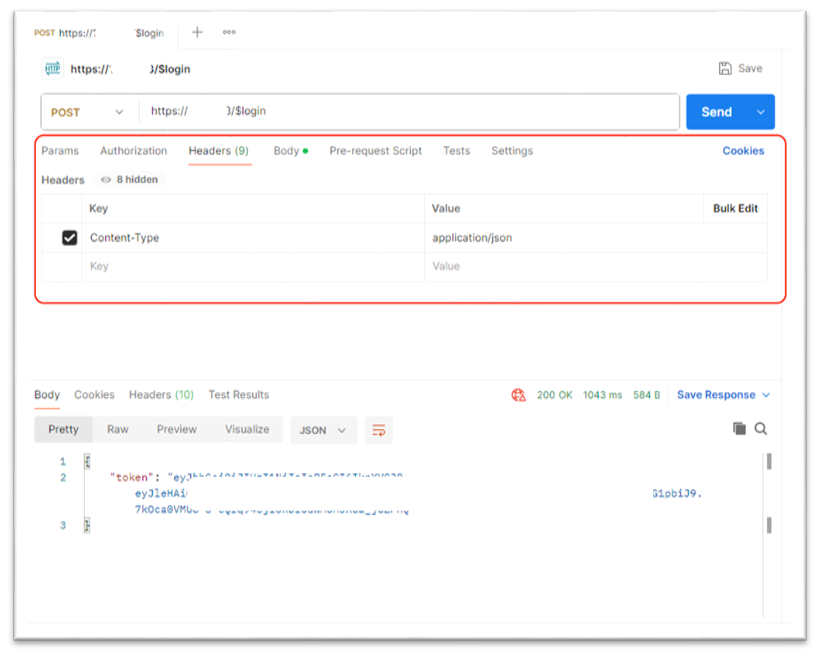
Copy this token value for use in the next steps.
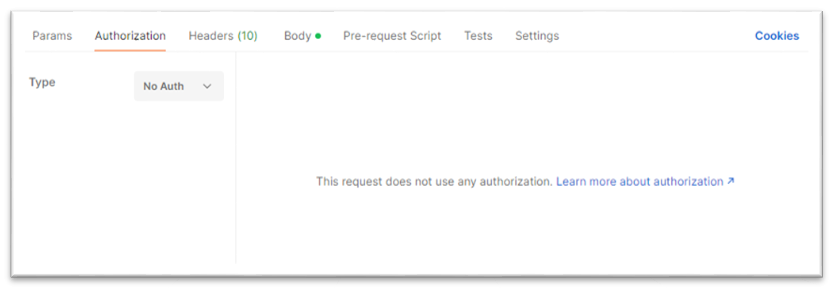
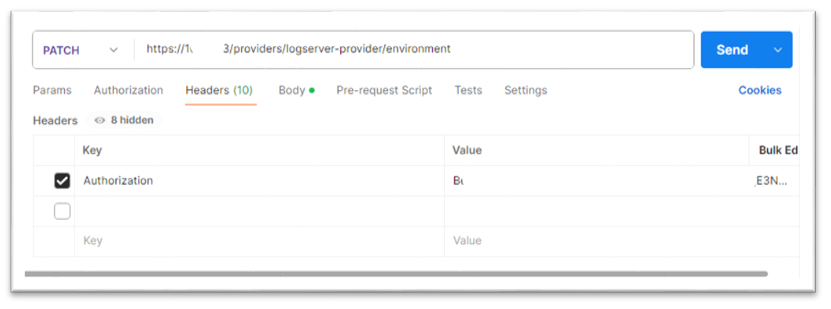
Step 1.2: Authorize API Calls
Include the generated token in the Authorization header for all subsequent API calls. The token must be prefixed with Bearer.
Authorization: Bearer abCD.efGH.ijKL
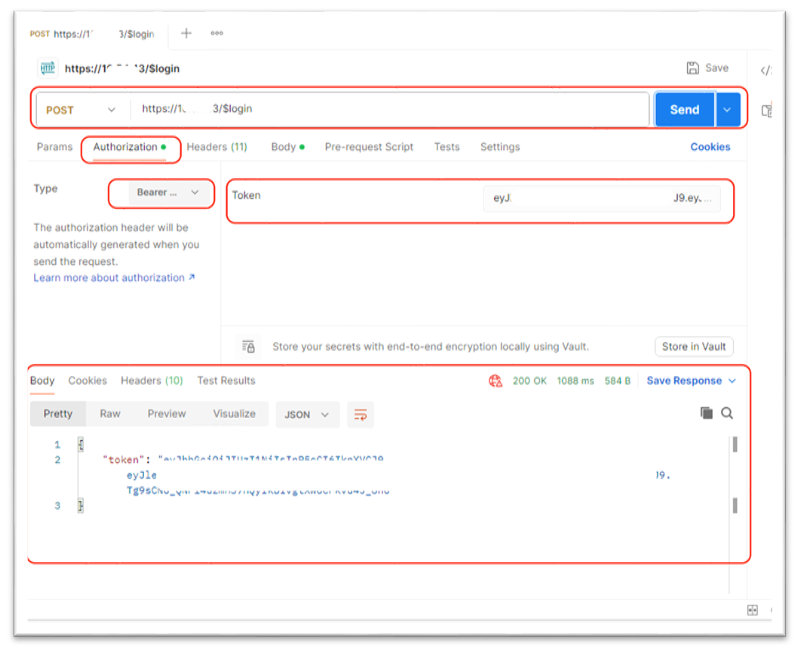
A valid token will allow the API call to proceed. An invalid or expired token will be rejected with an error message.
- Adding advanced settings
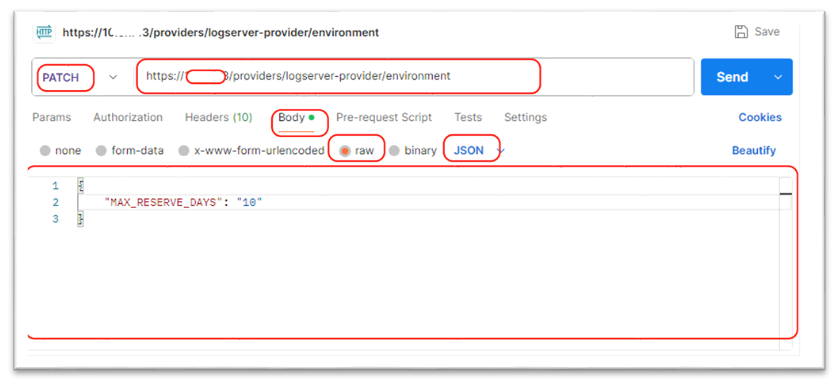
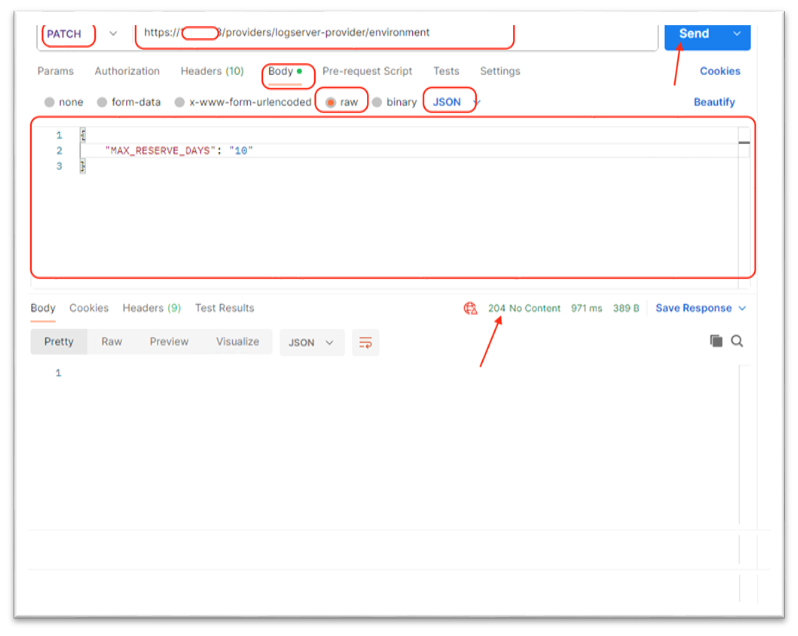
Once authenticated, you can configure the settings for a target container like logserver Configure the MAX_RESERVE_DAYS
This action configures the MAX_RESERVE_DAYS for the logserver.
- Endpoint: https://[ip]/providers/logserver-provider/environment
- Method: PATCH
Request Body
{ “MAX_RESERVE_DAYS”: “7” }
Fields
- MAX_RESERVE_DAYS (string, required): Default value is 7 days. Log Server stores log entries max days based on the TimeStamp field. Logs that were inserted 7 days ago will be deleted. Check every 10 minutes.
In this example, we are changing it to 10 days.
Responses
✅ Success (204 OK) Indicates setting is properly configured
Similarly, we can also adjust the Max Disk Usage Percentage from its default of 85. We are changing it to 90 here. When disk usage hits 90%, old logs are deleted to make space for new ones.
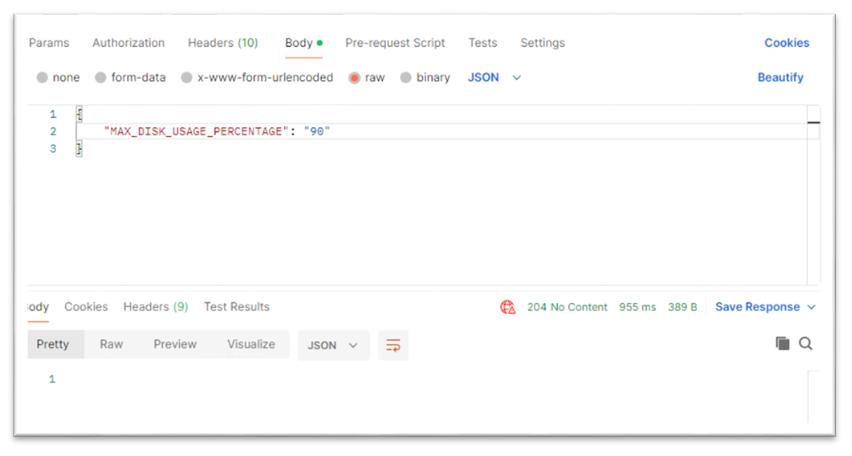
Response
✅ Success (204 OK) Indicates setting is properly configured