Install VDAs
Important:
- If you’re upgrading and your current version has the Personal vDisk or AppDisks software installed, see Removing PvD, AppDisks, and unsupported hosts.
- Binaries distributed by Citrix® are now signed. Signed binaries indicate that they are validated by either Citrix-generated certificates or authentic third-party certificates.
There are two types of VDAs for Windows machines: VDA for multi-session OS and VDA for single-session OS. (For information about VDAs for Linux machines, see the Linux Virtual Delivery Agent documentation.)
Before starting an installation, review Prepare to install and complete all preparation tasks.
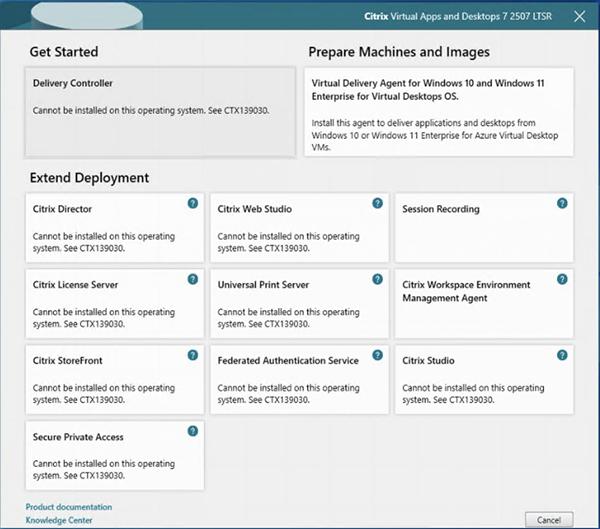
Before installing VDAs, install the core components. You can also create the site before installing VDAs.
This article describes the installation wizard sequence when installing a VDA. Command-line equivalents are provided. For details, see Install using the command line.
Step 1. Download the product software and launch the wizard
If you’re using the full-product installer:
- If you haven’t downloaded the product ISO yet:
- Use your Citrix account credentials to access the Citrix Virtual Apps and Desktops™ download page. Download the product ISO file.
- Unzip the file. Optionally, burn a DVD of the ISO file.
-
Use a local administrator account on the image or machine where you’re installing the VDA. Insert the DVD in the drive or mount the ISO file. If the installer does not launch automatically, double-click the AutoSelect application on the mounted drive.
The installation wizard launches.
Step 2. Choose which product to install
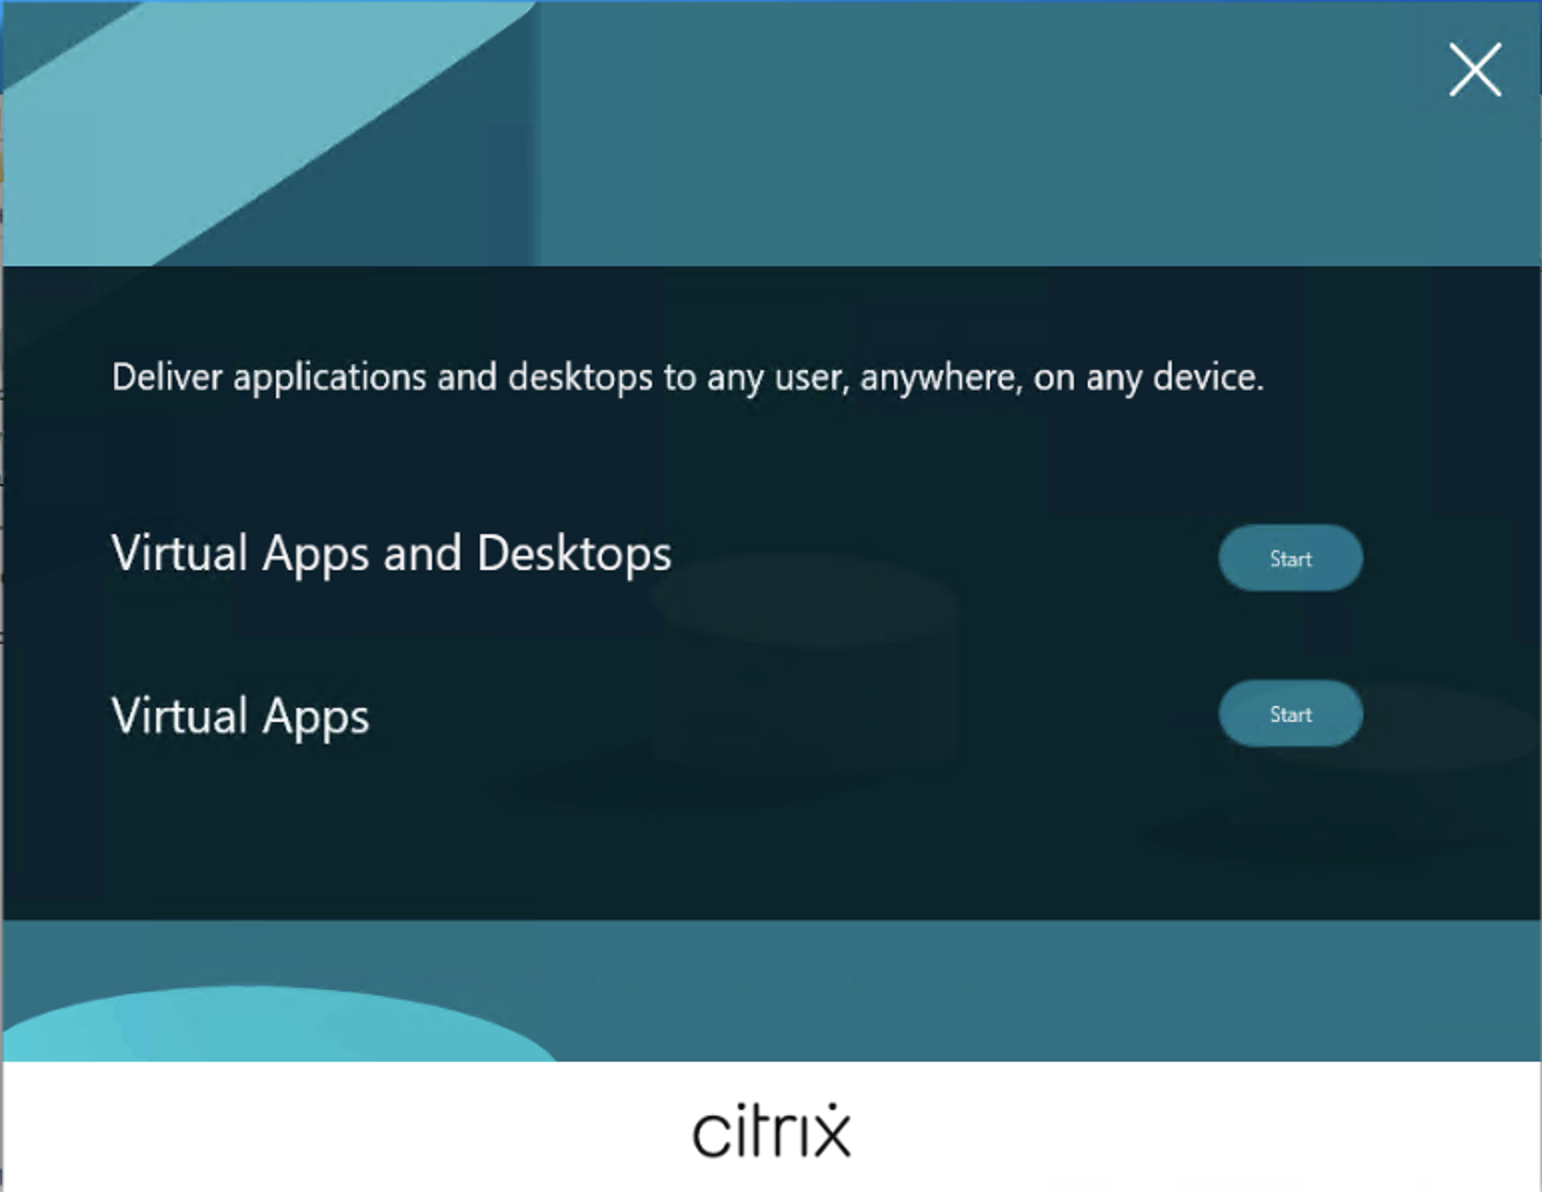
Click Start next to the product to install: Citrix Virtual Apps or Citrix Virtual Desktops. (If the machine already has a Citrix Virtual Apps or Citrix Virtual Desktops component installed, this page does not appear.)
Command-line option: /xenapp to install Citrix Virtual Apps. Citrix Virtual Desktops is installed if this option is omitted.
Step 3. Select the VDA
Select the Virtual Delivery Agent entry. The installer knows whether it’s running on a single-session or multi-session OS, so it offers only the appropriate VDA type.
For example, when you run the installer on a Windows Server 2019 machine, the VDA for multi-session OS option is available. The VDA for single-session OS option is not offered.
If you try to install (or upgrade to) a Windows VDA on an OS that is not supported for this Citrix Virtual Apps and Desktops version, a message guides you to information about options.
If you’re using a standalone package:
- Use your Citrix account credentials to access the Citrix Virtual Apps and Desktops download page. Download the appropriate package:
-
VDAServerSetup_2507.exe: Multi-session OS VDA version -
VDAWorkstationSetup_2507.exe: Single-session OS VDA version -
VDAWorkstationCoreSetup_2507.exe: Single-session OS Core Services VDA version -
VDASingleSessionCoreSetup_2507.exe: New Single-session OS Core Services VDA version (for 2507 CU1 and later)
-
-
Right-click the package and choose Run as administrator.
The installation wizard launches.
Step 4. Specify how the VDA will be used
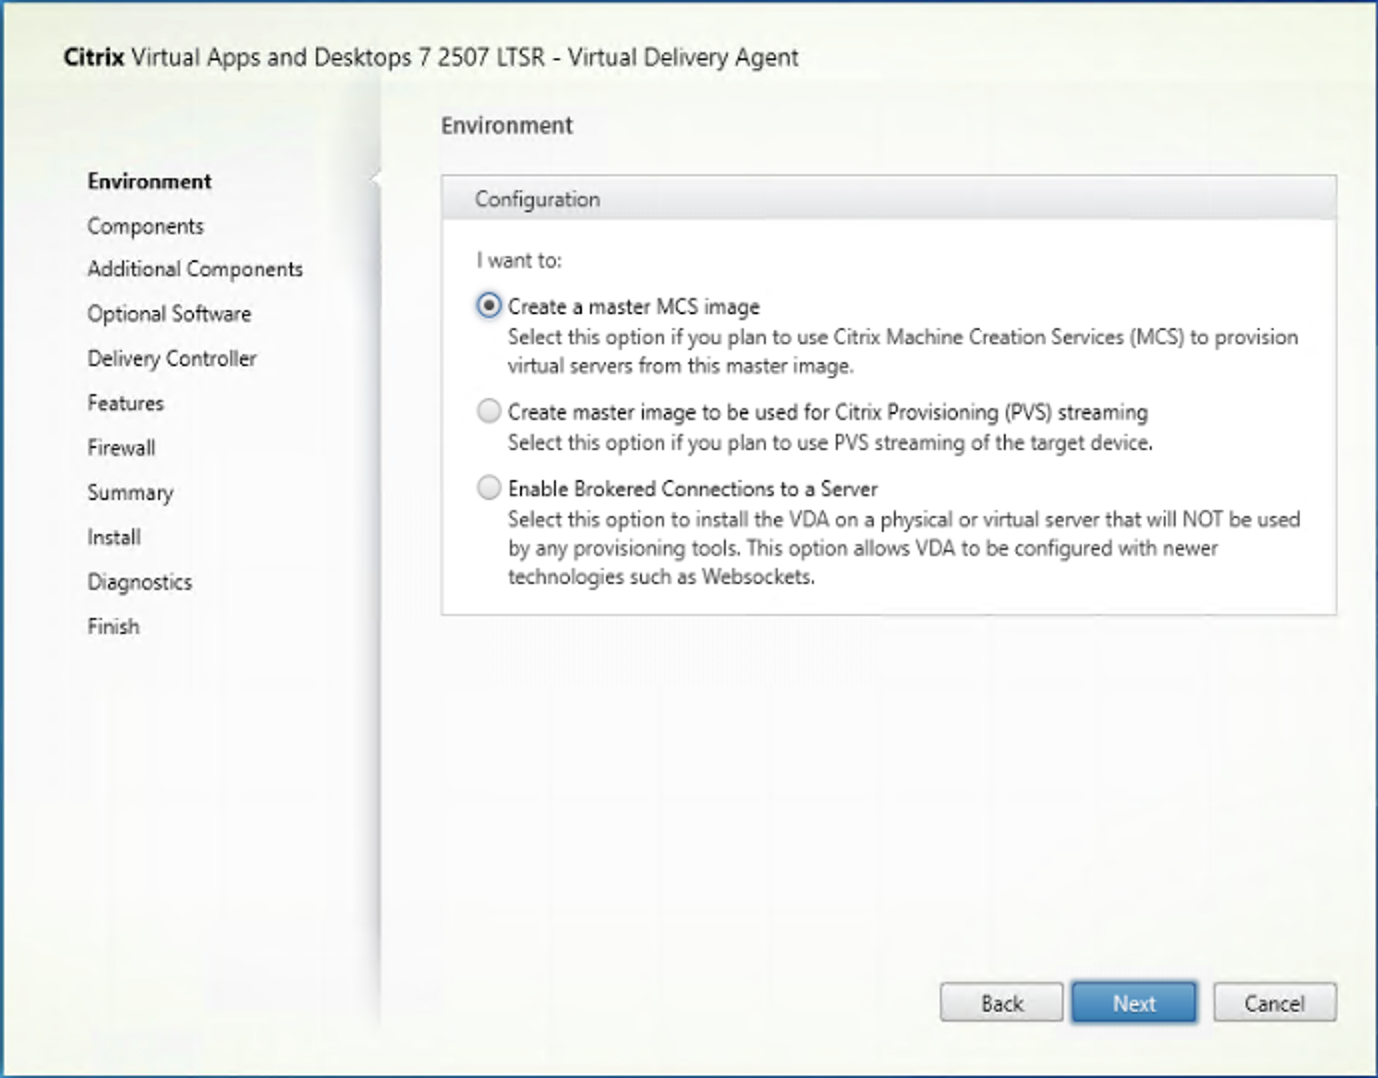
On the Environment page, specify how you plan to use the VDA, indicating whether you use this machine as an image to provision more machines.
The option you choose affects which Citrix Provisioning™ tools are installed automatically (if any), and the default values on the Additional Components page of the VDA installer.
Several MSIs (provisioning and other) are installed automatically when you install a VDA. The only way to prevent their installation is with the /exclude option in a command-line installation.
Choose one of the following:
-
Create a master MCS image: Select this option to install a VDA on a VM image, if you plan to use Machine Creation Services™ to provision VMs. This option installs the Machine Identity Service. This is the default option.
Command-line option:
/mastermcsimageor/masterimage
Important:
The installation media or ISO image must be mounted locally. Mounting an ISO image off a network drive for the purposes of installing software is not supported.
-
Create a master image using Citrix Provisioning or third-party provisioning tools: Select this option to install a VDA on a VM image, if you plan to use either Citrix Provisioning or third-party provisioning tools (such as Microsoft System Center Configuration Manager) to provision VMs.
Command-line option:
/masterpvsimage -
(Appears only on multi-session OS machines) Enable brokered connections to a server: Select this option to install a VDA on a physical or virtual machine that will not be used as an image to provision other machines.
Command-line option:
/remotepc -
(Appears only on single-session OS machines) Enable Remote PC Access: Select this option to install a VDA on a physical machine for use with Remote PC Access.
Command-line option:
/remotepc
Click Next.
This page does not appear:
- If you’re upgrading a VDA
- If you are using the
VDAWorkstationCoreSetup_2507.exe,VDAServerSetup_2507.exe, orVDAWorkstationSetup_2507.exeinstaller
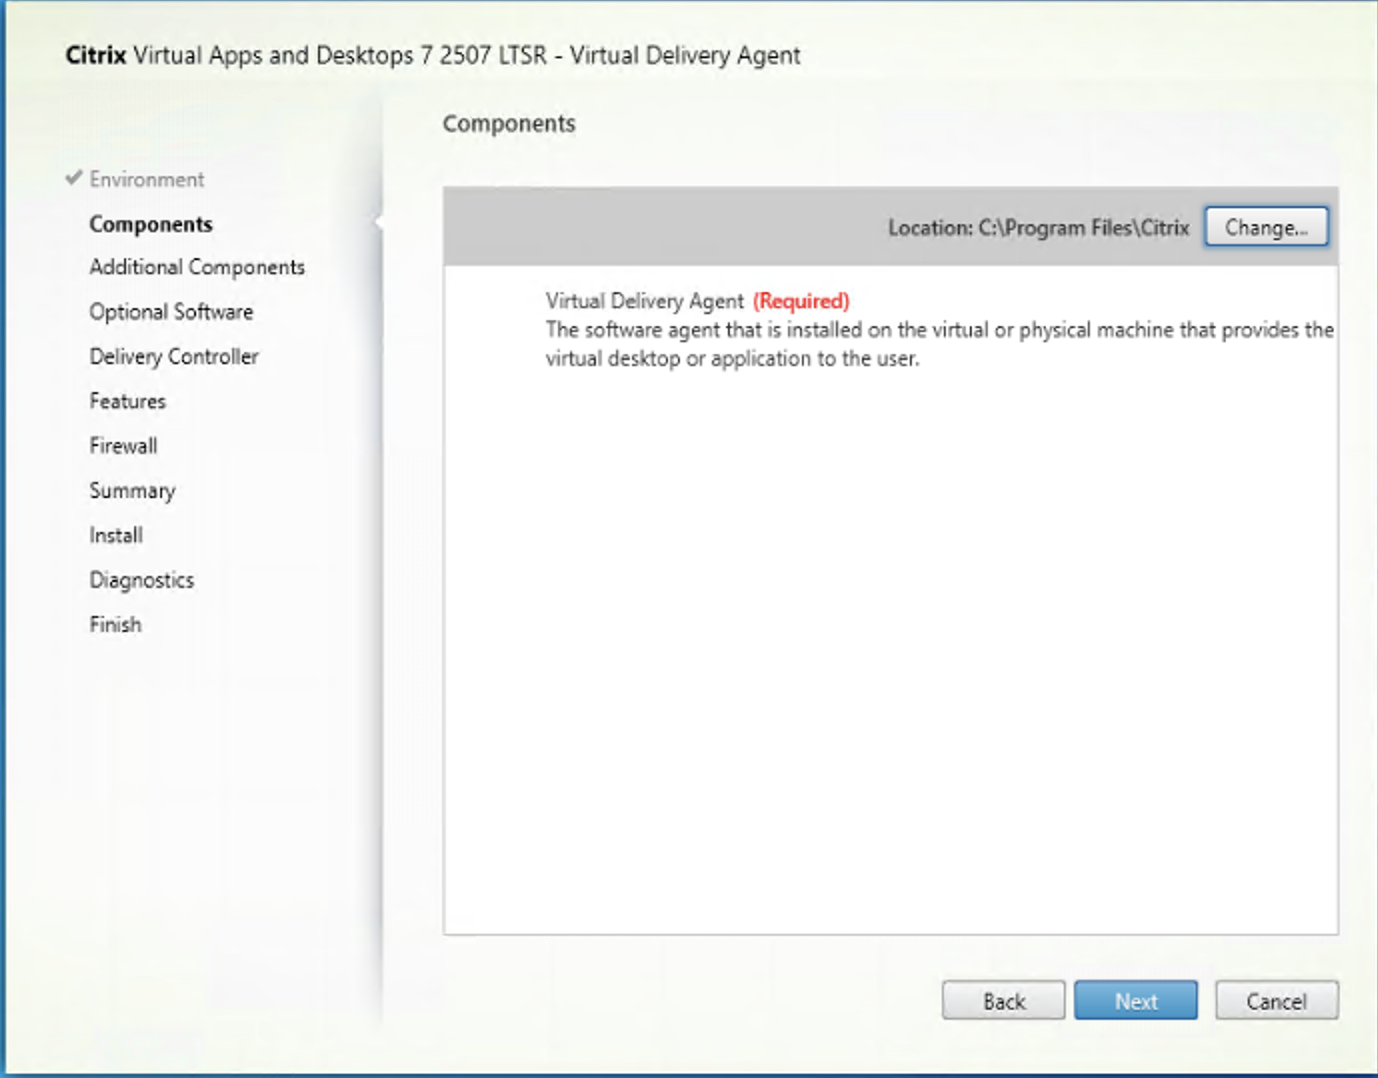
Step 5. Select the location to install VDA
Note:
CWA and CSA have moved from the Component page to the new Optional Software page.
On the Components page:
-
Location: By default, VDA is installed in
C:\Program Files\Citrix. This default is fine for most deployments. If you specify a different location, that location must haveexecutepermissions for network service.
Click Next.
Step 6. Install additional components
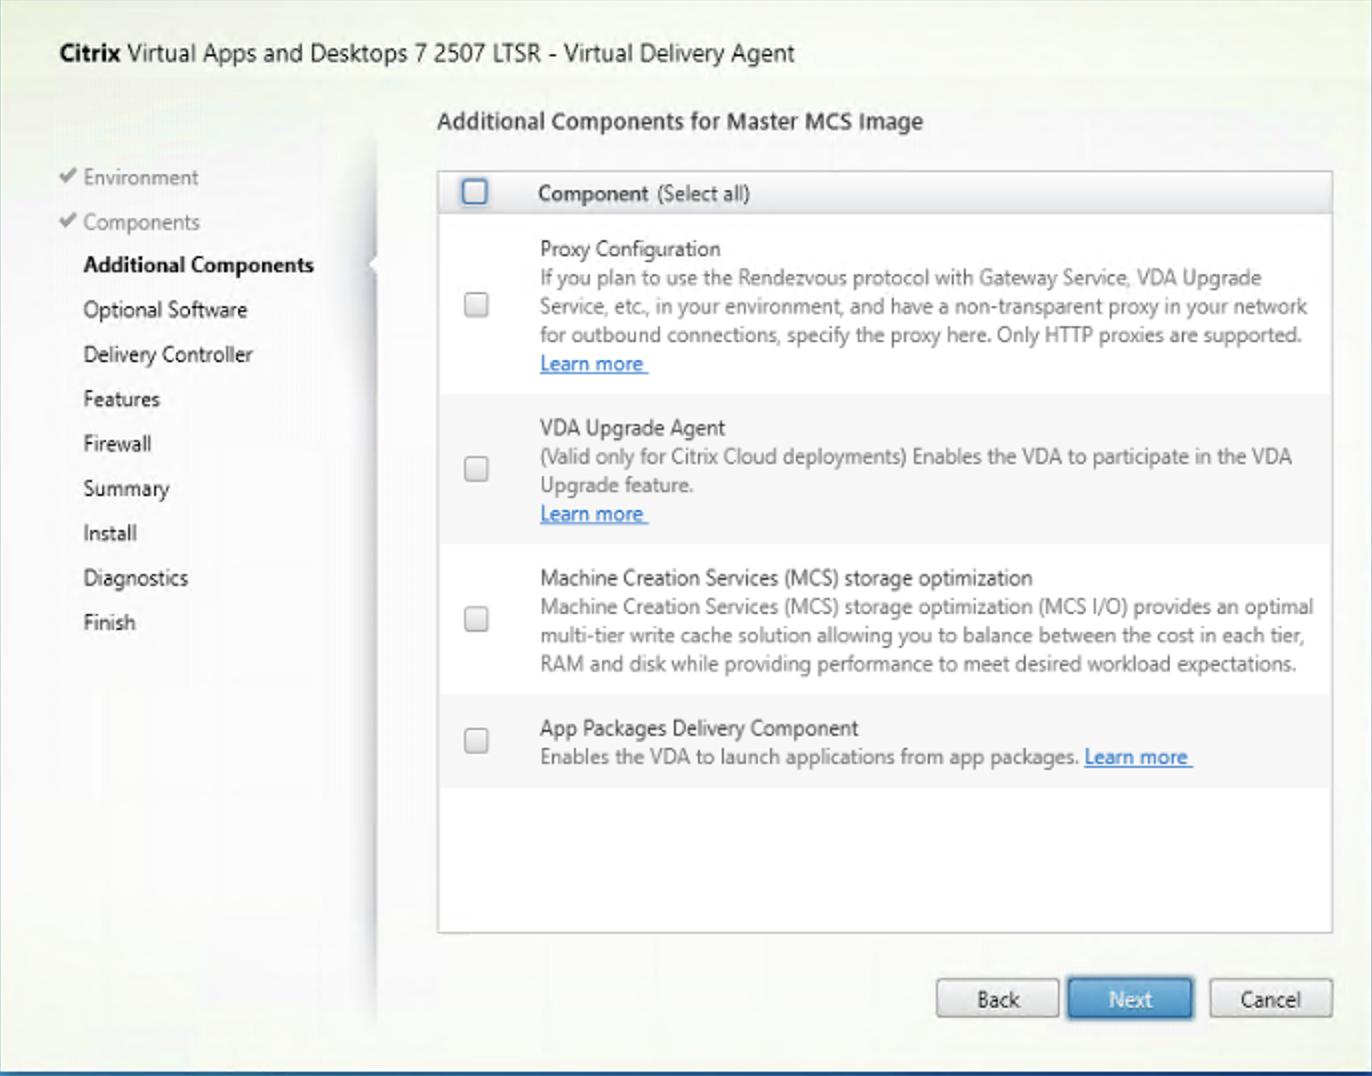
The Additional Components page contains checkboxes to enable or disable installation of other features and technologies with the VDA. In a command-line installation, you can use the /exclude or /includeadditional option to expressly omit or include one or more available components:
- /includeadditional “component”[,”component”] …
- /exclude “component”[,”component”] …
The following table indicates the default setting of items on this page. The default setting depends on the option that you selected on the Environment page.
| Additional Components page | Environment page: “Master image with MCS” or “Master image with Citrix Provisioning” selected | Environment page: “Enable brokered connections to server” (for multi-session OS) or “Remote PC Access” (for single-session OS) selected |
|---|---|---|
| App Packages Delivery Component | Not selected | Not selected |
| Citrix VDA Upgrade Agent | Not selected | Not selected |
| Citrix Backup and Restore | Not selected | Not selected |
| Citrix MCS IODriver | Not selected | Not selected |
| Citrix Rendezvous V2 | Not selected | Not selected |
This page does not appear if:
- You are using the
VDAWorkstationCoreSetup.exeinstaller. Also, the command-line options for the additional components are not valid with that installer. - You are upgrading a VDA and all the additional components are already installed. If some of the additional components are already installed, the page lists only components that are not installed.
Select or clear the following checkboxes. (The components might appear in a different order in the installer.)
-
App Packages Delivery Component: Install this component if you use applications from Microsoft App-V packages. For details, see Deploy and deliver App-V applications.
Command-line option:
/includeadditional "App Packages Delivery Component"to enable component installation,/exclude "App Packages Delivery Component"to prevent component installation. -
Citrix Profile Management: This component manages user personalization settings in user profiles. For details, see Profile Management.
Excluding Citrix Profile Management from the installation affects the monitoring and troubleshooting of VDAs with Citrix Director. On the User details and End Point pages, the Personalization panel and the Logon Duration panel fail. On the Dashboard and Trends pages, the Average Logon Duration panel display data only for machines that have Profile Management installed.
Even if you are using a third-party user profile management solution, Citrix recommends that you install and run the Citrix Profile Management Service. Enabling the Citrix Profile Management Service is not required.
Command-line option:
/includeadditional "Citrix Profile Management"to enable component installation,/exclude "Citrix Profile Management"to prevent component installation. -
Citrix Profile Management WMI Plug-in: This plug-in provides Profile Management runtime information in WMI (Windows Management Instrumentation) objects (for example, profile provider, profile type, size, and disk usage). WMI objects provide session information to Director.
Command-line option:
/includeadditional "Citrix Profile Management WMI Plug-in"to enable component installation,/exclude "Citrix Profile Management WMI Plug-in"to prevent component installation.
Note:
Starting with this version, Citrix Profile Management and Citrix Profile Management WMI Plug-in are now part of the VDA and are installed automatically for Master Image/MCS/PVS use cases. These components are not installed by default for the Remote PC use case. In all instances, installed components are automatically upgraded. The command-line behavior remains unchanged from previous releases.
-
VDA Upgrade Agent: Applicable only to Citrix DaaS (formerly Citrix Virtual Apps and Desktops service) deployments. Enables the VDA to participate in the VDA Upgrade feature. You can use that feature to upgrade a catalog’s VDAs from the management console, immediately or at a scheduled time. If this agent is not installed, you can upgrade a VDA by running the VDA installer on the machine.
Command-line options:
/includeadditional "Citrix VDA Upgrade Agent"to enable component installation,/exclude "Citrix VDA Upgrade Agent"to prevent component installation. -
MCSIO write cache for storage optimization: Installs the Citrix MCS I/O driver. For more information, see Storage shared by hypervisors and Configure cache for temporary data.
Command-line options:
/includeadditional "Citrix MCS IODriver"to enable component installation,/exclude "Citrix MCS IODriver"to prevent component installation. -
Proxy Configuration: Install this component if you plan to use the Rendezvous protocol with the Gateway Service, VDA Upgrade Service, and so on, in your environment, and you have a non-transparent proxy in your network for outbound connections, specify the proxy here. Only HTTP proxies are supported.
If you install this component, specify the address of the proxy or PAC file path on the Rendezvous Proxy Configuration page. For feature details, see Rendezvous protocol.
Command-line option:
/includeadditional "Citrix Rendezvous V2"to enable component installation,/exclude "Citrix Rendezvous V2"to prevent component installation. -
Citrix Backup and Restore: If a VDA installation or upgrade fails, then this component can return the machine to a backup that was done before the installation or upgrade.
Make sure that the Microsoft prerequisites are met as mentioned in Prepare to install.
Command-line option:
/includeadditional "Citrix Backup and Restore"to enable component installation,/exclude "Citrix Backup and Restore"to prevent component installation.Note:
If the MCS storage optimization is enabled, then the backup or restore for Windows server or desktop Operating System can fail. To resolve this, disable the MCS storage optimization option in the meta installer.
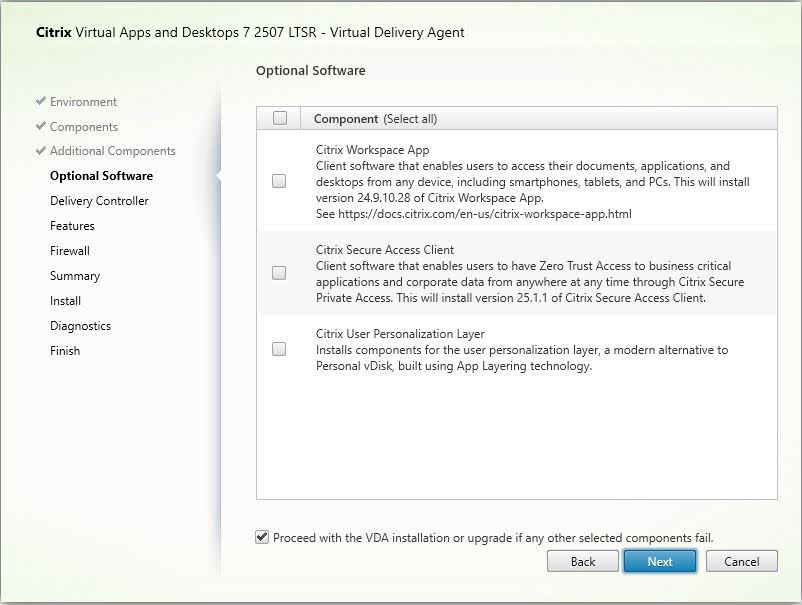
Step 7. Install optional software
Note:
The Optional Software page is a new addition starting Citrix Virtual Apps and Desktops 2503, providing customers with more flexibility to install additional Citrix software on the VDA.
The Citrix Workspace™ App and Citrix Secure Access™ Client have been moved from the Component page to the Optional Software page.
The User Personalization Layer has also been moved from the Additional Component page to the Optional Software page. Its selection logic remains the same as when it was on the Additional Component page. That is, if the User Personalization Layer is already installed, it is selected as Required and the component is upgraded.
On the Optional Software page:
-
Location: By default, components are installed in
C:\Program Files\Citrix. This default is fine for most deployments. If you specify a different location, that location must haveexecutepermissions for network service. -
Components: By default, Citrix Workspace app for Windows is not installed with the VDA. If you are using the
VDAWorkstationCoreSetup.exeinstaller, Citrix Workspace app for Windows is never installed, so this checkbox is not displayed.
Click Next.
Command-line options: '/installdir "C:\Program Files\VDA" /components "VDA","CSA","PLUGINS".to install the Virtual Delivery Agent, Citrix Secure Access Client, Citrix deviceTRUST, Citrix uberAgent, and the Citrix Workspace app into the specified directory.
Note:
You can choose to install, upgrade, or uninstall the Citrix Workspace app and other components during a VDA installation, upgrade, or uninstallation in the following scenarios:
During VDA installation and upgrade to 2507 LTSR, you can choose to include or exclude components and CWA plug-ins.
By default, Citrix Workspace app (CWA), Citrix Secure Access Client (CSA), and Citrix User Personalization Layer (UPL) are not installed. You can select them during installation if needed.
Citrix Device Trust, Citrix uberAgent, and Citrix Workspace Environment Management™ agent are now integrated with the VDA and are always installed. These components cannot be deselected when installing using the GUI.
By default, the Citrix Workspace Environment Management™ agent runs in Basic deployment, a single-machine mode with limited functionality that doesn’t connect to a WEM infrastructure. To enable full WEM capabilities by connecting the agent to the WEM service in Citrix Cloud or an on-premises deployment, configure the settings through group policies. For more information, see this WEM article.
Command-line changes
/components VDA CSA : The command installs VDA and CSA (selected), and also Citrix Device Trust, Citrix uberAgent, and Citrix Workspace Environment Management agent (default integrated).
/components VDA : The command installs VDA, and also Citrix Device Trust, Citrix uberAgent, and Citrix Workspace Environment Management agent as these are now integrated into the VDA itself. If you specify Citrix Device Trust, Citrix uberAgent, and Citrix Workspace Environment Management agent as arguments alongside the “/components” option, the VDA Meta-installer logs a notification indicating the removal of these arguments from the “/components” option. Subsequently, the VDA Meta-installer proceeds with the installation or upgrade of the VDA.
/components : The command is an invalid command and it must always include VDA. Additional components can be added for installation as required.
Using
/excludecommand for default integrated components : In Citrix Virtual Apps and Desktops 2507 LTSR, the/excludeoption always takes precedence. It can be used to prevent installation of default integrated components. Example:/exclude“Citrix Device Trust”,”Citrix Universal Print Client”. The command installs VDA with Citrix Workspace Environment Management agent, but does not install Citrix Device Trust and Citrix Universal Print Client.- During a VDA upgrade, if Citrix Workspace app, Citrix Secure Access Client and Citrix User Personalization Layer are not already installed in the VDA, you can choose to install them.
- During a VDA upgrade, if the version of Citrix Workspace app, and other installed plug-ins can be upgraded, then the option to upgrade them is displayed.
- During installation or upgrade, if the Citrix Workspace app (CWA) plug-in or any components fail to install or upgrade, you can override the failure and continue installing the core VDA by selecting the checkbox ‘Proceed with VDA upgrade or installation if selected components fail.’
- During a VDA uninstallation, you can choose whether to uninstall the Citrix Workspace app (CWA) and any other installed components. By default, all components except CWA are uninstalled automatically. CWA is treated differently and is not removed unless explicitly selected.
-
Citrix User Personalization Layer: Installs the MSI for the user personalization layer. For details, see User personalization layer.
This component appears only when installing a VDA on a single-session Windows 10 machine.
Command-line option:
/includeadditional "User Personalization Layer"to enable component installation,/exclude "User Personalization Layer"to prevent component installation.
Step 8. Delivery Controller™ addresses
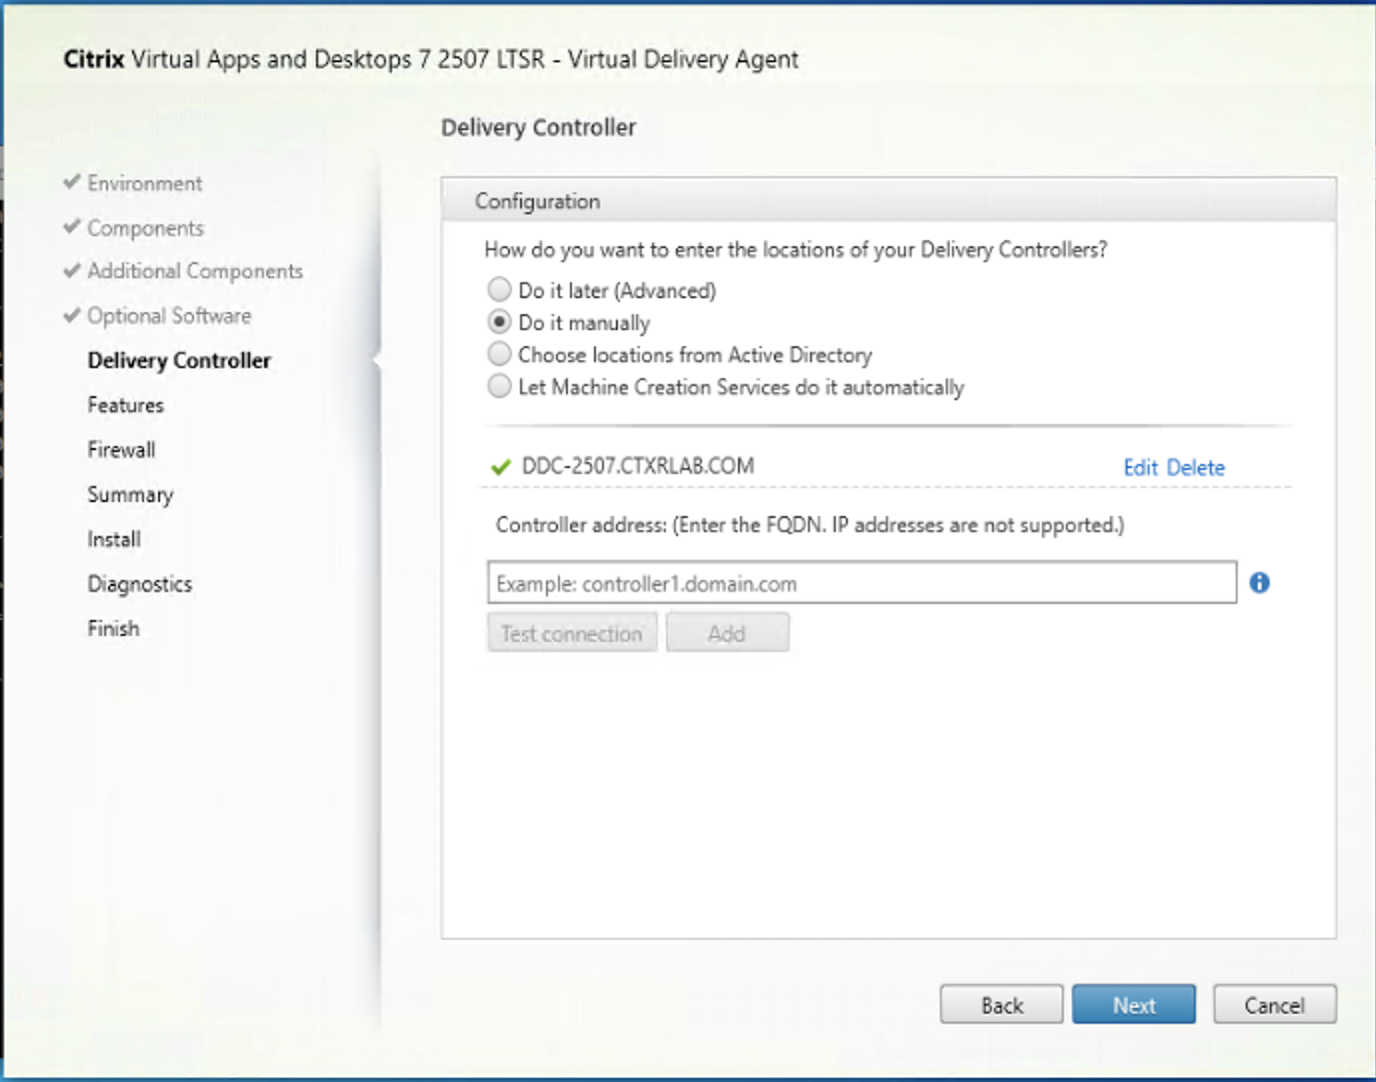
On the Delivery Controller page, choose how you want to enter the addresses of installed Controllers. Citrix recommends that you specify the addresses while you’re installing the VDA (Do it manually). The VDA cannot register with a Controller until it has this information. If a VDA cannot register, users cannot access applications and desktops on that VDA.
- Do it manually: (default) Enter the FQDN of an installed Controller and then click Add. If you’ve installed more Controllers, add their addresses.
- Do it later (Advanced): If you choose this option, the wizard asks you to confirm that’s what you want to do before continuing. To specify addresses later, you can either rerun the installer or use Citrix Group Policy. The wizard also reminds you on the Summary page.
- Choose locations from Active Directory: Valid only when the machine is joined to a domain and the user is a domain user.
- Use WebSocket Token: Creates a WebSocket VDA. The WebSocketToken is for the token that is required.
- Let Machine Creation Services do it automatically: Valid only when using MCS to provision machines.
Click Next. If you selected Do it later (Advanced), you are prompted to confirm that you will specify Controller addresses later.
Other considerations:
- The address cannot contain non-alphanumeric characters.
- If you specify addresses during VDA installation and in Group Policy, the policy settings override settings provided during installation.
- Successful VDA registration requires that the firewall ports used to communicate with the Controller are open. That action is enabled by default on the Firewall page of the wizard.
- After you specify Controller locations (during or after VDA installation), you can use the auto-update feature to update the VDAs when Controllers are added or removed. For details about how VDAs discover and register with Controllers, see VDA registration.
Command-line option: /controllers
Step 9. Proxy Configuration

The Proxy Configuration page appears only if you enabled the Proxy Configuration check box on the Additional Components page.
- Select whether you will specify the proxy source by proxy address or PAC file path.
-
Specify the proxy address or PAC file path.
- Proxy address format:
http://<url-or-ip>:<port> - PAC file format:
http://<url-or-ip>:<port>/<path>/<filename>.pac
- Proxy address format:
The firewall for the proxy port must be open for the connection test to succeed. If a connection cannot be made to the proxy, you can choose whether to continue with the VDA installation.
Command-line option: /proxyconfig
Step 10. Enable or disable features
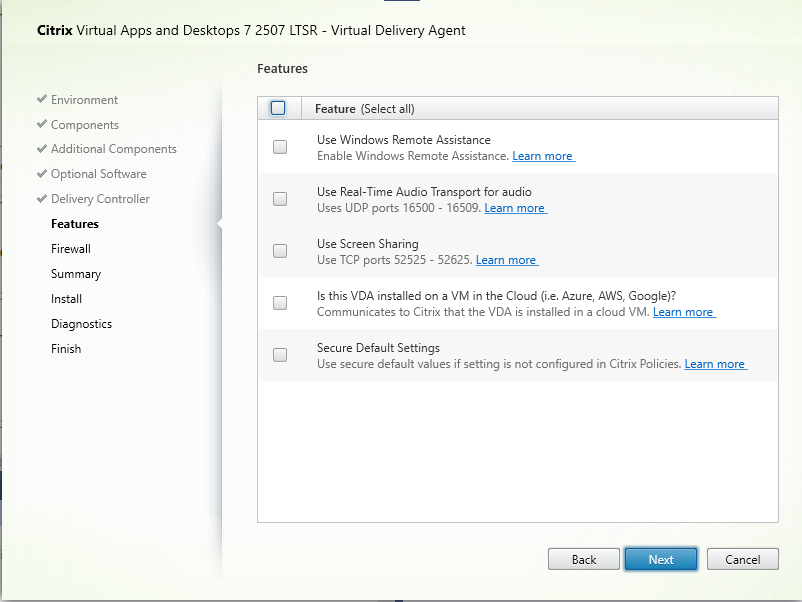
On the Features page, use the check boxes to enable or disable the features you want to use.
-
Use Windows Remote Assistance: When this feature is enabled, Windows Remote Assistance is used with the user shadowing feature of Director. Windows Remote Assistance opens the dynamic ports in the firewall. (Default = disabled)
Command-line option:
/enable_remote_assistance -
Use Real-Time Audio Transport for audio: Enable this feature if voice-over-IP is widely used in your network. The feature reduces latency and improves audio resilience over lossy networks. It allows audio data to be transmitted using RTP over UDP transport. (Default = disabled)
Command-line option:
/enable_real_time_transport -
Use screen sharing: When enabled, ports used by screen sharing are opened in the Windows firewall. (Default = disabled)
Command-line option:
/enable_ss_ports -
Is this VDA installed on a VM in a cloud: This setting helps Citrix to correctly identify resource locations for on-premises and service (Citrix Cloud™) VDA deployments for telemetry purposes. This feature has no impact on customer-side utilization. Enable this setting if your deployment uses Citrix DaaS (Default = disabled).
Command-line option:
/xendesktopcloud -
Secure Default Settings: This option changes the default setting for various features from enabled to disabled for a more secure out-of-box configuration. The relevant features are: client drive redirection, special folder redirection, drag and drop, client TWAIN device redirection, Client USB Plug and Play device redirection, client printer redirection, client clipboard redirection, and client microphone redirection.
Command-line option: /ENABLE_SECURE_DEFAULTS
Click Next.
Step 11. Firewall ports
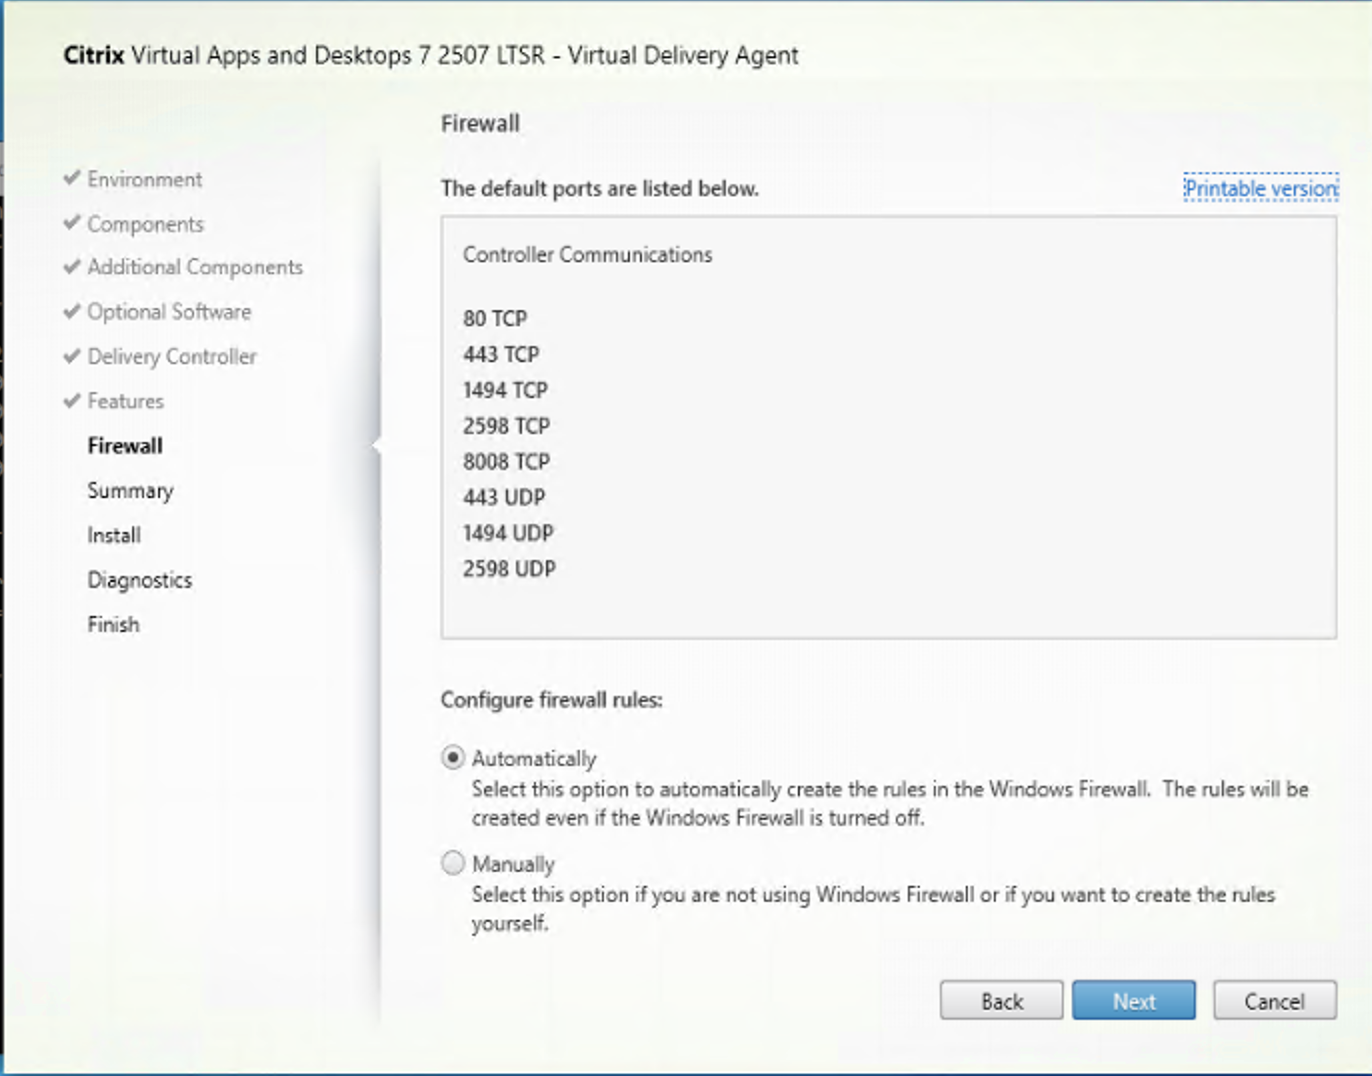
On the Firewall page, by default, the ports are opened automatically if the Windows Firewall Service is running, even if the firewall is not enabled. This default setting is fine for most deployments. For port information, see Network ports.
Click Next.
Command-line option: /enable_hdx_ports
Step 12. Review prerequisites and confirm installation
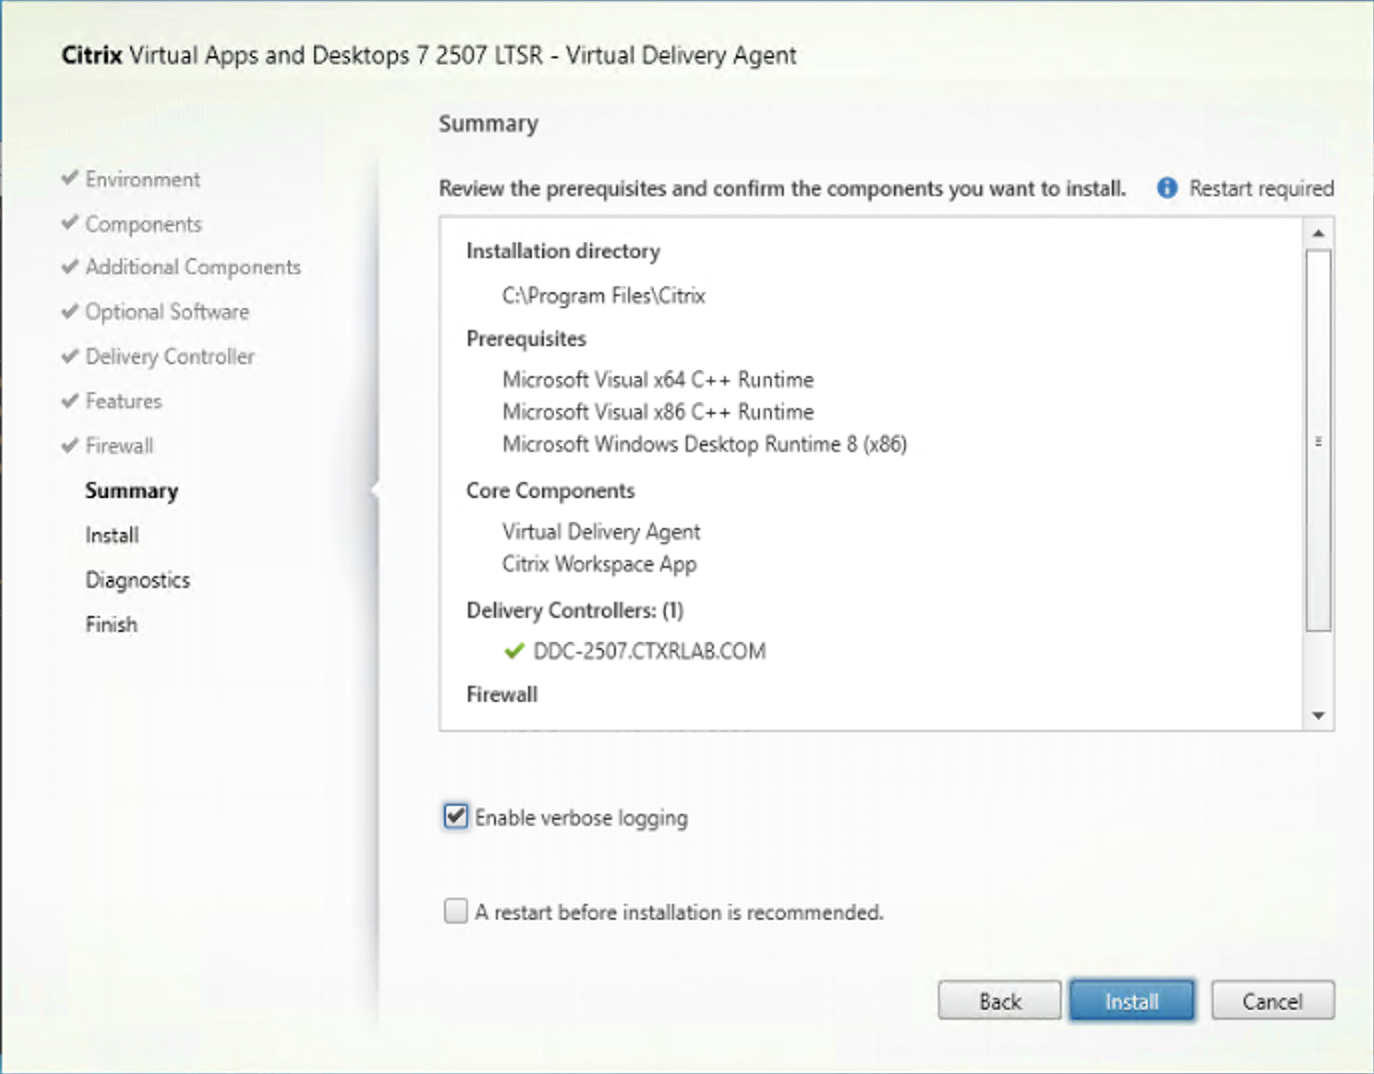
The Summary page lists what will be installed. Use the Back button to return to earlier wizard pages and change selections.
When you’re ready, click Install.
If prerequisites aren’t already installed or enabled, the machine might restart once or more times. See Prepare to install.
Step 13. Diagnostics
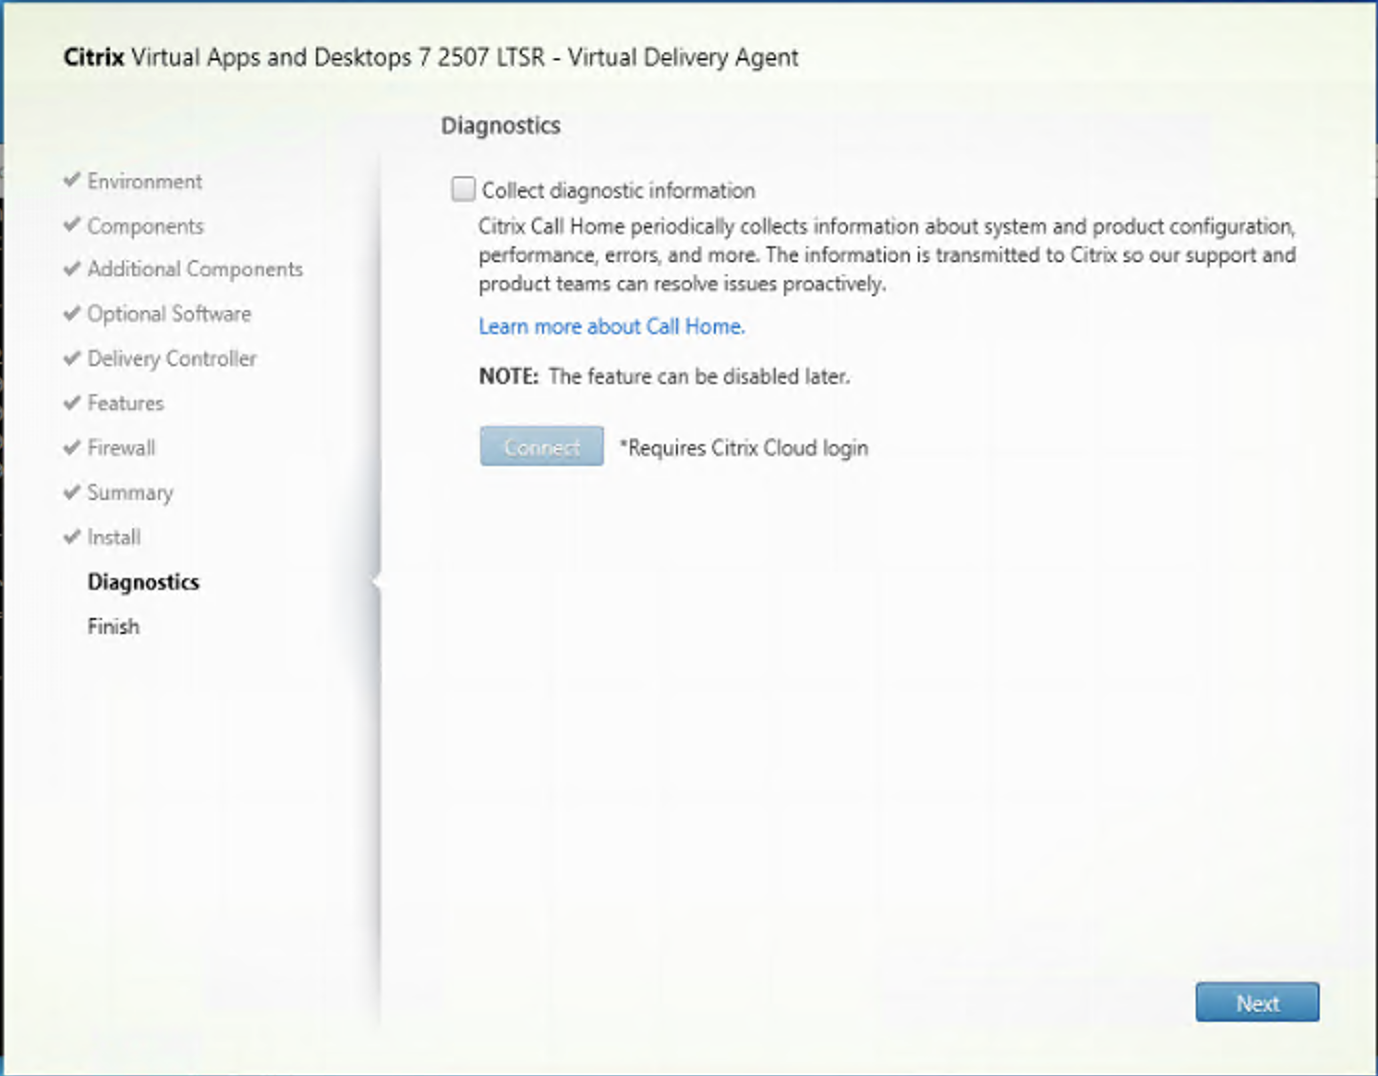
On the Diagnostics page, choose whether to participate in Citrix Call Home. If you choose to participate (the default), click Connect. When prompted, enter your Citrix account credentials.
After your credentials are validated (or if you choose not to participate), click Next.
When using the full product installer, if you click Connect on the Diagnostics page without first selecting Collect diagnostic information, after you close the Connect to Citrix Insight Services dialog the Next button is disabled. You cannot move to the next page. To reenable the Next button, select and immediately deselect Collect diagnostic information.
For more information, see Call Home.
Step 14. Complete this installation
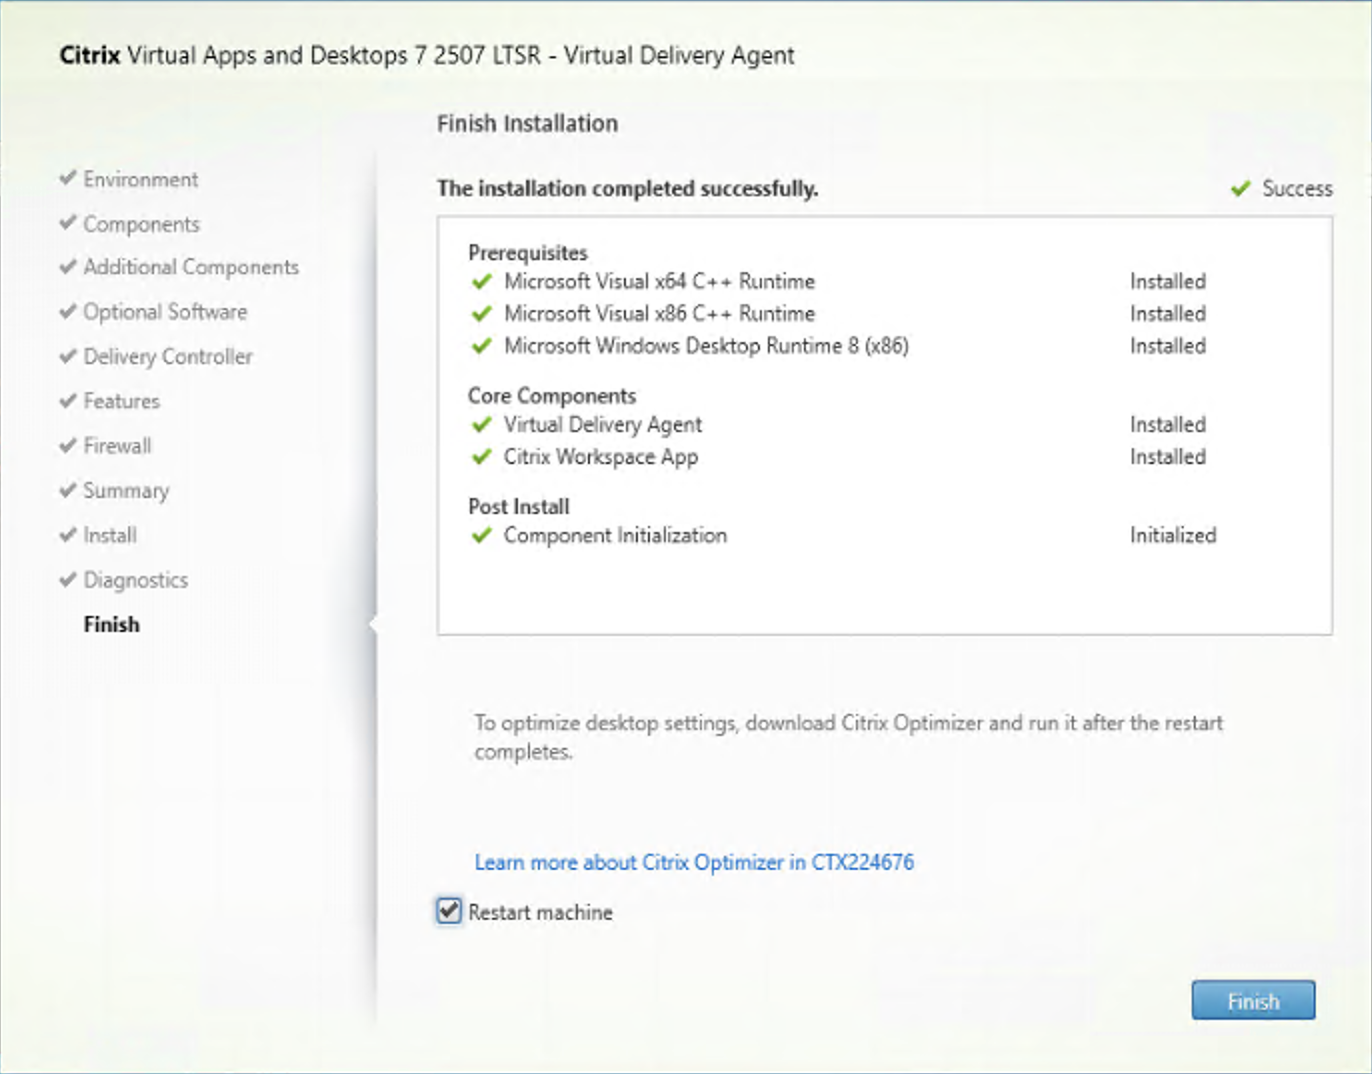
The Finish page contains green check marks for all prerequisites and components that installed and initialized successfully.
Click Finish. By default, the machine restarts automatically. Although you can disable this automatic restart, the VDA cannot be used until the machine restarts.
Next steps
Repeat the procedure above to install VDAs on other machines or images, if needed.
After you install all VDAs, launch Studio. If you haven’t created a site yet, Studio automatically guides you to that task. After that’s done, Studio guides you to create a machine catalog and then a delivery group. See:
Citrix Optimizer
Citrix Optimizer is a tool for Windows OS that helps Citrix administrators optimize VDAs by removing and optimizing various components.
After installing a VDA and completing the final restart, download and install Citrix Optimizer. See CTX224676. The CTX article contains the download package, plus instructions about installing and using Citrix Optimizer.
Customize a VDA
To customize an installed VDA:
- From the Windows feature for removing or changing programs, select Citrix Virtual Delivery Agent or Citrix Remote PC Access/VDI Core Services VDA. Then right-click and select Change.
-
Select Customize Virtual Delivery Agent Settings. When the installer launches, you can change:
- Controller addresses
- TCP/IP port to register with the Controller (default = 80)
- Whether to open Windows Firewall ports automatically
Troubleshoot
-
For information about how Citrix reports the results of component installations, see Citrix installation return codes.
-
In the Studio display for a delivery group, the Installed VDA version entry in the Details pane might not be the version installed on the machines. The machine’s Windows Programs and Features display shows the actual VDA version.
-
After a VDA is installed, it cannot deliver apps or a desktop to users until it registers with a Delivery Controller.
To learn about VDA registration methods and how to troubleshoot registration issues, see VDA registration.
Known limitation
When you use Citrix Workspace app for Windows version 1912 or earlier, the session drops after a while. This issue is fixed in the newer LTSR and CR versions of Citrix Workspace app. For more information on the supported release versions, see Citrix Workspace app for Windows / Citrix Receiver for Windows Long Term Service Releases.
In this article
- Step 1. Download the product software and launch the wizard
- Step 2. Choose which product to install
- Step 3. Select the VDA
- Step 4. Specify how the VDA will be used
- Step 5. Select the location to install VDA
- Step 6. Install additional components
- Step 7. Install optional software
- Step 8. Delivery Controller™ addresses
- Step 9. Proxy Configuration
- Step 10. Enable or disable features
- Step 11. Firewall ports
- Step 12. Review prerequisites and confirm installation
- Step 13. Diagnostics
- Step 14. Complete this installation
- Next steps
- Citrix Optimizer
- Customize a VDA
- Troubleshoot
- Known limitation