-
-
Cloud Connector Standalone Citrix Secure Ticketing Authority (STA) service
-
-
-
-
-
This content has been machine translated dynamically.
Dieser Inhalt ist eine maschinelle Übersetzung, die dynamisch erstellt wurde. (Haftungsausschluss)
Cet article a été traduit automatiquement de manière dynamique. (Clause de non responsabilité)
Este artículo lo ha traducido una máquina de forma dinámica. (Aviso legal)
此内容已经过机器动态翻译。 放弃
このコンテンツは動的に機械翻訳されています。免責事項
이 콘텐츠는 동적으로 기계 번역되었습니다. 책임 부인
Este texto foi traduzido automaticamente. (Aviso legal)
Questo contenuto è stato tradotto dinamicamente con traduzione automatica.(Esclusione di responsabilità))
This article has been machine translated.
Dieser Artikel wurde maschinell übersetzt. (Haftungsausschluss)
Ce article a été traduit automatiquement. (Clause de non responsabilité)
Este artículo ha sido traducido automáticamente. (Aviso legal)
この記事は機械翻訳されています.免責事項
이 기사는 기계 번역되었습니다.책임 부인
Este artigo foi traduzido automaticamente.(Aviso legal)
这篇文章已经过机器翻译.放弃
Questo articolo è stato tradotto automaticamente.(Esclusione di responsabilità))
Translation failed!
Troubleshooting
Troubleshooting session sign-out issues with Published Applications
When publishing applications, only the main executable file for the published application is specified. However, some applications might produce additional (child) processes that run in the background and are not closed by the corresponding main executable file when the main published application is closed. Additional processes might also be created, from scripts that are executed, or from specific registry keys, like Run and RunOnceKey. These applications can prevent a graceful sign-out, resulting in lingering or hanging sessions and might result in the session not closing and the user being signed out.
In this case, you need to reset or exit these sessions using Citrix Director.
To help identify and troubleshoot sessions not being signed out properly, Citrix has made three registry entries available. Identifying and troubleshooting of session not being logged off properly due to these issues is a three-step process:
-
Identifying which sessions have published applications are holding up a graceful sign-out
-
Identifying for those published applications if they produce any additional (child) processes
-
Add these processes to a specified registry entry to prevent them from holding up sign-out
Step 2: Identifying for those published applications if they produce any additional (child) processes
Once a published application is identified to hold up a graceful sign-out, the next step is to determine if this application produces additional processes when running.
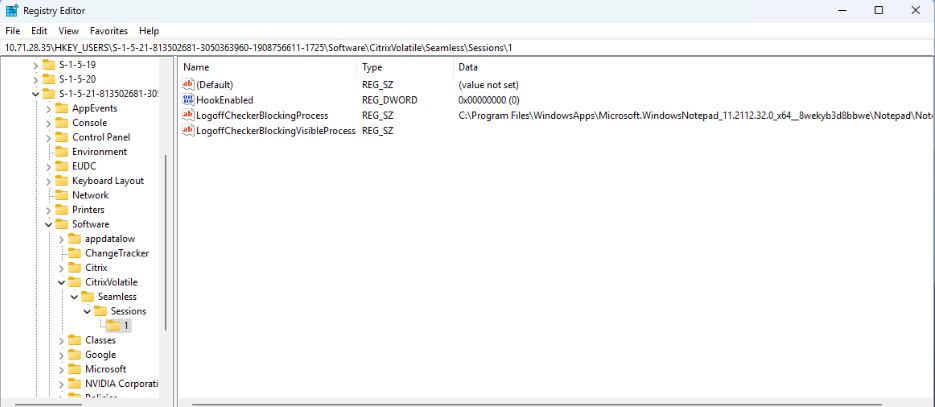
You can read HKCU\Software\CitrixVolatile\Seamless\Sessions\[ID]\LogoffCheckerBlockingProcess to determine if any processes are blocking a graceful sign-out when a published application is closed.
In the following example, the key LogoffCheckerBlockingProcess contains the following entries:
PhoneExperienceHost.exe
SkypeApp.exe
SkypeBackgroundHost.exe
<!--NeedCopy-->
These processes have held up the graceful sign-out.
Note:
Replace the [ID] with the correct session ID for the session you want to check.
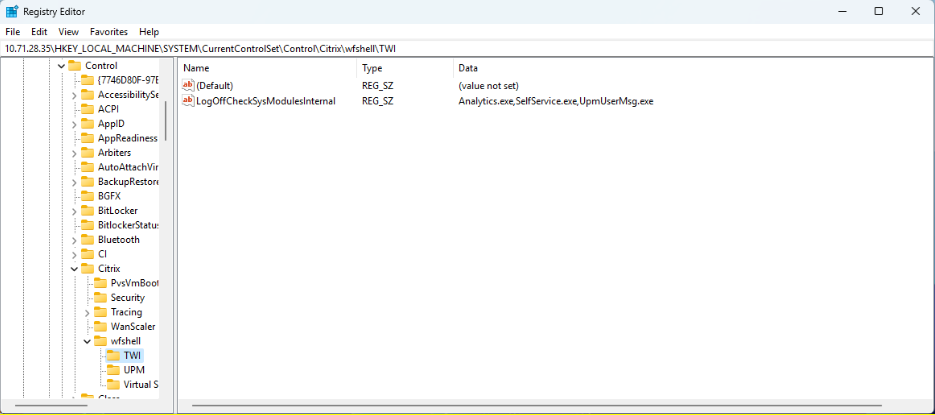
Step 3: Add these processes to a specified registry entry to prevent them from holding up sign-out
You can add these processes to the following registry keys to prevent them from holding up sign-out in future sessions:
Add the process file name to the following registry key:
Caution! Refer to the Disclaimer at the end of this article before using the Registry Editor.
HKEY_LOCAL_MACHINE\SYSTEM\CurrentControlSet\Control\Citrix\wfshell\TWI
Value Name:LogoffCheckSysModules
Type:REG_SZ
String:MyAppName.exe
<!--NeedCopy-->
More information about LogoffCheckSysModules, see Graceful logoff from a published application renders the session in an active state.
Step-by-step troubleshooting guide
-
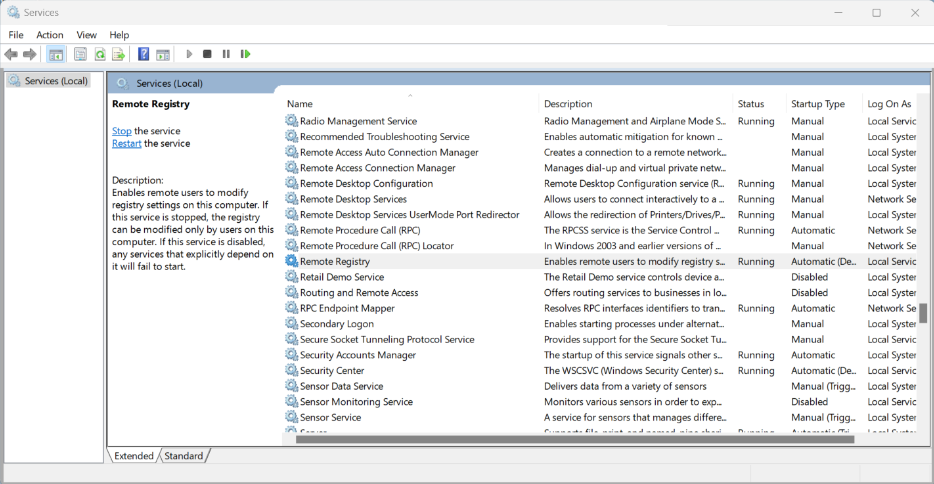
Start the remote registry Service under the VDA under test:
-
In the Control Panel, select Administrative Tools > Services.
-
Right-click Remote Registry Service and select Properties.
-
Under Startup Type, select Automatic from the drop-down menu.
-
-
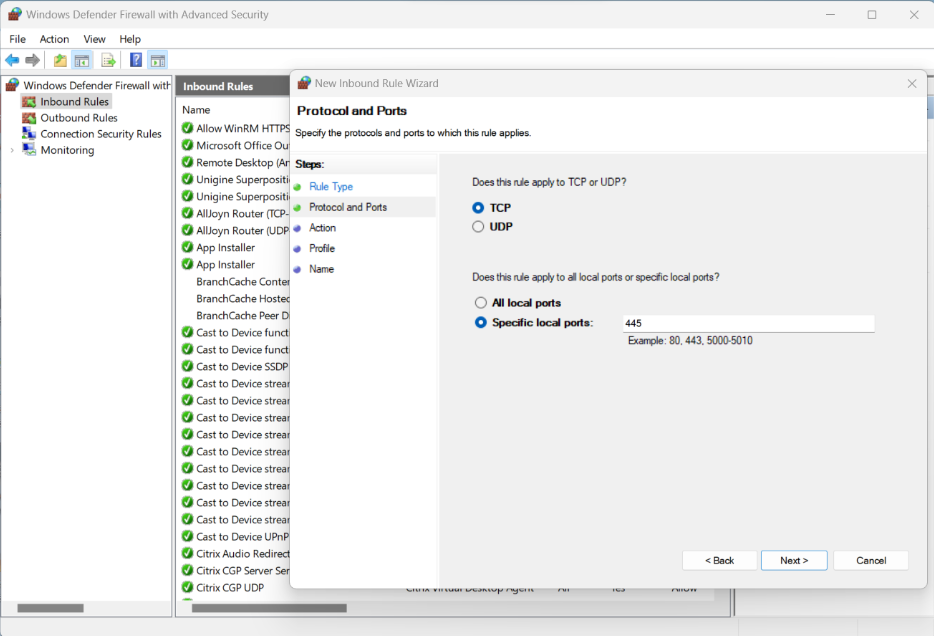
Turn off the Windows Firewall on the VDA under test or create an inbound firewall rule to enable port 455:
-
In the Control Panel, select Windows Defender Firewall > Advanced Settings.
-
Right-click Inbound Rules and select New Rule.
-
In New Inbound Rule Wizard, select Port.
-
On the Protocols and Ports page, select TCP and Specific Local Ports. Enter
445as the local port. -
Select Allow Connection on the Action page.
-
Select the firewall profiles that you want to apply the new inbound rule.
-
Name the firewall rule and select Finish to exit New Inbound Rule wizard.
-
-
From another VM on the same domain (it could be DC, DDC, or another VDA), run
Regeditand connect to a remote registry.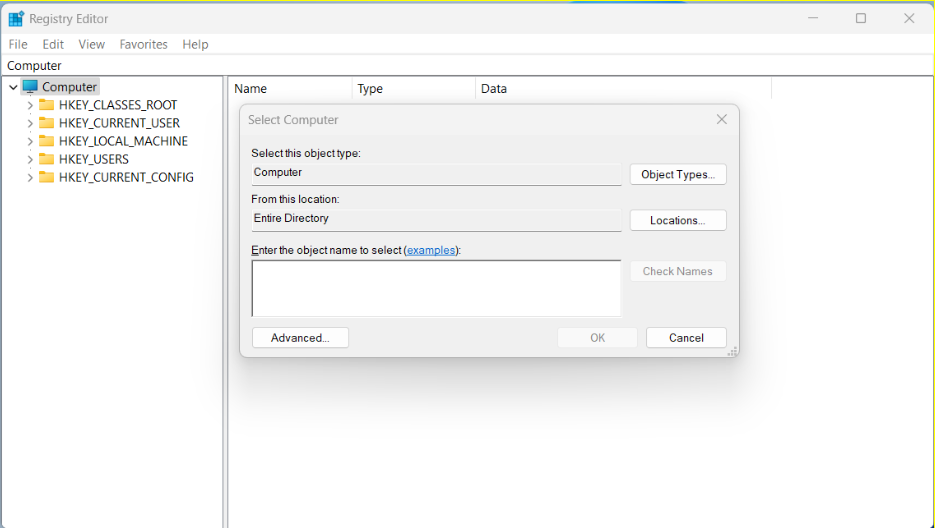
-
Enter the IP address of the VDA under test and click OK. The
regedittree must display branches for the VDA under test.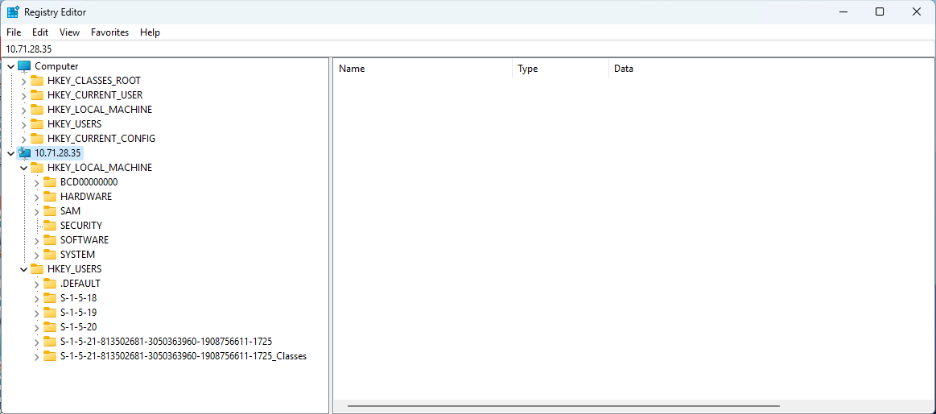
-
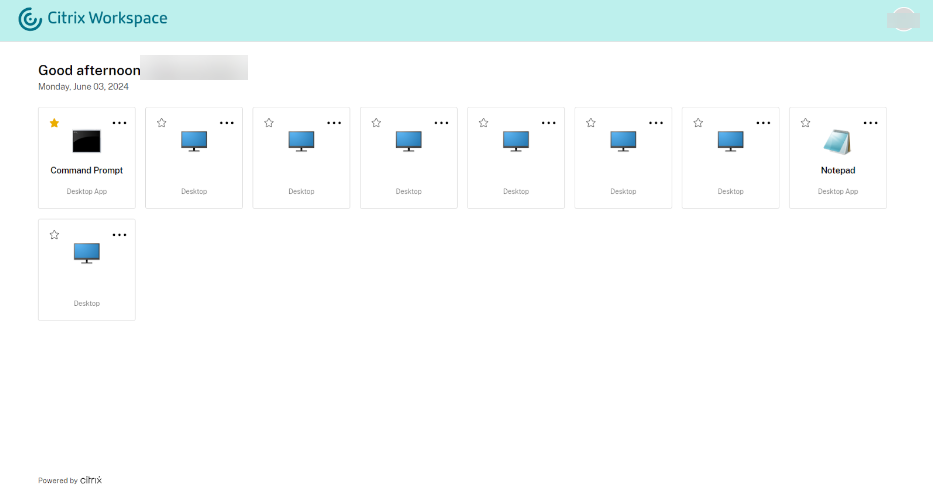
Open the Command Prompt published application.

The Command Prompt app is displayed on Citrix Workspace.
-
Open Connection Center on the client. This is used for monitoring when a session is signed out, after closing an opened seamless app. We can see in the following image that the Command Prompt process
c:\Windows\system32\cmd.exeis active on the remote VDI.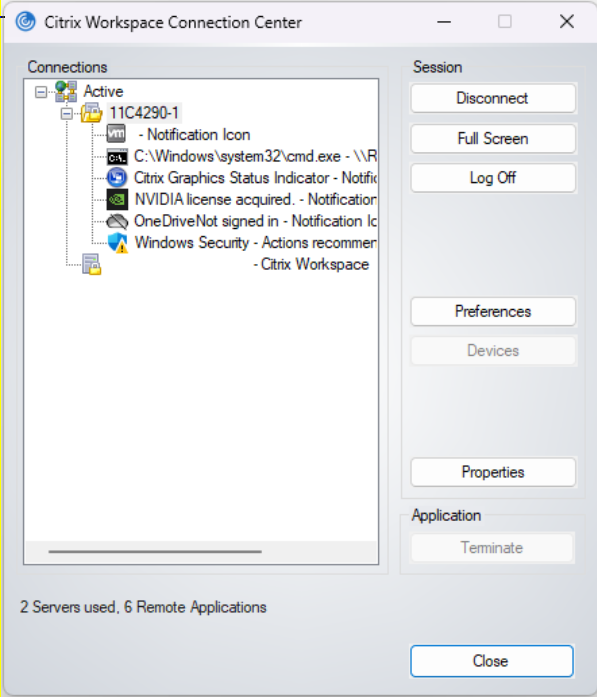
-
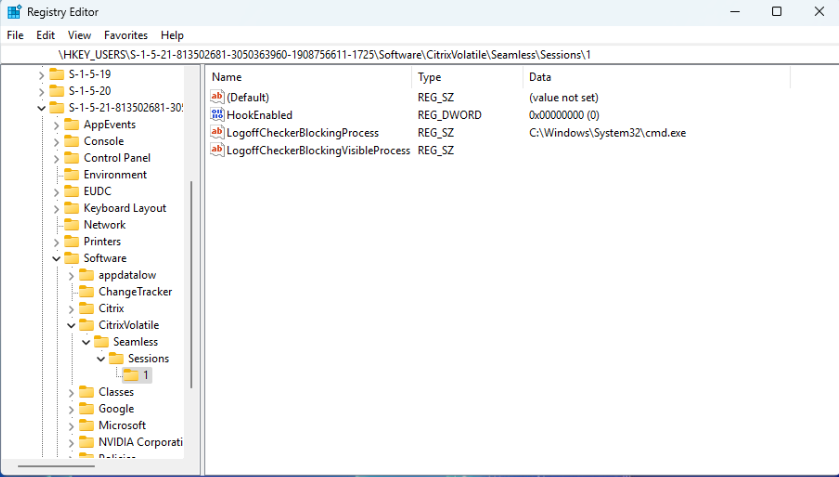
From the VDA where regedit is running, go to the following remote IP location:
HKEY_USERS\S-1-X-XX-XXXXXXXX-XXXXXXXXXXX-XXXXXXXXXX-XXXX\SOFTWARE\CitrixVolatile\Seamless\Sessions\X\Note:
This path changes every time you open a new session.
-
There are two keys to read here (do not change them here): LogoffCheckBlockingProcess and LogoffCheckerBlockingVisibleProcess. These keys display any programs that are blocking sign-out. The first one must display
C:\Windows\System32\cmd.exesince that was open and has not been closed yet.Note:
LogoffCheckBlockingProcess and LogoffCheckerBlockingVisibleProcess must not be manually edited. Manually editing these registry values could lead to unstable sessions.
-
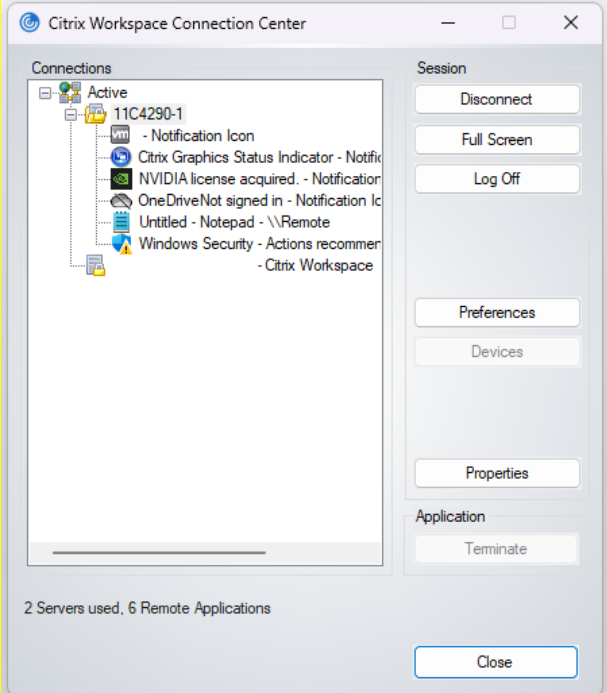
Click X in the upper-right hand corner to exit Seamless CMD.
-
Check the connection center to see if the session closes. It may take up to 30 seconds to close. If it closes, there have been no applications or processes that have prevented a graceful sign-out.
-
If the session did not close, refresh the regedit output with F5.
-
Check the contents of LogoffCheckBlockingProcess and LogoffCheckerBlockingVisibleProcess again. CMD must no longer be present but there should be another listed process. Whatever process is currently blocking session sign-out must be displayed here.
In this case, Notepad.exe is open from the published command prompt before the command prompt was closed and this remote notepad process is holding up a graceful sign-out.
-
Make a note of the path to this executable, and which key it appeared in, and enter it in the following registry key, under the remote tree:
- If it appears in LogoffCheckBlockingProcess:
HKLM\SYSTEM\CurrentControlSet\Control\Citrix\wfshell\TWILogoffCheckSysModulesInternal - If it appears in LogoffCheckerBlockingVisibleProcess:
HKLM\SYSTEM\CurrentControlSet\Control\Citrix\wfshell\TWILogoffCheckVisibleSysModules
Note:
If there is already one or more entries in the key, add a comma to the end and put the new entry after the comma.
- If it appears in LogoffCheckBlockingProcess:
-
Sign out from the session from the connection center on the client, and re-open the Remote Application.
-
Repeat steps 9-16 until the session is signed out automatically within 30 seconds of closing the Remote Application.
Note:
After troubleshooting, revert the temporary Firewall changes to allow remote registry access if needed.
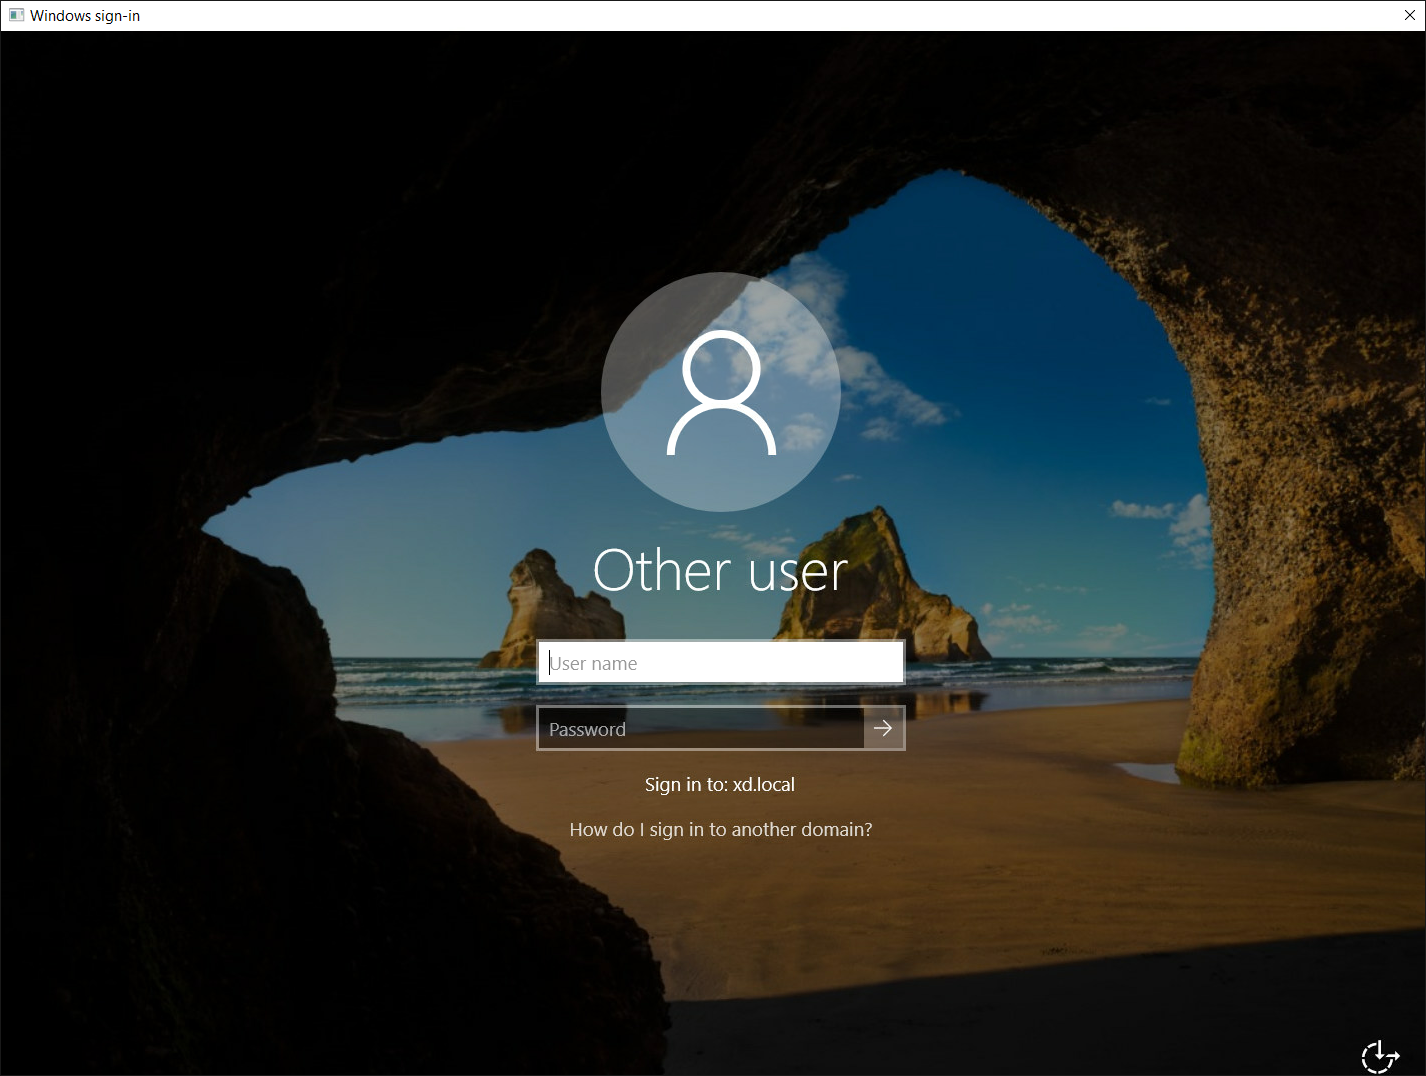
How to modify LogonUI to view Windows disclaimer message in full size when opening published applications
The LogonUI window scaling is improved for scenarios where authentication pass-through does not occur. The LogonUI window is scaled based on the monitor resolution and DPI settings used which ensures that the complete LogonUI window is visible without any clipping.
The window size in pixels can also be set manually in the registry.
-
Open the Registry Editor using
regediton the Run command. -
Go to
HKEY_LOCAL_MACHINE\Software\Citrix\CtxHook\AppInit_DLLS\Seamless Hook\. -
Create two new DWORD keys: LogonUIWidth and LogonUIHeight.
-
Set the value of the keys to the required width and height in pixels for the LogonUI window.
When manually setting the LogonUI windows size, automatic scaling is disabled.
Note:
These registry paths have changed from 2407 and later. The old registry values are ignored and deprecated.
By default, the LogonUI window includes a title bar with a close button which enables the end user to disconnect from the session if needed.
Disable a tilebar
You can disable the tile bar in the LogonUI window with the following registry key:
-
Open the Registry Editor using
regediton the Run command. -
Go to
HKEY_LOCAL_MACHINE\Software\Citrix\CtxHook\AppInit_DLLS\Seamless Hook\. -
Create new DWORD keys: LogonUICaption and set the value of the key to
0.
Published application does not appear
Refer to the support articles to troubleshoot instances when the published application do not launch or disappear during launch or when it fails to appear.
To troubleshoot instances
Additional Seamless configuration settings
Under most circumstances, the default server settings are sufficient for the majority of applications, and no additional settings are required for published applications.
In some cases, additional configuration is required, including controlling the interaction and display of specified application windows, as well as settings within the published application environment itself.
Note:
Citrix does not recommend changing these configuration settings unless explicitly instructed by Citrix support
These settings are outlined in the Seamless configuration settings KB article.
Share
Share
This Preview product documentation is Citrix Confidential.
You agree to hold this documentation confidential pursuant to the terms of your Citrix Beta/Tech Preview Agreement.
The development, release and timing of any features or functionality described in the Preview documentation remains at our sole discretion and are subject to change without notice or consultation.
The documentation is for informational purposes only and is not a commitment, promise or legal obligation to deliver any material, code or functionality and should not be relied upon in making Citrix product purchase decisions.
If you do not agree, select I DO NOT AGREE to exit.