-
-
-
Service Window operations in Azure
-
-
Cloud Connector Standalone Citrix Secure Ticketing Authority (STA) service
-
-
-
-
-
This content has been machine translated dynamically.
Dieser Inhalt ist eine maschinelle Übersetzung, die dynamisch erstellt wurde. (Haftungsausschluss)
Cet article a été traduit automatiquement de manière dynamique. (Clause de non responsabilité)
Este artículo lo ha traducido una máquina de forma dinámica. (Aviso legal)
此内容已经过机器动态翻译。 放弃
このコンテンツは動的に機械翻訳されています。免責事項
이 콘텐츠는 동적으로 기계 번역되었습니다. 책임 부인
Este texto foi traduzido automaticamente. (Aviso legal)
Questo contenuto è stato tradotto dinamicamente con traduzione automatica.(Esclusione di responsabilità))
This article has been machine translated.
Dieser Artikel wurde maschinell übersetzt. (Haftungsausschluss)
Ce article a été traduit automatiquement. (Clause de non responsabilité)
Este artículo ha sido traducido automáticamente. (Aviso legal)
この記事は機械翻訳されています.免責事項
이 기사는 기계 번역되었습니다.책임 부인
Este artigo foi traduzido automaticamente.(Aviso legal)
这篇文章已经过机器翻译.放弃
Questo articolo è stato tradotto automaticamente.(Esclusione di responsabilità))
Translation failed!
Service Window operations in Azure
This article describes how to perform Service Window operations using Web Studio in Azure environments.
The Service Window currently supports OS disk resets and hardware configuration changes.
Use the Hardware view in both Search and Machine Catalog nodes to update hardware settings and reset OS disk.
Hardware view in Search node
Hardware view within the Search node displays your MCS-provisioned VMs and their critical properties, including machine security settings, network details, images, and machine profile details.

| Callout | Area | Description |
|---|---|---|
| A
|
Search bar
|
Provides a quick search and a filter-based search that allows you to define complex search criteria. For more information, see Search for machines.
Tip: Use filters to quickly narrow down machines by specific properties. For example, Identity Type = Microsoft Entra joined to view all Microsoft Entra joined machines. |
| B | Switch to Default view | Switch from Hardware view to Default view. |
| C | Main view | Displays your MCS-provisioned machines and their critical properties. You can customize the view by selecting the Column to display icon. For more information about available columns, see Machine columns. |
| D | Details pane | Displays details information for the selected machine. |
| E
|
List-level actions
|
Displays actions that you can perform on the the entire displayed list:
|
Reference: Machine columns
This table lists all columns in Hardware view and their descriptions.
| Column | Description |
|---|---|
| Name | The DNS host name of the machine. |
| Provisioning Scheme Name | The name of the provisioning scheme used to provision the machine. |
| CPU Cores | The number of CPU cores allocated to the machine. |
| Memory (MB) | The amount of memory (in MB) allocated to the machine. |
| Persistency | Indicates whether the machine’s disk and data persist across restarts. |
| Identity Type | The identity type of the machine. |
| Pending Image Update | Indicates whether the VM image for the machine is outdated and due to be updated to a new image at the machine’s next reboot. |
| Last Boot Time (UTC) | The date and time (in UTC) when the machine was last started. |
| Use WBC | Indicates whether the machine is configured with WBC (aka MCSIO). |
| WBC Disk Size (GB) | The MCSIO disk-cache size of the machine. |
| WBC Memory Size (MB) | The MCSIO memory-cache size of the machine. |
| Identity Provider | The identity provider of the machine. |
| Activation Type | Valid only for Windows VDAs. The Windows license activation type of the machine. Values include: Unsupported VDA, Key Management Service, Multiple Activation Key, and Not valid. |
Update hardware settings for VMs
This feature provides a centralized way to manage and apply changes to VM hardware settings, such as storage, licenses, and NICs using Service Window.
Limitations
- Currently, supported for only Azure MCS Persistent VMs.
- Not supported for Quick Deploy catalog VMs.
- All VMs must belong to the same catalog.
-
To avoid potential issues, upgrade VDA to version 2503 or later if you do the following:
- Enable hibernation for existing VMs that are using temporary disk.
- Change the VM size between Azure sku with temp disk and Azure sku without temp disk.
Update hardware settings for a single VM
- Navigate to the Search node. Switch to the Hardware view. Right-click a VM you want to update, and then select Update Hardware.
- On the Update Hardware page, click Create version. Configure only the settings you want to change. There are no default settings.
- Navigate to the Summary page and click Finish.
-
Choose either Schedule or Save version only to confirm when you want to apply the changes to the selected VM.
- If you select Schedule, you are redirected to the Apply to VM page. Configure the schedule time and information, then click Save. A new hardware version is created with a schedule. The VM updates when the schedule finishes.
- If you select Save version only, the system creates a new hardware version without immediately applying the changes to the selected VM.
Note:
The newly created hardware version inherits the changes from the previous version.
You can still apply the hardware changes to the VM, even if you save them without scheduling an application time.
- Navigate to the Search node. Switch to the Hardware view. Right-click a VM, and then select Update Hardware.
- On the Update Hardware page, select a version. Click Apply to VM to create a schedule. The VM updates when the schedule finishes.
Update hardware settings for multiple VMs
- Navigate to the Search node. Switch to the Hardware view. Select multiple VMs, right-click, and then select Update Hardware.
- On the Create hardware version wizard, there are no default settings. Configure only the settings you want to change.
- Configure a schedule on the Schedule page.
- Navigate to the Summary page. Finish the creation workflow.
- After creation, you can right-click each VM and select Update hardware to view version details.
Manage hardware versions for single VMs
You can delete hardware versions, cancel schedules, and clear customization for single VMs.
- Delete hardware versions: On the Update Hardware page, select one or more versions and click Delete to remove versions.
- Cancel a schedule: On the Update Hardware page, if you want to cancel a schedule that hasn’t even started yet, click Cancel in the Schedule status column to cancel it.
- Clear customization: On the Update Hardware page, if you want to create or apply a version that removes all custom hardware settings, click Clear Customization. To create the version and schedule it to apply, select Schedule. To create the version without applying it, select Save version only.
Reset OS disk
This feature provides a way to reset the OS disk for one VM or multiple VMs using Service Window.
Limitations
- Currently, supported for only Azure MCS Persistent VMs.
- Not supported for Quick Deploy catalog VMs.
- All VMs must belong to the same catalog.
Reset OS disk for a single or multiple VMs
- Navigate to the Search node. Switch to the Hardware view. Right-click a VM or multiple VMs whose OS disk you want to reset, and then select Reset OS Disk if it’s available.
- Choose to reset immediately or schedule it later.
Monitor task status for VM
To check whether the reset OS disk is applied successfully or not:
- Select the VM.
- Navigate to Details > Service Windows tab and see the Status column.
- Click the Task ID to access the Task center. This center provides detailed task progress and results. See Monitor and manage tasks in Task Center.
Hardware view in Machine Catalogs node
Hardware view within the Machine Catalogs node displays your provisioning schemes and their critical properties, including security settings, network details, images, and machine profile details.
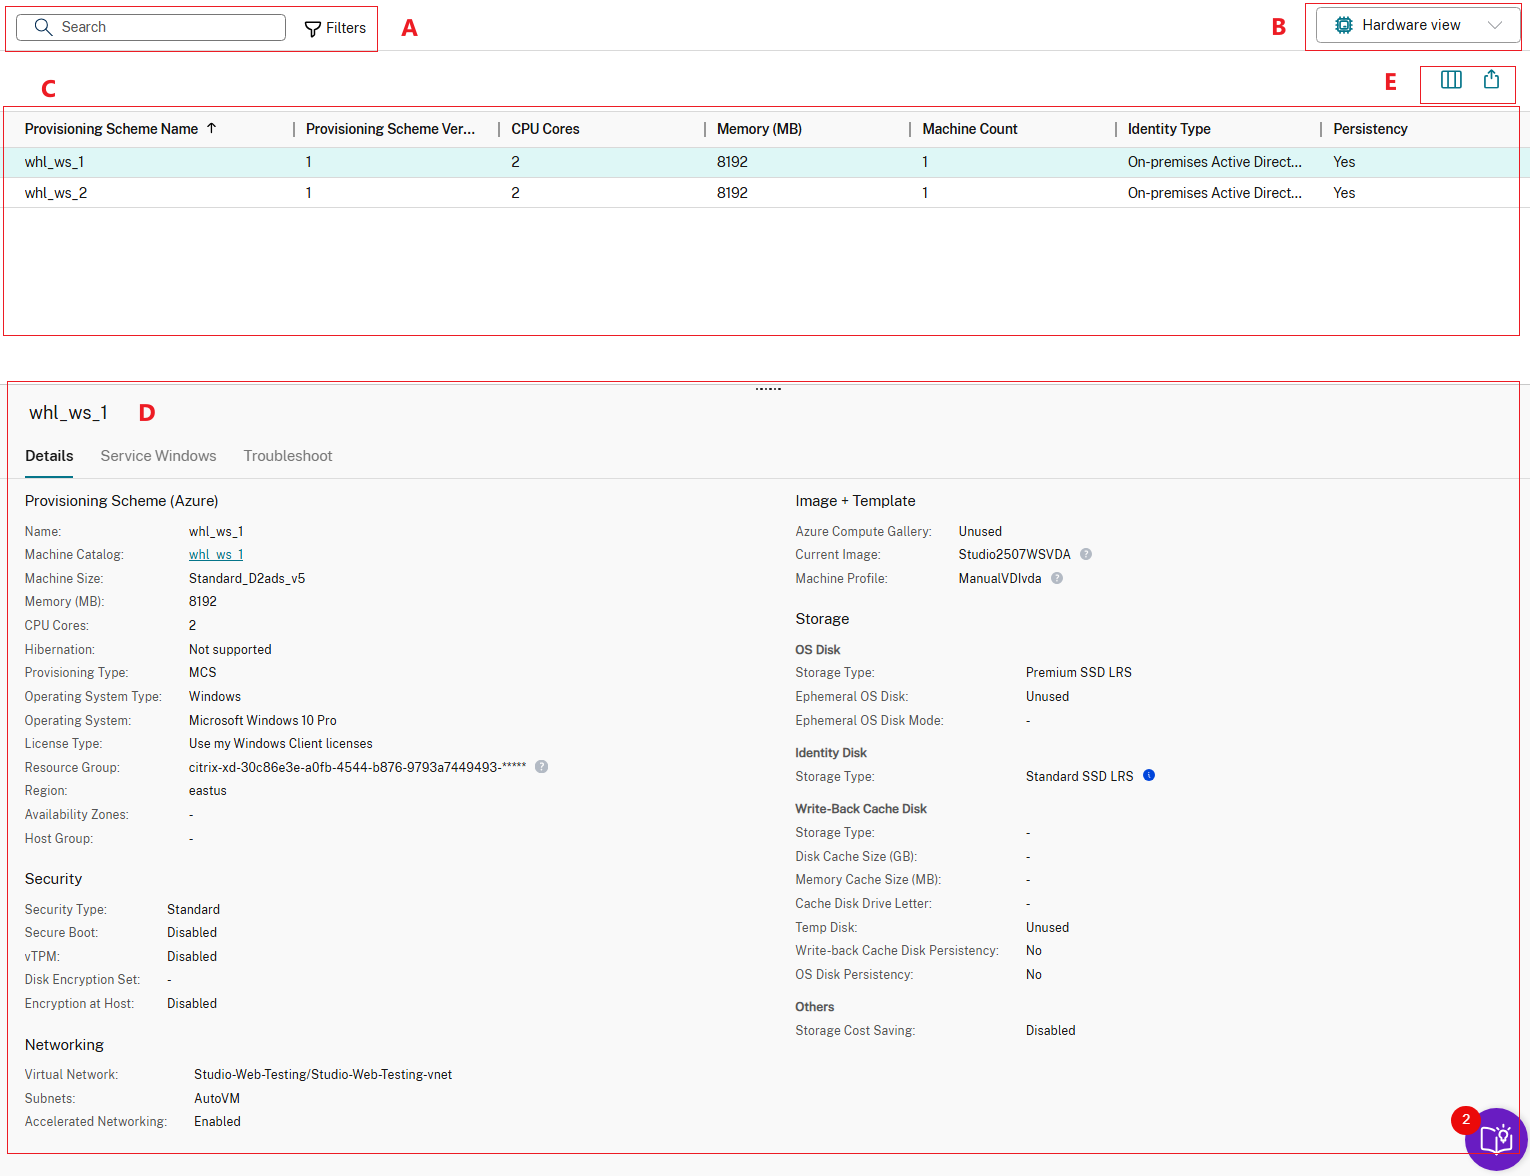
| Callout | Area | Description |
|---|---|---|
| A | Search bar | Provides a quick search and a filter-based search that allows you to define complex search criteria. |
| B | Hardware view dropdown | Select to switch from Hardware view to Default view. |
| C | Main view | Displays your provisioning schemes and their critical properties. You can customize the view by selecting the Column to display icon. For more information about available columns, see Provisioning Scheme columns. |
| D | Details pane | Displays details information for the selected provisioning scheme. |
| E
|
List-level actions
|
Displays actions that you can perform on the the entire displayed list:
|
Reference: ProvScheme columns
This table lists all columns in Hardware view and their descriptions.
| Column | Description |
|---|---|
| ProvScheme Name | The name of the provisioning scheme. |
| ProvScheme Version | The version number of provisioning scheme |
| CPU Cores | The number of CPU cores allocated to the provisioning scheme. |
| Memory (MB) | The amount of memory (in MB) allocated to the provisioning scheme. |
| Machine count | The number of machines provisioned by the provisioning scheme. |
| Persistency | Indicates whether the provisioning scheme’s disk and data persist across restarts. |
| Identity Type | The identity type of the provisioning scheme. |
| Use WBC | Indicates whether the provisioning scheme is configured with WBC (aka MCSIO). |
| WBC Disk Size (GB) | The MCSIO disk-cache size of the provisioning scheme. |
| WBC Memory Size (MB) | The MCSIO memory-cache size of the provisioning scheme. |
| Activation Type | Valid only for Windows VDAs. The Windows license activation type of the provisioning scheme. Values include: Unsupported VDA, Key Management Service, Multiple Activation Key, and Not valid. |
Update hardware settings for machine catalogs
This feature provides a centralized way to manage and apply changes to a machine catalog VMs hardware settings, such as machine profiles, storage, licenses, and NICs using Service Window. Changes applies to both existing and new VMs.
You can do the following:
- Update hardware settings for a machine catalog
- Manage hardware versions
- Monitor task status for a machine catalog
Limitations
- Currently, supported for only Azure MCS machine catalogs.
- Not supported for Quick Deploy catalogs.
-
To avoid potential issues, upgrade VDA to version 2503 or later if you do the following:
- Enable hibernation for existing VMs that are using temporary disk.
- Change the VM size between Azure sku with temp disk and Azure sku without temp disk.
Steps to update hardware settings for a machine catalog
- Go to Machine Catalog node, switch to Hardware view, right-click a machine catalog that you want to update, and then select Update Hardware.
- On the Update Hardware page, click Create version. Configure only the settings you want to change. There are no default settings.
- Navigate to the Summary page and click Finish.
-
Choose either Schedule or Save version only to confirm when you want to apply the changes to the selected machine catalog.
- If you select Schedule, you are redirected to the Apply to machine catalog page. Configure the schedule time and information, then click Save. A new hardware version is created with a schedule. The machine catalog updates when the schedule finishes.
- If you select Save version only, the system creates a new hardware version without immediately applying the changes to the selected machine catalog.
Note:
The newly created hardware version inherits the changes from the previous version.
You can still apply the hardware changes to the machine catalog, even if you save them without scheduling an application time.
- Right-click a machine catalog, and then select Update Hardware.
- On the Update Hardware page, select a version. Click Apply to machine catalog to create a schedule. The machine catalog updates when the schedule finishes.
Manage hardware versions for machine catalog
You can delete hardware versions and cancel schedules for machine catalogs.
- Delete hardware versions: On the Update Hardware page, select one or more versions and click Delete to remove versions.
- Cancel a schedule: On the Update Hardware page, if you want to cancel a schedule that hasn’t even started yet, click Cancel in the Schedule status column to cancel it.
Monitor task status for machine catalog
To check whether the hardware updates are applied successfully or not:
- Select the machine catalog.
- Navigate to Details > Service Windows tab and see the Status column.
- Click the Task ID to access the Task center. This center provides detailed task progress and results. See Monitor and manage tasks in Task Center
Share
Share
This Preview product documentation is Citrix Confidential.
You agree to hold this documentation confidential pursuant to the terms of your Citrix Beta/Tech Preview Agreement.
The development, release and timing of any features or functionality described in the Preview documentation remains at our sole discretion and are subject to change without notice or consultation.
The documentation is for informational purposes only and is not a commitment, promise or legal obligation to deliver any material, code or functionality and should not be relied upon in making Citrix product purchase decisions.
If you do not agree, select I DO NOT AGREE to exit.