Azureで準備済みイメージを使用してカタログを作成
-
準備済みイメージを作成し、その準備済みイメージを使用して、次の方法でMCSマシンカタログを作成します。
- Studio
- PowerShellコマンド
準備済みイメージを使用してMCSマシンカタログを作成するための主要な手順は次のとおりです。
- イメージ定義と初期イメージバージョンを作成します。
- イメージバージョンを準備済みイメージとして使用してカタログを作成します。
Studioの使用
イメージ定義と初期イメージバージョンの作成
イメージ定義と初期イメージバージョンを作成するには、次の手順を実行します。
- Studioから、[イメージ] ノードに移動し、[イメージ定義の作成] をクリックします。[はじめに] ページで [次へ] をクリックします。
- [イメージ定義] ページで、イメージ定義の [OSタイプ] と [セッションタイプ] を指定します。
- 既存のリソースグループを選択するか、イメージリソースを保持するための新しいリソースグループを作成します。イメージ共有を有効にするには、Azure Compute Galleryで [イメージバージョンを配置] を選択し、新しいギャラリーを作成するか、既存のギャラリーを使用してイメージバージョンを保持します。
-
[イメージ] ページで、[リソース] (設定された接続に適用可能なリソースのみが一覧表示されます) と、イメージバージョンを作成するためのテンプレートとして使用するマスターイメージを選択します。[マシンプロファイルを使用] チェックボックスをオンにして、マシンプロファイルを選択できます。
注:
- イメージを選択する前に、マスターイメージにVDA 2311以降がインストールされており、MCSIOドライバーがVDAにインストールされていることを確認してください。
- 機密VMタイプの準備済みイメージを使用してMCSカタログを作成する場合は、機密VMタイプのマスターイメージと機密VMタイプのマシンプロファイルを使用して準備済みイメージを作成します。機密VMタイプのマスターイメージとマシンプロファイルの準備については、Azure機密VMを参照してください。
- イメージを選択する前に、マスターイメージにVDA 2311以降がインストールされており、MCSIOドライバーがVDAにインストールされていることを確認してください。
-
[ストレージとライセンスの種類] ページで、イメージ準備プロセスの一部として使用するストレージとライセンスの種類を選択します。
注:
[イメージ] ページでマシンプロファイルを選択した場合、マシンプロファイルのライセンスタイプはプロファイル設定に基づいて事前に選択されます。
- [マシン仕様] ページで、マシンサイズを選択します。[イメージ] ページでマシンプロファイルを選択した場合、マシンプロファイルのサイズがデフォルトで選択されます。
- [NIC] ページで、準備イメージのNICを選択または追加します。各NICについて、関連する仮想ネットワークを選択します。
- [ディスク設定] ページで、顧客管理の暗号化キー (CMEK) を選択します。マシンプロファイルにCMEKがないが、マスターイメージにCMEKがある場合、マスターイメージからCMEKが事前に選択されます。
- [バージョン説明] ページで、作成された初期イメージバージョンの説明を入力します。
- [概要] ページで、イメージ定義と作成された初期イメージバージョンの詳細を確認します。イメージ定義の名前と説明を入力します。[完了] をクリックします。
イメージバージョンの作成
イメージバージョンを使用すると、特定のイメージに対するさまざまなイテレーションや更新を管理できます。この機能により、さまざまな目的のためにイメージの複数のバージョンを維持できます。
初期イメージバージョンからイメージバージョンを作成するには、次の手順を実行します。
注:
すべてのイメージバージョンのホスティングユニットは同じである必要があります。
- [イメージ] ノードに移動し、イメージバージョンまたはイメージ定義を選択して、[イメージバージョンの作成] をクリックします。
- イメージ定義ページで、そのイメージバージョンのホスティングユニットを変更し、マスターイメージとマシンプロファイルを再選択できます。
- イメージバージョンの構成を最初に構成されたイメージバージョンと異なるものにする場合は、[イメージバージョンの作成] ダイアログの [ストレージとライセンスの種類]、[マシン仕様]、[NIC]、および [ディスク設定] ページで設定を構成します。
- イメージバージョンの説明を追加します。[完了] をクリックします。

注:
何らかの理由でイメージバージョンの作成が失敗した場合、下部の [トラブルシューティング] タブに [再試行] オプションが表示されます。
準備済みイメージの共有
Azureの異なるホスティングユニット間で準備済みイメージを共有するには、次の手順を実行します。
- イメージバージョンを右クリックし、[イメージ共有の管理] を選択します。Azure環境内のすべてのホスティングユニットが表示されます。イメージバージョンが作成されたリソースは、すべてのアクションに対して無効になっています。
- イメージを共有するホスティングユニットを選択し、[保存] をクリックします。[共有ステータス] 列に [進行中] と表示されます。
- 共有ステータスの詳細については、[リソース] タブをクリックします。
注:
イメージバージョンの共有ステータスが進行中の場合、[イメージバージョンの削除] または [イメージ共有の管理] オプションは無効になります。
イメージノードからのマシンカタログ作成
イメージバージョンを使用してカタログを作成するには、イメージノードのカタログの作成オプションを使用します。
または、マシンカタログノードでカタログを作成する際にバージョンを選択し、カタログ作成ワークフローで準備されたイメージオプションにリンクすることもできます。マシンカタログノードからのマシンカタログ作成を参照してください。
イメージノードからMCSマシンカタログを作成するには、次の手順を実行します。
- イメージバージョンを選択し、カタログの作成をクリックします。はじめにページで次へをクリックします。
- デスクトップエクスペリエンスページで、必要なデスクトップエクスペリエンスを選択します。
- イメージページからディスク設定ページまで、設定は選択したイメージバージョンに基づいて事前に選択されています。
- リソースグループページで、新しいリソースグループを作成するか、既存のリソースグループを使用してこのカタログのリソースを配置するかを選択できます。
- 以降のページで設定を完了します。
- 概要ページで、マシンカタログの詳細を確認します。マシンカタログの名前と説明を入力します。完了をクリックします。
- 作成されたマシンカタログを表示するには、マシンカタログノードに移動します。
マシンカタログノードからのマシンカタログ作成
マシンカタログノードからMCSマシンカタログを作成するには、次の手順を実行します。
-  1.  左側のナビゲーションペインで**マシンカタログ**をクリックします。
-  1.  **マシンカタログの作成**をクリックします。**マシンカタログのセットアップ**ページが表示されます。**はじめに**ページと**マシンタイプ**ページで**次へ**をクリックします。
-
マシン管理ページで、次の設定を選択します。
-
-
電源管理されているマシン(仮想マシンやブレードPCなど)を選択します。
- Citrixプロビジョニングテクノロジーを選択します。次に、Citrix Machine Creation Services™を選択します。
- リソースフィールドには、異なるゾーンに属するリソースが一覧表示されます。任意のAzureネットワークリソースを選択し、次へをクリックします。
-
電源管理されているマシン(仮想マシンやブレードPCなど)を選択します。
-
-
イメージページ:
準備されたイメージタイプの場合は、次の手順に従います。
- 準備されたイメージを選択します。
- 準備されたイメージの下で、イメージ定義のイメージバージョンを選択します。必要に応じて、選択した準備されたイメージバージョンにメモを追加します。
- イメージバージョン名をクリックします。選択したイメージバージョンの詳細を表示するには、下線が引かれているバージョン番号をクリックします。
-
- 選択したイメージバージョンがマシンプロファイルで構成されている場合は、マシンプロファイルを選択します。選択したイメージバージョンがマシンプロファイルで構成されていない場合は、マシンプロファイルを使用することを選択できません。
-
- 以降のページで設定を構成します。
- ディスク設定ページで、選択した準備されたイメージがディスク暗号化セットを使用している場合、その暗号化セットを削除することはできませんが、キーを別の暗号化キーに変更することはできます。
- リソースグループページで、新しいリソースグループを作成するか、既存のリソースグループを使用してこのカタログのリソースを配置するかを選択できます。
- 以降のページで設定を完了します。
- 概要ページで、マシンカタログの詳細を確認します。マシンカタログの名前と説明を入力します。完了をクリックします。
PowerShellの使用
準備されたイメージの作成
準備されたイメージバージョン仕様を作成するための詳細なPowerShellコマンドは次のとおりです。
-
Test-ProvImageDefinitionNameAvailableコマンドを使用して、利用可能なイメージ定義名を確認します。例:Test-ProvImageDefinitionNameAvailable -ImageDefinitionName <string[]> <!--NeedCopy-->-
-
New-ProvImageDefinitionコマンドを使用して、イメージ定義を作成します。例:
-
New-ProvImageDefinition -ImageDefinitionName image1 -OsType Windows -VdaSessionSupport MultiSession <!--NeedCopy--> -
-
Add-ProvImageDefinitionConnectionコマンドを使用して、指定されたホスティング接続でイメージ定義の新しい構成を作成します。Add-ProvImageDefinitionConnectionのCustomPropertiesには、次のものが含まれます。パラメーターを使用しない場合、デフォルト値が使用されます。-
ResourceGroups: ベースディスクを持つリソースグループ。 -
UseSharedImageGallery: ベースディスクのタイプを示すインジケーター。ACG(イメージ共有)の場合はtrue、スナップショットの場合はfalseを使用します。 -
ImageGallery: ベースディスクがACGイメージバージョンの場合のギャラリー名。
例:
-
スナップショットと顧客提供のリソースグループの場合:
$CustomerOwnRsourceGroupProperties = @" <CustomProperties xmlns="http:// schemas.citrix.com/2014/xd/machinecreation" xmlns:xsi="http://www.w3.org/2001/XMLSchema-instance"> <Property xsi:type="StringProperty" Name="ResourceGroups" Value="yangj_image" /> </CustomProperties> "@ <!--NeedCopy--> -
ACGと顧客提供のリソースグループおよびイメージギャラリーの場合:
$CustomerOwnAllProperties = @" <CustomProperties xmlns="http://schemas.citrix.com/2014/xd/machinecreation" xmlns:xsi="http://www.w3.org/2001/XMLSchema-instance"> <Property xsi:type="StringProperty" Name="UseSharedImageGallery" Value="true" /> <Property xsi:type="StringProperty" Name="ResourceGroups" Value="rg" /> - <Property xsi:type="StringProperty" Name="ImageGallery" Value="gallery" /> </CustomProperties> "@ <!--NeedCopy--> -
In case of ACG and customer provided resource group only:
$CustomerOwnResourceGroupProperties = @" <CustomProperties xmlns="http://schemas.citrix.com/2014/xd/machinecreation" xmlns:xsi="http://www.w3.org/2001/XMLSchema-instance"> <Property xsi:type="StringProperty" Name="UseSharedImageGallery" Value="true" /> <Property xsi:type="StringProperty" Name="ResourceGroups" Value="rg" /> </CustomProperties> "@ <!--NeedCopy--> -
In case of ACG and resource group and image gallery managed by Citrix:
 $CustomerOwnResourceGroupNothingProperties = @"
 <CustomProperties xmlns="http://schemas.citrix.com/2014/xd/machinecreation" xmlns:xsi="http://www.w3.org/2001/XMLSchema-instance">
 <Property xsi:type="StringProperty" Name="UseSharedImageGallery" Value="true" />
 </CustomProperties>
 "@

 <!--NeedCopy-->
Add-ProvImageDefinitionConnection -ImageDefinitionName image1 -HypervisorConnectionName Azure28 [-CustomProperties $CustomProperties] <!--NeedCopy--> -
-
Create an image version using the
New-ProvImageVersioncommand. For example,New-ProvImageVersion -ImageDefinitionName image1 -Description "version 1" <!--NeedCopy--> -
Add a master image version spec to the image version using the
Add-ProvImageVersionSpeccommand. For example,Add-ProvImageVersionSpec -ImageDefinitionName image1 -ImageVersionNumber 1 -HostingUnitName azure -MasterImagePath "XDHyp:\HostingUnits\azure\image.folder\azureresourcegroup.resourcegroup\win2022-snapshot.snapshot" <!--NeedCopy-->Note:
You can add only one master image version spec to one image version for a hosting unit.
-
Create a prepared image version spec from the master image version spec using the
New-ProvImageVersionSpeccommand.The CustomProperties for
New-ProvImageVersionSpeccan include the following. If you do not use the parameters, then default values are used:-
PreparedImageStorageType: The storage type to use for the prepared image. Defaults toStandard_LRS, can also bePremium_LRSorStandard_ZRS.Standard_ZRSprovides zone redundancy for the image.
New-ProvImageVersionSpec -SourceImageVersionSpecUid c6e7384c-b2f8-46d6-9519-29a2c57ed3cb -NetworkMapping @{"0"="XDHyp:\HostingUnits\azure\virtualprivatecloud.folder\azureresourcegroup.resourcegroup\azure-vnet-eastus.virtualprivatecloud\dev.network"} -ServiceOffering"XDHyp:\HostingUnits\azure\serviceoffering.folder\Standard_B2ms.serviceoffering" -CustomProperties "<CustomProperties xmlns=`"http://schemas.citrix.com/2014/xd/machinecreation`" xmlns:xsi=`"http://www.w3.org/2001/XMLSchema-instance`"></CustomProperties>" -RunAsynchronously <!--NeedCopy--> -
-
You can also share a prepared image version spec with another hosting unit in all hosting connections by using the
Add-ProvImageVersionSpecHostingUnitcommand.The CustomProperties for
Add-ProvImageVersionSpecHostingUnitcan include the following. If you do not use the parameters, then values from the source prepared image spec are used:-
PreparedImageStorageType: The storage type to use for the prepared image.
Add-ProvImageVersionSpecHostingUnit -ImageVersionSpecUid xxxxxxx -HostingUnitName AzureWest

<!--NeedCopy-->
Note:
One hosting unit and preparation type can have only one prepared instance.
-
Example of the complete set of Powershell commands to create image definition, image version, and prepared image version spec:
New-ProvImageDefinition -ImageDefinitionName image1 -OsType Windows -VdaSessionSupport MultiSession

-  $ImageDefinitionCustomProperties = @" <CustomProperties xmlns="http://schemas.citrix.com/2014/xd/machinecreation" xmlns:xsi="http://www.w3.org/2001/XMLSchema-instance"> <Property xsi:type="StringProperty" Name="UseSharedImageGallery" Value="true" /> <Property xsi:type="StringProperty" Name="ResourceGroups" Value="rg" /> <Property xsi:type="StringProperty" Name="ImageGallery" Value="gallery" /> </CustomProperties> "@

Add-ProvImageDefinitionConnection -ImageDefinitionName image1 -HypervisorConnectionName Azure28 -CustomProperties $ImageDefinitionCustomProperties

$imageVersion = New-ProvImageVersion -ImageDefinitionName image1 -Description "version 1"

-  $SourceImageVersionSpec = Add-ProvImageVersionSpec -ImageVersionUid $imageVersion.ImageVersionUid ` -HostingUnitUid $hostingunit.HostingUnitUid ` -MasterImagePath "XDHyp:\HostingUnits\azure28\image.folder\abc.resourcegroup\def-snapshot.snapshot"

-  $ImageVersionSpecCustomProperties = @'

-  <CustomProperties xmlns="http://schemas.citrix.com/2014/xd/machinecreation" xmlns:xsi="http://www.w3.org/2001/XMLSchema-instance">

-  <Property xsi:type="StringProperty" Name="PreparedImageStorageType" Value="Premium_LRS" />

-  <Property xsi:type="StringProperty" Name="LicenseType" Value="Windows_Client" />

-  </CustomProperties>

'@

New-ProvImageVersionSpec -NetworkMapping @{"0" = "XDHyp:\HostingUnits\azure28\virtualprivatecloud.folder\East US.region\virtualprivatecloud.folder\studio-mcs-infrastructure.resourcegroup\studio-mcs-vnet-eastus.virtualprivatecloud\mcs-dev.network" } -CustomProperties $ImageVersionSpecCustomProperties -ServiceOffering "XDHyp:\HostingUnits\azure28\serviceoffering.folder\Standard_B2s.serviceoffering" -SourceImageVersionSpecUid $SourceImageVersionSpec.ImageVersionSpecUid

$TargetCustomProperties = @'

<CustomProperties xmlns="http://schemas.citrix.com/2014/xd/machinecreation" xmlns:xsi="http://www.w3.org/2001/XMLSchema-instance">

<Property xsi:type="StringProperty" Name="PreparedImageStorageType" Value="Standard_ZRS" />

</CustomProperties>

'@

Add-ProvImageVersionSpecHostingUnit -ImageVersionSpecUid xxxxxxx -HostingUnitName AzureWest –TargetCustomProperties $TargetCustomProperties

$PreparedImageVersionSpec = Get-ProvImageVersionSpec -ImageVersionUid $imageVersion.ImageVersionUid | Where SourceImageVersionSpecUid-eq $SourceImageVersionSpec.ImageVersionSpecUid

<!--NeedCopy-->
Note:
- All image version specs in an image definition must belong to the same hosting unit.
- An image version can have only one master image version spec and one prepared image version spec.
- All image version specs must either have a machine profile or none of the image version specs must have a machine profile.
Create a catalog using a prepared image version spec
Create an MCS machine catalog from the prepared image version spec using the New-ProvScheme command. For example,
New-ProvScheme -ProvisioningSchemeName <string> -ImageVersionSpecUid <Guid> -HostingUnitUid <Guid> -IdentityPoolUid <Guid> [-VMCpuCount <int>] [-VMMemoryMB <int>] [-UseWriteBackCache] [-NetworkMapping <Hashtable>] [-CleanOnBoot] [-Scope <string[]>] [-Metadata <Hashtable>] [-ServiceOffering <string>] [-SecurityGroup <string[]>] [-TenancyType <string>] [-MachineProfile <string>] [-CustomProperties <string>] [-ResetAdministratorPasswords] [-UseFullDiskCloneProvisioning] [-RunAsynchronously] [-PurgeJobOnSuccess] [-ProvisioningSchemeType <ProvisioningSchemeType>]
[-ImageAssignmentNote <string>]

<!--NeedCopy-->
Or,
-  New-ProvScheme -ProvisioningSchemeName <string> -ImageVersionSpecUid <Guid> -HostingUnitName <string> -IdentityPoolName <string> [-VMCpuCount <int>] [-VMMemoryMB <int>] [-UseWriteBackCache] [-NetworkMapping <Hashtable>] [-CleanOnBoot] [-Scope <string[]>] [-Metadata <Hashtable>] [-ServiceOffering <string>] [-SecurityGroup <string[]>] [-TenancyType <string>] [-MachineProfile <string>] [-CustomProperties <string>] [-ResetAdministratorPasswords] [-UseFullDiskCloneProvisioning] [-RunAsynchronously] [-PurgeJobOnSuccess] [-ProvisioningSchemeType <ProvisioningSchemeType>]
[-ImageAssignmentNote <string>]

<!--NeedCopy-->
If you want to use an ACG image version spec, then set UseSharedImageGallery as true. For example,
$provSchemeCustomProperties= @"
<CustomProperties xmlns="http://schemas.citrix.com/2014/xd/machinecreation" xmlns:xsi="http://www.w3.org/2001/XMLSchema-instance">
    <Property xsi:type="StringProperty" Name="UseSharedImageGallery" Value="true" />
    <Property xsi:type="StringProperty" Name="StorageAccountType" Value="StandardSSD_LRS" />
</CustomProperties>
"@
New-ProvScheme -ProvisioningSchemeName assignimage -ImageVersionSpecUid $PreparedImageVersionSpec.ImageVersionSpecUid `
    -HostingUnitUid $hostingunit.HostingUnitUid `
    -IdentityPoolUid $IdentityPool.IdentityPoolUid `
    -CleanOnBoot -Scope @() -SecurityGroup @() `
    -ServiceOffering "XDHyp:\HostingUnits\azure28\serviceoffering.folder\Standard_B2s.serviceoffering" `
    -NetworkMapping @{"0"="XDHyp:\HostingUnits\azure28\virtualprivatecloud.folder\East US.region\virtualprivatecloud.folder\studio-mcs-infrastructure.resourcegroup\studio-mcs-vnet-eastus.virtualprivatecloud\mcs-dev.network"} `
    -CustomProperties $provSchemeCustomProperties

<!--NeedCopy-->
Example of the complete set of Powershell commands to create a catalog:
$Catalog = New-BrokerCatalog  -AllocationType "Random"  -IsRemotePC $False  -MinimumFunctionalLevel "L7_20" -Name "azurecatalog" -PersistUserChanges "Discard" -ProvisioningType "MCS" -Scope @() -SessionSupport "MultiSession"

$IdentityPool = New-AcctIdentityPool  -AllowUnicode  -Domain "azure.local" -IdentityPoolName "azurecatalog" -IdentityType "ActiveDirectory"  -NamingScheme "azure##" -NamingSchemeType "Numeric" -Scope @()

$PreparedImageVersionSpec = Get-ProvImageVersionSpec -ImageDefinitionName image1 -ImageVersionNumber 1 -Filter "PreparationType -eq 'Mcs'"

$Task = New-ProvScheme -ProvisioningSchemeName azurecatalog -ImageVersionSpecUid $PreparedImageVersionSpec.ImageVersionSpecUid -HostingUnitName azure -IdentityPoolName azurecatalog -CleanOnBoot -Scope @() -SecurityGroup @() -ServiceOffering "XDHyp:\HostingUnits\azure\serviceoffering.folder\Standard_B2s.serviceoffering" -NetworkMapping @{"0"="XDHyp:\HostingUnits\azure\virtualprivatecloud.folder\azureresourcegroup.resourcegroup\azure-vnet-eastus.virtualprivatecloud\dev.network"} -CustomProperties "<CustomProperties xmlns=`"http://schemas.citrix.com/2014/xd/machinecreation`" xmlns:xsi=`"http://www.w3.org/2001/XMLSchema-instance`">    <Property xsi:type="StringProperty" Name="UseSharedImageGallery" Value="true" /><Property xsi:type=`"StringProperty`" Name=`"StorageAccountType`" Value=`"StandardSSD_LRS`" /></CustomProperties>" -RunAsynchronously

Get-ProvTask -TaskId $Task.TaskId
$ProvScheme = Get-ProvScheme -ProvisioningSchemeName azurecatalog

Set-BrokerCatalog -Name $Catalog.Name -ProvisioningSchemeId $ProvScheme.ProvisioningSchemeUid

<!--NeedCopy-->
Create Microsoft Entra joined and Microsoft Intune enrolled catalogs with prepared images
You can now use prepared images to create Microsoft Entra joined and Microsoft Intune enrolled catalogs. This feature is applicable to single and multi-session persistent and non-persistent type MCS catalogs. This implementation significantly reduces the storage and time costs, and simplifies the VM deployment and image update process.
Examples
-
To create a Microsoft Entra catalog using a prepared image.
New-ProvScheme -ProvisioningSchemeName <name> -ImageVersionSpecUid <preparedVersionSpecUid> -HostingUnitUid <hostingUnitUid> -IdentityPoolUid <IdentityPoolUid> [-CleanOnBoot] -NetworkMapping @{"0"="XDHyp:\HostingUnits\<hostingunitName>\<region>.region\virtualprivatecloud.folder\<resourcegroupName>.resourcegroup\<vnetName>.virtualprivatecloud\<sunNetName>.network"} -ServiceOffering <serviceofferingPath> [-MachineProfile <machineProfilePath>] [-CustomProperties <>] <!--NeedCopy--> -
To create a Microsoft Entra catalog enrolled in Microsoft Intune using a prepared image:
 New-ProvScheme -ProvisioningSchemeName <name> -ImageVersionSpecUid <preparedVersionSpecUid> -HostingUnitUid <hostingUnitUid> -IdentityPoolUid <IdentityPoolUid> [-CleanOnBoot] -NetworkMapping @{"0"="XDHyp:\HostingUnits\<hostingunitName>\<region>.region\virtualprivatecloud.folder\<resourcegroupName>.resourcegroup\<vnetName>.virtualprivatecloud\<sunNetName>.network"} -ServiceOffering <serviceofferingPath> [-MachineProfile <machineProfilePath>] [-CustomProperties <>]

  <!--NeedCopy-->
Share prepared images across Azure subscriptions or tenants
To share a prepared image across subscriptions or tenants on the Azure platform, follow this example:
- Service principal: SPN 1
- Subscription: Subscription 1
- Tenant: Tenant 1
You want to share this image with:
- Service principal: SPN 2
- Subscription: Subscription 2
- Tenant: Tenant 2 (can be the same as Tenant 1)
To successfully share and use the image, you must grant SPN 2 the following permissions in Subscription 1—at the gallery, resource group, or subscription scope:
Microsoft.Resources/subscriptions/readMicrosoft.Compute/galleries/images/read-
Microsoft.Compute/galleries/images/versions/readNote:
Any service principal that has any permission on a subscription or resource automatically inherits the
Microsoft.Resources/subscriptions/readpermission.
Alternatively, assign the Compute Gallery Image Reader built-in role to SPN 2.
For step-by-step guidance, see this Microsoft article.
Share encrypted prepared image across regions, subscriptions, and tenants
Azure Compute Gallery (ACG) images can be encrypted with a Disk Encryption Set (DES). With ACG sharing feature, you can share an encrypted prepared image across regions, subscriptions and tenants for Azure. The target resource needs to pick a DES in its region from the subscription where the prepared image belongs. You can thereafter create a machine catalog in the resource where the encrypted prepared image is shared.
The key steps to share an encrypted prepared image are:
- Create Disk Encryption Set (DES) in each region: See the microsoft documentation Use the Azure portal to enable server-side encryption with customer-managed keys for managed disks.
- Create an image definition for the Azure host connection and image versions in Azure Compute Gallery (ACG) and specify the DES to encrypt the prepared image : See Create an image definition and initial image version.
- Share the encrypted prepared image across regions, subscriptions, and tenants: You can use Studio or PowerShell commands.
You can now create a machine catalog in the resource where the encrypted prepared image is shared. For more information on creating the catalog, see Create a prepared image machine catalog in Azure.
Note:
- If the primary region is not encrypted, the shared regions also cannot have DES.
- If two host units target the same region, they have the same DES.
Share the encrypted image across regions, subscriptions, and tenants using Studio
- Right-click an image version and select Manage Image Share. The resources with region and disk encryption set are listed.
-
Select the resources that you want to share with the image version. The resources where the image version is created from is disabled for any actions. Select a DES from the drop-down menu if DES is not configured for a resource.
Note:
Resources within the same region must use the same encryption key.
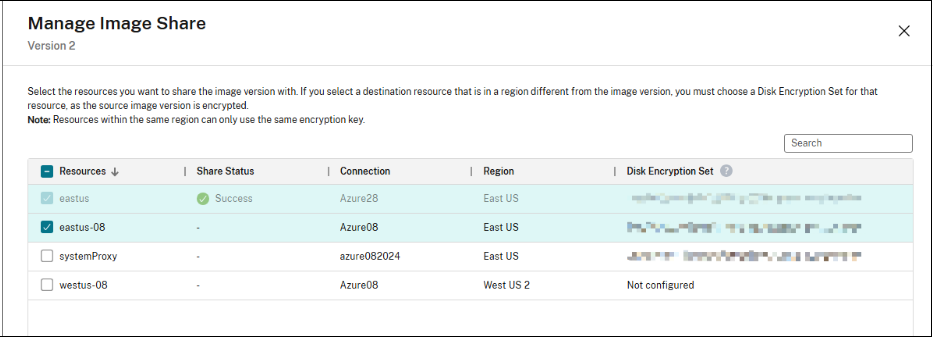
- Click Save.
-
Click the Resources tab for more details about the sharing status.
Note:
- When the status of the image version sharing is in progress, the option to Delete Image Version or Manage Image Share is disabled.
- When a resource is successfully shared, the DES is not editable.
Share the encrypted image across regions, subscriptions, and tenants using PowerShell
Use the command Add-ProvImageVersionSpecHostingUnit and add the parameter CustomProperties. In CustomProperties, configure the DES for the target resource. When sharing the prepared encrypted image, each resource picks a DES in its region from the subscription which the prepared image belongs to. For example,
$CustomProperties = "<CustomProperties xmlns=`"http://schemas.citrix.com/2014/xd/machinecreation`" xmlns:xsi=`"http://www.w3.org/2001/XMLSchema-instance`">"
 "<Property xsi:type=`"StringProperty`" Name=`"DiskEncryptionSetId`" Value=`"/subscriptions/xxxxxx-7152-46c4-b061-xxxxxx70c/resourceGroups/resourcegroup1/providers/Microsoft.Compute/diskEncryptionSets/desid1`" />"+
 "</CustomProperties>"
Add-ProvImageVersionSpecHostingUnit -ImageVersionSpecUid <Guid> -HostingUnitUid <Guid> -CustomProperties $CustomProperties

<!--NeedCopy-->