This content has been machine translated dynamically.
Dieser Inhalt ist eine maschinelle Übersetzung, die dynamisch erstellt wurde. (Haftungsausschluss)
Cet article a été traduit automatiquement de manière dynamique. (Clause de non responsabilité)
Este artículo lo ha traducido una máquina de forma dinámica. (Aviso legal)
此内容已经过机器动态翻译。 放弃
このコンテンツは動的に機械翻訳されています。免責事項
이 콘텐츠는 동적으로 기계 번역되었습니다. 책임 부인
Este texto foi traduzido automaticamente. (Aviso legal)
Questo contenuto è stato tradotto dinamicamente con traduzione automatica.(Esclusione di responsabilità))
This article has been machine translated.
Dieser Artikel wurde maschinell übersetzt. (Haftungsausschluss)
Ce article a été traduit automatiquement. (Clause de non responsabilité)
Este artículo ha sido traducido automáticamente. (Aviso legal)
この記事は機械翻訳されています.免責事項
이 기사는 기계 번역되었습니다.책임 부인
Este artigo foi traduzido automaticamente.(Aviso legal)
这篇文章已经过机器翻译.放弃
Questo articolo è stato tradotto automaticamente.(Esclusione di responsabilità))
Translation failed!
从 CVAD 核心组件上传 AOT 日志
从 CVAD 2507 CU1 和 CVAD 2511 开始,AOT 日志将从所有适用的组件中收集。支持的组件包括 DDC、StoreFront、Citrix Director、Windows VDA、Linux VDA、Mac VDA、License Server、FAS、Cloud Connector、PVS、WEM、Session Recording、Citrix Workspace UI 和 Citrix Gateway。
通过 Citrix Web Studio 为本地 CVAD 集中配置日志转发
Citrix Web Studio 提供了一个集中位置,用于配置整个站点的 Always-on Tracing (AOT) 日志转发。此设置定义了 AOT 日志的发送位置,并自动将配置传播到环境中的相关组件。
在 Web Studio 中配置日志服务器时:
- 配置写入到 站点数据库 中。
- 交付控制器 检索更新的设置并将其分发给所选交付组中的 VDA。
- VDA 使用收到的配置将其 AOT 日志转发到指定的日志服务器。
- 参与 AOT 日志记录的 StoreFront 通过相同的集中机制接收必要的详细信息。
- Director 使用提供的 AuthKey 和日志服务器详细信息来查询和显示 AOT 日志,以便进行监视和故障排除。
这种集中式方法消除了单独配置每个组件的需要。您只需在 Web Studio 中设置一次日志服务器详细信息,Citrix 就会自动将配置传播到整个站点。
以下是配置 Web Studio 后将获取日志服务器详细信息的组件列表:
- Citrix Director/监控
- Citrix 交付控制器
- Windows 虚拟投递代理
- Linux 虚拟投递代理
- Mac VDA
- StoreFront
- 会话录制代理
- Citrix Workspace 应用程序
配置本地环境的日志服务器设置
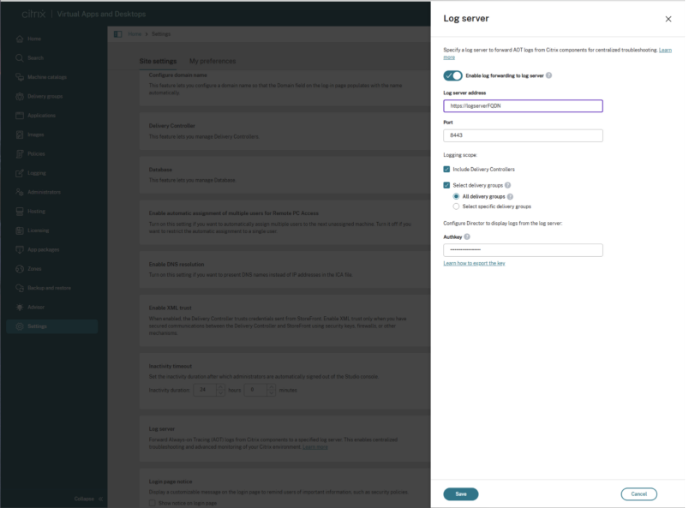
- 登录 Web Studio 并在左侧窗格中选择 设置。
- 在 日志服务器 磁贴中,如果未配置日志服务器,请选择 添加。
- 在 日志服务器 页面上,打开 启用日志转发到日志服务器。
-
输入 日志服务器地址 和 端口。VDA 和 Delivery Controller 使用此信息转发 AOT 日志。
注意:
-
如果您正在使用 Citrix Connector Appliance 部署日志服务器,请确保仅配置了端口 443。
-
在 Citrix Studio 中更新日志服务器地址和端口最初是有效的,但如果您重新访问设置并在未重新输入身份验证密钥的情况下修改日志服务器详细信息,则保存后身份验证密钥占位符会变为空,即使操作看起来成功。这会导致 Director 和 Monitor 中缺少或配置无效。作为一种变通方法,在修改日志服务器设置时,请务必重新输入并验证身份验证密钥,直到此问题解决。
-
-
选择转发日志的组件:
-
包括 Delivery Controller:从所有 Delivery Controller 发送 AOT 日志。
-
选择交付组:从所选交付组中的 VDA 发送日志。
- 所有交付组:从所有 VDA 发送日志。
- 选择特定交付组:选择要包括的各个交付组。
-
- 输入在日志服务器上生成的 AuthKey。Director 使用此密钥进行身份验证和检索日志。
- 选择保存以应用配置。
编辑现有配置
要更新日志服务器或修改日志记录范围,请转至设置 > 日志服务器并选择编辑。
通过 DaaS 设置配置 Citrix DaaS/云环境的日志服务器设置
始终在线跟踪 (AOT) 支持本地 (CVAD) 和 Citrix DaaS(云)部署。但是,日志收集行为因组件托管位置而异。
在安装和配置 AOT 日志服务器(在 Linux、Windows 或连接器设备上)后,完成以下步骤以在 Citrix DaaS 设置中为云部署启用日志转发到日志服务器:
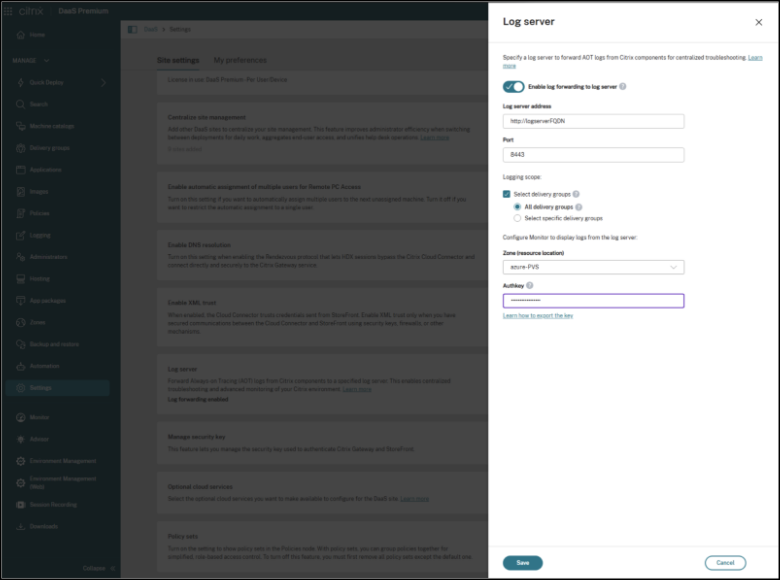
适用于 DaaS 的 Citrix Web Studio(DaaS 设置)提供了一个集中位置,用于为云管理站点配置始终在线跟踪 (AOT) 日志转发。此配置确定 AOT 日志的发送位置,并控制哪些 VDA 参与日志转发。Monitor 使用这些设置检索和显示日志以进行故障排除。
- 登录适用于 DaaS 的 Web Studio(DaaS 设置),并在左侧窗格中选择设置。
- 在日志服务器磁贴中,如果当前未配置日志服务器,请选择添加。
- 在日志服务器页面上,输入日志服务器地址和端口。VDA 使用此信息将 AOT 日志转发到服务器。
-
定义哪些 VDA 转发日志:
- 选择选择交付组以控制范围。
- 所有交付组(默认)转发站点中所有 VDA 的日志。
- 要定位特定的 VDA,请选择选择特定交付组,然后选择要包括的交付组。
注意:
如果您正在使用 Citrix Connector Appliance 部署日志服务器,请确保仅配置了端口 443。
- 选择部署日志服务器的区域(资源位置)。
- 输入日志服务器生成的 Authkey。Monitor 使用此密钥进行身份验证并检索日志以供显示。
- 选择保存以应用配置。
其他组件的日志转发配置
在 Citrix Cloud 部署中配置 StoreFront 的 AOT 日志上传
对于 Citrix Cloud(混合)部署,当本地 StoreFront(而不是 Citrix Workspace)与 Cloud DDC 一起使用时,StoreFront 不会自动从 Cloud Connector 接收 AOT 日志服务器配置。在 StoreFront 服务器上运行以下 PowerShell 命令以手动配置 AOT 日志服务器端点。
# Enable - Run the following command in StoreFront PowerShell

Enable-CitrixAOTUpload -AoTDataStoreEndpoint https://<FQDNofLogServer>:<server_port> -Role StoreFront

# Disable - Run the following command in StoreFront PowerShell
Disable-CitrixAOTUpload
<!--NeedCopy-->
注意:
仅对使用 Cloud DDC 的 Citrix Cloud(混合)部署执行此命令。请勿对 StoreFront 与本地 Delivery Controller 配对的本地 CVAD 部署运行此命令,因为日志服务器配置会自动同步,无需手动配置。
为会话录制服务器配置 AOT 日志上传
您可以通过在会话录制服务器计算机上运行以下 PowerShell 命令,将会话录制服务器配置为将 AOT 日志上传到中央日志服务器:
#Enable - run following command in Session Recording Server PowerShell
Enable-CitrixAOTUpload -AotDataStoreEndpoint <https://FQDNofServer>:<server port> -Role SessionRecording

#Disable - run following command in Session Recording Server PowerShell
Disable-CitrixAOTUpload
<!--NeedCopy-->
为 FAS 配置 AOT 日志上传
您可以通过在 FAS 服务器上运行以下 PowerShell 命令,将 FAS 配置为将 AOT 日志上传到中央日志服务器:
#Enable - run following command in FAS PowerShell
Enable-CitrixAOTUpload -AotDataStoreEndpoint <https://FQDNofServer>:<server port> -Role FAS

#Disable - run following command in FAS PowerShell
Disable-CitrixAOTUpload
<!--NeedCopy-->
注意:
如果您使用 FAS 安装程序 MSI 文件 - FederatedAuthenticationService_x64.msi 进行安装或升级,则无法使用始终在线跟踪。
始终从 CVAD MetaInstaller 或 XenDesktopFasSetup.exe 或 FasSetup_xxxx.exe 安装 FAS
为 PVS 配置 AOT 日志上传
您可以通过在 PVS 服务器上运行以下 PowerShell 命令,将 PVS 配置为将 AOT 日志上传到中央日志服务器:
#Enable - run following command in PVS PowerShell
Enable-CitrixAOTUpload -AotDataStoreEndpoint <https://FQDNofServer>:<server port> -Role PVS

#Disable - run following command in PVS PowerShell
Disable-CitrixAOTUpload
<!--NeedCopy-->
注意:
如果您有多个 PVS 服务器,请在每个服务器上运行该命令以启用或禁用 AOT 日志上传。
上传许可证服务器的 AOT 日志
- 需要更新 SLS 配置文件中的 Logserver URL,该文件位于“C:\Program Files (x86)\Citrix\Licensing\WebServicesForLicensing\SimpleLicenseServiceConfig.xml”,并带有 XML 标签“AotServerURL”
示例:
<AotServerURL>https://<FQDNofLogServer:443>//ctxlogserver/UploadCitrixLogStream</AotServerURL>
<!--NeedCopy-->
注意:
许可证服务器何时生成日志?
许可证服务器 AOT 日志仅在特定事件期间生成,例如:许可证服务器安装或升级、WSL (Citrix 许可 Web 服务) 服务重启、许可证激活失败、暗站激活失败以及时钟相关的许可问题。
如果最近没有发生这些事件,缺少日志不一定表示存在问题。
快速检查
- 确认最近是否发生了符合条件的事件(重启、升级、激活问题等)。
- 重启 Citrix 许可 Web 服务,并留出最多一小时进行上传处理。
- 验证 AOT 日志服务器 URL 是否配置正确。
- 确认 Citrix 许可 Web 服务正在运行。
- 检查:
C:\Program Files (x86)\Citrix\Licensing\LS\resource\aot如果文件包含数据,则日志可能正在等待上传。
注意:
许可证服务器 AOT 日志记录是事件驱动的,而非连续的。在没有发生符合条件的事件时,没有日志是正常的。
- 许可证服务器会定期自动将日志上传到 AOT 服务器。
配置适用于 Citrix Connector 的 AOT 日志上传
要在 AOT 日志服务器中收集 Cloud Connector 日志,需满足以下要求:
-
Cloud Connector 必须是 版本 6.169.0.22492 或更高版本。
-
在云DDC部署中,日志服务器配置详细信息随五月版本自动同步到注册表,无需手动配置
-
在混合部署(本地DDC)中,需要手动配置注册表以启用日志收集。在Cloud Connector计算机上创建以下注册表项:
路径:
HKLM\Software\Citrix\ConfigSyncService
条目:
-
LogServerEnabled (REG_DWORD) = 1 -
LogServerEndpoint (REG_SZ) = <https://<logserver-fqdn>:<port>>
配置适用于Citrix Workspace应用程序的AOT日志上传
Citrix使Citrix Workspace应用程序客户端能够自动将诊断日志上传到集中式日志服务器。此功能通过向管理员提供对客户端诊断信息的即时访问,而无需手动收集日志,从而提高了故障排除效率。客户端AOT将自动上传,并在整个CVAD环境中启用AOT功能以及用户启动资源时触发。
系统要求
- Citrix Virtual Apps and Desktops 2511 或 CVAD 2507 CU1 及更高版本
- Citrix Workspace app 2511 或 CWA 2507.1 CU1 及更高版本
- 确保已安装所选Citrix Workspace应用程序 (CWA) 的所需版本。有关详细信息,请参阅支持的版本
先决条件
Citrix Workspace应用程序Web启动
对于Citrix Workspace应用程序Web启动(包括WebHelper、直接ICA文件下载和Web浏览器扩展启动方法),StoreFront必须配置为使用现代用户界面(UI体验)。 有关启用现代UI体验的说明,请参阅StoreFront文档。
注意:
此先决条件仅适用于基于 Web 的启动,对于本机 Citrix Workspace 应用程序启动则不需要。
配置用于 NetScaler 的 AOT 日志上传
- 通过 SSH 连接到 NetScaler CLI,然后通过运行“shell”命令进入 NetScaler shell。
-
进入 /var/analytics_conf 目录
cd /var/analytics_conf <!--NeedCopy--> - 通过执行交互式 Python 脚本 “python {auditlog_schema_generator_for_hec_export.py}” 生成架构文件。架构文件定义了 HTTP 标头(身份验证令牌、用户代理等)和负载属性(角色、计算机 IP 等)。
此脚本生成的输出片段
root@Raju-adc2# python auditlog_schema_generator_for_hec_export.py
Schema Builder: Follow the prompts to define your schema.
Include 'Auth-Token'? (Y/n):
Enter the display name (alias) for 'Auth-Token' (press Enter to keep as is): Authkey
'Auth-Token' can only go in 'header'. Automatically selected.
Include 'HostName'? (Y/n): n
Include 'Content-type'? (Y/n): y
Enter the display name (alias) for 'Content-type' (press Enter to keep as is):
'Content-type' can only go in 'header'. Automatically selected.
Default value for 'Content-type' is 'application/json'.
Do you want to change it? (y/N):
Include 'User-agent'? (Y/n):
Enter the display name (alias) for 'User-agent' (press Enter to keep as is):
'User-agent' can only go in 'header'. Automatically selected.
Default value for 'User-agent' is 'AUDITLOGS/1.0'.
Do you want to change it? (y/N):
Include 'Role'? (Y/n): y
Enter the display name (alias) for 'Role' (press Enter to keep as is):
Where should 'Role' be included? (HEADER/payload): HEADER
Default value for 'Role' is 'GW'.
Do you want to change it? (y/N): y
Enter new default value for 'Role': Gateway
<!--NeedCopy-->
已生成示例架构文件
{
     "Header": {
         "Auth-Token": {
             "name": "AuthKey"
         },
         "Content-type": {
             "name": "Content-type",
             "value": "application/json"
         },
         "User-agent": {
             "name": "User-agent",
             "value": "AUDITLOGS/1.0"
         },
         "Role": {
             "name": "Role",
             "value": "Gateway"
         },
         "MachineIP": {
             "name": "MachineIP"
         },
         "MachineName": {
             "name": "MachineName"
         }
     },
     "Payload": {
         "LogLevel": "Level",
         "MessageContent": "Message",
         "ModuleName": "Module",
         "Time": "TimeStamp"
     },
     "Format": {
         "delimiter": ""
     }
 }
<!--NeedCopy-->
- 退出 shell 并返回 NetScaler CLI
- 创建一个 syslog 操作,它定义了 Syslog 服务器、端口以及架构文件(在上一步中创建)等
add audit syslogAction {Action Name} {AOT Server IP/FQDN} -serverPort {Destination Port} -logLevel {Log Level} -transport HTTP -httpAuthToken {Authentication Token generated on the AOT sever} -httpEndpointUrl {AOT Server URL where logs will be sent} -httpSchemaFile {Schema File created in Previous Step}
<!--NeedCopy-->
示例:
add audit syslogAction act1 10.102.154.196 -serverPort 8088 -logLevel ALL -transport HTTP -httpAuthToken fbb94d5b234d86a6cb155e3f808dd33c9698a0d1a866e814573b1909e4c9e56896f433da1071e3276bd133269fd69203d8f29166816f4d427e709773ceb9d41d531043331f7f76 -httpEndpointUrl "/services/collector/event" -httpSchemaFile sample.json
<!--NeedCopy-->
- 将 syslogAction 绑定到审计 Syslog 策略
add audit syslogPolicy {PolicyName} True {Name of the Syslog Action}
<!--NeedCopy-->
示例:
add audit syslogPolicy pol1 true act1
<!--NeedCopy-->
共享
共享
This Preview product documentation is Citrix Confidential.
You agree to hold this documentation confidential pursuant to the terms of your Citrix Beta/Tech Preview Agreement.
The development, release and timing of any features or functionality described in the Preview documentation remains at our sole discretion and are subject to change without notice or consultation.
The documentation is for informational purposes only and is not a commitment, promise or legal obligation to deliver any material, code or functionality and should not be relied upon in making Citrix product purchase decisions.
If you do not agree, select I DO NOT AGREE to exit.